
After cloning Windows to a larger HDD or SSD, you may find that the C drive has not increased in size even though the new disk has plenty of unallocated space. When you try to extend C drive in Disk Management, the Extend Volume option may be greyed out. This post explains why you can’t extend C drive after cloning and how to solve it.
Why Can’t I Extend C Drive After Cloning?
If you can’t extend C drive after cloning, the most common reason is that the unallocated space is not next to the C drive.
This typically occurs when you clone a disk or restore a disk image to a larger disk without resizing the partitions. After the cloning or restoration, you will find that the disk layout appears as shown below.

As you can see, the cloned disk retained the original partition layout, leaving extra space at the end of the disk rather than directly after C.
In this case, Windows C drive won’t extend because the recovery partition is between C drive and unallocated space.
To learn more about why you can’t extend the Windows C drive, read this post: Why Extend Volume Grayed out and How to Quickly Fix It.
How to Fix If You Can’t Extend C Drive After Cloning
If your disk layout is exactly as shown in the image above, you can extend the C drive using the following three methods.
Method 1. Move the Recovery Partition to the End of the Disk
You are unable to extend C drive after cloning because the C drive is in the way. To solve the issue, the most straightforward method is to move the recovery partition to the end of the drive so that the unallocated space is adjacent to the C drive. Then, you can then use the unallocated space to extend the C drive.
To move the recovery partition, you can use MiniTool Partition Wizard. Its Move/Resize feature enables you to exchange the position of the recovery partition and unallocated space with ease. Here is the guide.
MiniTool Partition Wizard FreeClick to Download100%Clean & Safe
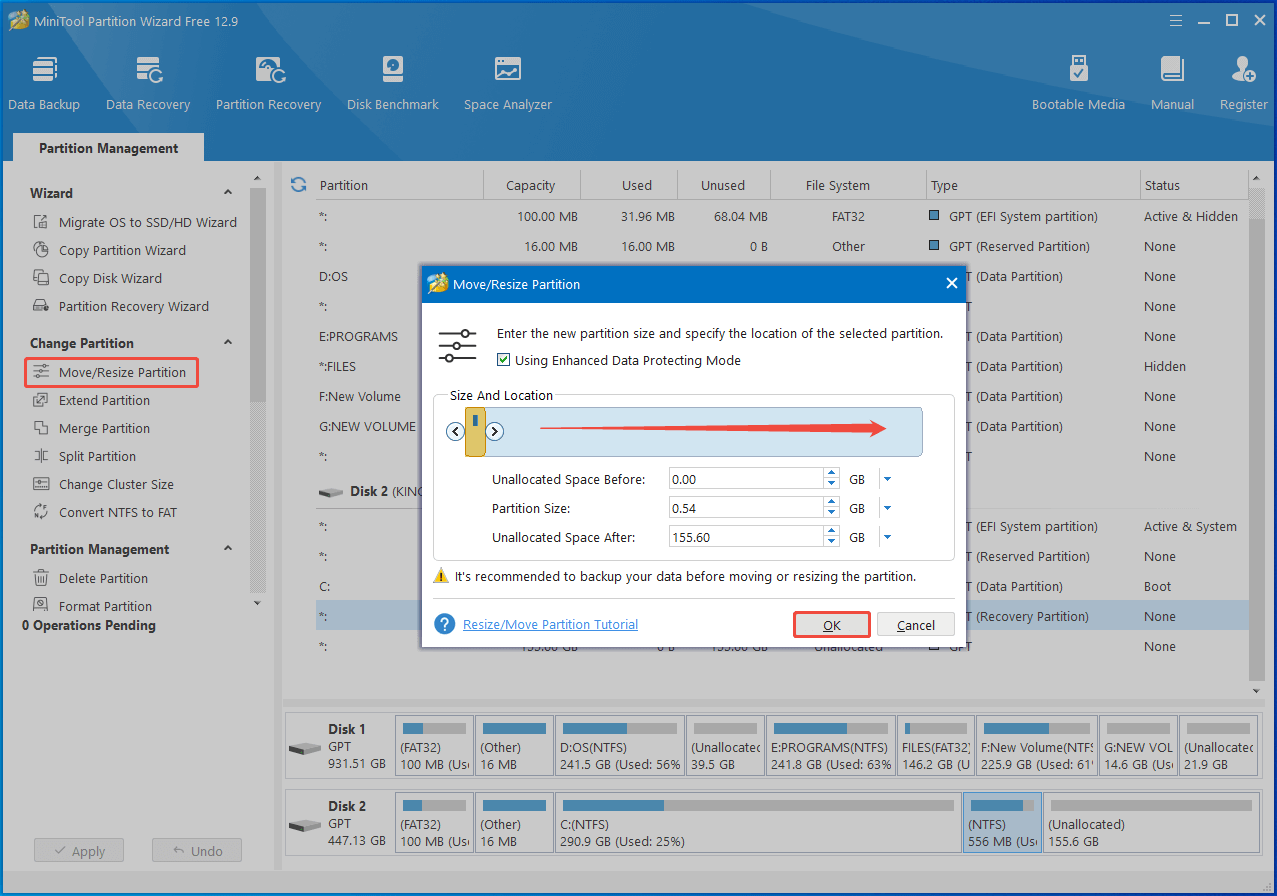
Step 1: Launch MiniTool Partition Wizard, highlight the recovery partition, and tap Move/Resize Partition on the left pane.
Step 2: In the prompted window, drag the recovery partition to the far right and click OK to save changes.
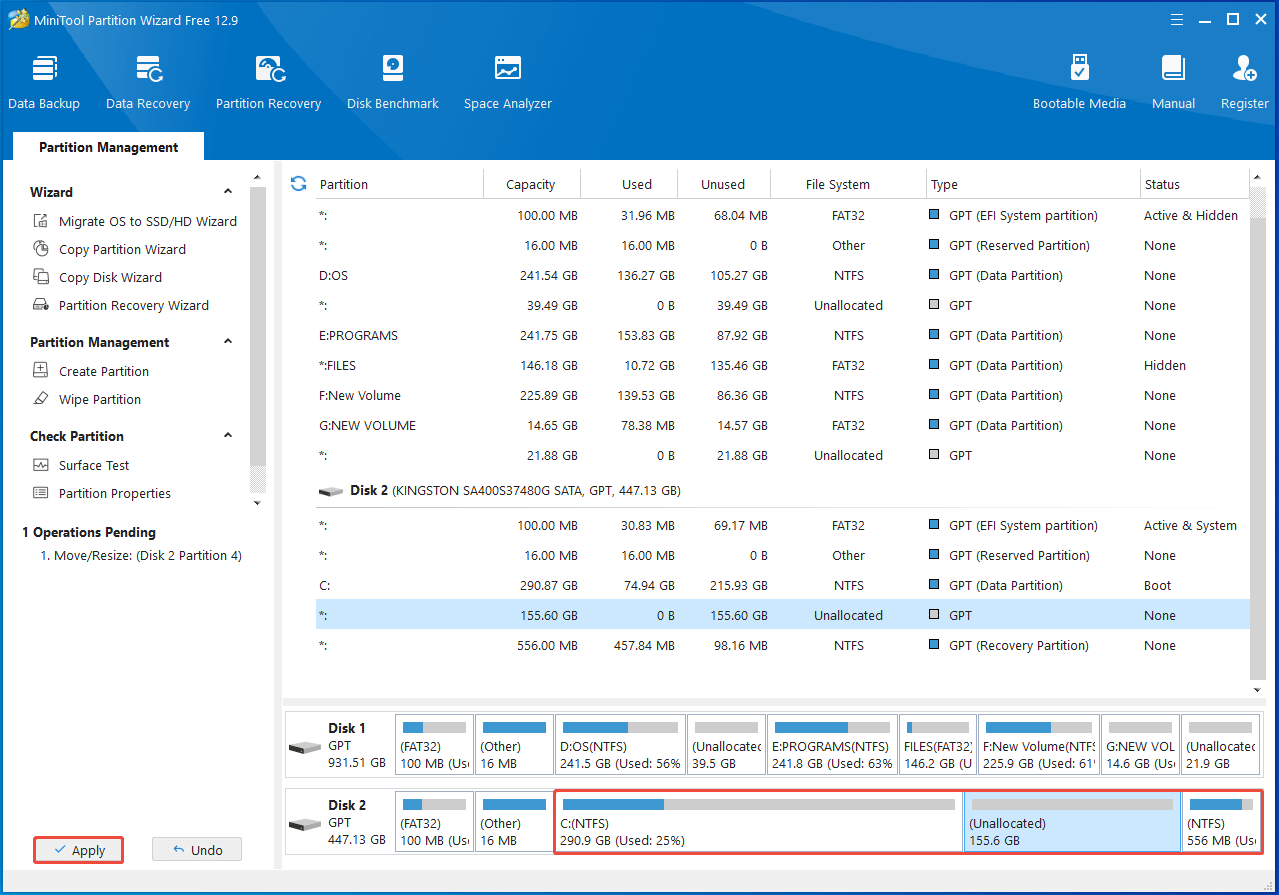
Step 3: Then you can view the result in disk map area. Click Apply > Yes to carry out the pending operation.
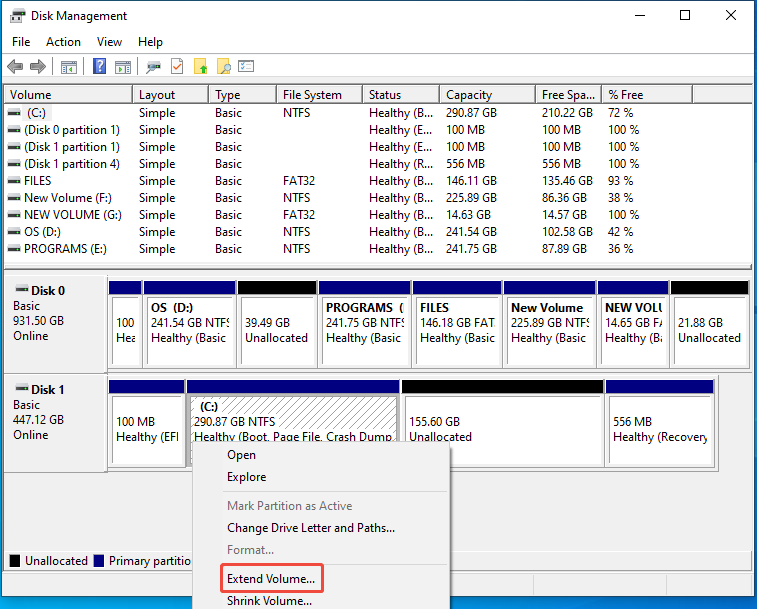
Step 4: Right-click the Start icon and then click Disk Management on the elevated menu.
Step 5: Right-click the C drive and choose Extend Volume.
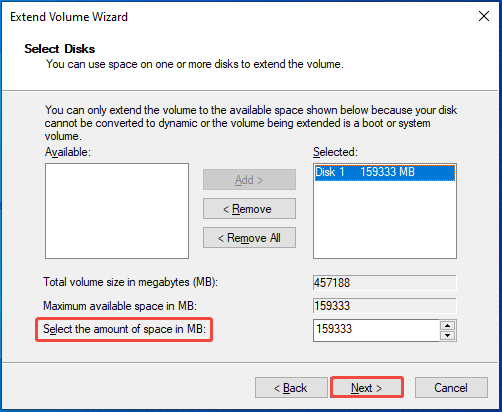
Step 6: Hit Next to continue. Then select the amount of space to take from the available unallocated space and tap Next.
Step 7: Click Finish to complete the operation.
Method 2: Extend C Drive Without Moving the Recovery Partition
Compared to Method 1, MiniTool Partition Wizard also offers a more direct method to solve the issue. Its Extend Partition feature can extend the C partition using unallocated space, ignoring any intervening partitions.
With this software, you can easily extend C drive after restoring image to larger hard drive.
MiniTool Partition Wizard FreeClick to Download100%Clean & Safe
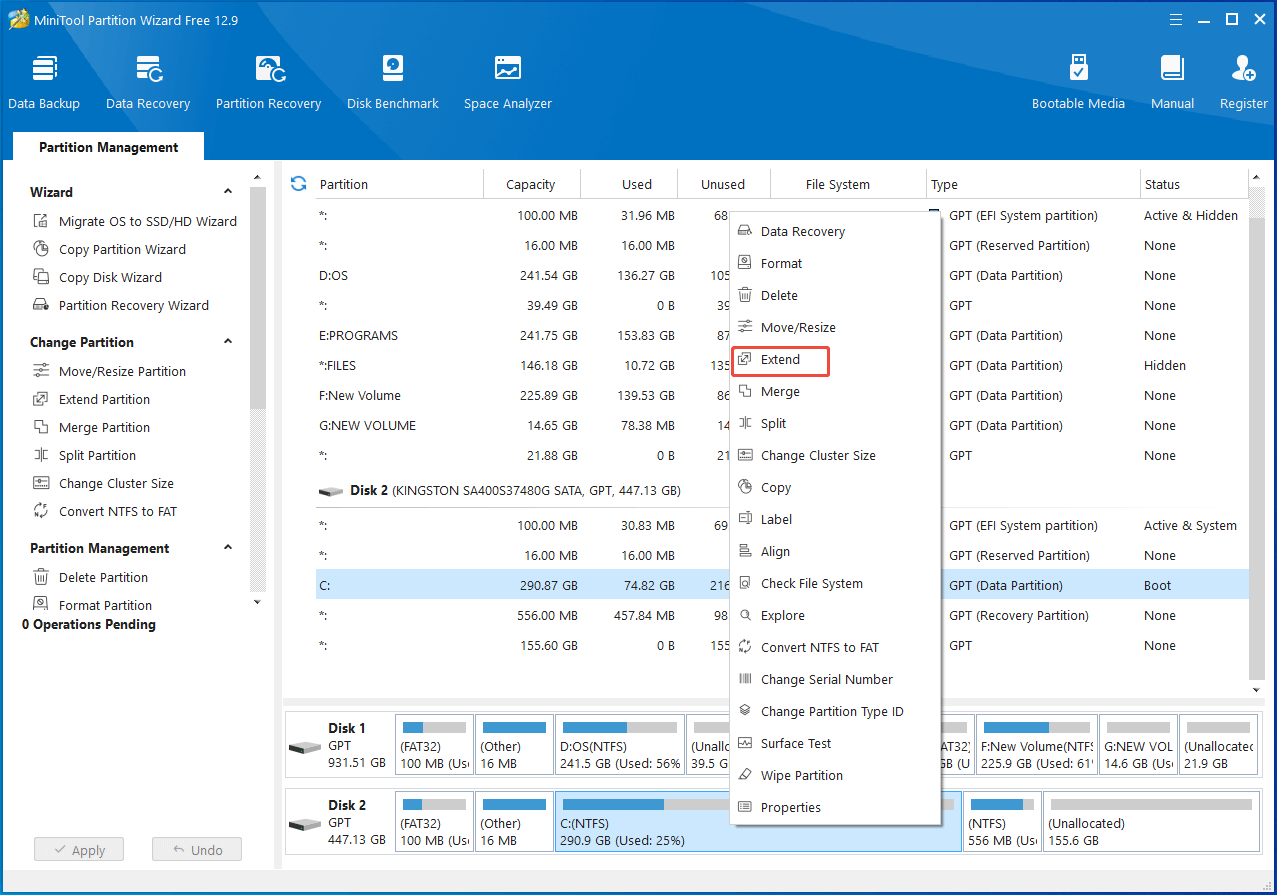
Step 1: Run the software, right-click the C drive, and choose Extend on the context menu.
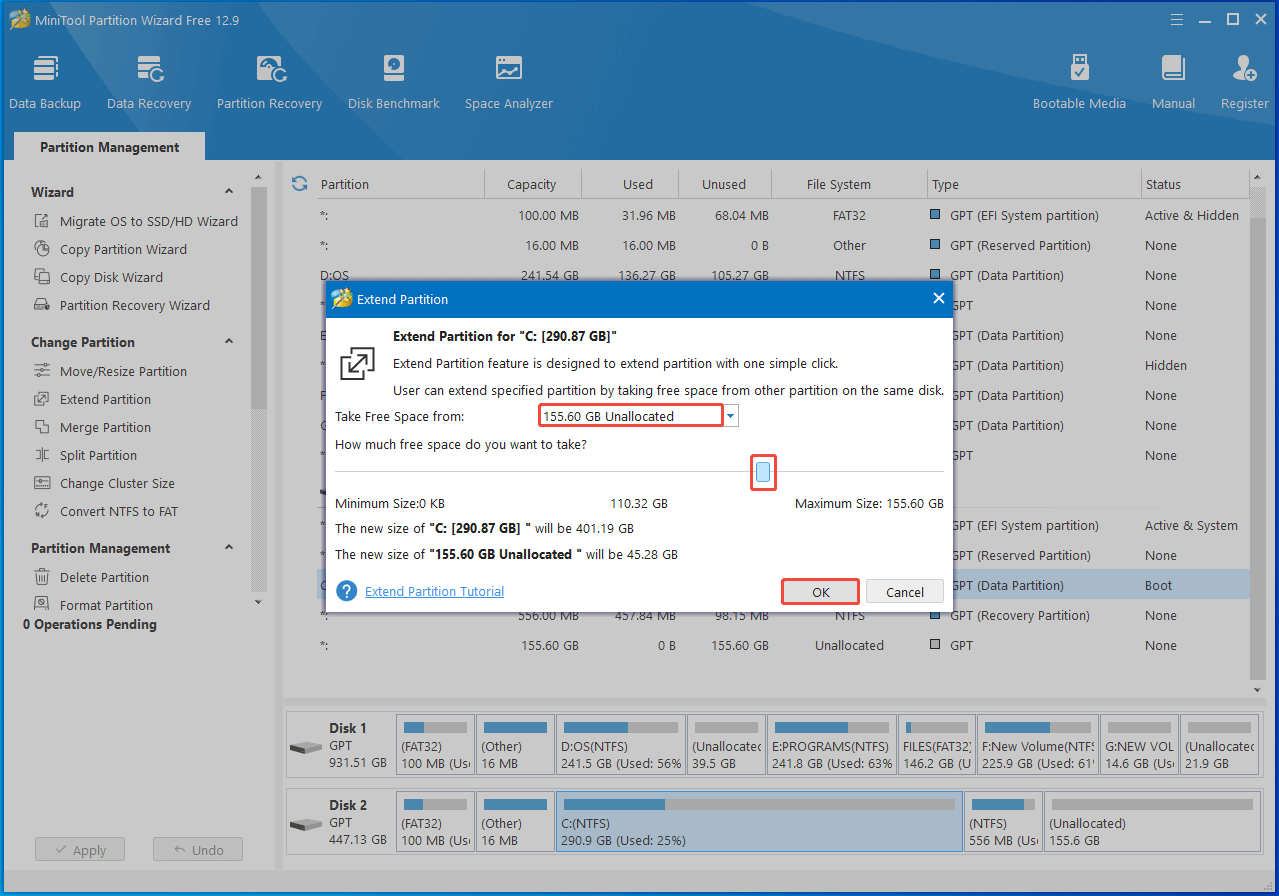
Step 2: From the drop-down menu, select a partition or unallocated space to take space from.
Step 3: Drag the sidebar to determine the amount of space to take from the selected partition or unallocated space. Then click OK to save changes.
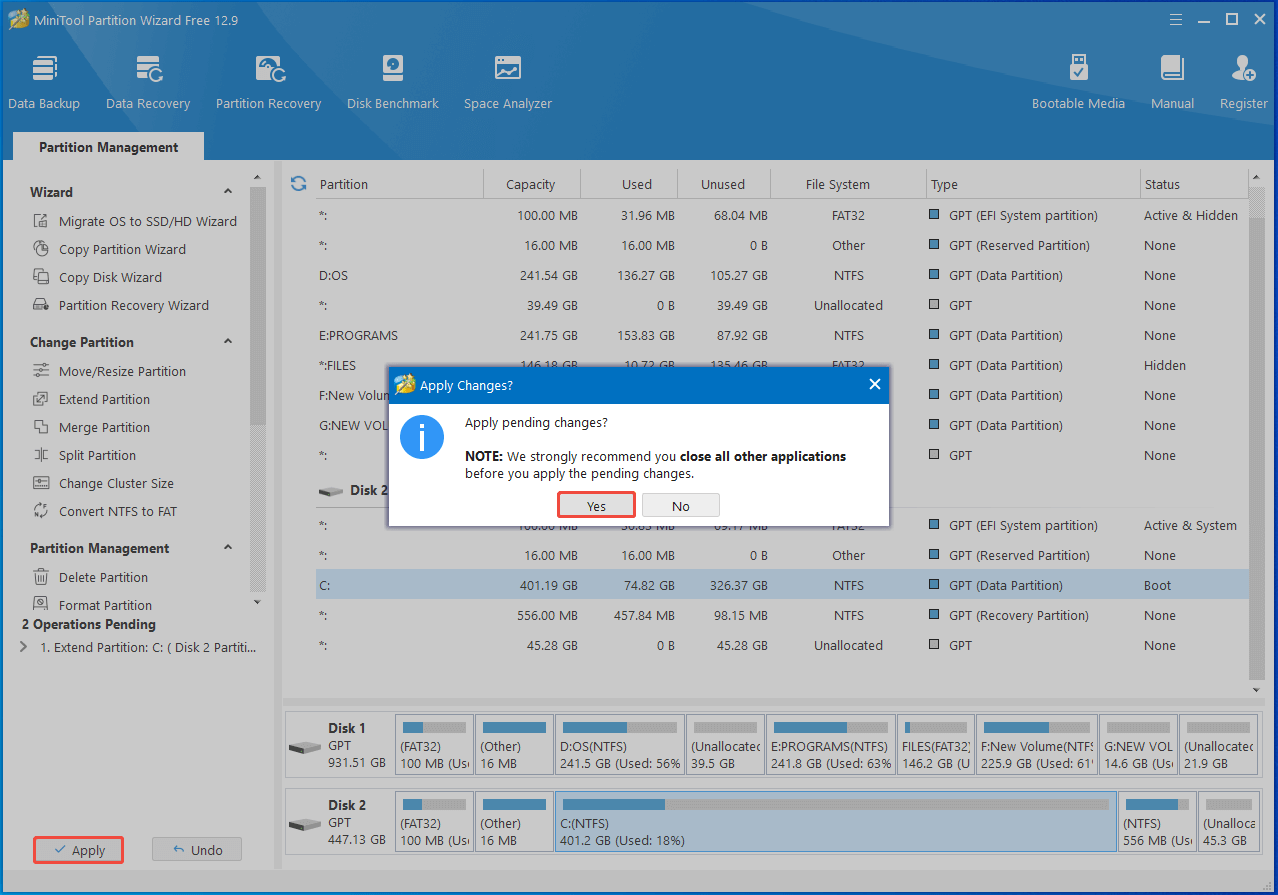
Step 4: Tap Apply > Yes to execute the operation.
Method 3: Delete the Recovery Partition
If the recovery partition is blocking C from the unallocated space, deleting it can make the free space available for C. However, this should be considered carefully because the recovery partition can provide Windows recovery functions.
Before deleting it, make sure you have a reliable alternative, such as Windows installation media or a recovery drive. Do not delete a recovery partition simply to gain disk space without first confirming that you can recover the system if Windows fails to boot.
Here, I show you how to delete the recovery partition by using DiskPart.
Step 1: Open the Run window by pressing Windows and R.
Step 2: Type diskpart in the Run window and press the Ctrl + Shift + Enter keys simultaneously.
Step 3: In the UAC window, click Yes to allow the operation.
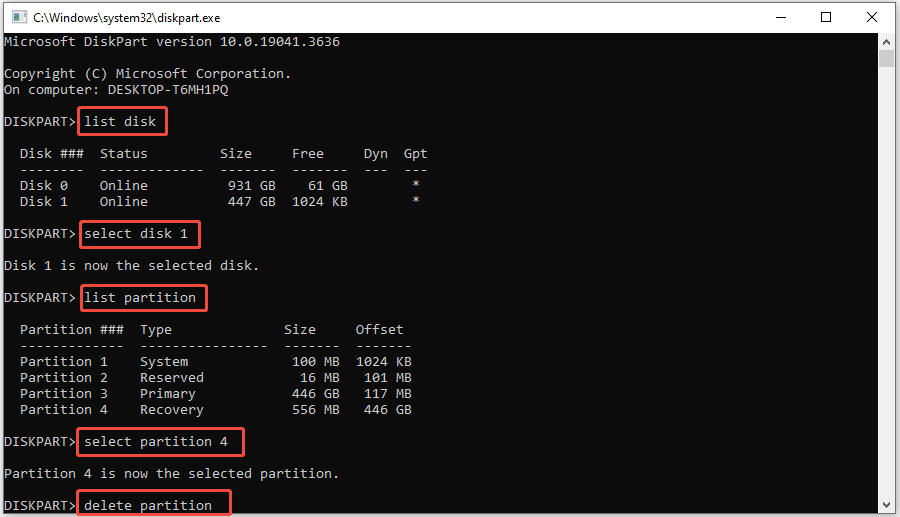
Step 4: In DiskPart, type the following commands and hit Enter after each to delete the recovery partition.
- list disk (Lists all disks connected to the computer)
- select disk 1 (Replace 1 with the correct disk number)
- list partition (Lists all the partitions on the selected disk)
- select partition 4 (Replaces 4 with the partition number of the recovery partition)
- delete partition
Step 5: After the recovery partition is deleted, type exit and hit Enter to exit DiskPart.
Step 6: Now, you can extend C drive as usual.
Other Issues You May Encounter After Cloning
In addition to the issue discussed in the post, you may encounter some other issues after cloning. Common issues that occur after cloning are summarized as follows. When you receive these issues, refer to the given tutorials to troubleshoot them.
1. Windows 10 slow after clone
This issue can occur due to outdated graphics card driver, improper SSD settings, insufficient Windows drive disk space, etc. Given that fact, try updating graphics card driver, modifying SSD settings, increasing C drive disk space to resolve the problem. Besides, it’s recommended to enable AHCI, enable TRIM for SSD, and disable disk indexing to speed up the computer.
2. Windows will not boot after restoring image
First and foremost, ensure that you are cloning the whole system instead of only cloning the C drive. Then check if the cloned drive is set as the boot disk in BIOS. It’s also important to remove other connected external bootable devices like bootable USB drives.
If the cloned drive is GPT but the computer doesn’t support UEFI, you need to convert MBR to GPT before booting from it.
3. Hard drive missing after cloning
When this issue happens, check if there’s anything wrong with cables and connections. Then detect the hard drive in Disk Management. If the disk appears as Offline, right-click it and choose Online. After that, try restoring the disappeared hard drive, resetting the drive letter, checking BIOS settings, scanning the disk for bad sectors, etc.
4. Blue screen after cloning SSD
If this error occurs, it indicates that Windows cannot find the necessary boot configuration files. This could be triggered by a wrong boot mode, corrupted BCD, missing or mismatched disk driver, and other factors. So, you can fix the issue by changing boot mode to UEFI, rebuilding BCD, running CHKDSK, and updating disk driver.
5. Apps crashing after cloning boot drive to SSD
How to fix apps crashing after cloning boot drive to SSD? Well, you can boot from the new SSD, optimize RAM to optimal state, update BIOS, and uninstall problematic apps.
Bottom Line
This post mainly tells what to do if you can’t extend partition after cloning, especially the C drive.
If you have any difficulty while using MiniTool Partition Wizard, contact us by sending an email via [email protected]. We will help you work out the problem as soon as possible.
About The Author

Position: Columnist
Linda has been an editor at MiniTool for seven years. She continuously learns about computers and puts her knowledge into practice. Moreover, she is particularly knowledgeable in disk management, data recovery, system installation, and PDF editing. Her articles typically reference multiple examples or are based on her own experience, providing users with the most suitable solutions.
User Comments :