Partitioning a hard drive means dividing a disk into separate sections for storing operating systems, applications, games, or personal files. This post offers a guide on how to partition a hard drive using Disk Management or MiniTool Partition Wizard.
What Does Partitioning a Hard Drive Mean?
Partitioning a hard drive means dividing a physical disk into separate storage sections called partitions.
After partitioning a drive, Windows treats each partition as a separate volume with its own drive letter, file system, and storage space.
Most PCs only have one hard drive. When you install Windows on it, select the unallocated space, and then the Windows installation will partition the hard drive automatically for you.
However, if your hard drive is partitioned in this way, you can only get 3 partitions:
- The System Reserved or EFI partition used to store system boot files.
- The C drive used to store the Windows system files and user’s personal files.
- The Recovery partition used to store the backup of the Windows system.
Why Partition a Hard Drive?
Partitioning offers several practical benefits:
- Separate the operating system from personal data, making Windows reinstallation easier without affecting your files.
- Organize data more efficiently by keeping work files, media, games, and backups on different partitions.
- Support multiple operating systems, such as installing Windows and Linux on the same computer.
- Improve backup and recovery by storing system images or recovery files on a dedicated partition.
- Make storage management easier, allowing you to resize, format, or manage partitions independently.
Method 1. Partition a Hard Drive Using Disk Management
Disk Management is the built-in Windows utility for creating, deleting, formatting, shrinking, and extending partitions.
How to Partition a New Hard Drive
Step 1: Press the Windows key + R to call out the Run box. Type “diskmgmt.msc” and press Enter to open Disk Management. Then, the Initialize Disk window will pop up automatically asking you to initialize the new disk to MBR or GPT.
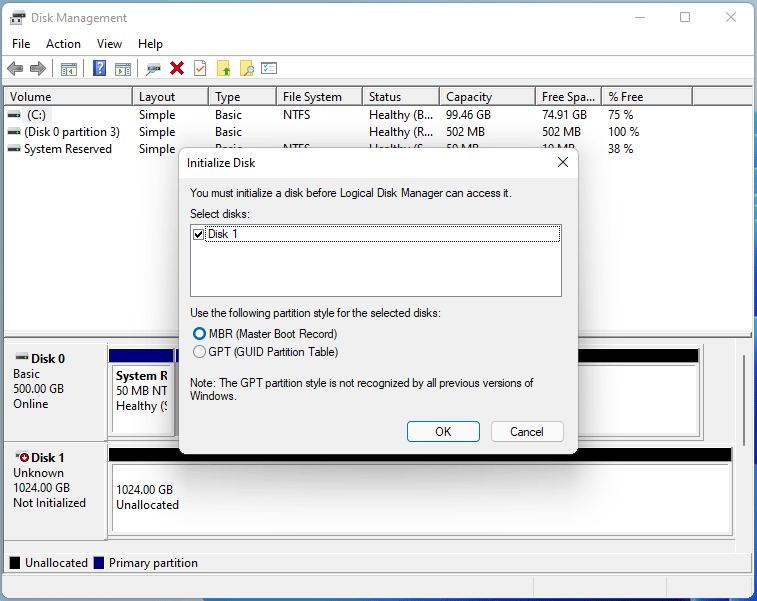
Should you initialize the disk to MBR or GPT? Here are suggestions.
- GPT: Best for modern PCs and disks larger than 2TB.
- MBR: Best for old PCs.
Step 2: Create partitions on the hard drive.
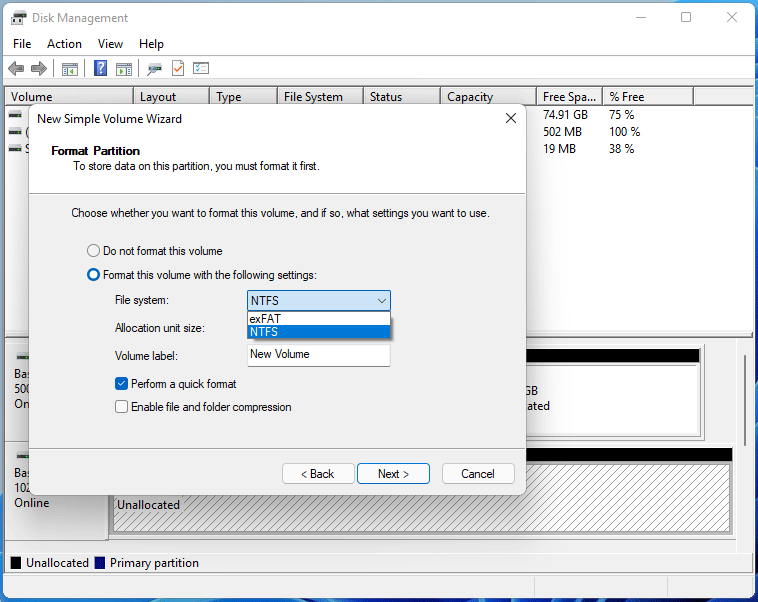
- Right-click on the Unallocated space and choose New Simple Volume.
- When the New Simple Volume Wizard pops up, click Next.
- Specify Volume Size in MB and then click Next.
- On the Assign Drive Letter or Path window, keep the default value and click Next.
- On the Format Partition window, choose a File system, set the Allocation unit size, and type the Volume label. You can also keep the default value. Then, click Next.
- Click Finish.
2. In most cases, it’s recommended to keep the default value for the allocation unit size unless you have special demands. In addition, you can use MiniTool Partition Wizard to change the allocation unit size without formatting.
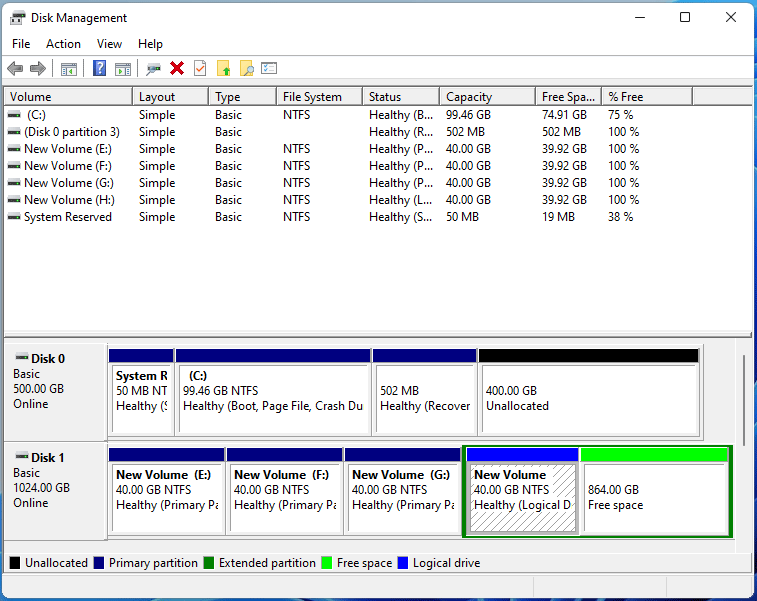
Use the same way to create other partitions. Note that on an MBR disk, the fourth partition you created will become a logical partition automatically. The unallocated space behind the logical partition will also automatically become Free space that is used to create logical partitions.
How to Partition a Hard Drive That Already Has Data?
Shrink a Partition
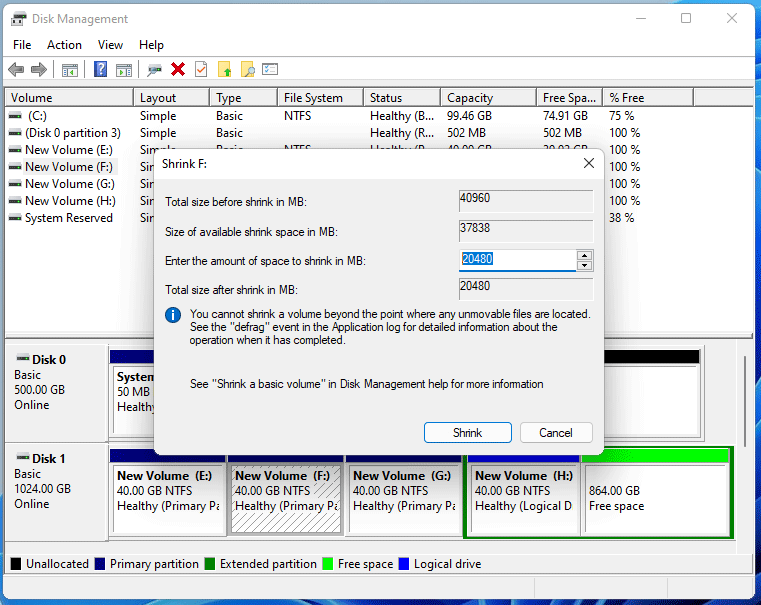
- Open Disk Management.
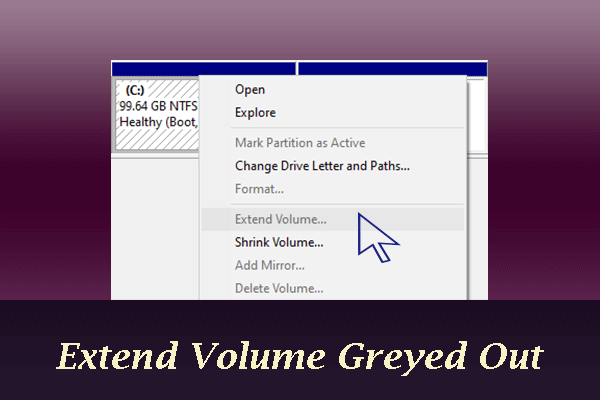
- Right-click an NTFS partition and choose Shrink Volume. Note that Disk Management can’t shrink or extend a FAT32, exFAT, or Recovery partition.
- On the pop-up window, enter the amount of space to shrink in MB and then click Shrink. After that, you can see an unallocated space appears behind this partition. Then, you can use this space to create a new partition.
Extend a Partition
- Open Disk Management.
- Right-click an NTFS partition and choose Extend Volume. This feature is only available when there is unallocated or free space. In addition, the unallocated or free space should be behind and adjacent to the partition to be extended.
- When the Extend Volume Wizard pops up, click Next.
- Select the amount of space in MB and click Next.
- Click Finish.
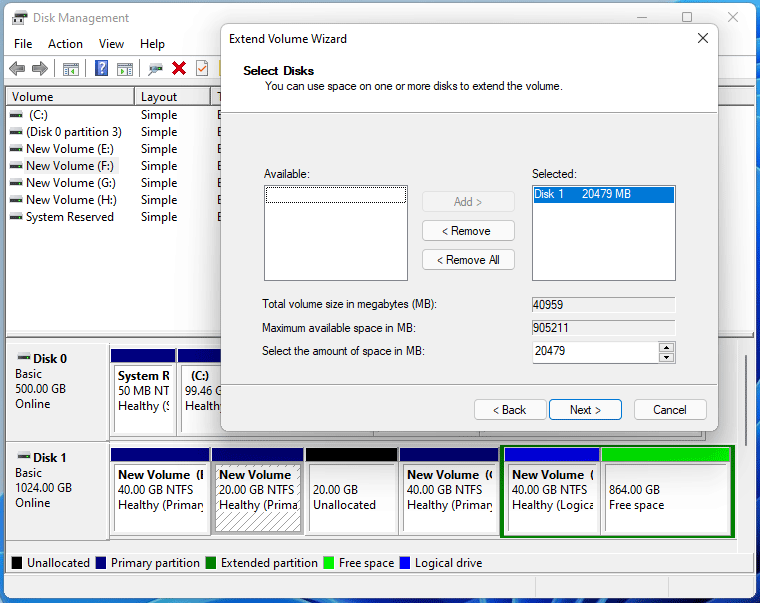
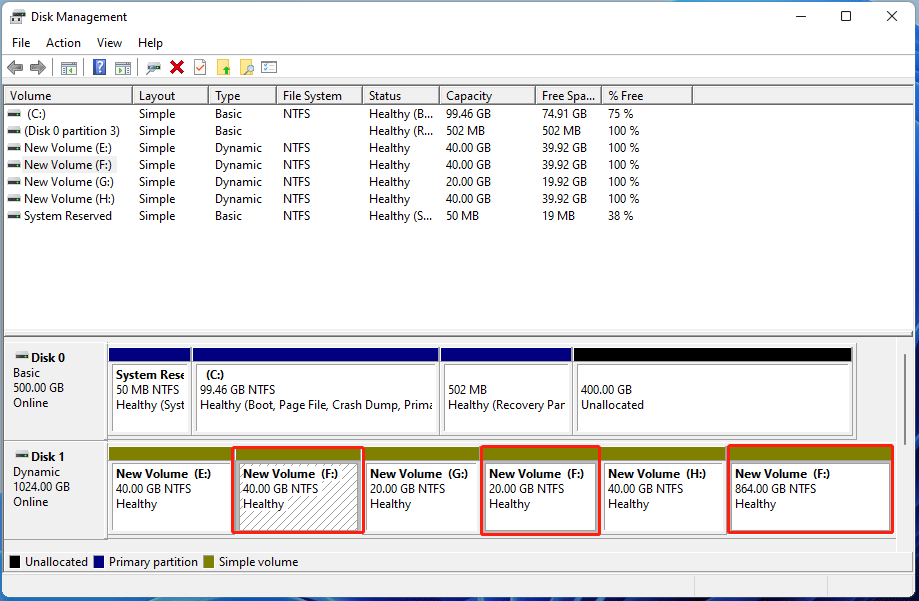
If the unallocated space or free space is not behind or adjacent to the partition you want to extend, the Extend feature will convert the disk to a dynamic disk so that the partition and the unallocated/free space can become one partition. It should look like the following picture:
Dynamic disk is not a commonly used disk type. Click to know the difference between dynamic and basic disks.
Method 2. Partition a Hard Drive with MiniTool Partition Wizard
If you need more flexibility than Windows Disk Management provides, MiniTool Partition Wizard is a powerful alternative.
It allows you to create, resize, move, split, merge, and format partitions with a user-friendly interface. It can also perform operations that Disk Management cannot, such as moving partitions or extending a partition when unallocated space is not adjacent.
Here is a video guide:
MiniTool Partition Wizard FreeClick to Download100%Clean & Safe
How to Create a New Partition
#1. From Unallocated Space
Step 1: Launch MiniTool Partition Wizard. Right-click the unallocated space and choose Create.
Step 2: Configure the partition settings, including: Partition Label, Drive Letter, File System (NTFS is recommended for Windows), Partition Size, etc. Then, click OK.
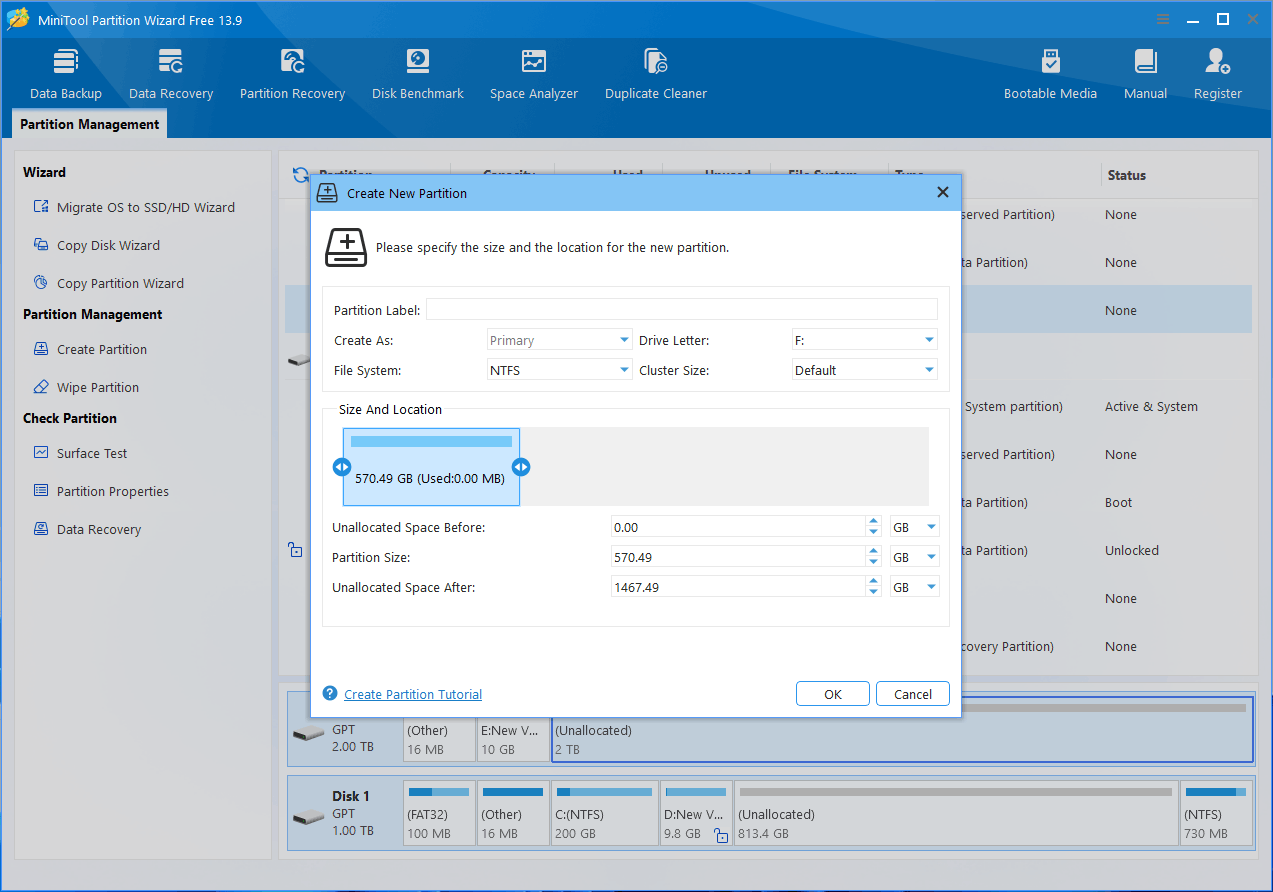
Step 3: Click Apply in the bottom-left corner to execute the operation.
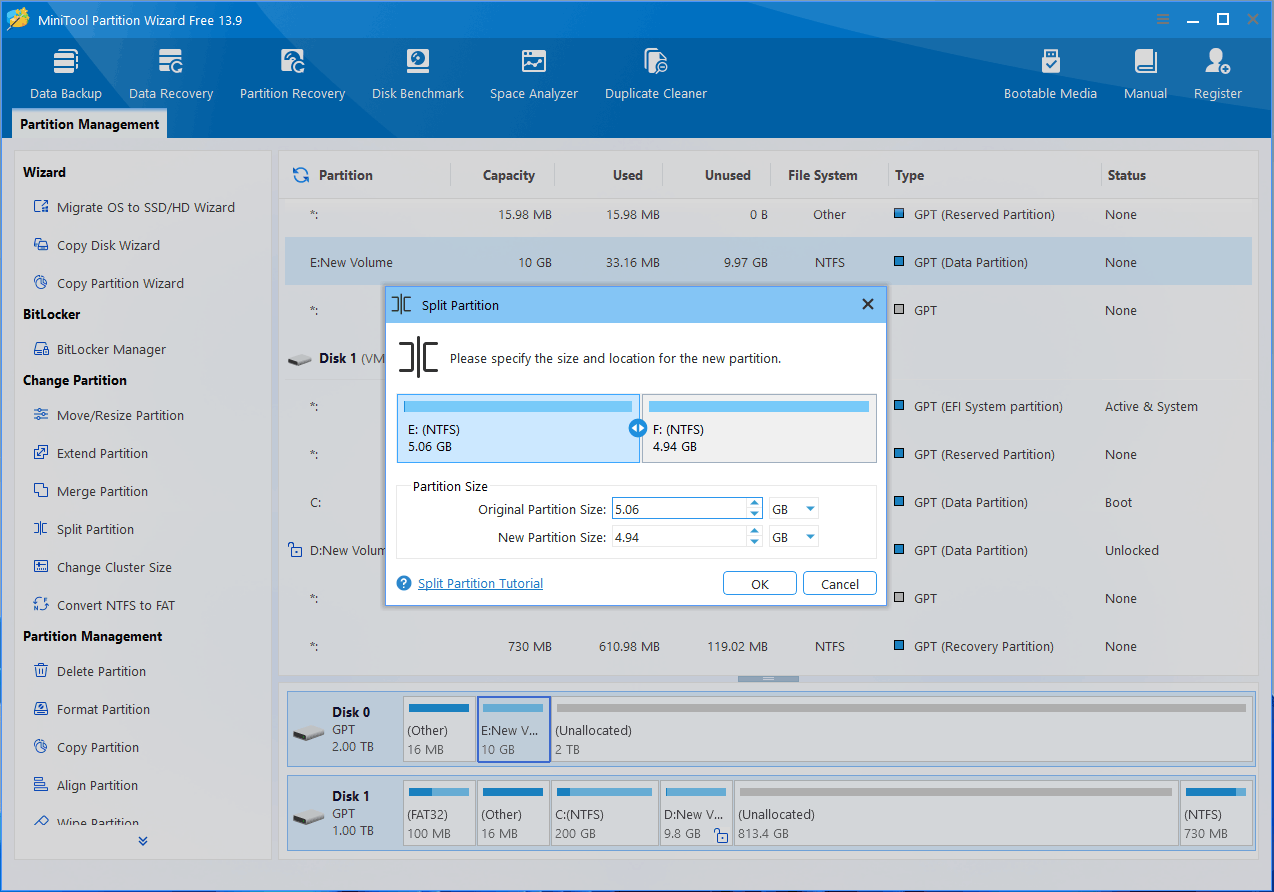
#2. By Splitting an Existing Partition
- Open MiniTool Partition Wizard.
- Right-click the partition and choose Advanced > Split.
- Drag the divider to specify the size of the new partition.
- Click OK and then Apply.
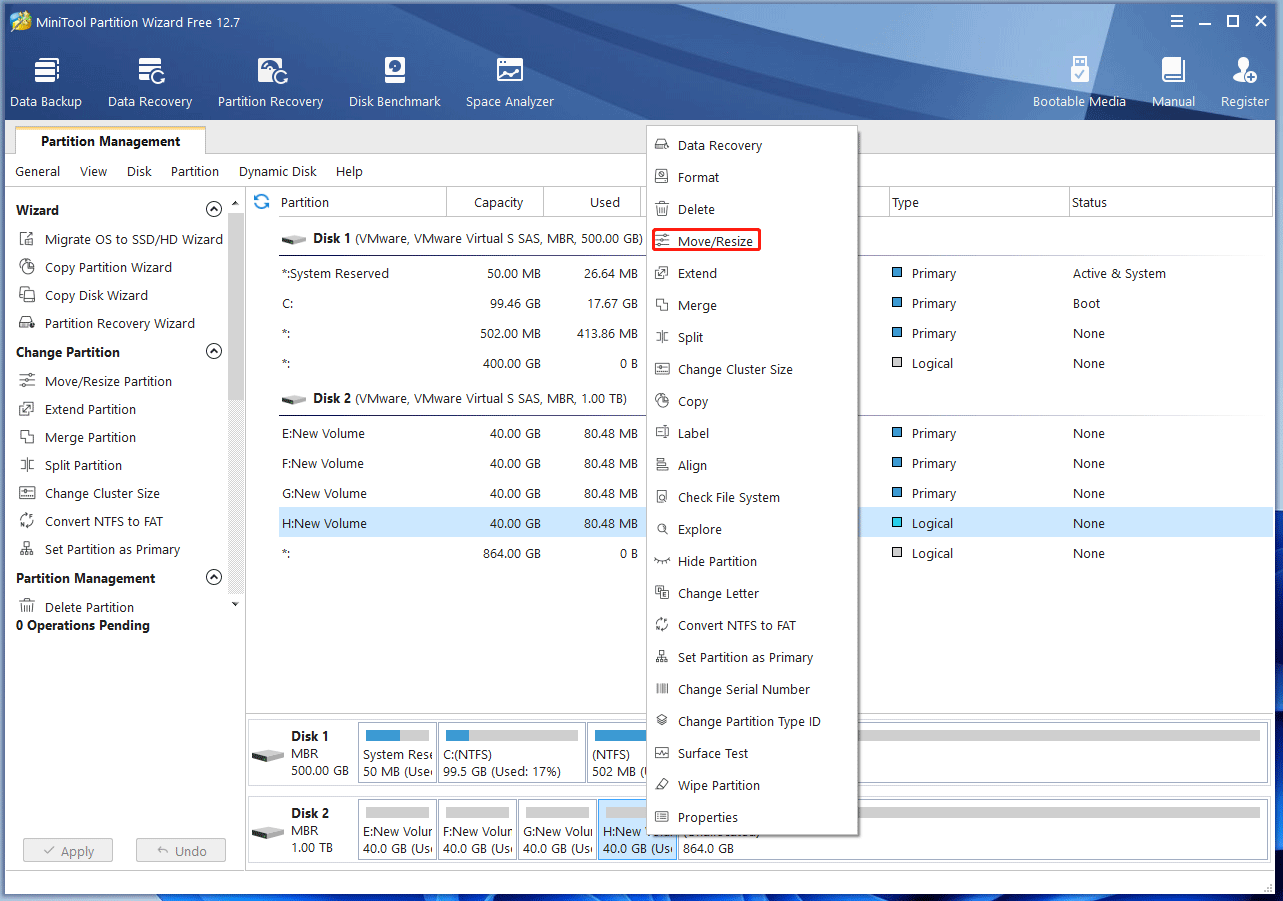
How to Move/Resize a Partition
Step 1: Download, install, and launch MiniTool Partition Wizard. Right-click a partition and choose Move/Resize.
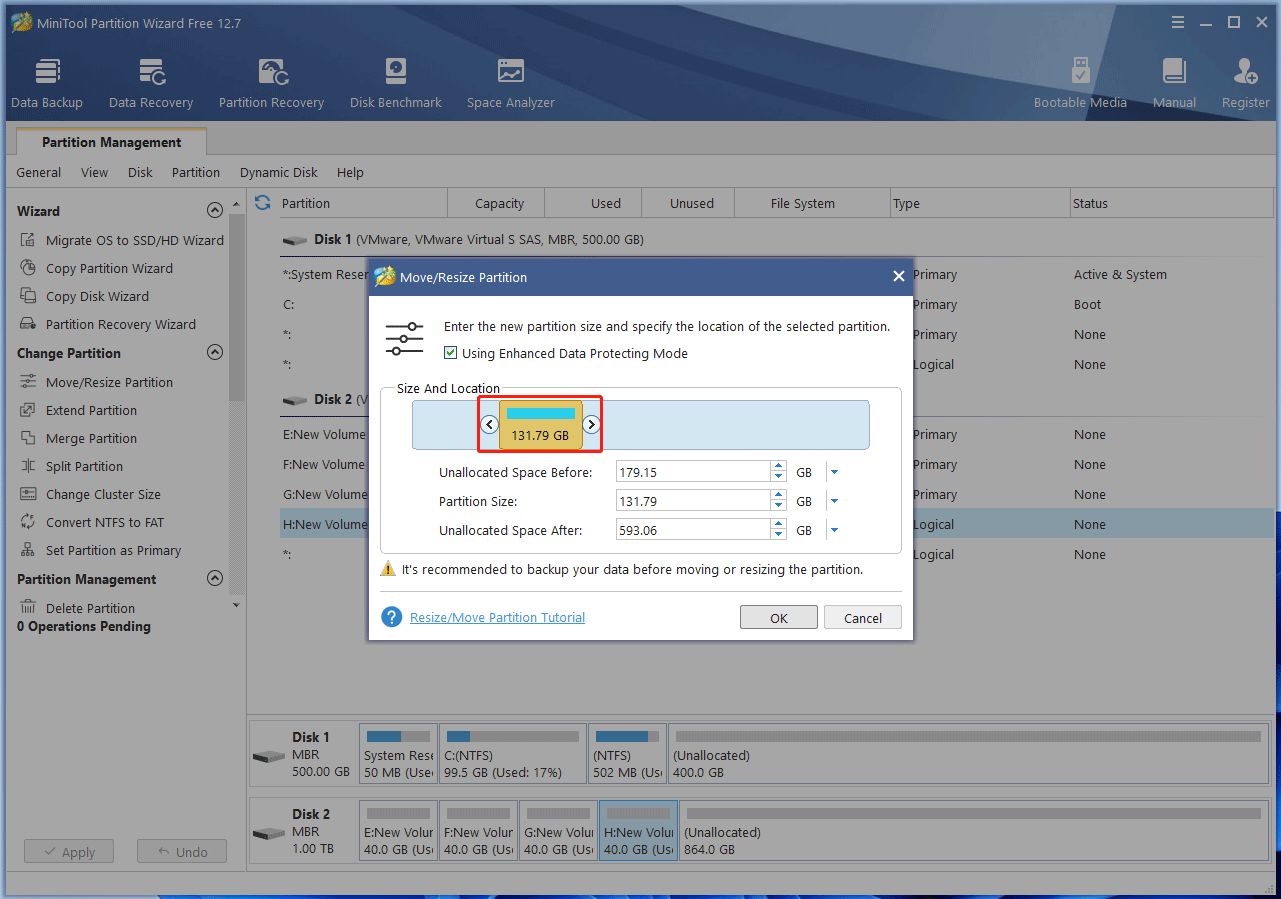
Step 2: On the pop-up window, under Size And Location, drag the arrow icons to shrink or extend the partition. Dragging the partition block can change the location of the partition. Then, click OK.
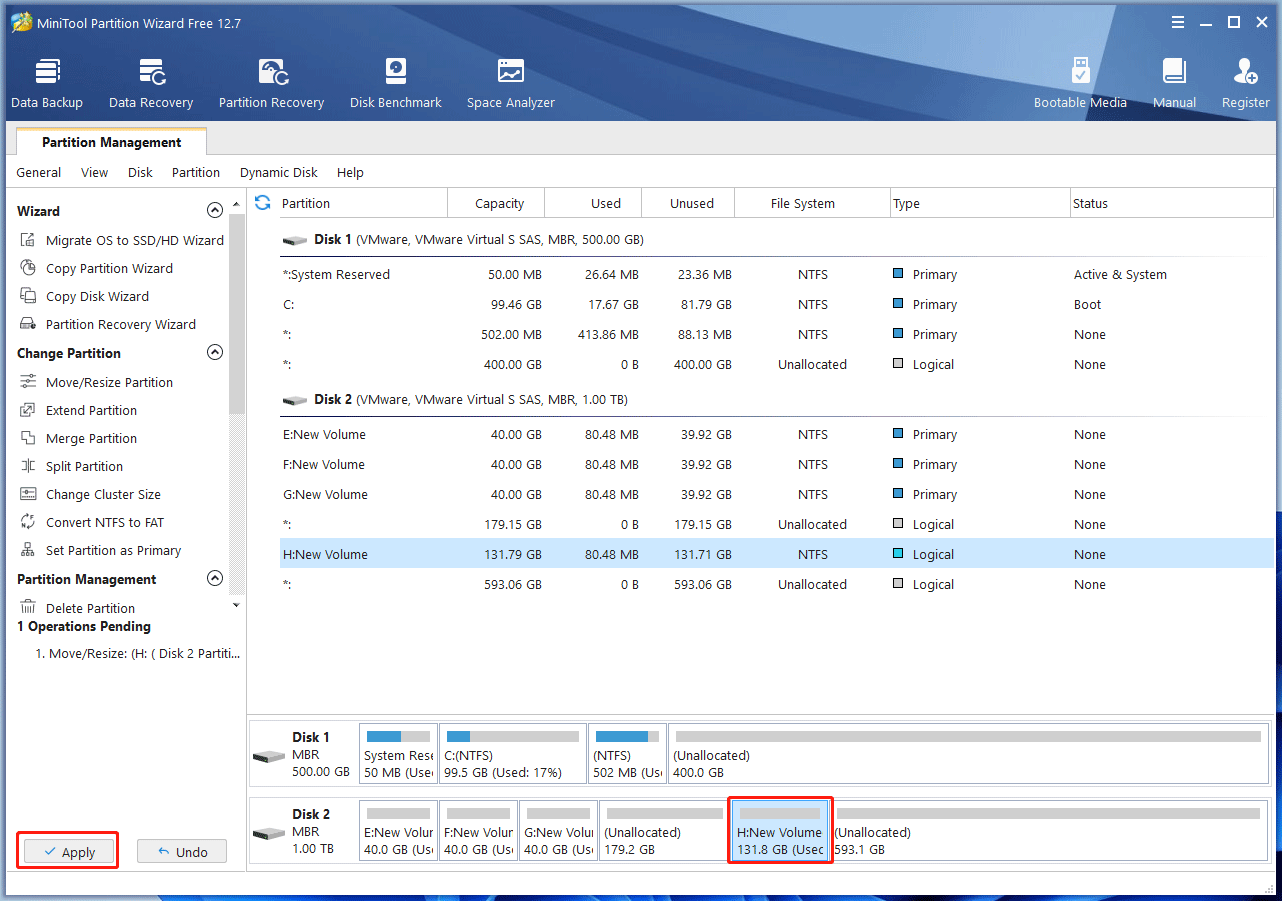
Step 3: Check the layout of the partition and then click Apply to execute the operation.
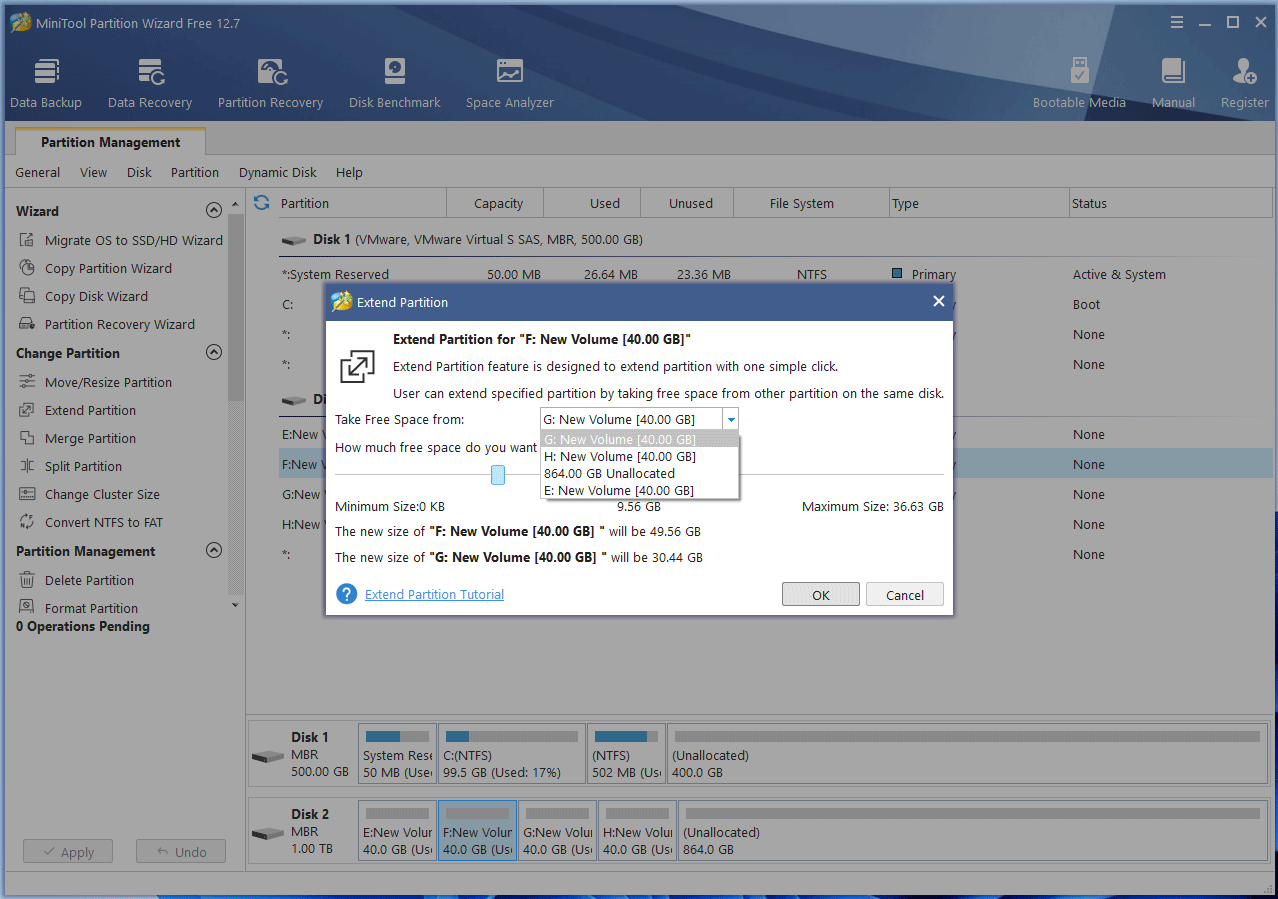
How to Extend a Partition More Flexibly
Step 1: On the MiniTool Partition Wizard main interface, right-click a partition and choose Extend.
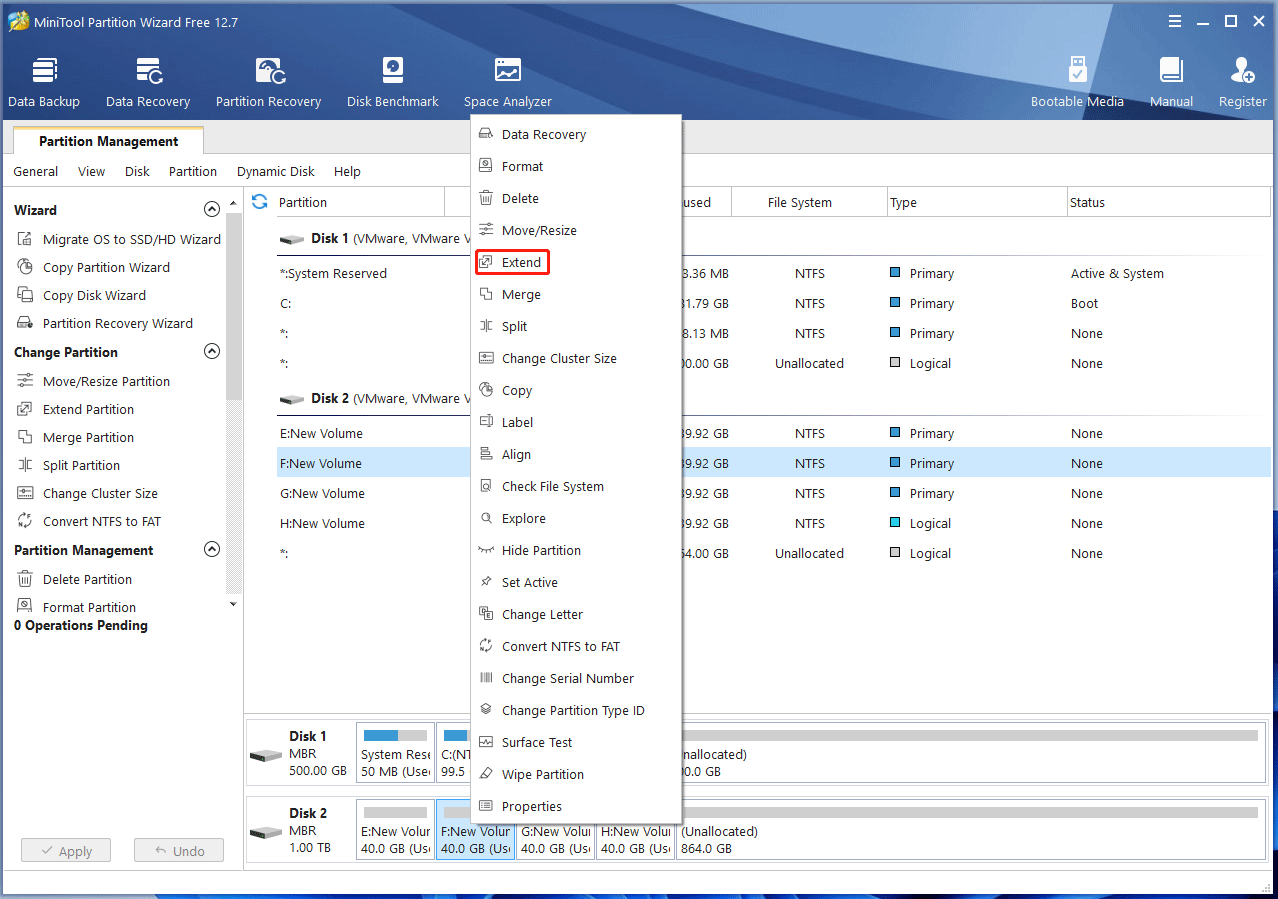
Step 2: On the pop-up window, choose a partition or unallocated space to take free space. Then, decide how much free space you want to take. After that, click OK. Finally, check the disk layout and click Apply to execute the operation.
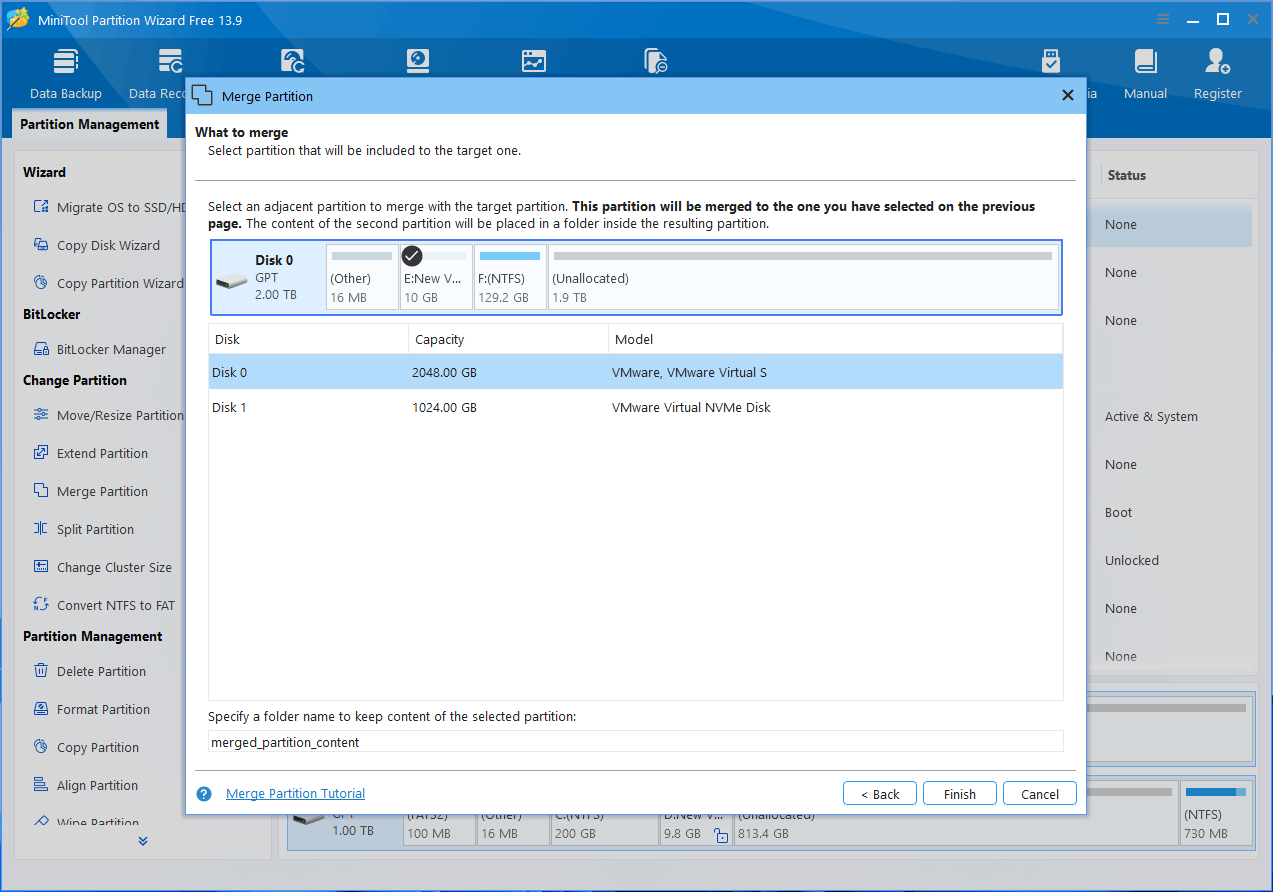
How to Merge 2 Partitions Without Losing Data
Step 1: In MiniTool Partition Wizard, right-click the partition you want to expand and choose Advanced > Merge. Then, click Next.
Step 2: Select the partition you want to merge and click Finish. Then, click Apply.
Method 3. Partition a Hard Drive Using DiskPart
If you want to partition hard drive during the Windows 10/11 installation, you can use the DiskPart commands. Here is the guide:
Step 1: When you install Windows 10/11 using a USB drive, you will see this page. Click Repair your computer.
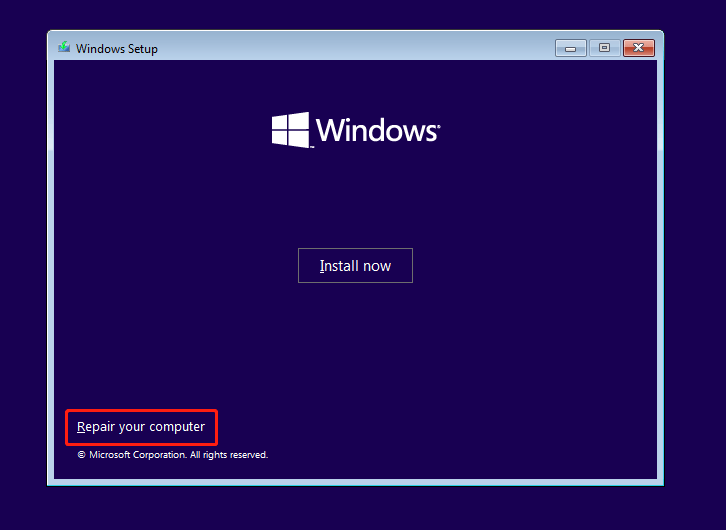
Step 2: Go to Troubleshoot > Command Prompt. On the cmd.exe window, type DiskPart and press Enter to execute it. On the cmd.exe – diskpart window, use the following commands to partition a hard drive.
- List disk. This will list all hard drives connected to your PC.
- Select disk #. Select the hard drive you want to partition. Then, all the following commands will be applied to the selected disk.
- Clean. This will delete all partitions and data on the selected disk.
- Convert MBR or convert GPT. This will initialize the disk to MBR or GPT.
- Create partition primary size = 40960. This will create a primary partition of 40GB. If you want to create a logical partition, you need to create an extended partition first using the command “create partition extended size = xx”. Then, use the command “create partition logical size = xx”.
- Assign letter = *. This will assign a drive letter to the created partition.
- Format fs=ntfs quick. This will format this created partition to the NTFS file system.
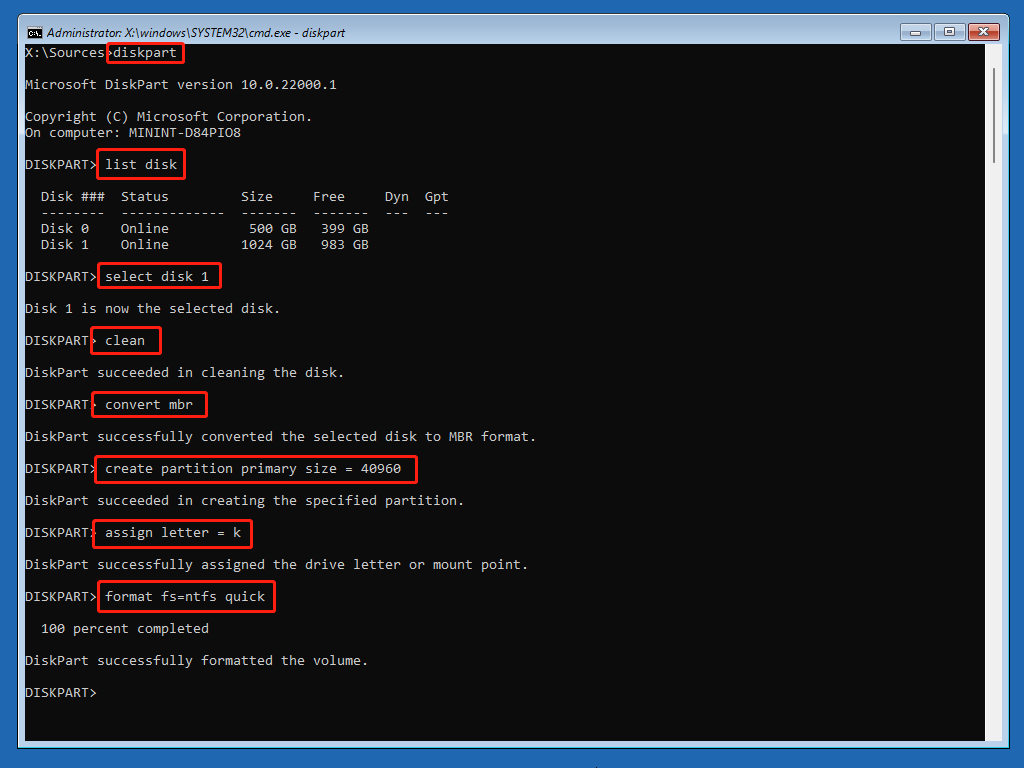
Step 3: After partitioning the hard drive, you can exit the window and start the Windows installation again.
Further reading:
Here are common partitioning mistakes to avoid:
- Creating Too Many Partitions: Too many small partitions may waste space and complicate storage management.
- Making the C Drive Too Small: Modern games and Windows updates require significant storage space.
- Forgetting Backups:Partition operations always carry some risk.
- Using MBR on Modern PCs: GPT is usually the better option for Windows 11 systems.
- Interrupting Partition Operations: Power failures or forced shutdowns during partitioning may corrupt data.
How to Partition a Hard Drive FAQ
Bottom Line
Partitioning a hard drive can help organize files, separate Windows from personal data, simplify backups, and improve storage management. Most Windows 11/10 users can safely partition hard drives using Disk Management or MiniTool Partition Wizard.
For any problem or suggestion when using MiniTool Partition Wizard, please feel free to contact us via [email protected]. We will get back to you as soon as possible.
About The Author

Position: Columnist
Linda has been an editor at MiniTool for seven years. She continuously learns about computers and puts her knowledge into practice. Moreover, she is particularly knowledgeable in disk management, data recovery, system installation, and PDF editing. Her articles typically reference multiple examples or are based on her own experience, providing users with the most suitable solutions.
User Comments :