You may want to upgrade to larger disk because you are running low on storage space or your computer is running slowly. This post provides a step-by-step guide for a hard drive upgrade.
Whether it’s a laptop, desktop, game console, or server, the need for more disk space is growing. If you frequently see the “low disk space warnings” message or need to delete old files to accommodate new ones, upgrading to a larger hard drive is often the solution.
This guide will take you through everything you need to know to plan and execute a disk upgrade to ensure you have more storage space on your PC.
When Do You Need to Upgrade to Larger Disk?
Before you begin the upgrade process, determine when you need to upgrade your hard drive. Common signs include:
- Frequent “low storage space” warnings disrupt your workflow.
- The hard drive is sluggish because it’s running low on space. In particular, a traditional hard drive slows down when it’s almost full.
- Can’t install new software, games, or system updates because you’re running out of space.
- Keep deleting files (photos, videos, old projects) to make room, only to repeat the process a few weeks later.
If these scenarios sound familiar, upgrading to a larger hard drive, especially switching from an HDD to an SSD, can solve the shortage and improve your computer’s speed and reliability.
How to Choose a Suitable Disk for Your Computer?
When considering replacing your current hard drive, you can refer to the following factors to help you choose the right hard drive.
HDD vs SSD
The first decision in the upgrade process is choosing the right hard drive type. There are two main options: HDD and SSD.
An HDD is usually large in capacity, low in price, and slow in speed, while an SSD is fast and expensive.
So, which hard drive should you choose? If you need a large capacity but have a limited budget, an HDD may be the best choice. If you are looking for high performance, an SSD may be more suitable for you.
Form Factor
The form factor of hard drives includes 2.5-inch, 3.5-inch, and M.2.
- 2.5-inch: Standard size for laptop HDDs and SSDs, and also for some desktop upgrades. Most 2.5-inch drives are either 7mm or 9.5mm thick.
- 3.5-inch: Typical size for desktop HDDs. They are larger and require more power, so they are rarely used in laptops.
- M.2: A compact slot-style form factor that is common in modern laptops and desktops. This compact form factor is mainly used for SSDs, which connect directly to the motherboard and are faster than traditional 2.5-inch SSDs.
Interface
Common hard drive interfaces include SATA and NVMe.
- SATA: The most popular interface for hard drives and SSDs in personal computers, known for its high speed and ease of use.
- NVMe: The popular interface designed specifically for SSDs to take full advantage of flash memory performance.
Capacity Recommendations
After choosing an HDD or SSD, the next step is to choose the right capacity. To avoid the need to upgrade again shortly, the target drive should have a capacity of at least 1.5–2 times your current storage needs.
- If you currently use 500GB of storage space, a 1TB drive should provide enough room for growth.
- If you work with large files, such as 4K videos, raw photos, or complex projects, you may need a 2TB or larger drive.
What Do You Need to Upgrade to Larger Disk?
Before you upgrade to a bigger hard drive, you can refer to the following tips to save time and ensure the upgrading process is completed successfully.
#1. Clean up the Current Drive
Before cloning or transferring data, remove unnecessary files to reduce the amount of data that needs to be moved. This includes:
- Temporary files and caches.
- Unused applications and games.
- Old downloads, logs, or outdated project files.
A cleaner hard drive will make the cloning/transfer process faster and ensure that you don’t bring redundant files to the new hard drive.
#2. Prepare Tools and Supplies
Here are some tools and supplies you need to prepare:
- A set of screwdrivers. Most laptops and desktops use Phillips screws. Some require specialized tools, such as Torx screwdrivers.
- A hard drive case or a USB to SATA adapter.
- The computer’s user manual. It can help you locate the hard drive bay and avoid damaging internal components.
#3. A Reliable Cloning Software
For the best disk clone software, MiniTool Partition Wizard is highly recommended because it is easy to use and professional. It can help you make a complete copy of the source hard drive.
MiniTool Partition Wizard DemoClick to Download100%Clean & Safe
How to Upgrade to Larger Disk?
Now, it’s time to upgrade to a larger hard drive. The specific steps vary slightly depending on the device (laptop vs desktop) and whether you’re replacing an old hard drive, adding a second one, or clean installation. Here’s a general guide:
Method 1. Replace the Old Hard Drive
This is the most common scenario, especially for laptops with limited hard drive bays.
Stage 1. Clone your old drive (recommended)
Cloning transfers your entire system, including the operating system, applications, files, and settings, to the new drive, so you don’t have to reinstall everything from scratch.
You can use MiniTool Partition Wizard to do that with a few clicks. It can help you upgrade to larger disk without reinstalling Windows.
What’s more, MiniTool Partition Wizard is a powerful disk manager that can help you partition a hard drive, convert MBR to GPT, recover data from a hard drive, migrate OS to SSD/HD, and more.
MiniTool Partition Wizard DemoClick to Download100%Clean & Safe
Step 1. Launch MiniTool Partition Wizard.
Connect the new drive to your computer via a USB enclosure or adapter. Then launch MiniTool Partition Wizard to enter its main interface.
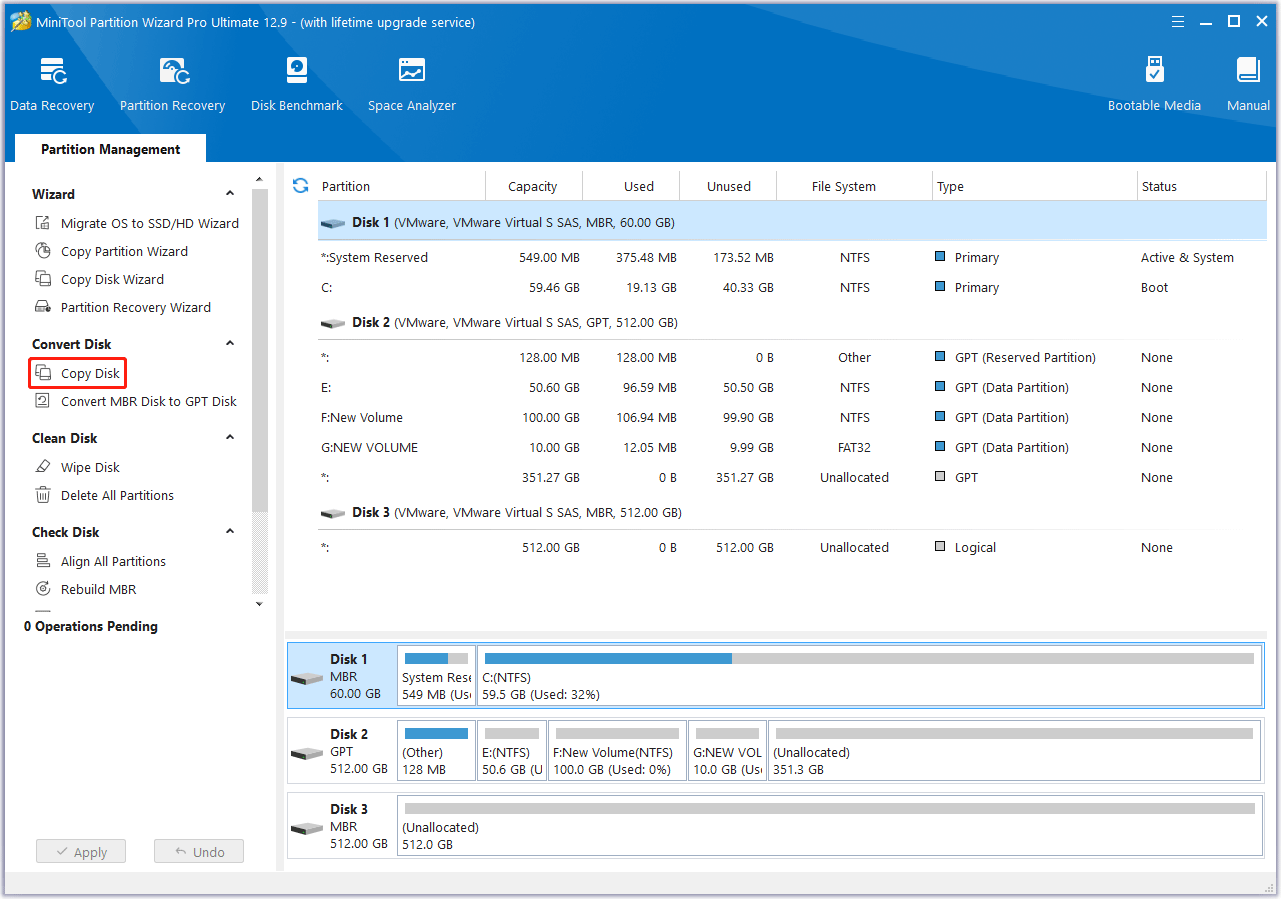
Step 2. Select the old drive as the source disk.
Select the old drive and click Copy Disk from the left action panel.
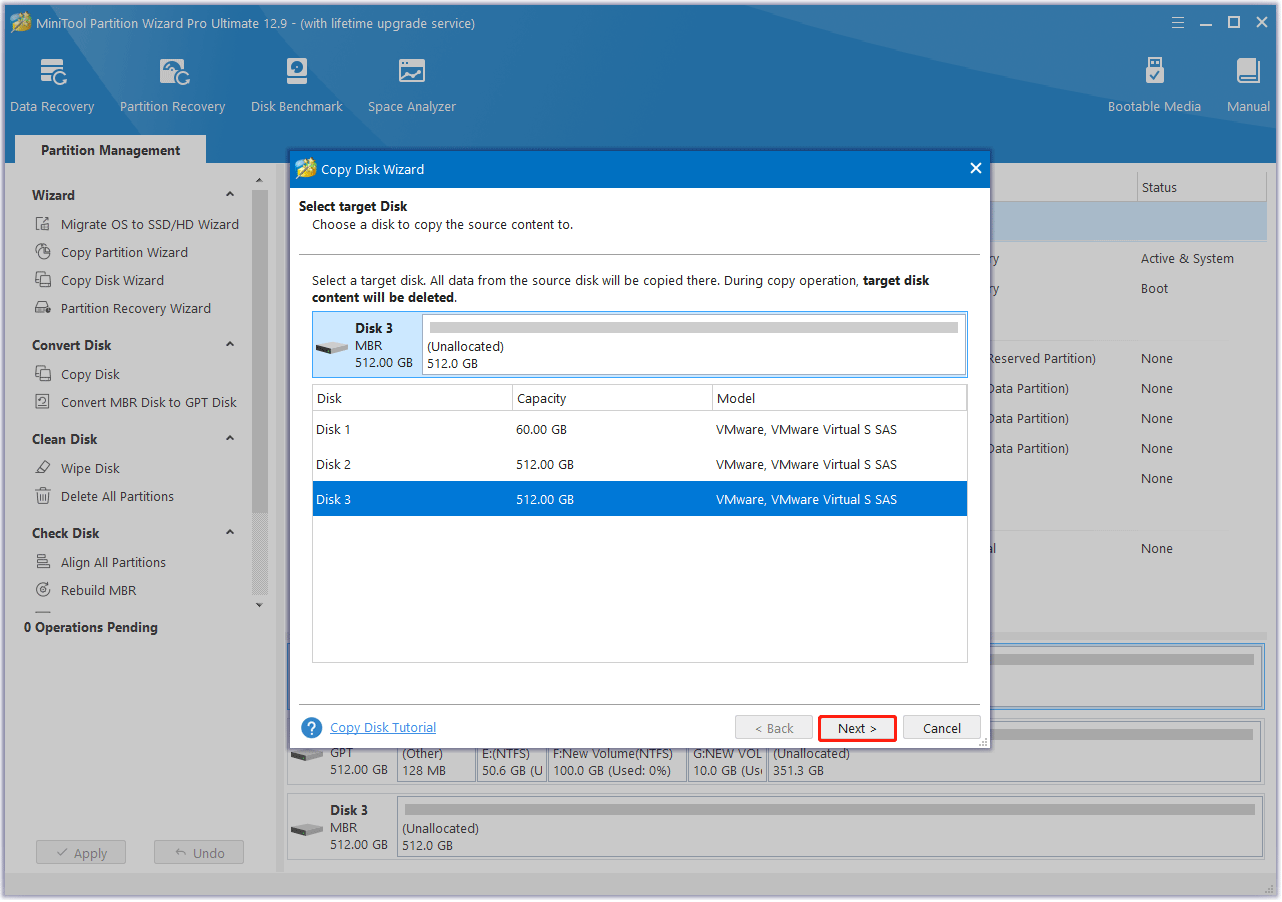
Step 3. Choose the new drive as the destination disk.
In the next window, choose the new drive as the destination disk and click Next. In the prompted warning window, click Yes to continue.
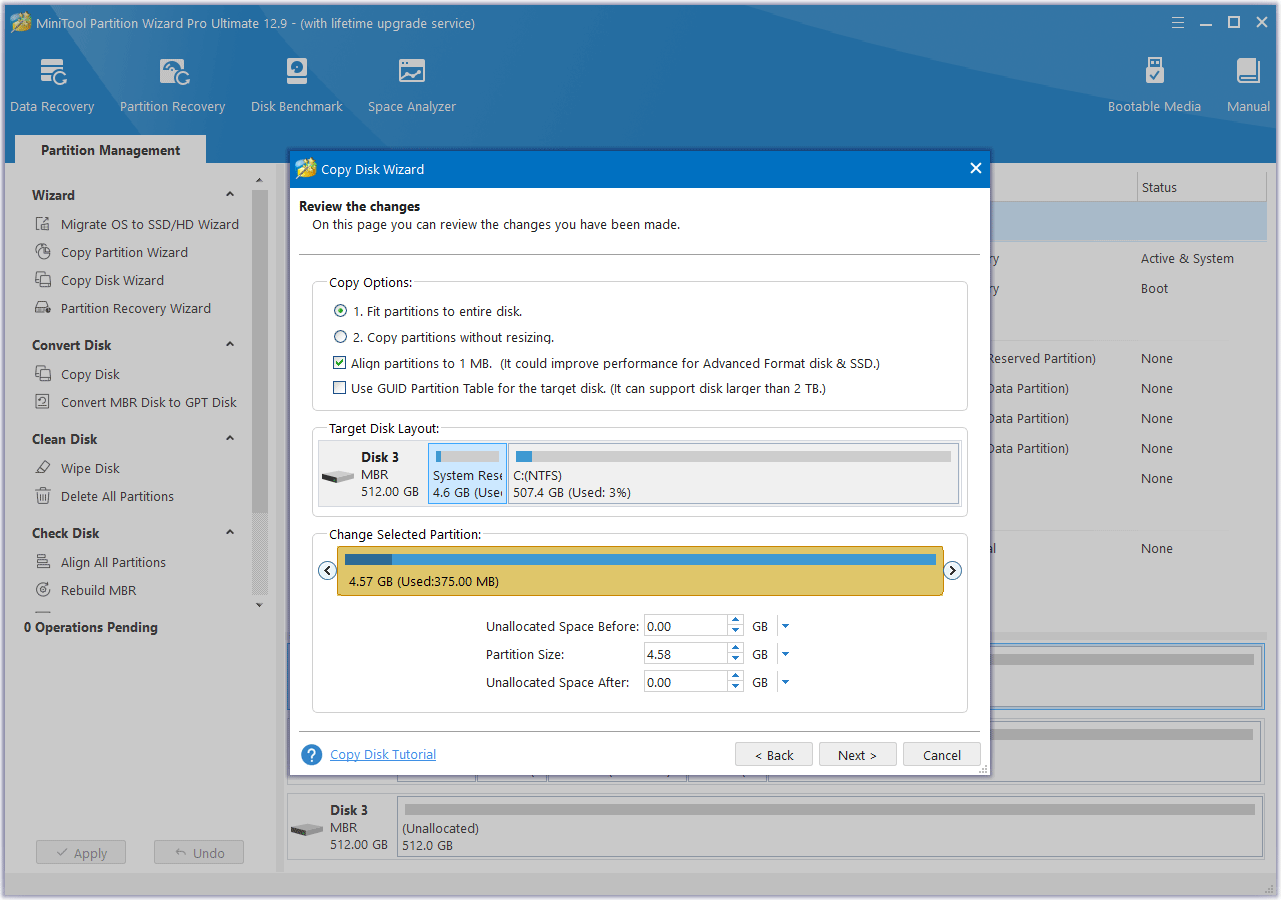
Step 4. Select copy options.
Choose the option whether to fit partitions to the entire disk or copy partitions without resizing.
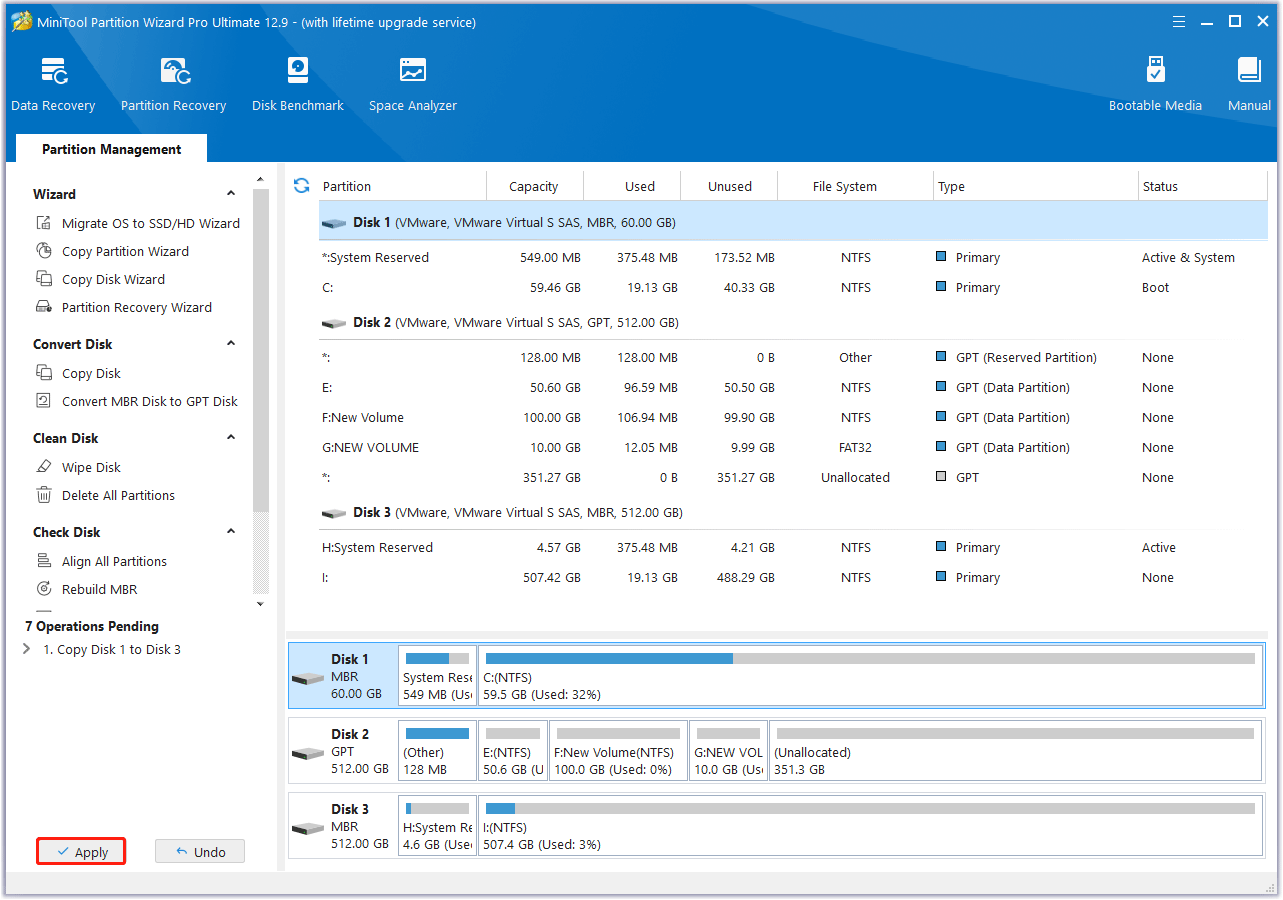
Step 5. Apply the cloning process.
Read the NOTE information and click Finish. Then, preview the changes and click Apply to start the cloning process.
Stage 2. Power off and disassemble the device
The steps are slightly different for laptops and desktops. Specific steps should be followed according to the manual to avoid damage to the computer.
Laptops
- Power off completely, unplug the power cord, and remove the battery (if removable).
- Place the laptop on a flat, clean surface. Remove the bottom panel with a screwdriver.
- Locate the old drive.
Desktops
- Power off and unplug the power cord.
- The case is usually opened by removing a side panel with screws or latches.
- The drive bay is usually near the front of the case. The HDD/SSD is mounted in a bracket or slot.
Stage 3. Install the new drive
Insert the new drive into the empty bay, securing it with the screws or brackets.
Reconnect the data and power cables (desktop); slide the drive into the M.2 slot (laptop), making sure it is securely seated.
Stage 4. Reassemble and test
Replace the bottom panel on a laptop or the case on a desktop, and reconnect the power.
Try to boot the device. It should automatically boot from the new drive. If it doesn’t, enter the BIOS/UEFI (press a key such as F2, F12, or Delete during boot) and set the new drive as the primary boot device.
Method 2. Add a Second Hard Drive
If your device has an extra hard drive bay (common in desktops and some gaming laptops), you can keep the old hard drive as additional storage and add the new hard drive as the primary or second hard drive.
To do this, you just need to install the new hard drive in the empty hard drive bay. If you want to use it as the primary drive, you should use MiniTool Partition Wizard to clone the OS to the new drive and change the boot order in BIOS.
In order to clearly understand the difference between these two options, we have summarized a table to show.
| Replace old hard drive | Add a second hard drive | |
| Storage space | Get a new large-capacity space directly, and the old hard drive will no longer be used. | The total capacity is the sum of the new and old hard drives. |
| Data migration | The old hard drive data needs to be migrated. | No migration is required |
| Operation complexity | High (need to remove the old disk and install the new disk) | Low (only need to install the new disk) |
| Applicable scenarios | When the old hard drive capacity is too small, aging, or you want to completely upgrade the storage. | When you need to retain the old hard drive data and want to quickly expand the space. |
Clean Installation
You can choose to replace the old drive and reinstall the operating system on the new drive. Here is how to do it:
Step 1. Create a bootable USB.
Use the Microsoft Media Creation Tool to create a bootable USB drive with the installation files for your operating system.
Step 2. Install the new drive.
Install the new, larger drive in your computer.
Step 3. Boot from USB and install the OS.
Boot from the USB drive and follow the on-screen instructions to install the operating system on the new drive.
Step 4. Transfer files.
Once the new installation is complete, connect the old drive via a SATA-to-USB adapter and copy your files to the new drive.
What to Do After Upgrading to Larger Disk?
Once the new drive is installed and working properly, complete these final steps to ensure optimal performance:
#1. Verify Data Integrity
Check that all files, applications, and settings were transferred correctly. Open a few key documents, launch applications, and test system functions (e.g., printing, Internet access) to confirm that nothing is missing or corrupted.
#2. Wipe the Old Drive
After upgrading to a bigger hard drive, you may have no idea what to do with old hard drive. You can choose to sell it to make money, but it’s better to wipe the old drive. This can prevent your information from being leaked.
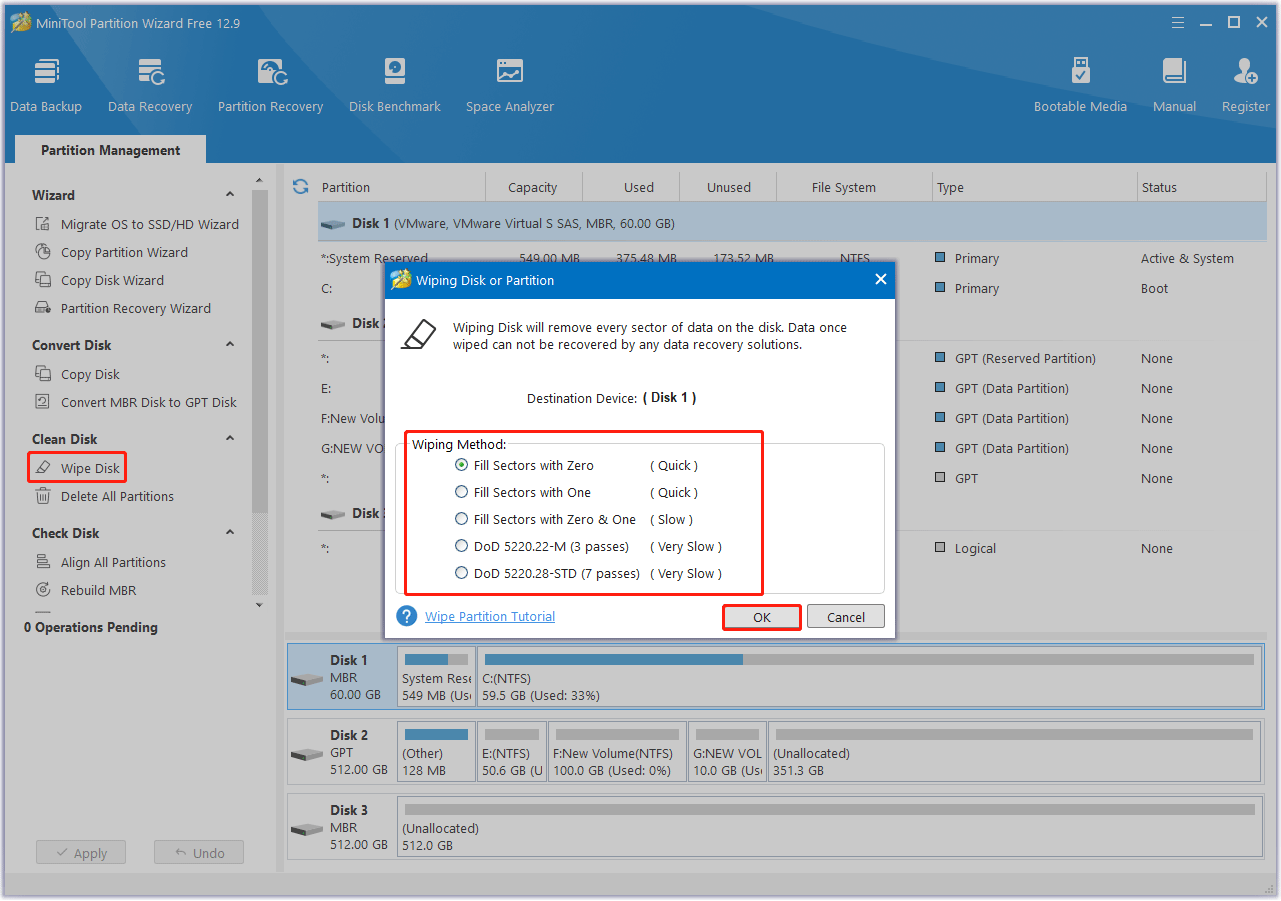
To wipe the old drive, you can use the Wipe Disk feature of MiniTool Partition Wizard. This feature can erase the drive in 5 different ways.
MiniTool Partition Wizard FreeClick to Download100%Clean & Safe
- Launch this free partition manager to enter its main interface.
- Click on the old drive and choose Wipe Disk in the left panel.
- In the window that pops up, select a wiping method from the given options and click OK. The more complex the process, the higher the security level.
- Finally, click Apply to complete the wiping process.
Bottom Line
Upgrading to a larger hard drive is a worthwhile process that can solve storage problems and improve performance.
By choosing the right hard drive, using the right tools and software, and following the step-by-step installation process, you can easily complete the upgrade.
If you have any questions or suggestions on how to use MiniTool Partition Wizard, please do not hesitate to contact us via [email protected].
Upgrade to Larger Disk FAQ
About The Author

Position: Columnist
Vega enjoys helping people with computer problems, including disk management, data recovery, data backup, and more. She is constantly expanding her knowledge in related fields. And she will continue to bring more easy-to-understand professional articles to help people solve various problems on the PC.
User Comments :