Is your laptop running slowly, running out of storage, or showing signs of hard drive failure?
Replacing the hard drive is one of the most effective laptop upgrades. Whether you want to upgrade from an HDD to an SSD, increase storage capacity, or replace a failing drive, this guide walks you through the entire process.
Can You Replace a Laptop Hard Drive?
Yes, you can replace the internal hard drive with a larger HDD or SSD.
The process usually involves:
- Backing up or cloning your data.
- Removing the old drive.
- Installing the new drive.
- Restoring Windows or booting from the cloned drive.
For most users, replacing an HDD with an SSD provides the biggest performance improvement.
You may wonder: Is it worth replacing a laptop hard drive? In most cases, yes.
| Situation | Recommended Action |
| A laptop uses an HDD | Upgrade to SSD |
| SSD storage is full | Install a larger SSD |
| The drive has bad sectors | Replace immediately |
Why Do You Need to Replace Laptop Hard Drive?
Replacing your hard drive is one of the most efficient upgrades or repairs you can make during your laptop’s lifespan.
You might need to replace your laptop’s hard drive for the following reasons:
- When your computer is running slowly, replacing the hard drive (HDD) with a solid-state drive (SSD) can help get faster speeds.
- You want to upgrade to a larger-capacity hard drive when the disk space is not enough.
- When your computer shows signs of hard drive failure (such as slow operation, unusual noises, or frequent file errors), it’s best to replace the hard drive before it completely fails.
How to replace a hard drive in a laptop? This guide covers everything from pre-replacement planning to post-installation setup to ensure a smooth transition for your Windows system and data.
Pre-Replacement Preparation
Before replacing your laptop’s hard drive, follow these steps to ensure a smooth process.
#1. Choose the Right Replacement Drive
To choose the right replacement drive for a laptop, first check your laptop’s hard drive compatibility.
- Form Factor and Interface: Most modern laptops use 2.5-inch SATA hard drives or M.2 hard drives (newer models).
- PCIe version: If your computer supports M.2 hard drives, check the PCIe version (Gen 3, 4, or 5). Note that a few computers may use M.2 SATA hard drives.
- Type: If your computer offers SATA slots, you may consider whether to use an SSD or an HDD. It depends on your budget.
- Size: Ensure the hard drive size matches your laptop’s hard drive bay. For 2.5-inch drives: Ensure the thickness matches your laptop’s bay (most use 7mm drives; some older models require 9.5mm). For M.2 SSDs: Check the length (2242, 2260, or 2280).
Therefore, before purchasing a hard drive, you should consult the manufacturer’s manual to confirm the detailed information about the hard drive form factor, interface, size, type, and installation requirements.
#2. Gather Essential Tools
The tools needed are minimal but essential for a smooth installation:
- Screwdriver: Most laptops use Phillips-head screws, while some use Torx screws.
- Anti-static wrist strap: Use an anti-static wrist strap to prevent damage to internal components.
- SATA/NVMe-to-USB adapter or hard drive enclosure: Useful for cloning the old drive to the new one.
- External storage: A USB flash drive (8GB+ for Windows installation media) or external hard drive (for data backups).
#3. Clone the Drive or Reinstall Windows?
Before replacing the hard drive, decide how you want to transfer your system.
| Method | Pros | Cons |
| Clone the drive | Keep Windows, programs, and files | Requires cloning software |
| Reinstall Windows | Clean installation system and fewer software issues | Requires reinstalling apps |
Most users prefer cloning because it avoids setting up the system again.
How to Replace Laptop Hard Drive and Reinstall Operating System?
Replacing laptop hard drive and reinstalling operating system means a clean installation for your laptop. This process installs a fresh copy of Windows on the new drive, so you’ll need to reinstall apps and restore files from backups.
To replace laptop hard drive with reinstalling the Windows OS, the steps are as follows:
Step 1. Back up your important data to external storage, including documents, pictures, music files, videos, program installation files, and so on.
Step 2. Create a bootable USB flash drive.
- Insert your USB flash drive into your computer.
- Download the Windows 10 Media Creation Tool or Windows 11 Installation Assistant.
- Run the tool, accept the license terms, and select Create installation media (USB flash drive, DVD, or ISO file) for another PC.
- Select your language, edition, and architecture settings.
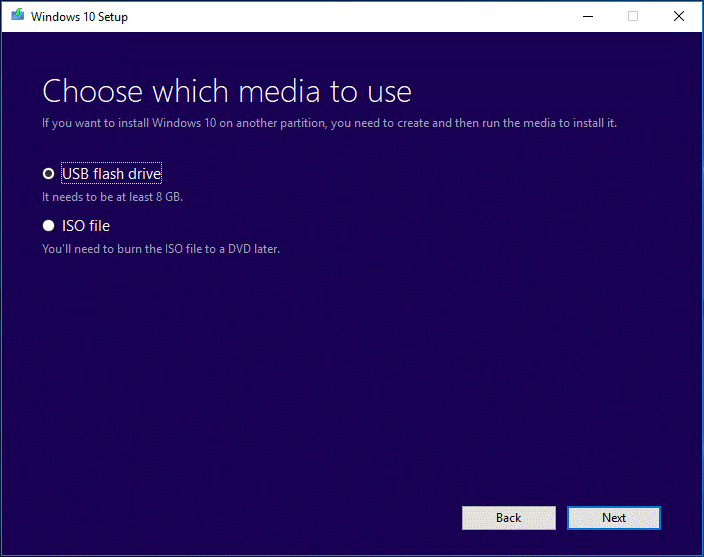
- Choose USB flash drive when prompted for media type, select your inserted USB drive, and follow the prompts to create the installer.
Step 3. Remove the old hard drive.
- Move the computer to a clean, flat, and stable work surface, preferably on a non-carpeted floor. And you need to wear an ESD wrist strap.
- Make sure the laptop is unplugged and the battery removed. Then, press and hold the laptop’s power button for a few seconds to discharge any residual charge.
- Locate the access panel on the bottom of the laptop (refer to your laptop’s user manual for specific location and screw information). Use a screwdriver to remove the screws that fasten the removable panel and gently take it away.
- Remove all screws securing the hard drive or its bracket to the hard drive bay.
- Carefully disconnect the SATA data cable and power cable (If some models use a single board/connector, simply unplug it), and then take the hard drive out. For M.2 SSD, gently slide it out of its slot on the motherboard.
- If there is a mounting bracket/caddy to hold the hard drive, remove it and use it for the new hard drive.
Step 4. Install the new hard drive.
- Use the previously removed screws to secure the mounting bracket/carrier to the replacement hard drive.
- Insert the new hard drive into the slot or hard drive bay, ensuring the connector is properly aligned.
- Secure the drive with screws.
- Reconnect the access panel, tighten the screws, and then reinsert the battery.
Step 5. Install Windows on the new hard drive.
- Insert the created Windows bootable USB drive into the laptop.
- Turn on your laptop and repeatedly press the BIOS key (usually F2, F10, F12, or Del) to enter the BIOS/UEFI settings.
- Navigate to the Boot menu and set the USB drive as the primary boot device. Press F10 to save the changes and exit. The laptop will restart and boot from the USB drive.
- The Windows installation wizard will launch. Select your language, time zone, and keyboard layout, then click Install now.
- When prompted for a product key, click I don’t have a product key. Windows will activate automatically later if your laptop has a digital license.
- Select the Windows edition for which you have a license (Home or Pro).
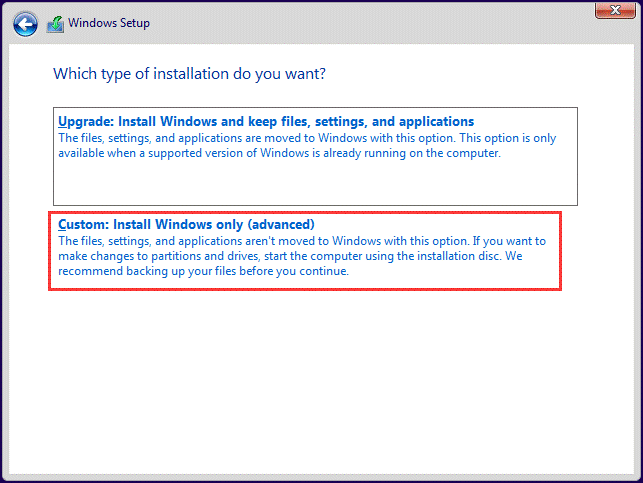
- Accept the license terms and choose Custom: Install Windows only (advanced).
- Select the unallocated space of the new drive from the list of disks and click Next.
- The Setup tool will start installing the Windows OS.
After the operating system is installed, follow the on-screen wizard to configure your Windows. Then install your programs and transfer files back from your external drive.
How to Replace Laptop Hard Drive Without Reinstalling Windows?
If you don’t want to reinstall the Windows OS and apps, OS migration is needed. To do that, try MiniTool Partition Wizard.
It offers an OS migration feature to help you migrate the system and other data to the new drive. It can help you clone Windows 10 to SSD and clone HDD to SSD.
How to migrate the OS with this software? Here is the guide. Before that, connect the SSD to your computer with an NVMe/SATA to USB adapter.
MiniTool Partition Wizard DemoClick to Download100%Clean & Safe
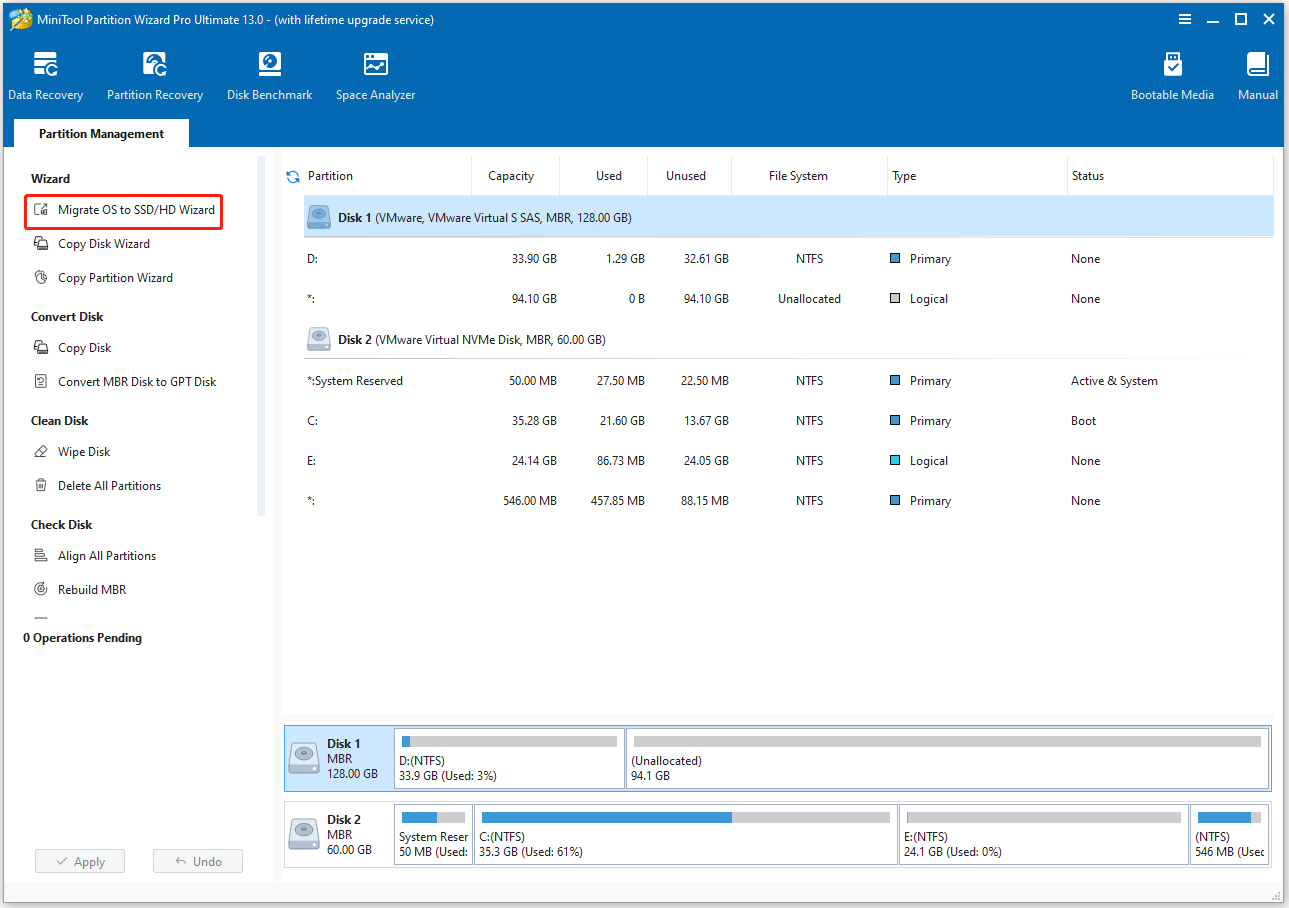
Step 1. Start the OS migration.
- Launch MiniTool Partition Wizard to enter its main interface.
- Select the Migrate OS to SSD/HD Wizard feature from the left action panel.
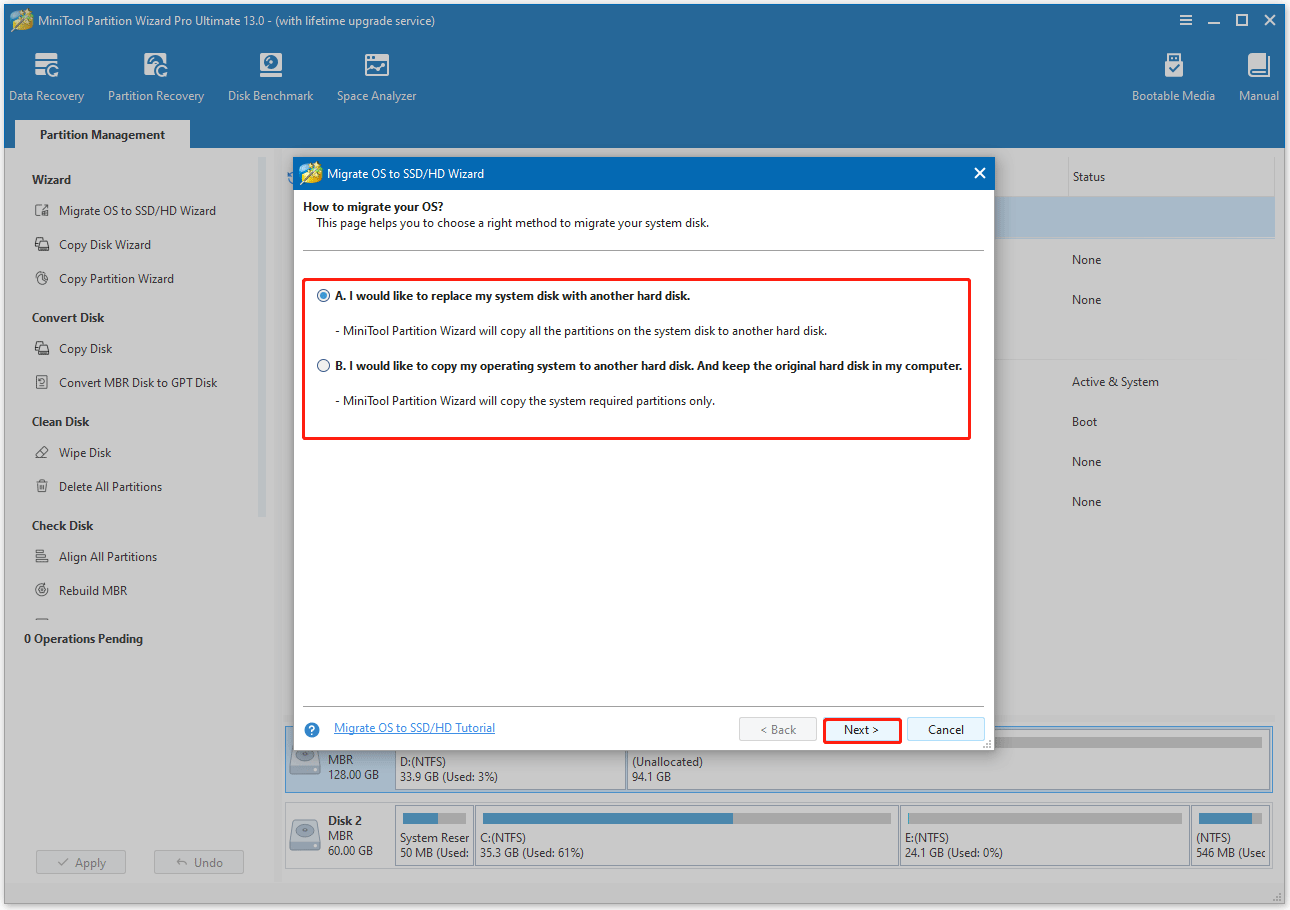
Step 2. Choose the migration method.
A prompt will appear offering two options:
- Option A: Copy all partitions on the system disk to the new drive.
- Option B: Only copy the operating system partition and related system partitions.
Choose the option that best fits your needs and click Next.
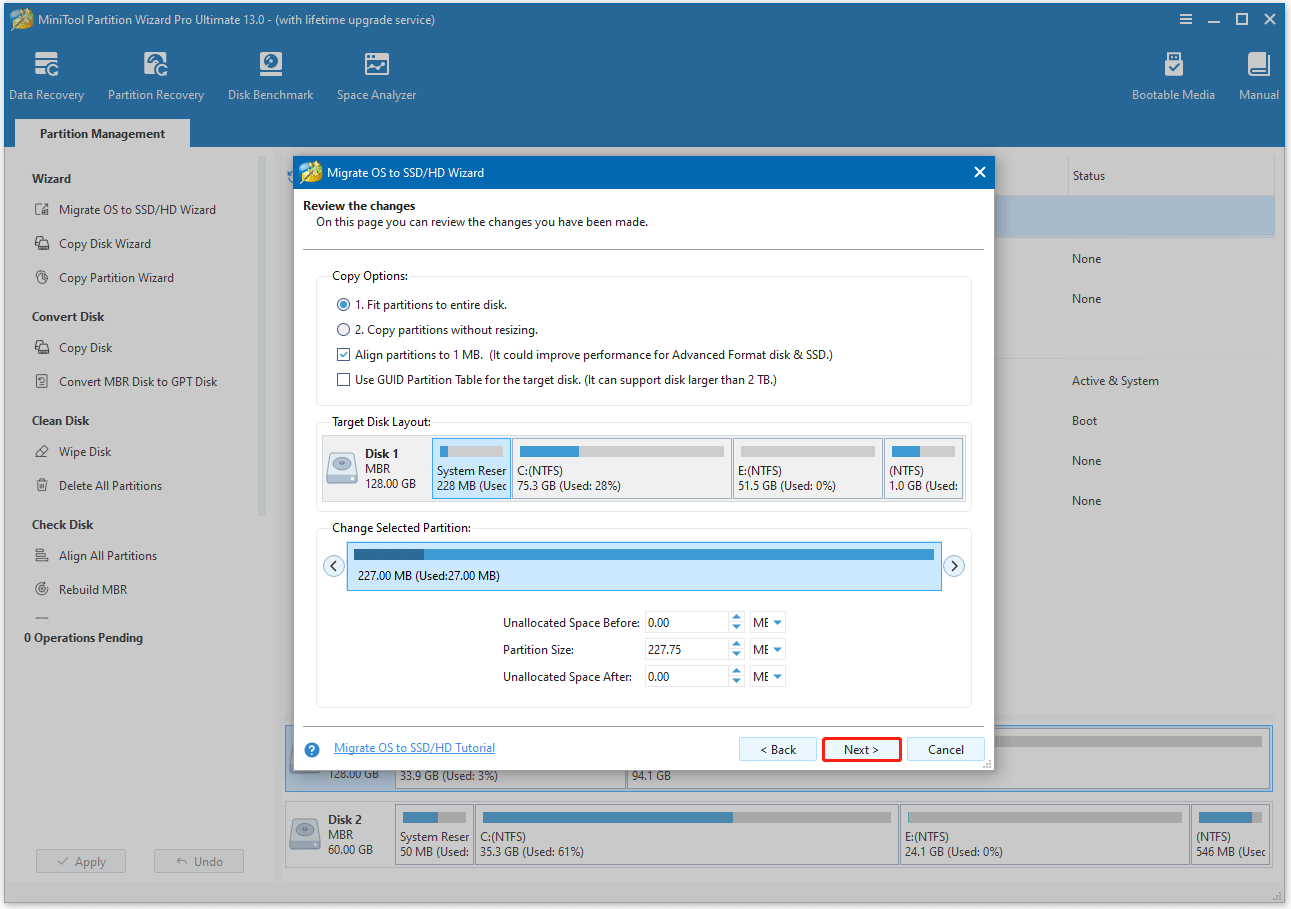
Step 3. Select the target disk and adjust copy options.
- Select the new drive as the target disk. A warning message will appear, informing you that all data on this disk will be destroyed. Click Yes to confirm.
- Configure the partition layout on the destination disk. You can adjust the size and location of the partitions by dragging the sliders.
- The Align partitions to 1MB option is usually checked by default, which is recommended for optimal performance.
- The Use GUID Partition Table for the target disk option is recommended to select if the new hard drive is larger than 2TB and your computer supports UEFI boot.
- Click Next to continue.
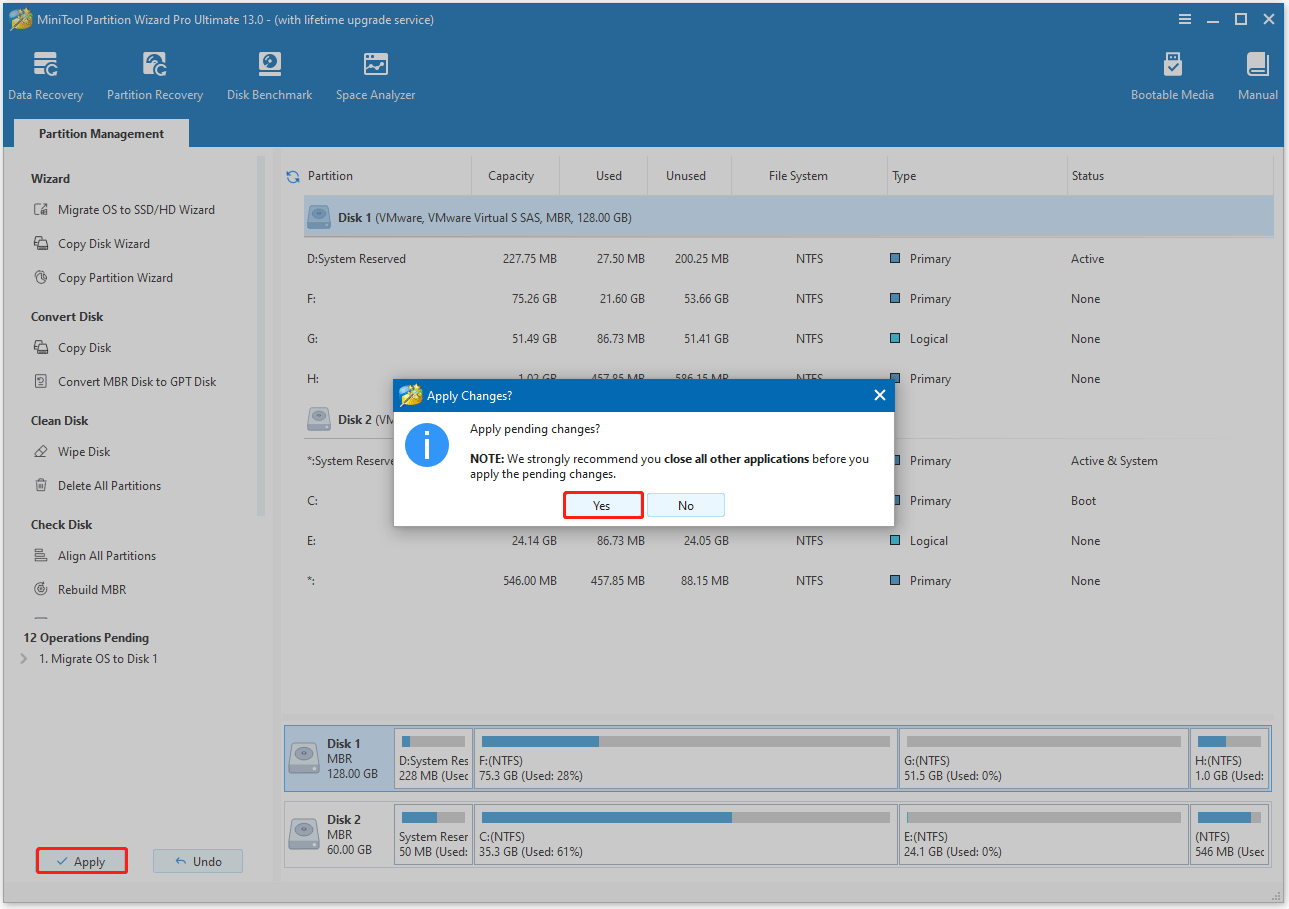
Step 4. Apply the migrating changes.
- Read the boot note that appears, and then click Finish to return to the main interface.
- Click the Apply button to start the process.
- Click Yes to confirm and allow the operation to proceed.
Once cloning is complete, shut down the laptop, remove the old drive from the laptop, install the new drive, and your laptop should boot normally from the new drive.
After getting Windows up and running, optimize the new drive to maximize speed and lifespan. Choose according tips for your drive type.
SSD Optimization Tips
- Enable TRIM: TRIM ensures the SSD efficiently reclaims unused space, preventing performance degradation.
- Disable defragmentation: Unlike HDDs, defragging SSDs wastes write cycles.
- Align SSD partitions: If you cloned the drive, ensure SSD partitions are aligned.
- Update SSD firmware: Manufacturers release firmware updates to fix bugs, improve compatibility, and boost performance.
HDD Optimization Tips
- Schedule regular defragmentation: HDDs slow down with fragmented files, so set up automatic defragging.
- Check for bad sectors: HDDs develop bad sectors over time, which cause file corruption. Run chkdsk /f /r monthly to scan for bad sectors.
Common Problems After Replacing a Hard Drive
Here are some common problems and solutions after replacing a laptop hard drive.
#1. Laptop Won’t Boot
If your laptop will not boot after replacing the hard drive, the issue is almost always a missing operating system, incorrect BIOS boot order, an unseated drive connection, or an unattached internal battery cable.
You should check:
- Drive connection
- Boot order in BIOS
- Cloning success
#2. New Drive Not Detected
If your new drive is not detected after replacing a laptop hard drive, the cause is usually loose physical connections, an uninitialized drive, an incorrect BIOS storage controller mode, or an outdated BIOS version.
You should verify:
- Interface compatibility
- Proper installation
- BIOS detection
#3. Windows Activation Issues
Most modern laptops store activation information in firmware, so Windows should reactivate automatically after reinstallation.
Further reading:
What to do with the old replaced laptop hard drive? Here are two cases:
- If it’s good but just performing poorly or has low disk space, you can reuse it as an external storage device by placing it in an external hard drive enclosure connected via USB.
- If it’s faulty, you need to safely dispose of it. Before disposing of it, you should safely erase the data and perform physical destruction.
Replace Laptop Hard Drive FAQ
Bottom Line
Replacing a laptop hard drive is a practical way to increase storage capacity and improve performance. For most users, upgrading from an HDD to an SSD offers the best balance of speed, reliability, and value.
Before replacing the drive, back up or clone your data, verify compatibility, and decide whether you want to keep your current Windows installation or perform a clean setup.
If you have any problems or suggestions when using MiniTool Partition Wizard, you can contact us by sending an email to [email protected]. We’ll get back to you as soon as possible.
About The Author

Position: Columnist
Vega enjoys helping people with computer problems, including disk management, data recovery, data backup, and more. She is constantly expanding her knowledge in related fields. And she will continue to bring more easy-to-understand professional articles to help people solve various problems on the PC.
User Comments :