If you observe Disk Management and find there is a recovery partition, probably you are wondering "can I delete recovery partition?" In this post, we show you how to remove recovery partition as well how to get the deleted recovery partition back in Windows 7/8/10.
Can I Delete Recovery Partition?
After the update to version 1511 build 10586 Windows has created a 450 Mb recovery partition on my SSD drive.I have already deleted the created Windows_OLD folder as well as the hidden folder with update files.Can I seamlessly and without risk also delete the recovery partition? TenforumsThere are many users asking about whether they can delete recovery partition to free out disk space so as to extend volume in Windows 7/8/10, and what happens if they delete a recovery partition, does this affect the running OS. Before answering these questions, we would like to introduce what a recovery partition is.
What Is Recovery Partition?
Recovery partition is a special partition on system hard drive and is used to restore the system to factory settings in the event of system issues. To protect recovery partition from being changed or deleted, recovery partition usually has no drive letter, and only a Help option is provided in Disk Management.There are two types of recovery partitions. One is created by installing Windows on GPT disk, which holds the Windows Recovery Environment (WinRE). Typically Windows recovery partition only takes up several hundred MB disk space, as it only contains the bare operating system.The rest one is created by computer manufactures like Dell, HP, Lenovo before delivery, which allows to restore computer to factory default settings, including OS, drivers and some build-in applications. Suppliers’ recovery partition takes more space than Windows recovery partition, and is usually marked as OEM Partition.
Is It Ok to Delete Recovery Partition?
As to the question “can I delete recovery partition“, the answer is absolutely positive. You can delete a recovery partition without affecting the running OS. However, for different computer users, we offer different suggestions:For average users, it is better to keep the recovery partition as it is in the hard drive, as such a partition won’t take up too much space. And if system gets corrupted or damaged or offers poor performance, users can turn to recovery partition for help instead of spending time reinstalling the operating system.But for advanced computer users, they may delete recovery partition optionally, provided they have one of the following things: a recovery drive, a recent system image backup or Windows installation CD. Normally, as time goes by, more and more personal files and applications are saved on the system partition, yet a recovery partition is useful only to return the drive to its factory state, which is not as useful as a recent backup.In a nutshell, recovery partition is viewed as your LAST resort when you have system problems as it will wipe out all your data and programs in system partition. Besides, although some software allows you to add drive letter to manage recovery partition, you should not attempt to store or alter files in it, for this can cause the system recovery process to fail.How to Safely Delete Recovery Partition in Windows 7/8/10
As you know, you are not allowed to remove recovery partition in Disk Management, only a Help option is offered there. Thus, you need to find other methods to remove recovery partition. In this post, we offer you three ways to delete recovery partition in Windows 7/8/10.Way 1: Delete Recovery Partition using Diskpart
Windows provides users a quite useful way to help delete recovery partition, that is to use Diskpart.exe to delete partitions from Diskpart command prompt. Please follow these steps to remove recovery partition.Let’s see how to delete recovery partition Windows 10.Step 1. Type “diskpart” in the search box, then in the best match results, right-click on “diskpart” and select “Run as administrator”.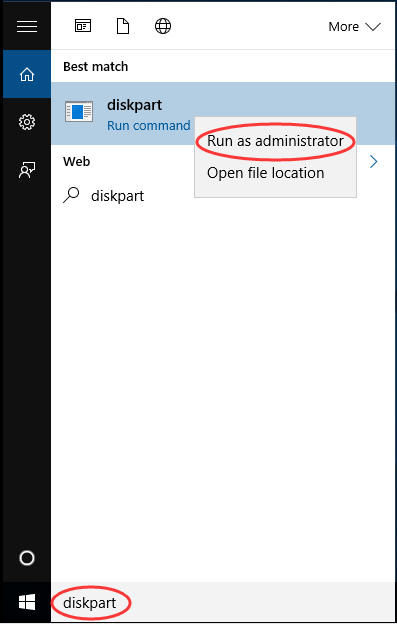 Step 2. At Diskpart prompt, type the following commands in order, each one should end up with the Enter key:
- Type “list disk” to display all the disks. Please pay attention to the disk number that contains the recovery partition.
- Type “select disk n”, in which “n” should be replaced with the correct disk number.
- Type “list partition” to list all the partitions on the selected disk. By viewing the partition label and partition information, you will know which one is the recovery partition to be deleted.
- Type “select partition n” where n should be the partition number of the recovery partition.
- Type “delete partition” to delete the recovery partition.
 What caused this error?This error message is likely to appear on GPT disk. If the recovery partition you intend to delete is regarded as protected partition by Windows, then deletion is prevented.How can we solve it?At this time, we should type “gpt attributes=0x8000000000000000” and then repeat “delete partition“. Then the recovery partition should be deleted.Cons: Although Diskpart is able to delete recovery partition, without a clear interface to display the details, there are chances that you may delete a wrong partition. For those who are unfamiliar with Diskpart, obviously this is not the best choice.Click to tweet
Way 2: Delete Recovery Partition while Creating Recovery Drive
In one of Microsoft’s HELP documents, we find another way to delete recovery partition. This trick appears during the process of creating a USB recovery drive. Please pay attention to Point 7 which writes:“When the process is done, do one of the following:- If you want to keep the recovery partition on your PC, select Finish.
- If you want to remove the recovery partition from your PC and free up disk space, select Delete the recovery partition. Then select Delete. This will free up the disk space used to store your recovery image. When the removal is done, select Finish.
Note: Some PCs don’t offer the option to remove a recovery partition. If you experience this, there isn’t a recovery partition on your PC that’s using additional disc space.”
Way 3: Delete Recovery Partition using Partition Wizard
The reason why we recommend Partition Wizard is that it is the easiest way we can find to delete all kinds of partitions. Besides, its Free Edition helps to get rid of recovery partition in Windows 7/8/10 within a few clicks.MiniTool Partition Wizard FreeClick to Download100%Clean & Safe
Recommended: Are you wondering “Can I Delete EFI System Volume”? This post tells all.Let’s see how it works:Step 1. Download MiniTool Partition Wizard Free Edition. Install and run it.Step 2. Right click on the recovery partition you want to delete and select “Delete Partition“.Step 3. The recovery partition will be displayed as unallocated space. Then click “Apply” to make the operation in process.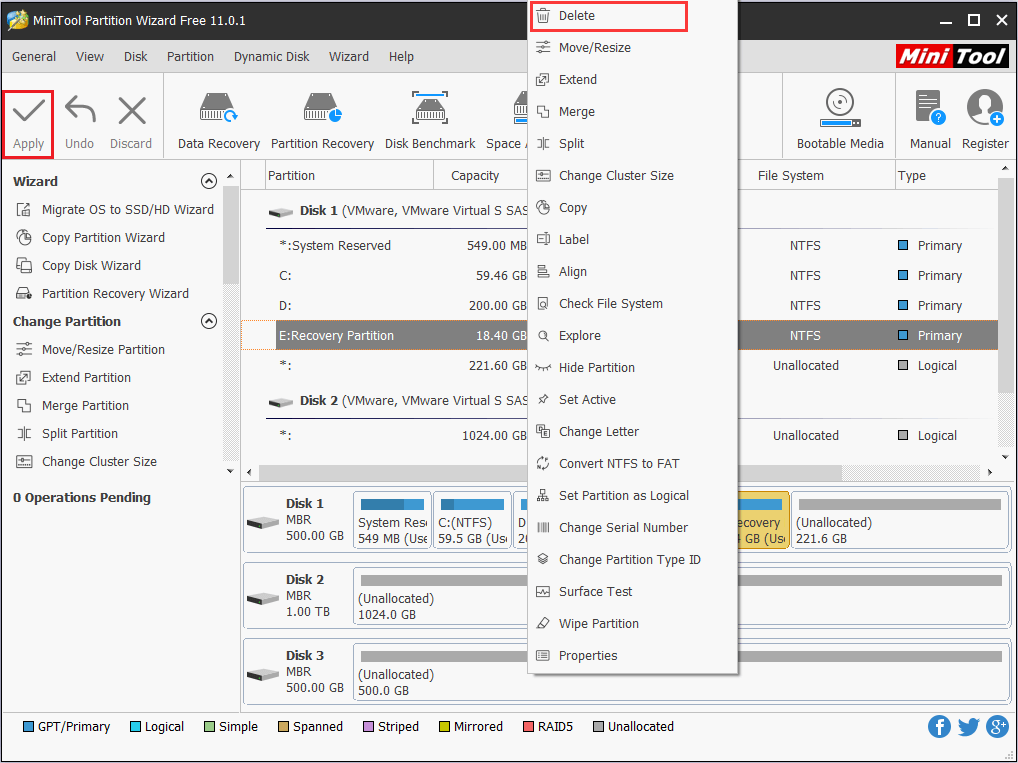 In a few seconds, you will have recovery partition deleted. Then you can use MiniTool Partition Wizard to add this unallocated space to any partition so as to extend partition or you may just create new partition on this location.
MiniTool Partition Wizard FreeClick to Download100%Clean & Safe
How to Restore Deleted Recovery Partition in Windows 7/8/10
“Sir I am having a windows 7 64 bit operating system. By some means my recovery partition has been deleted & now I cannot backup my data on my computer. Kindly tell me a way by which if can recover my recovery partition?”answers.microsoft.comWhile many users are searching for “how to remove recovery partition”, some users are also trying their best to restore deleted recovery partition, no matter it was deleted intentionally or by mistake. Anyhow, a recovery partition is really convenient when the operating system goes wrong.Instead of contacting your computer vendor and see if they’ll provide you with a Recovery DVD, here are two more practical solutions that deserve trying.
Here is a video guide:
Way 1: Use Partition Wizard to Do Partition Recovery
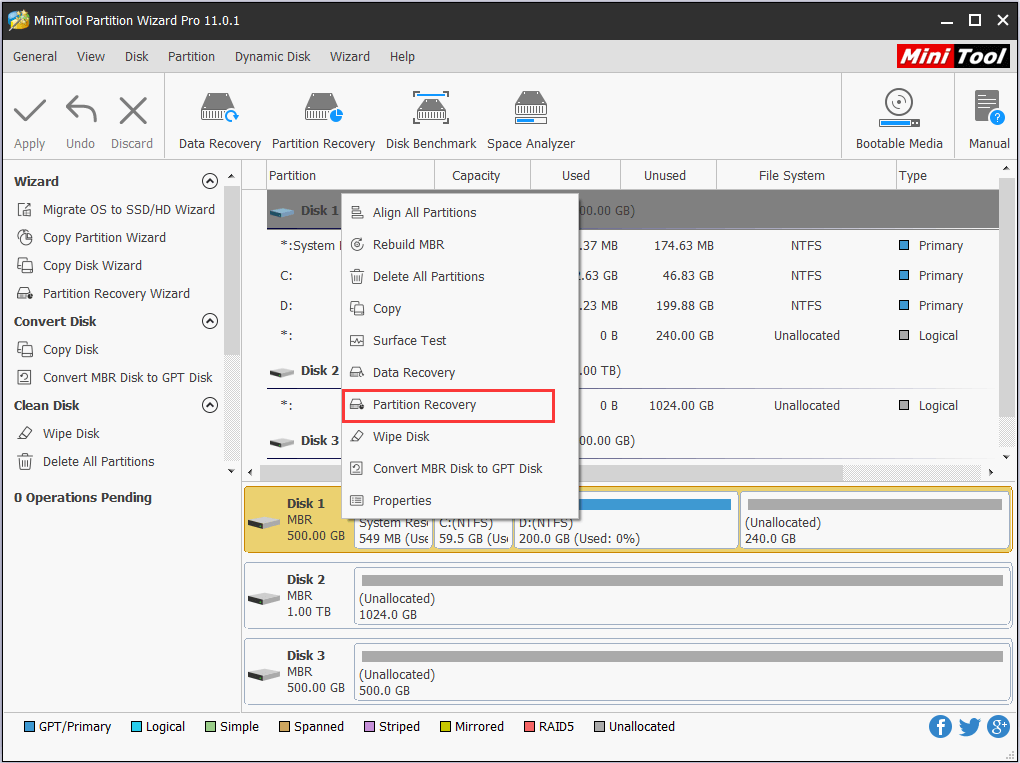
MiniTool Partition Wizard is not only helpful in deleting recovery partition, but also useful in recovering recovery partition. Here is how it works:Kind Remind: “Partition Recovery” is a paid feature for the advanced editions of Partition Wizard (view compare editions to know more). Thus, you need to buy a license to unlock this feature. Press the button to get MiniTool Partition Wizard Pro at best price.Step 1. Launch MiniTool Partition Wizard to get the main interface. Right-click on the source disk that partition loss happens and then choose “Partition Recovery”. Then you will be directed to choose a scanning range.Note: If you employ “Partition Recovery Wizard”, you should go through the welcome page and the source disk selection before you can choose a scanning range.
 Step 2. Choose one of the three options to continue searching for the lost partition. Full Disk will scan the whole disk; Unallocated Space only scans the free space, and Specified Range only scans the specified sectors you appointed. Here we choose Full Disk and click “Next” to go on.
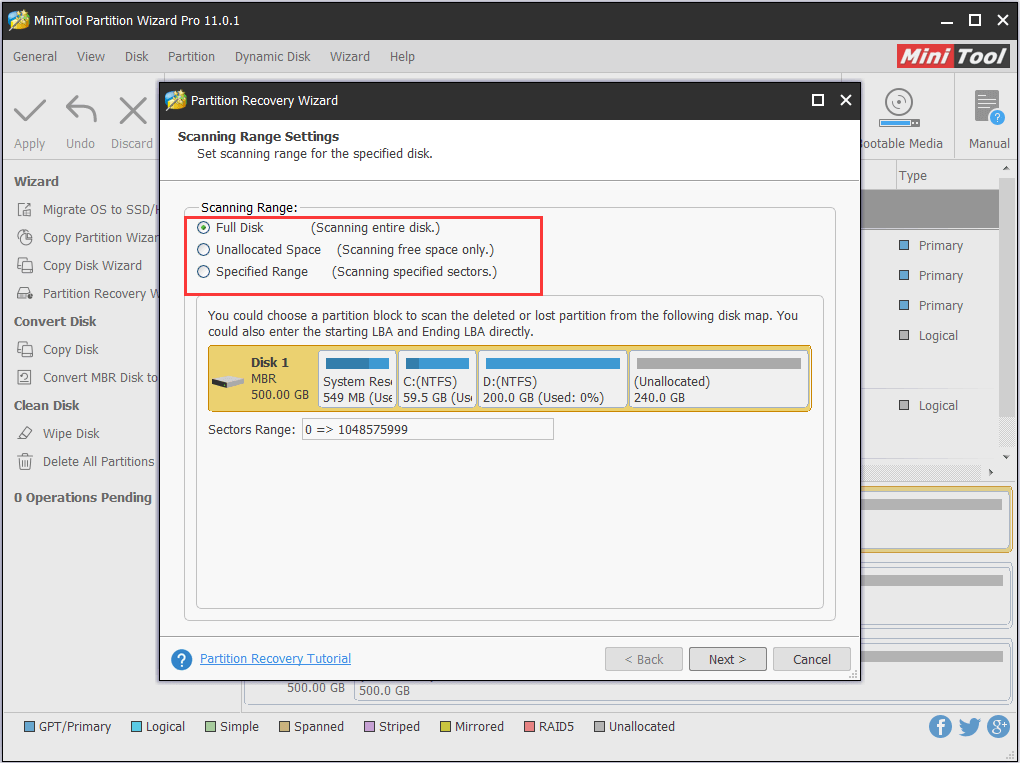 Step 3. Next you should determine a scanning method. First of all you can choose Quick Scan for saving time. If this does not work, you can turn to Full Scan. Click “Next” to continue.
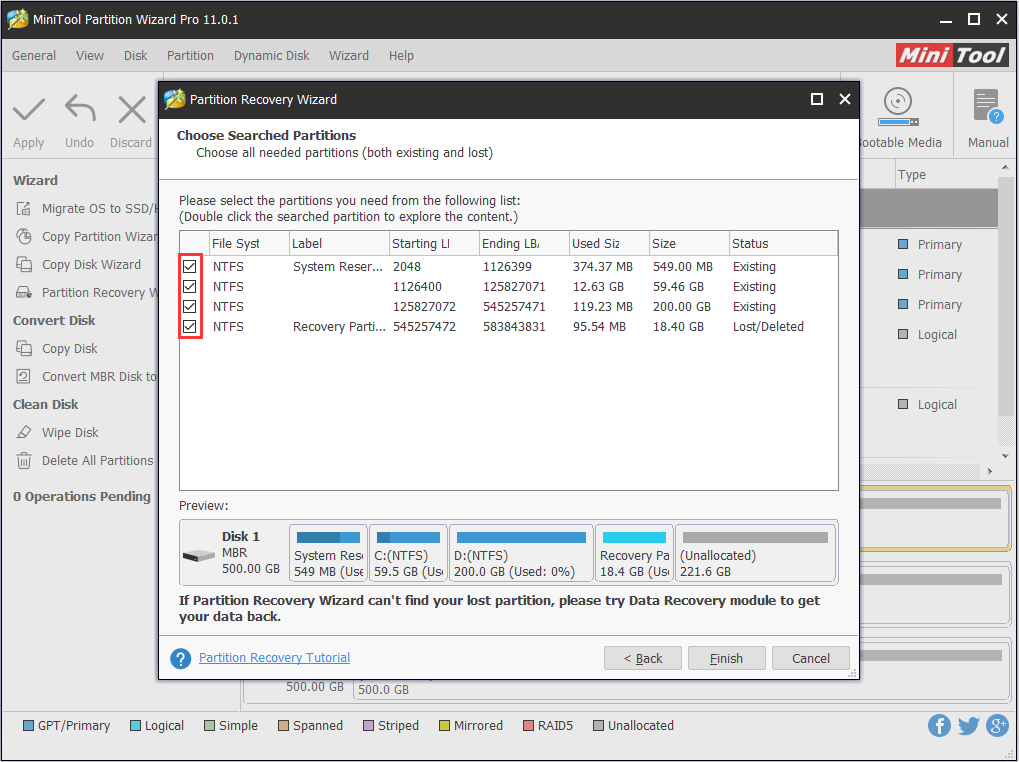
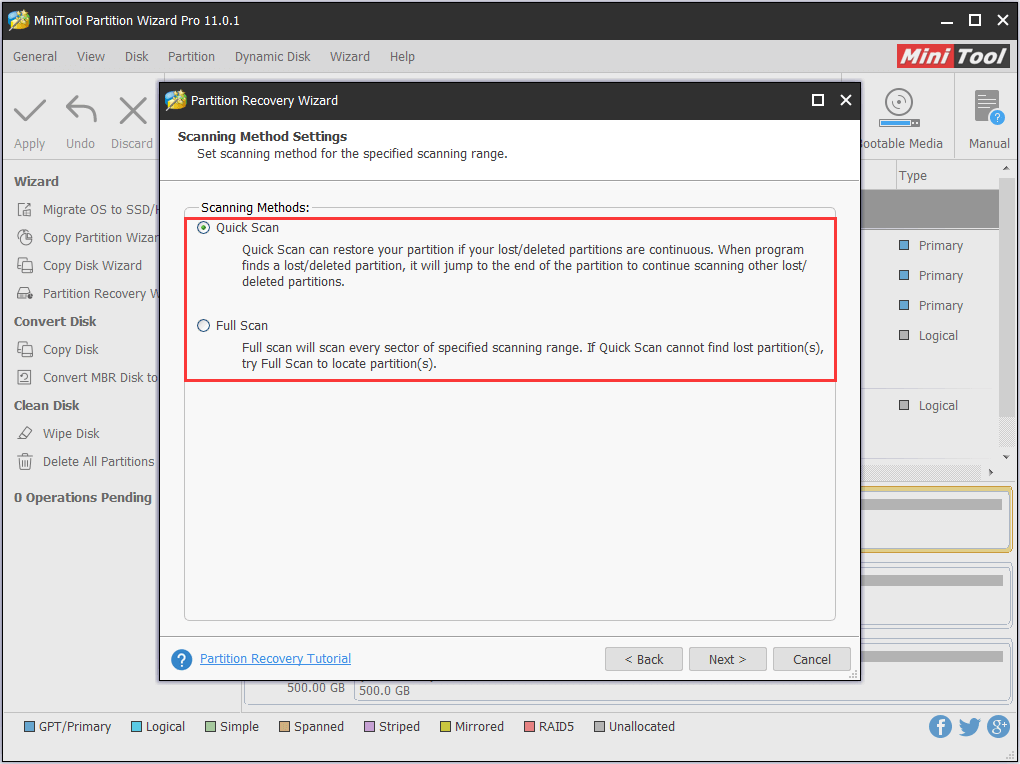 Step 4. See after Quick Scan, Partition Wizard has listed all partitions it found on the source disk, including the recovery partition we just deleted. Now we should select all partitions (both existing and lost) and tick “Finish” to start partition recovery.
Note: You can double-click a partition to explore files in it. If a partition is left out, it will disappear after the recovery.
 Step 5: Finally, press “Apply” to execute partition recovery.
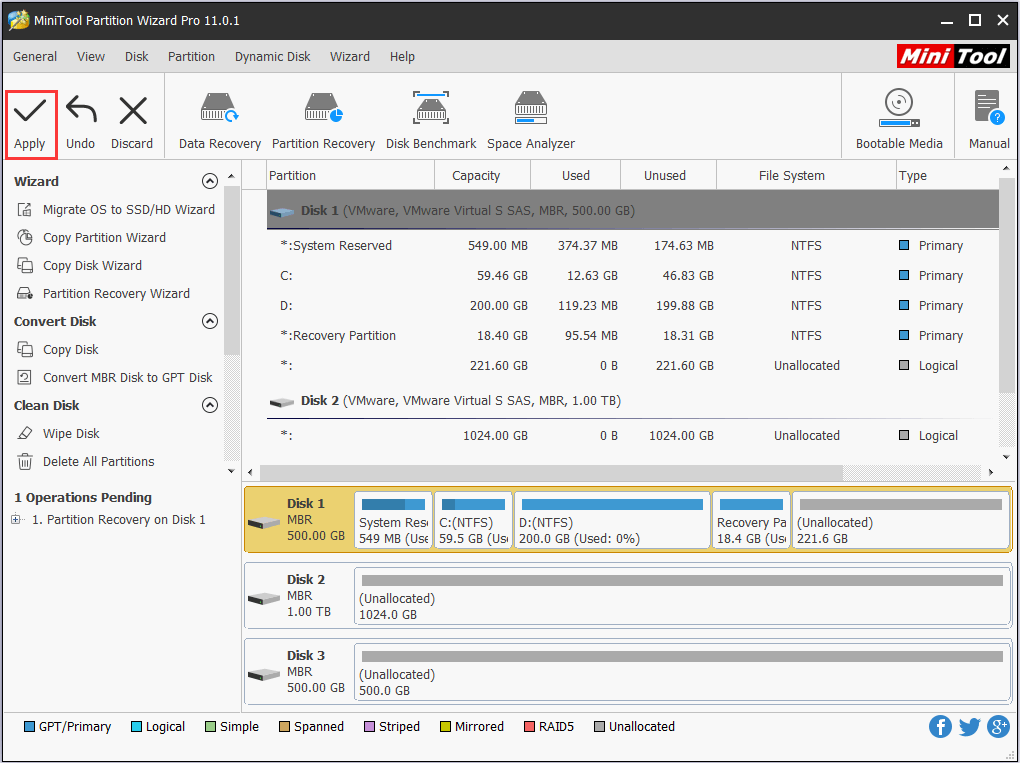
Note:• The partitions recovered are logical partitions in case that an MBR drive may have reached the maximum number of primary partition.• The partitions recovered are lack of drive letters, thus you cannot view them under Windows Explorer. To resolve this issue, please add drive letter for them.
Is your HP recovery drive full in Windows 10/8/7? Have you got low disk space warning on recovery D? Try to fix recovery disk full issue now.
Way 2: Recreate a Recovery Partition
This way is useful for those whose operating system is installed on GPT disk. However, the process is relatively complicated. Please follow the step-by-step guide. Note that all operations below are carried out on Windows 10. Besides, you might need the help of Professional MiniTool Partition Wizard. Click the button below to get its assistance.Step 1. Prepare an unallocated space on system disk that is large enough for creating recovery partition. Then create a new folder and name it “Sources” in a non-system partition.Step 2. Restart Windows by following: Start -> Settings -> Update & Security -> Recovery -> Advanced Start-up -> Restart Now.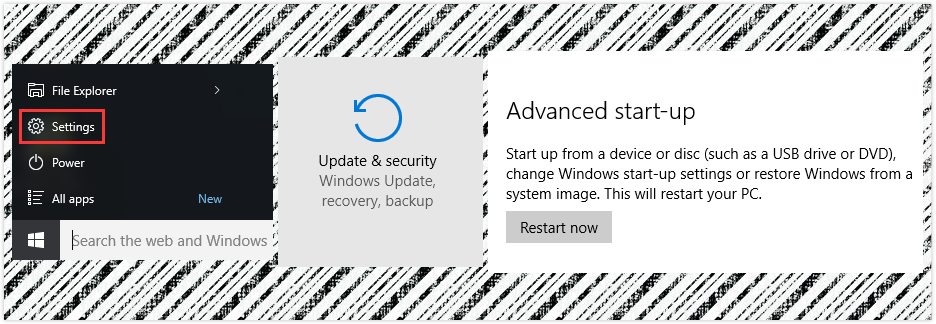 Step 3. Enter Command Prompt by following: Troubleshot -> Advanced Options -> Command Prompt.
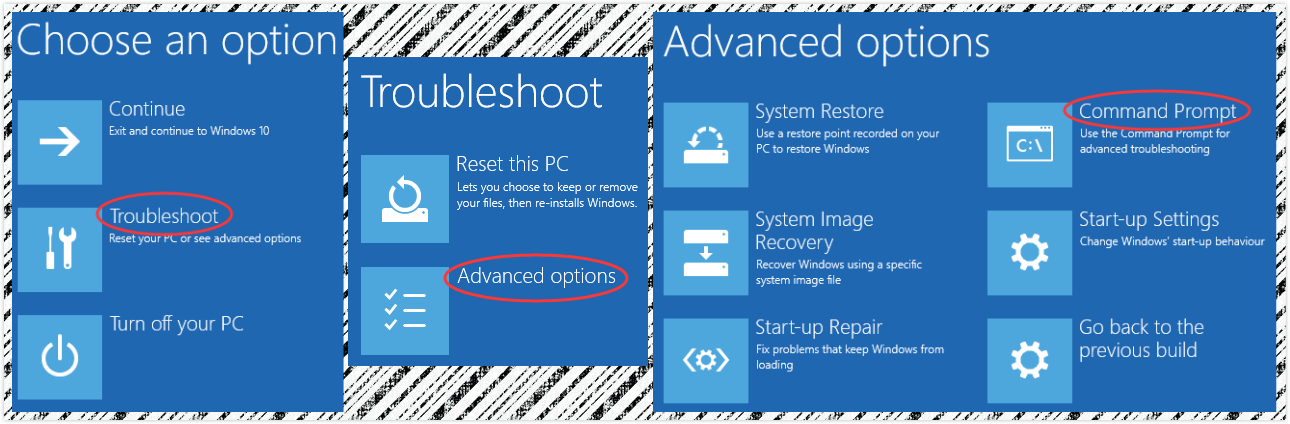 Step 4. Depending on your settings, you may need to enter the password of BIOS and select a login account.
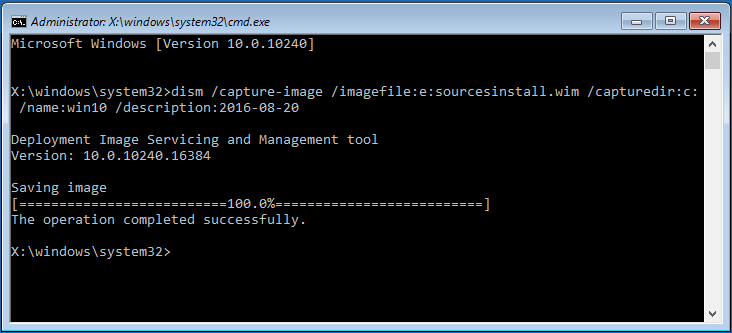
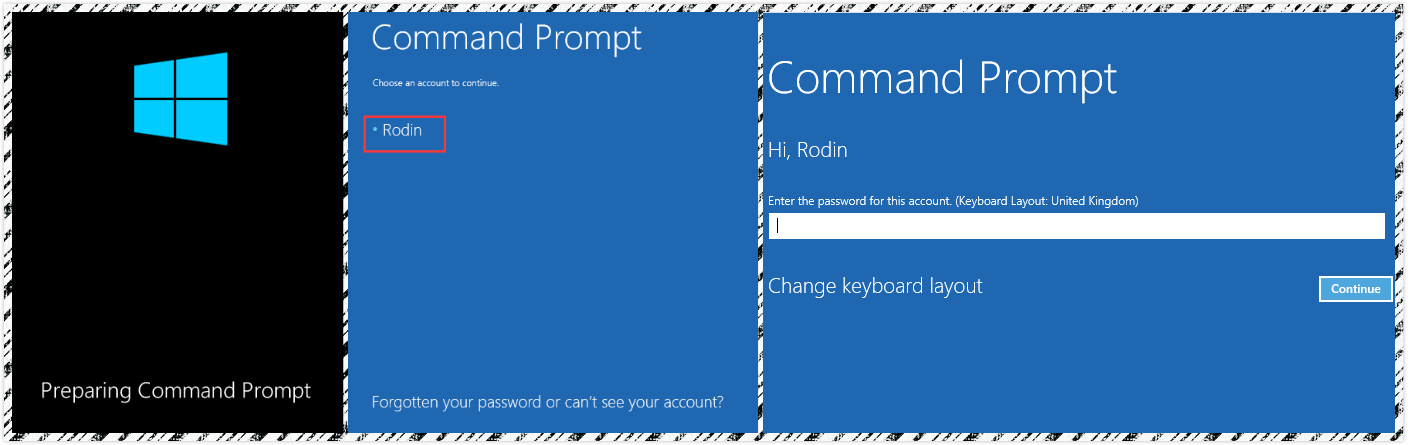 Step 5. Now type the following commands carefully and end it with Enter key:Dism /Capture-Image /ImageFile:A:sourcesinstall.wim /CaptureDir:B: /Name:Win10 /Description:2016-08-20Kind Remind: contents marked in Green should be in accordance with your real situation.
- “A” is the drive letter of the partition where the new folder “Sources” exists.
- “B” is the location of your system partition.
- “Win10” and “2016-08-20” can be replaced by anything you like.
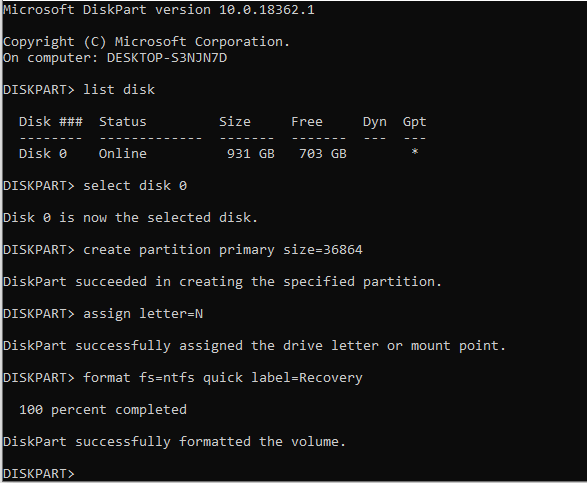
 Step 6. When the saving image operation is finished, exit Command Prompt and continue to Windows 10.Step 7. Now you can create recovery partition in Windows 10. Please input these commands and end each one with Enter. Please keep the diskpart command window there after you finish this step.
- Press Win+X and select Command Prompt(Admin).
- Type “diskpart”.
- Type “list disk”.
- Type “select disk n” where n should be the disk number of the system disk.
- Type “create partition primary size=n” to create a primary partition on the unallocated space prepared at the beginning. “N” is the new partition size in MB.
- Type “assign letter=”N”” (N can be other drive letter not occupied currently).
- Type “format quick fs=ntfs label=”Recovery””.
 Kind Remind: Step 7 can be simplified by using the “Create Partition” feature of Partition Wizard. No commands are required, only options are offered for you to select.
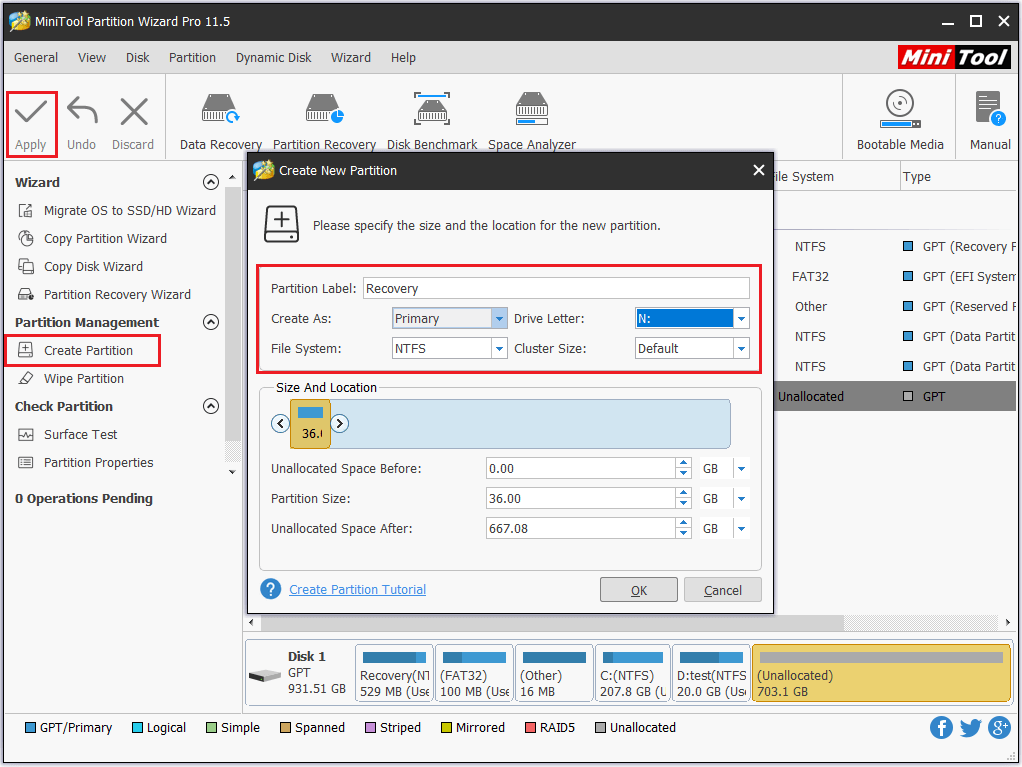 Step 8. Refresh Windows Explorer and copy the files & folder related to “Sources” to this new recovery partition.Step 9. Continue typing commands in the diskpart window to make the recovery partition a protected partition.
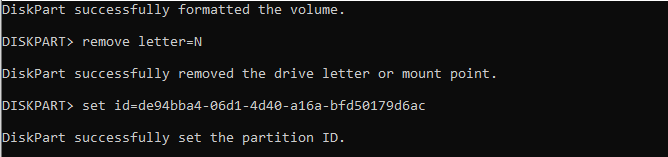
- Type “remove letter=N” (N is the drive letter you just added) and press Enter.
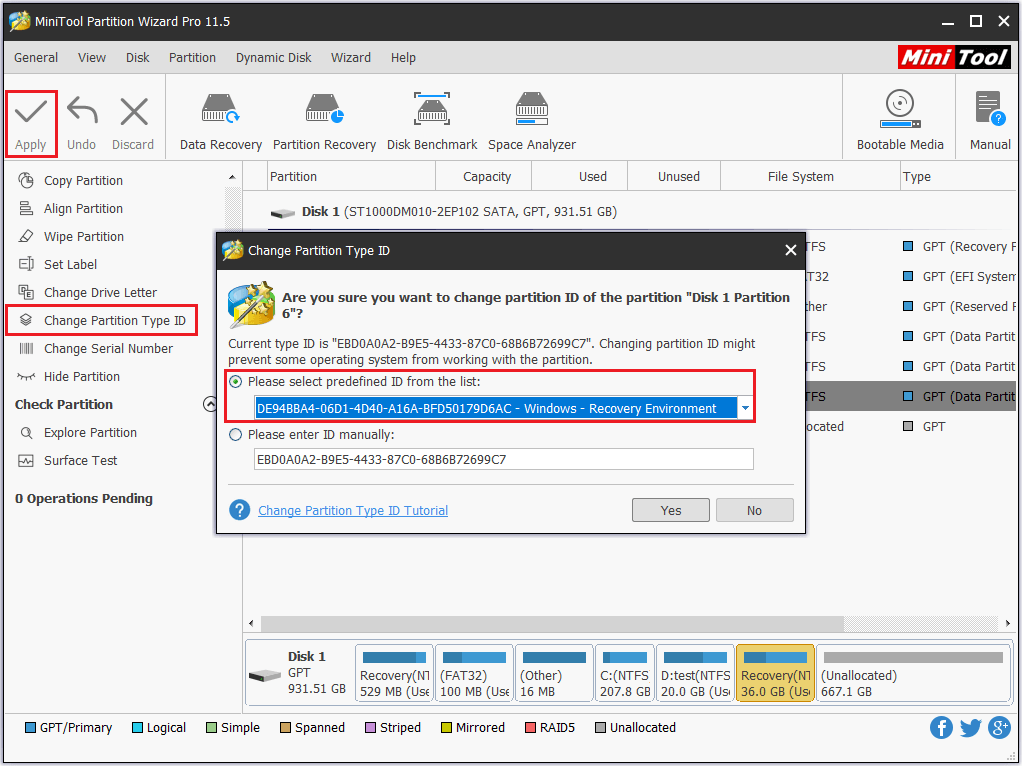
- Type “set id=de94bba4-06d1-4d40-a16a-bfd50179d6ac” and press Enter.
 Kind Remind: Step 9 can be finished easily by using the “Change Letter” & “Change Partition Type ID” features of MiniTool Partition Wizard.
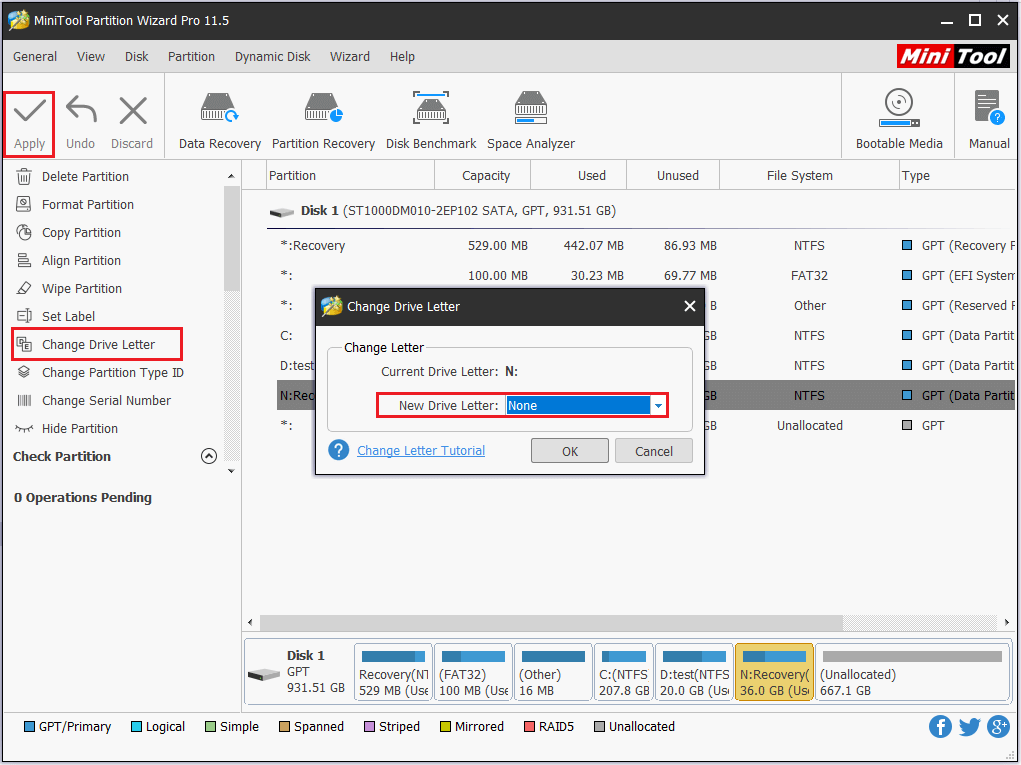
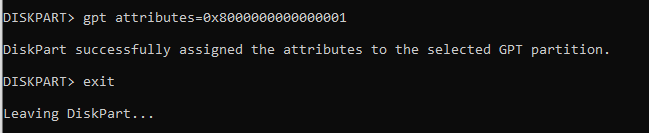
 Step 10. Now go back to the diskpart window with the following commands:
- Type “gpt attributes=0x8000000000000001” and press Enter.
- Type “exit” and hit Enter to quit diskpart. However, you are still in CMD.
 Step 11. Check whether a recovery partition is created successfully.
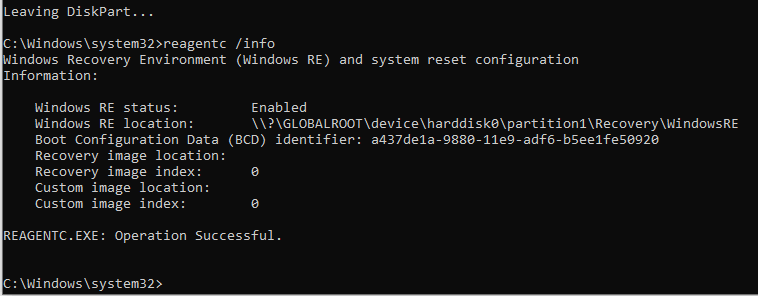
- Type “reagentc /info” and hit Enter.
- If you see the Windows RE status is Enabled, then the recovery partition is created successfully. At this time, Type “exit” and hit Enter to end CMD.
 After doing these, the recovery partition you created is missing from Windows Explorer. Now open Disk Management and you will see the attribute (not partition label) of this partition is Healthy (Recovery Partition).Click to tweet
Bottom Line
Here comes to the end of this article. Now you must have had a general understanding on what is recovery partition, can I delete recovery partition, how to delete recovery partition and how to restore recovery partition in Windows 7/8/10. Hope you can benefit from this post. If you have any questions or suggestions, you can leave us comments below or directly contact [email protected], thanks in advance!About The Author

Position: Columnist
Rodin is an enthusiastic IT writer focusing on Windows trends, disk partition management and data recovery. She loves to write and share her idea about the useful tips and tricks on personal computers' maintenance. If you are looking for methods to improve your computer performance, manage hard drives and recover data from different devices, Rodin can provide reliable solutions for data management.
User Comments :