In this post, Partition Magic summarizes the reasons and methods for increasing C drive partition. By following the instructions, you can extend C drive on basic disks and dynamic disks with ease. Additionally, it tells you what to do if you can’t extend C drive.
Reasons for Increasing C Drive Partition
The C drive is typically the place where the operating system, system files, and default programs are stored. As the primary drive or partition, it enables your computer to boot and function properly.
Therefore, you should ensure that the C drive always has abundant space. Insufficient disk space can trigger issues like slow PC startup, programs opening slowly, PC freezing/lagging/crashing, Windows Updates failure, etc.
If you have configured a low disk space alert, you will receive a notification if the disk space is running out. You can also enable storage usage bar to view the available disk space in real-time. Once the free space is lower than 10% of the total space, you will receive the low disk space warning: the partition bar turns red.
To improve the computer performance and fix these terrible issues, you have to increase C drive partition. How to do that? This post offers you detailed methods in different cases (on basic and dynamic disks). According to your situation, apply the corresponding method to expand C drive.
Further reading:
To avoid C drive low disk space issue, you can refer to these advices. They will help you prevent C drive full problem.
1. Run Disk Cleanup or Storage Sense regularly to free up disk space. Disk Cleanup is a Windows built-in utility that can delete temporary files, Recycle Bin files, unimportant system files, etc. If you turn on Storage Sense in Settings, it will automatically free up space by removing file you don’t need.
2. Install programs and games on other drives instead of the C drive. Programs and games are space-consuming, so consider installing them on other drives of the disk.
3. Transfer large files to other drives, external drives, or the cloud. This is also a great way to release disk space.
Case 1: The C Drive Is on a Basic Disk
If the C drive is located on a basic disk, you can extend C drive by taking free space from the same disk. Here, I show you how to extend C drive in Windows 10 via DiskPart, Disk Management, and MiniTool Partition Wizard in detail.
Option 1: Use DiskPart
DiskPart is a Windows command-line utility, which enables you to run various tasks by executing corresponding commands. For instance, it can create/format/extend/shrink partitions, assign drive letter, convert MBR to GPT, wipe disks, etc.
Here, I will show you how to extend C drive via DiskPart.
Step 1: Open the Run window by holding the Windows and R keys.
Step 2: Type diskpart in the Run window and press the Ctrl + Shift + Enter keys.
Step 3: In the UAC (User Account Control) window, click Yes to continue.
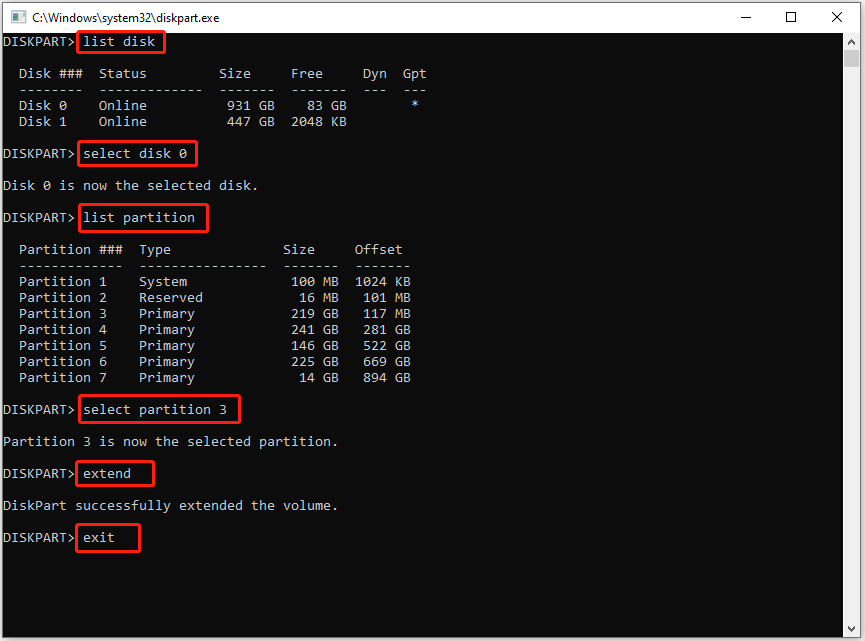
Step 4: In the DiskPart window, type the following commands in order and hit Enter after each.
- list disk
- select disk 0 (Replace 0 with the number of the disk that contains the C drive)
- list partition
- select partition 3 (Replace 3 with the partition number of the C drive)
- extend (This will take all the unallocated space adjacent to the C drive. To take the desired amount of free space, type extend size=x; x refers to the size in MB used to extend to the C drive.)
- exit
Option 2: Use Disk Management
Disk Management is a built-in disk management tool on Windows. It is capable of creating, formatting, extending, shrinking, and deleting partitions. Moreover, it helps you initialize disks, convert a basic disk to dynamic one, convert between MBR and GPT, change drive letter and paths, mark partition as active, etc.
In this scenario, you can extend C drive with Disk Management. Like DiskPart, it requires adjacent unallocated space behind the C drive. Otherwise, you will find that the Extend Volume option is greyed out, making it impossible to extend the C drive with this tool.
Additionally, the file system of the C drive must be NTFS or ReFS, or you will fail to extend the C drive. If you are ready, follow the steps below to extend the C drive.
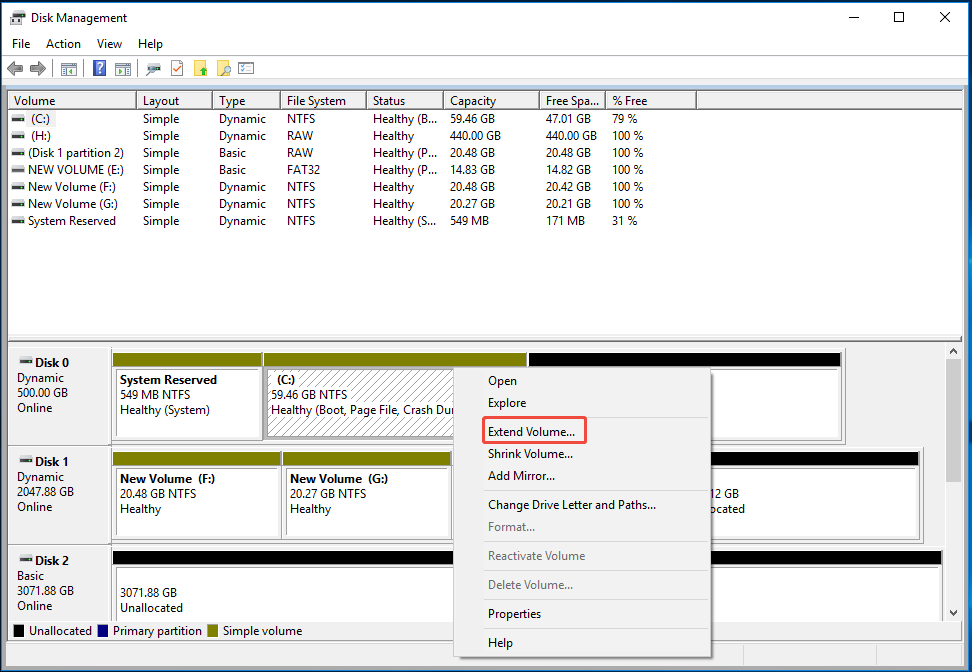
Step 1: Right-click the Start icon and then hit Disk Management on the prompted menu.
Step 2: Right-click the C drive and select Extend Volume.
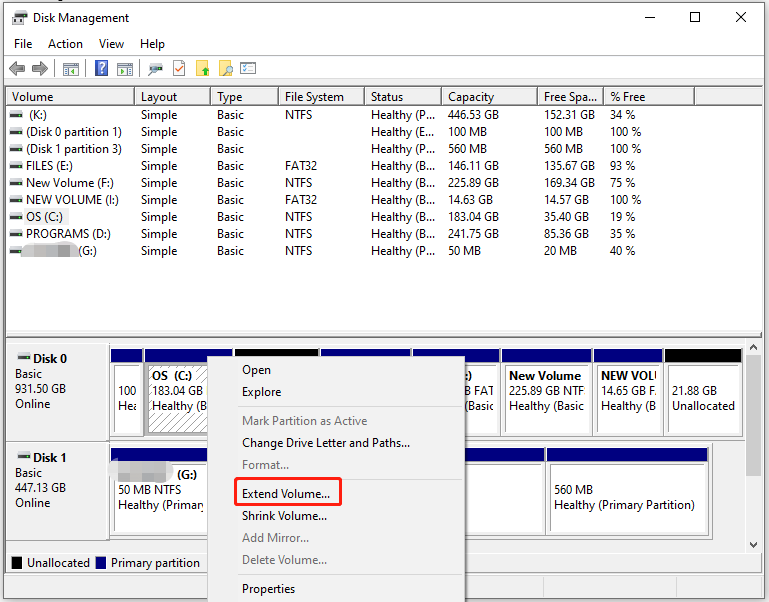
Step 3: Hit Next to move on.
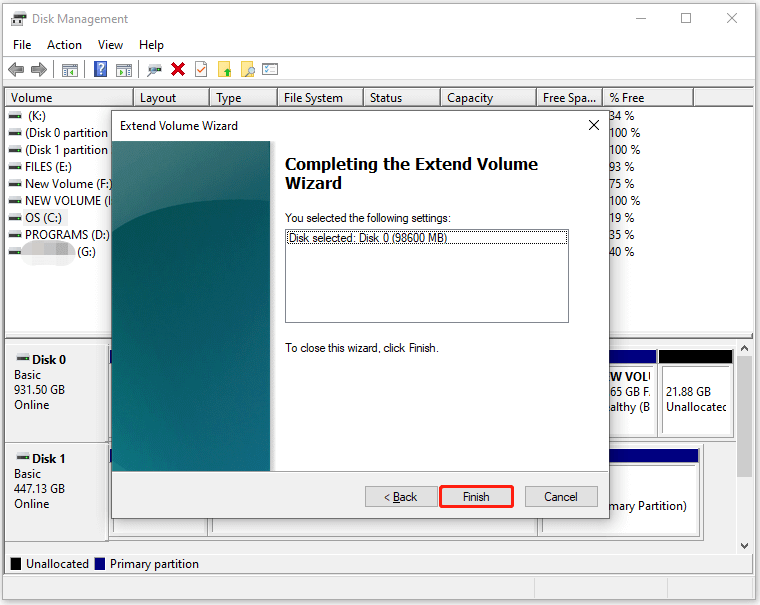
Step 4: Select the amount of disk space to add by typing the specific number. Then click the Next button.

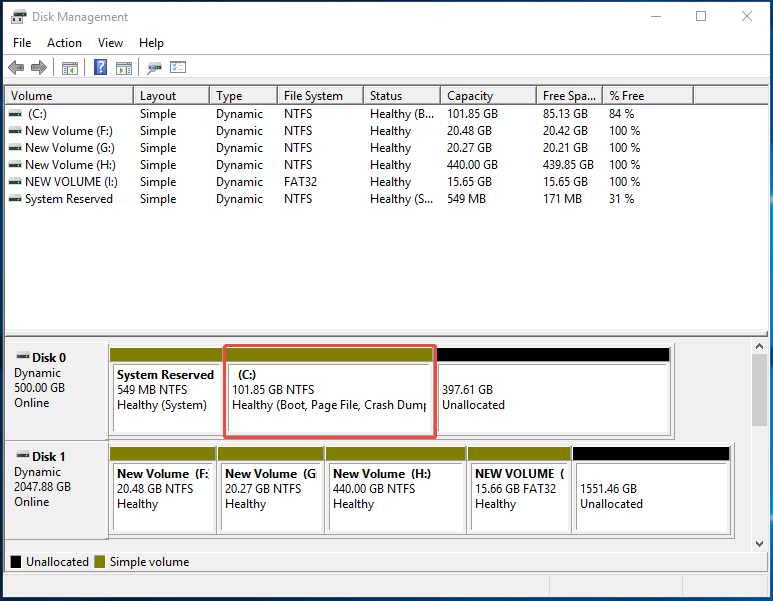
Step 5: Tap on the Finish button to save changes and execute the operation.
As you see, DiskPart and Disk Management have certain limitations. Furthermore, you need to calculate the size in MB manually while using the two built-in tools, which is troublesome especially if you don’t know how to convert. To increase C drive partition more efficiently, you can use third-party software like MiniTool Partition Wizard.
Option 3: Use MiniTool Partition Wizard Free Edition
Unlike DiskPart and Disk Management, MiniTool Partition Wizard can extend the C drive without requiring adjacent unallocated space. Additionally, you don’t need to need to manually calculate and enter partition sizes in MB.
Its Extend feature enables you to directly take space from other partitions or unallocated space on the same disk, while the Move/Resize feature can extend a drive to contiguous free space easily.
As a multifunctional partition manager, MiniTool Partition Wizard boasts nearly all features of DiskPart and Disk Management. Besides, it includes some advanced features that are not available in Windows built-in tools, such as Disk Benchmark, Space Analyzer, Migrate OS to SSD/HD, Convert NTFS to FAT, Partition/Data Recovery, etc.
Click the button below to download MiniTool Partition Wizard. Then install the software by following the prompted instructions and expand C drive with these steps.
MiniTool Partition Wizard FreeClick to Download100%Clean & Safe
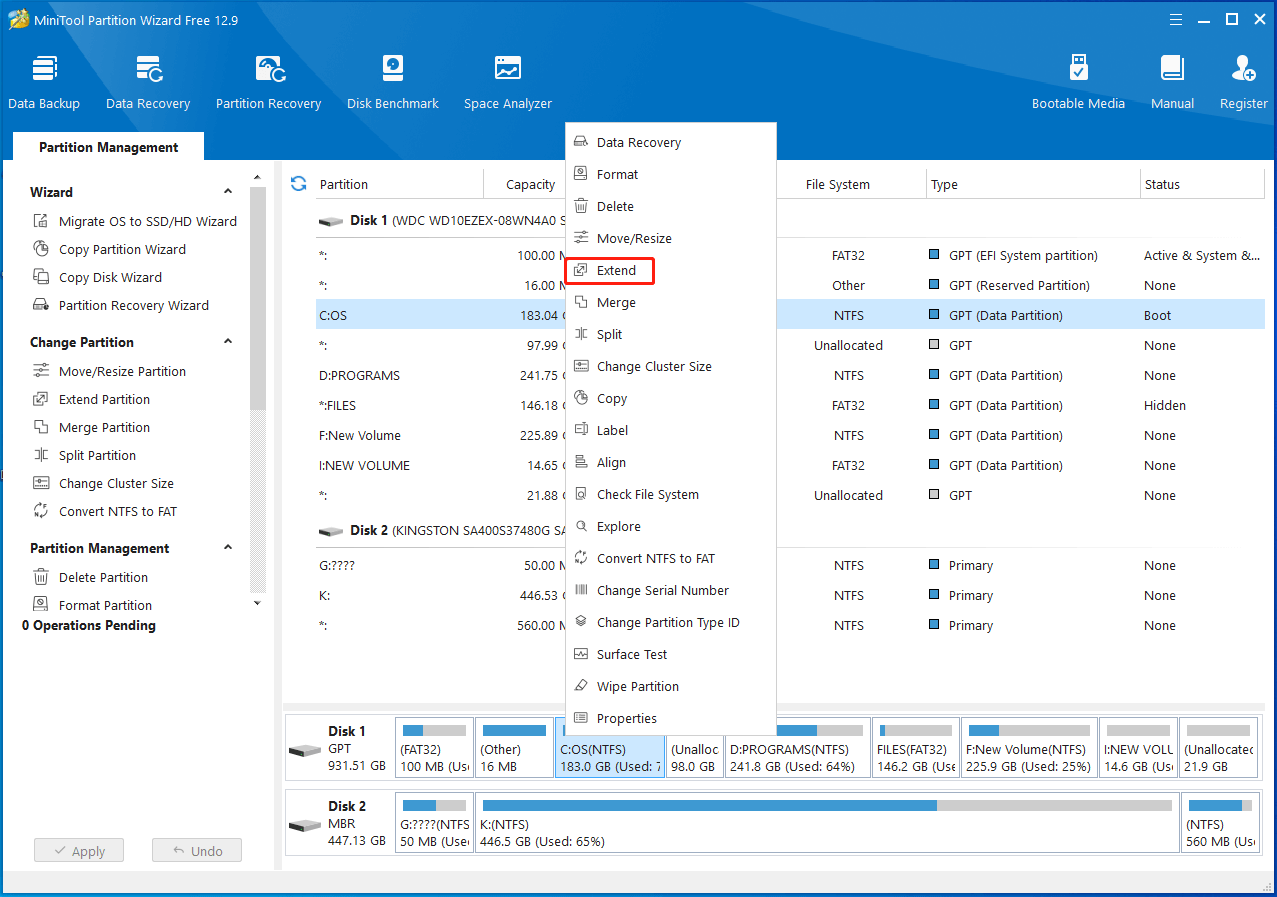
Step 1: Launch MiniTool Partition Wizard to enter its main interface.
Step 2: Right-click the C drive and hit the Extend option.
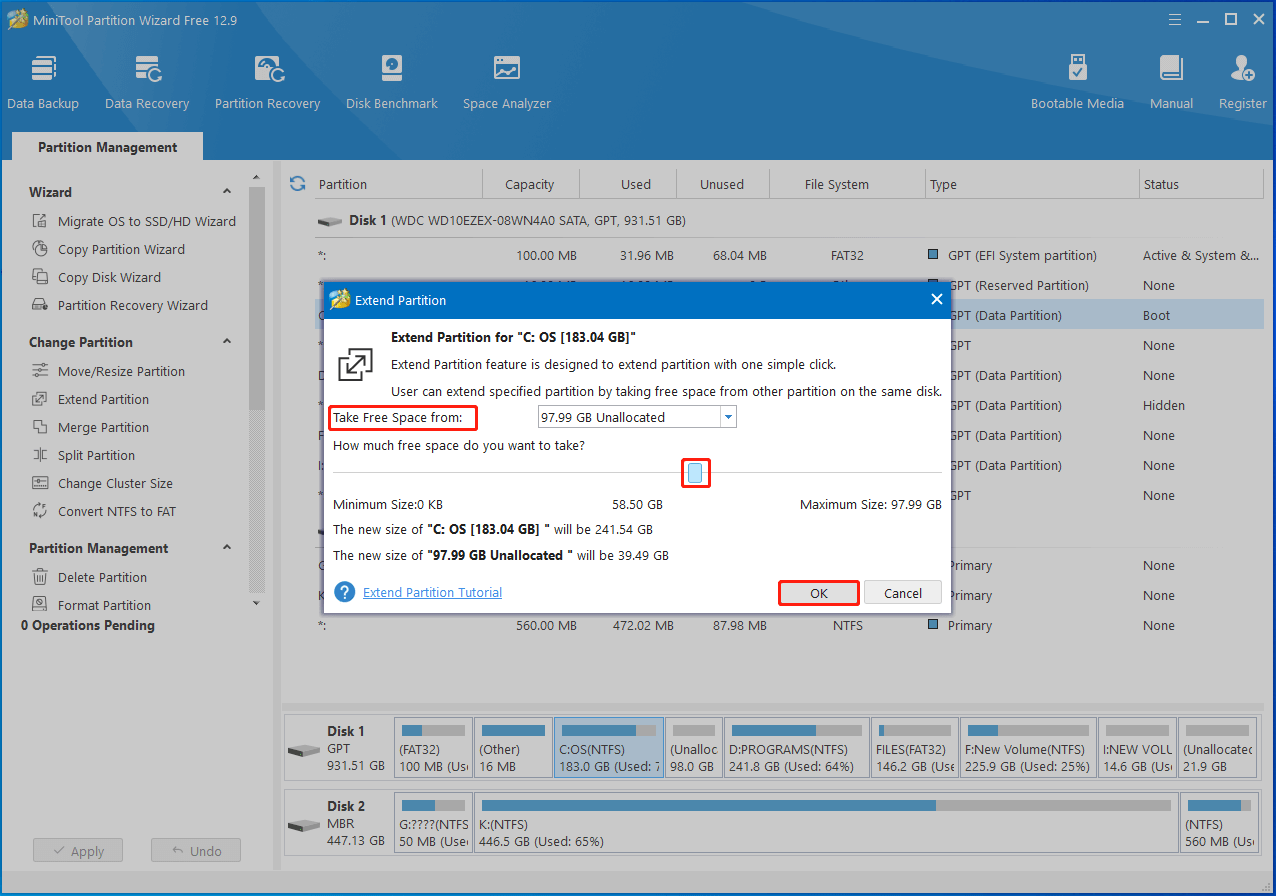
Step 3: Take free space and click OK to save changes.
- Open the Take Free Space from drop-down menu and select a partition or unallocated space.
- Move the blue slider to decide the amount of space to take.
- Hit the OK button.
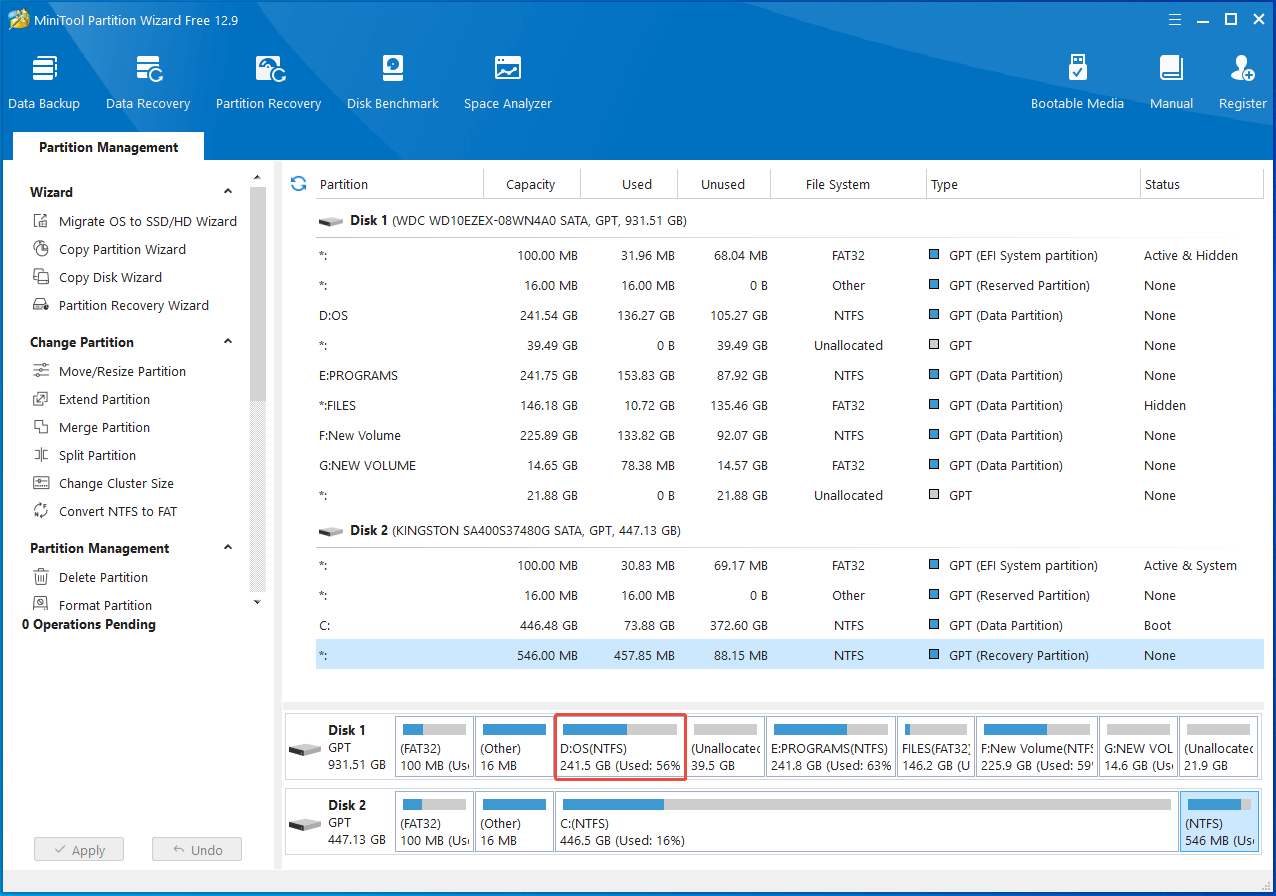
Step 4: Tap on Apply > Yes to execute the operation. Once done, the result will be displayed as follows.
How to enlarge a partition via the Move/Resize feature? Here’s the online tutorial. You can refer to it to increase C drive partition.
Up to now, 3 feasible methods to expand C drive on the basic disk have been shown to you. Which method to use? DiskPart and Disk Management sometimes are unavailable, while MiniTool Partition Wizard 100% works. Now, you may have the answer.
Case 2: The C Drive Is on a Dynamic Disk
How to extend C drive in Windows 10 if it is located on a dynamic disk? Two available methods have been shown to you. Pick one method to increase C drive partition now!
Option 1: Use Disk Management
Disk Management can also help you manage dynamic disks, including extending C drive. Similar to basic disks, dynamic disks require adjacent unallocated space behind the C drive as well. Otherwise, you can’t extend C drive with Disk Management successfully.
If there is unallocated space contiguous to the C drive, follow the steps below to expand C drive through Disk Management.
Step 1: Open Disk Management on your computer.
Step 2: Right-click the C drive and tap Extend Volume.
Step 3: Hit Next in the prompted window.
Step 4: Choose the amount of space to extend and click OK.

Step 5: Click the Finish button to carry out the operation. Then you can view the result.
Option 2: Use MiniTool Partition Wizard Pro Edition
Since MiniTool Partition Wizard Free Edition can’t manage dynamic disks, you need to get the Pro or above editions to extend C drive on a dynamic disk. After installing the software, follow the steps below to complete the operation.
MiniTool Partition Wizard DemoClick to Download100%Clean & Safe
Step 1: Run MiniTool Partition Wizard.
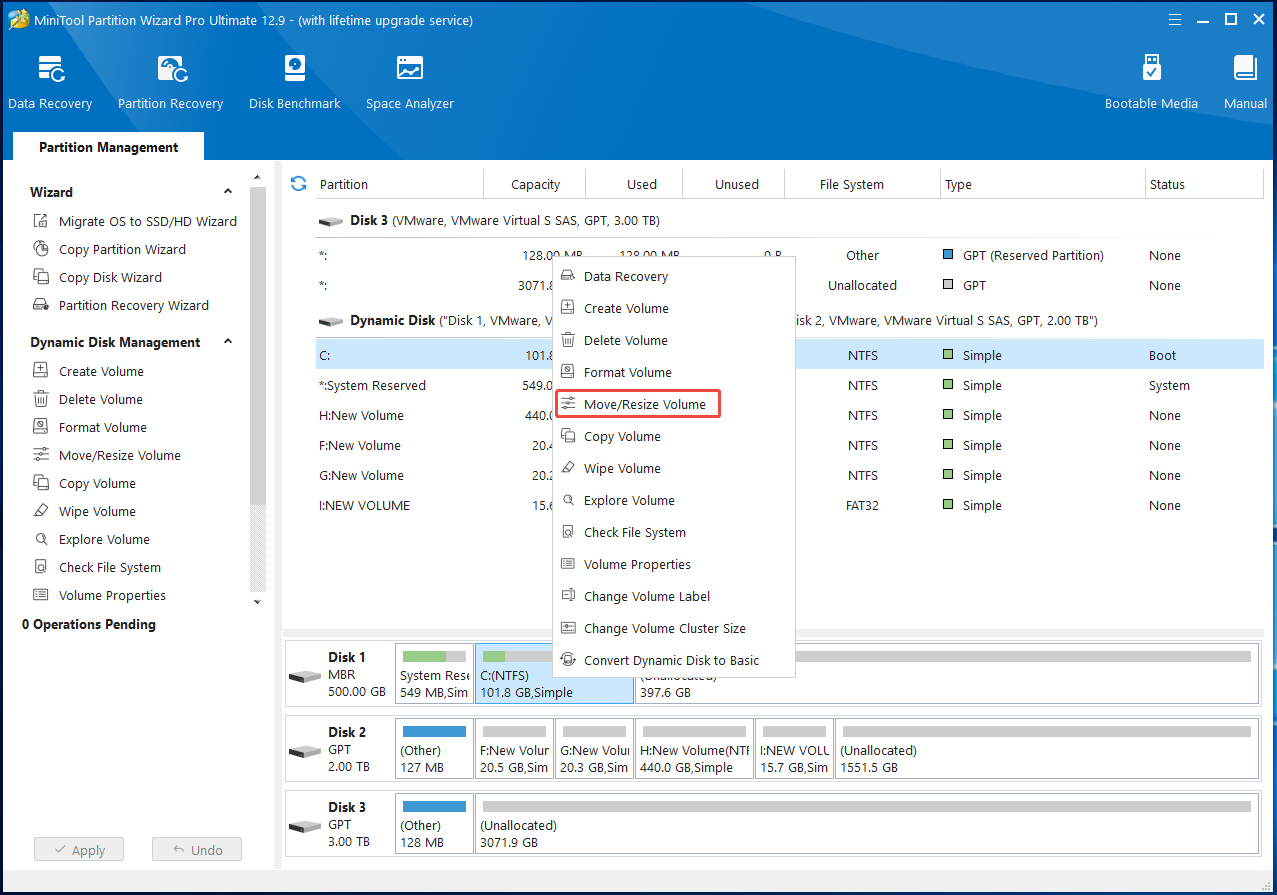
Step 2: Right-click the C drive and hit Move/Resize Volume. Alternatively, highlight the C drive and click Move/Resize Volume under the Dynamic Disk Management section in the left pane.
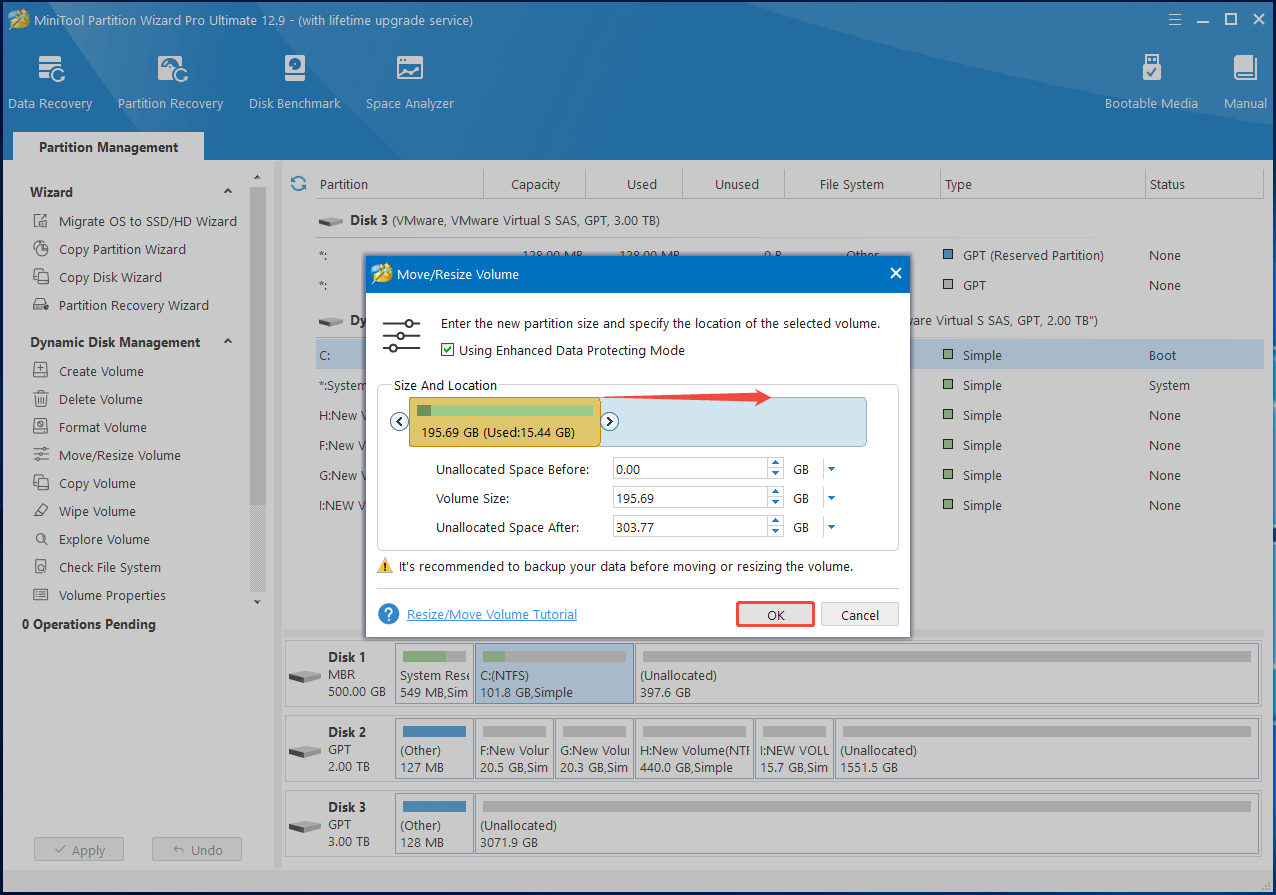
Step 3: In the prompted window, drag the arrow icon right forward to occupy the unallocated space. You can also type the desired volume size in the corresponding field. After that, click OK to save changes.
Step 4: Click on Apply > OK to execute the operation.
Can’t Extend C Drive – How to Fix
As mentioned earlier, you sometimes fail to extend C drive. This can be caused by limitations of the tool you are using, or by the absence or incorrect location of unallocated space. According to the specific cause, take corresponding measures to resolve the problem.
- The unallocated space is not adjacent to the C drive: Windows built-in tools like DiskPart and Disk Management require adjacent unallocated space behind the C drive. In this case, you can utilize MiniTool Partition Wizard to extend the C drive or move the unallocated space to the desired location and extend it again.
- There’s no unallocated space on the disk: If so, you can’t increase C drive partition with Disk Management. To resolve the issue, you can either delete or shrink another partition to create unallocated space adjacent to C, or use a third-party partition manager, such as MiniTool Partition Wizard, to redistribute free space from other partitions on the same disk without manually creating unallocated space..
Bottom Line
In conclusion, this post explains the reasons for increasing C drive partition, collects methods for doing that on basic and dynamic disks, and tells you possible reasons and fixes for C drive extend failure. It is a full guide on how to extend C drive. If you plan to expand C drive, take this post as a reference.
For any issues that occur while you use MiniTool Partition Wizard, contact us by sending an email via [email protected]. We will get back to you as soon as possible.
User Comments :