If you tried to use GParted to resize partitions but GParted crashed during resize, you should pay attention to this post in which Partition Magic offers you steps to recover a disk after failed GParted resize. Moreover, it shows you how to extend partitions using GParted alternatives.
About GParted
GParted is an open-source partition manager that can graphically manage disk partitions. For instance, it can create, resize, move, copy, delete, label, check partitions, and set new UUID for partitions. It is also capable of creating partition tables, enabling/disabling partition flags, and aligning partitions to mebibyte or conventional cylinder boundaries.
What’s more, it can be used for data recovery, disk reorganization, and dual-boot setup cases. You are able to access all the features of GParted by using the GParted Live bootable image. GParted Live enables you to use GParted on x86-64 based computers running Windows, Linux, or Mac OS X systems.
GParted supports dozens of file systems, including exFAT, NTFS, FAT16/32, Ext2/3/4, btrfs, bcachefs, HFS/HFS+, UFS, XFS, UDF, reiserfs/reiser4, nilfs2, minix, lvm2 pv, and linux-swap. It means that partitions with these file systems can be recognized by GParted. The table below shows you available features of these supported file systems.
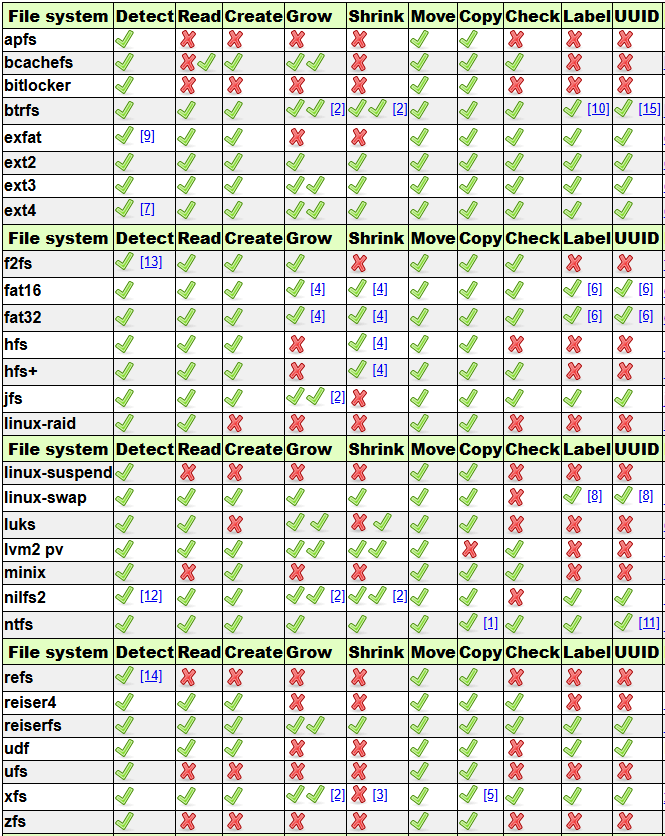
-image from gparted.org
As GParted is open-source, you can use it for free and have the freedom to run, study, copy, distribute, change, and improve it. Though GParted has so many advantages, it has drawbacks as well. It can prompt you with various errors during the process. For instance, you may receive errors like “GParted fails to move free space”, “GParted unable to read disk”, “GParted crashed during resize”, “GParted can’t resize NTFS partition”, etc.
GParted Resize Issues
Here, I mainly discuss GParted resize issues. When you go through forums, you will see various descriptions about GParted resize issues. Here are some common descriptions.
- Gparted crashed during resize. Can I recover data?
- Recover partition after GParted resizing interrupted by unexpected shutdown
- Data corrupted after using GParted Live to extend partition
- Partition corruption after resizing with GParted
- GParted: during a partition resize my NTFS partition gone, how can I recover it?
As you see, you may experience partition or data loss due to GParted resizing operation itself or issues with the resizing operation. Can you recover a disk after failed GParted resize? Of course, you can. Follow the instructions offered in the section below to recover the lost data or partition now!
Recover a Disk After Failed GParted Resize
You can recover a disk after failed GParted resize by using professional data recovery tools like TestDisk and MiniTool Partition Wizard. Like GParted, TestDisk is an open-source utility. It recovers deleted/lost partitions and data, rebuilds partition tables, rewrites the MBR (master boot record). However, TestDisk is hard to use unless you are specialized in it.
Differently, MiniTool Partition Wizard is an expertized data recovery tool – with a straightforward interface. It is user-friendly even for new beginners. Data recovery is one of the featured-functions of MiniTool Partition Wizard. It helps you perform USB data recovery, external hard drive data recovery, SSD data recovery, and other data recovery tasks.
Here, you can use it to recover data/partition after GParted resizing interrupted. Download, install, and launch the software on your computer. Then follow the steps to finish the recovery process.
MiniTool Partition Wizard DemoClick to Download100%Clean & Safe
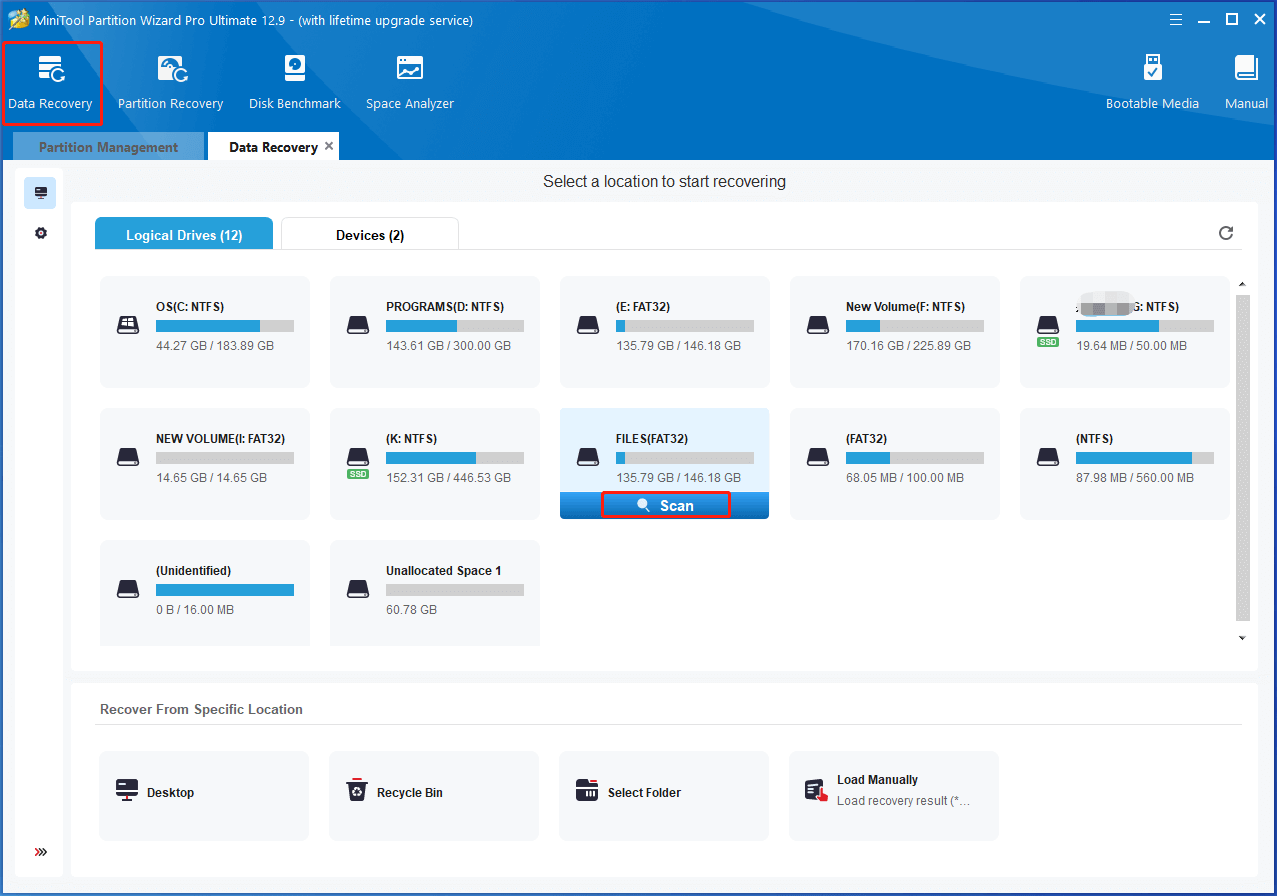
Perform Data Recovery with MiniTool Partition Wizard
Step 1: Click Data Recovery to open the wizard. Then hover over the resize failed partition, and click the Scan button.
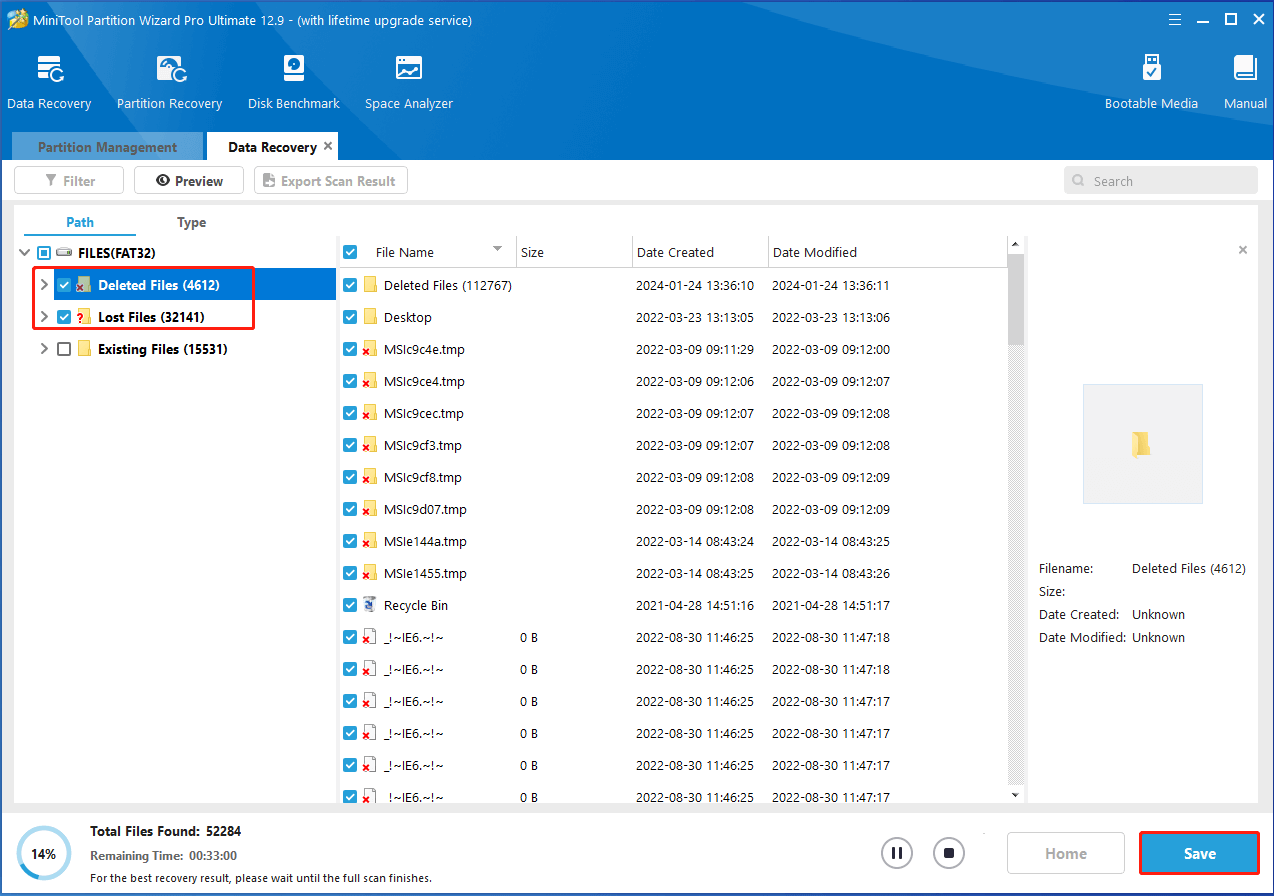
Step 2: The software will scan the selected partition for lost/deleted data. Wait for the finish of the process or until you find the needed data.
Step 3: Locate and select the needed data, and then click the Save button.
Step 4: Choose a directory for the recovered data and click OK to save changes.
Perform Partition Recovery with MiniTool Partition Wizard
Step 1: Tap on Partition Recovery on the tool bar and then click Next.
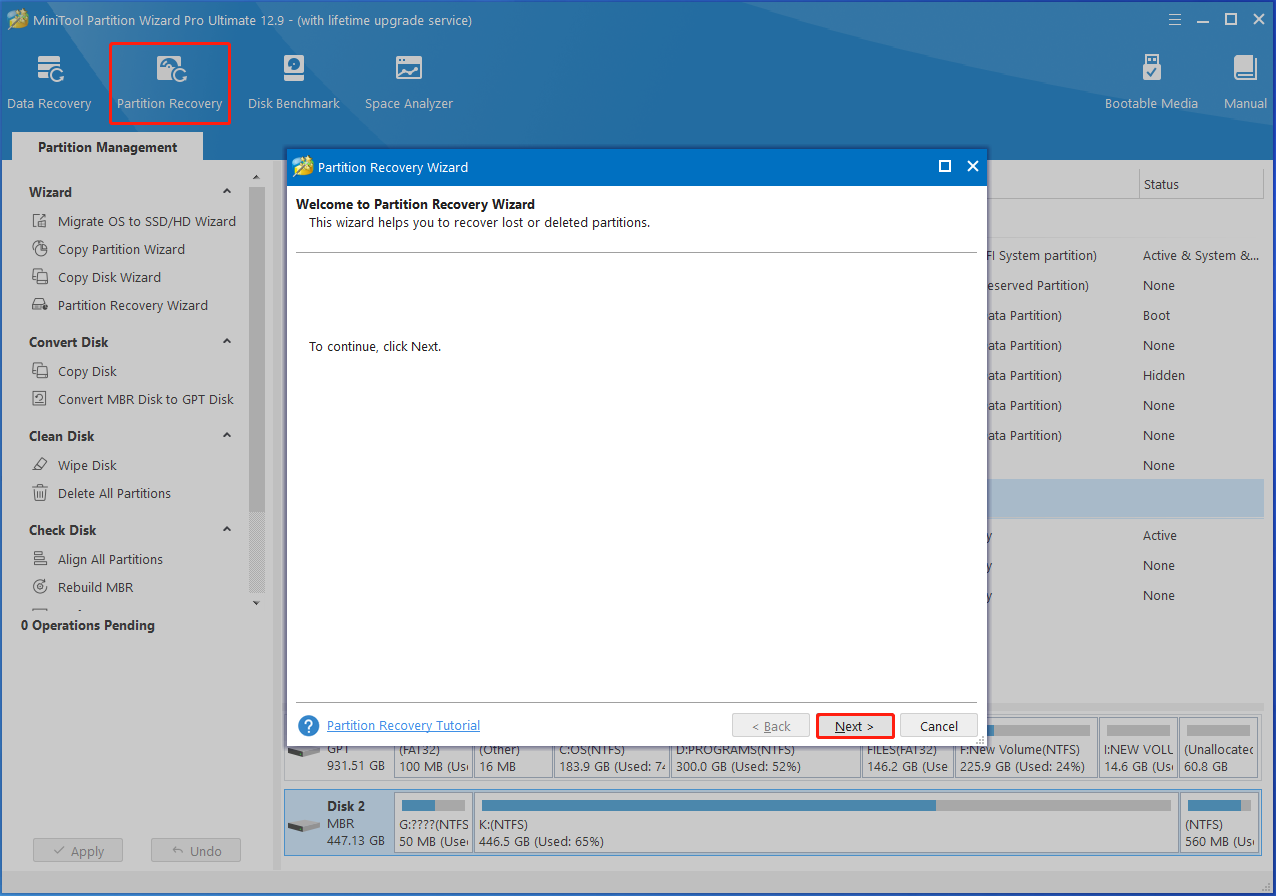
Step 2: Select the disk in which the lost partition is located and click the Next button.
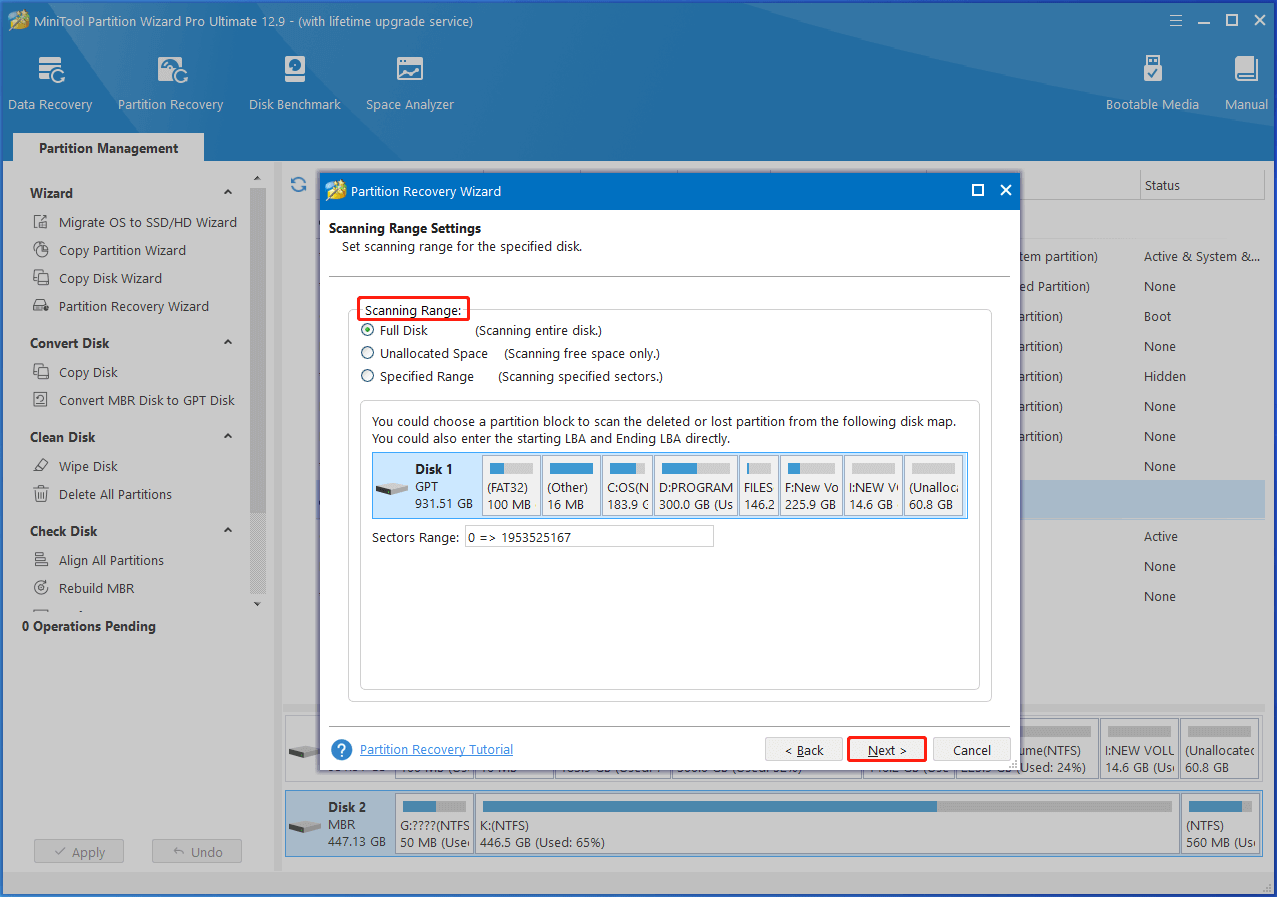
Step 3: Select a scanning range from the given options and click Next. In this scenario, I choose Full Disk.
- Full Disk: The entire disk will be scanned.
- Unallocated Space: The software only scans free space for the deleted or lost partition.
- Specified Range: The software scans the specified sectors to find the lost or deleted partition.
Step 4: Pick a scanning method and click Next.
- Quick Scan: It restores your partition if your lost/deleted partitions are continuous. When program finds a lost/deleted partition, it will jump to the end of the partition to continue scanning other lost/deleted partitions.
- Full Scan: It will scan every sector of specified scanning range. If Quick Scan cannot find lost partition(s), try Full Scan to locate partition(s).
Step 5: Wait for the finish of the scanning process. Once done, choose all needed partitions including existing and lost ones, and click Finish.

Step 6: As the recovered partition has no drive letter, you need to assign one for it. Right-click the target partition and hit Change Letter. Then follow the prompted instructions to complete the operation.
Extend Partitions with GParted Alternatives
Though GParted is free and multifunctional, it is difficult to use for ordinary users and can prompt various errors. What’s worse, it doesn’t have dedicated customer support teams. Once GParted crashed during resize or other errors occurred in use, you can’t get official support in time. Instead, you can only refer to tips in community or forums.
Therefore, it’s necessary to seek an alternative to GParted. Here, I will show you how to extend partitions with GParted alternatives.
#1: Use MiniTool Partition Wizard
MiniTool Partition Wizard is an all-in-one partition manager for Windows PCs. It can create, extend, format, shrink, resize, merge, split, copy, align, delete, wipe, and recover partitions. Moreover, it also enables you to convert MBR to GPT, clone hard drives, migrate OS to SSD/HDD, convert FAT to NTFS, change drive letter, etc.
It works with multiple storage devices, including SSDs, HDDs, dynamic disks, external hard drives, USB flash drives, and SD cards. It means that you can apply all the features on these storage devices. You can obtain 24/7 technical support if you have issues with the software.
Now, get it installed and then use it to extend partitions. It’s worth noting that MiniTool Partition Wizard allows you to take space from non-contiguous partitions or unallocated space to extend the target partition.
MiniTool Partition Wizard FreeClick to Download100%Clean & Safe
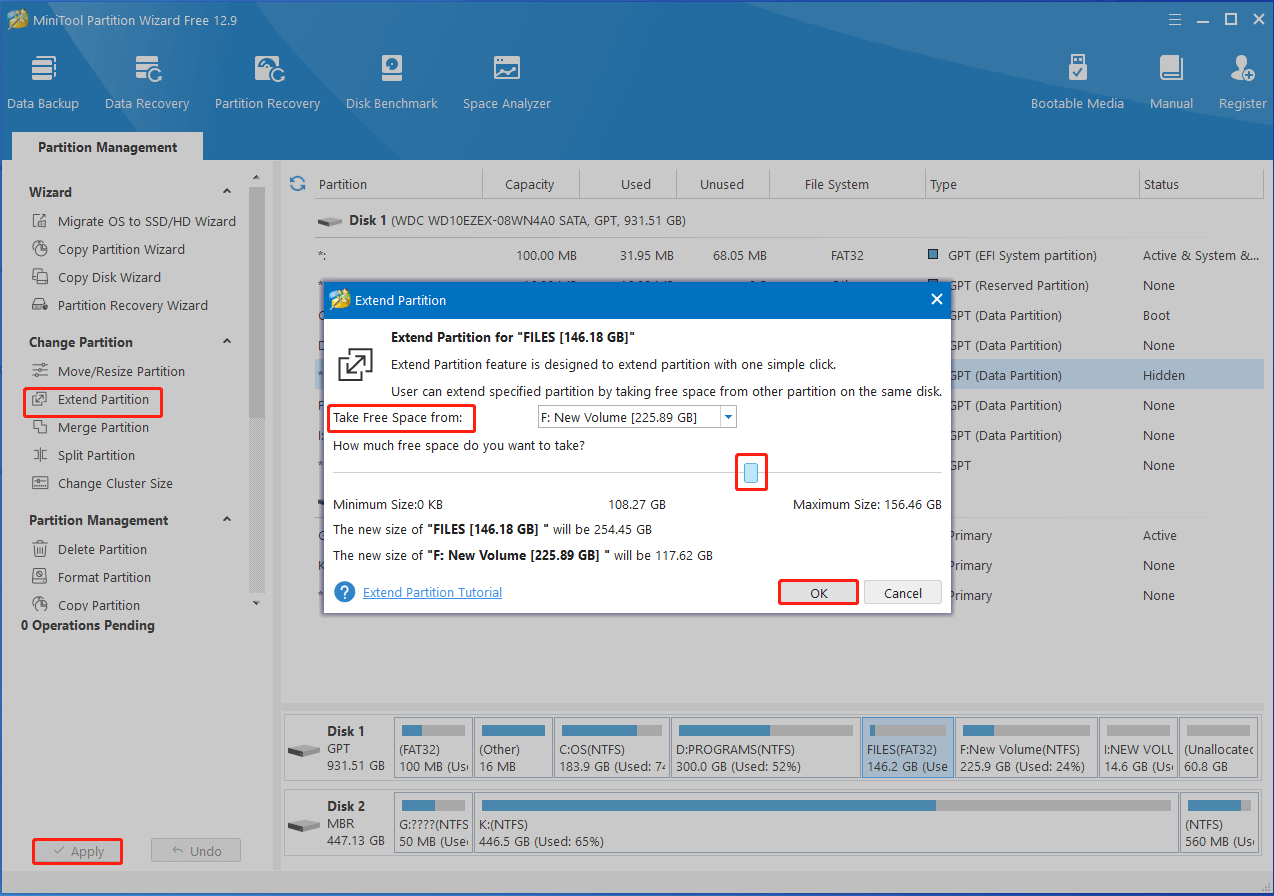
Step 1: After entering the main interface of MiniTool Partition Wizard, right-click the target partition and hit the Extend option on the context menu. Alternatively, click on the partition and click Extend Partition under the Change Partition section in the left pane.
Step 2: In the prompted window, choose unallocated or a partition from the drop-down menu, drag the blue block to decide the amount of disk space to take, and click OK to save changes.
Step 3: Finally, click Apply > Yes to execute the pending operation.
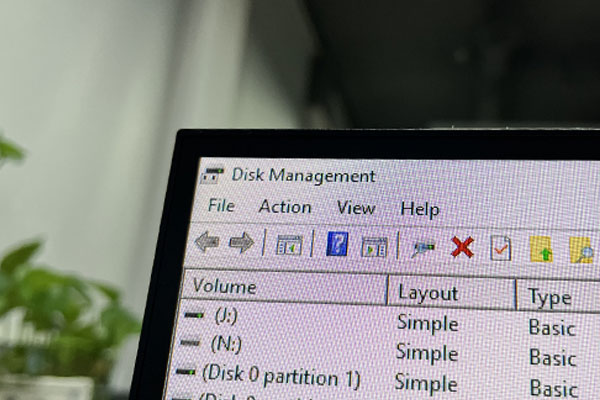
#2: Disk Management
Built-in Windows systems, Disk Management is a totally free partition manager offered by Microsoft. It has a graphical interface and is easy to use. With this utility, you can perform multiple operations related to partitions and disks.
It allows you to initialize disks, convert GPT/MBR, and convert to dynamic disk. Based on that, you can mark partition as active, create/format/extend/shrink/delete partitions, and change drive letter and paths. Once GParted crashed during resize, try using Disk Management to extend partitions.
Step 1: Open Disk Management on your computer. There are several ways to access Disk Management.
- Right-click the Start icon to open the Start menu and click Disk Management.
- Open the Start menu, click Computer Management, and hit Disk Management under the Storage option.
- Open the Run window, type diskmgmt.msc, and press Enter.
- Type create and format hard disk partitions in the search box and click Open under the matching search result.
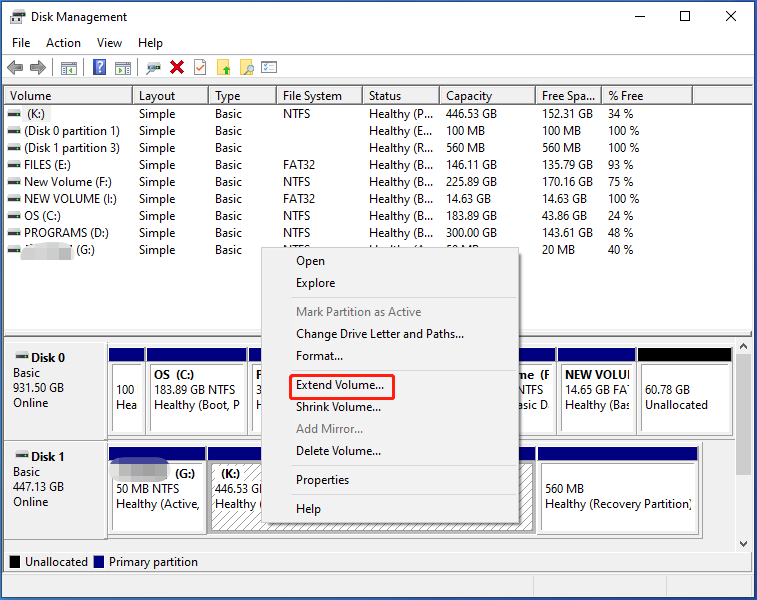
Step 2: Right-click the target partition and choose Extend Volume on the context menu.
Step 3: In the Extend Volume Wizard window, click the Next button.
Step 4: Input the amount of space (in MB) you want to extend the volume by. Then click Next to continue.
Step 5: Follow the on-screen instructions to finish the process.
#3: Use DiskPart
Like Disk Management, DiskPart is also a built-in utility on Windows computers. It is a command-line tool that helps you perform various tasks by running corresponding command lines. To extend partitions with DiskPart, you can refer to the following steps.
Step 1: Type cmd in the search box and click Run as administrator under Command Prompt.
Step 2: In the UAC window, click the Yes button.
Step 3: In Command Prompt, type the following commands and hit Enter after each.
- diskpart
- list disk
- select disk 0 (replace 0 with the target disk number)
- list partition
- select partition 3 (replace 3 with the number partition to extend)
- extend size=1024 (the unit of the number is MB. You can change the number with the desired partition size)

Step 4: After the partition is extended successfully, type exit and hit Enter.
Wrap Things Up
This post discusses GParted resize issues, including GParted crashed during resize. Then it shows you how to recover a disk after failed GParted resize with MiniTool Partition Wizard. After that, it offers you steps to extend partitions with GParted alternatives.
If you encounter any issues while using MiniTool Partition Wizard, contact us by sending an email via [email protected]. We will get back to you as soon as possible.
User Comments :