If your C drive is almost full, your computer may become slow, freeze frequently, fail to install Windows updates, or display low disk space warnings. This post offers solutions to increase C drive partition using Disk Management, DiskPart, and MiniTool Partition Wizard.
The C drive is typically the place where the operating system, system files, and default programs are stored. As the primary drive or partition, it enables your computer to boot and function properly.
Therefore, you should ensure that the C drive always has abundant space.
If your C drive is almost full, you may notice:
- Low disk space warning
- Slow system startup
- Windows updates failing
- Programs freezing or crashing
- Red storage bar in File Explorer
- Insufficient storage errors
Fortunately, you can increase C drive partition without reinstalling Windows by using Disk Management, DiskPart, or MiniTool Partition Wizard.
Now, depending on your situation (basic or dynamic disks), apply the appropriate methods to expand C drive.
To extend C drive on the basic disk, here are three tools:
- Use Disk Management if unallocated space is directly to the right of your C drive.
- Use DiskPart only if you are an advanced user working in a command-line or recovery environment with an ideal partition layout.
- Use MiniTool Partition Wizard if there are recovery or data partitions blocking the path between your C drive and the unallocated space.
Method 1. Increase C Drive Partition via Disk Management
Disk Management is a built-in Windows utility designed for managing disks and partitions. It allows you to create, format, extend, shrink, delete partitions, and perform other disk-related tasks.
You can use Disk Management to extend the C drive if there is no contiguous unallocated space. Or, the Extend Volume option will appear greyed out.
Furthermore, the C drive must use the NTFS or ReFS file system. Otherwise, the extend operation will fail. If your system meets these requirements, you can follow the steps below to extend the C drive successfully.
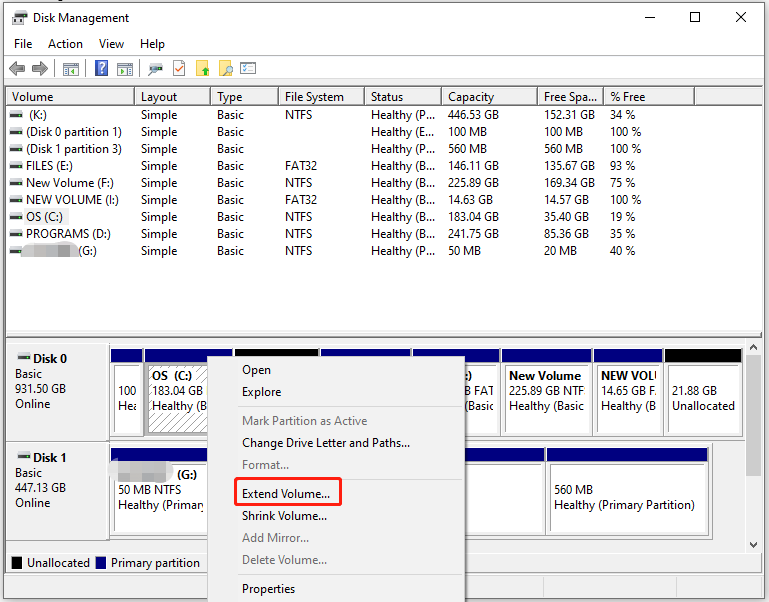
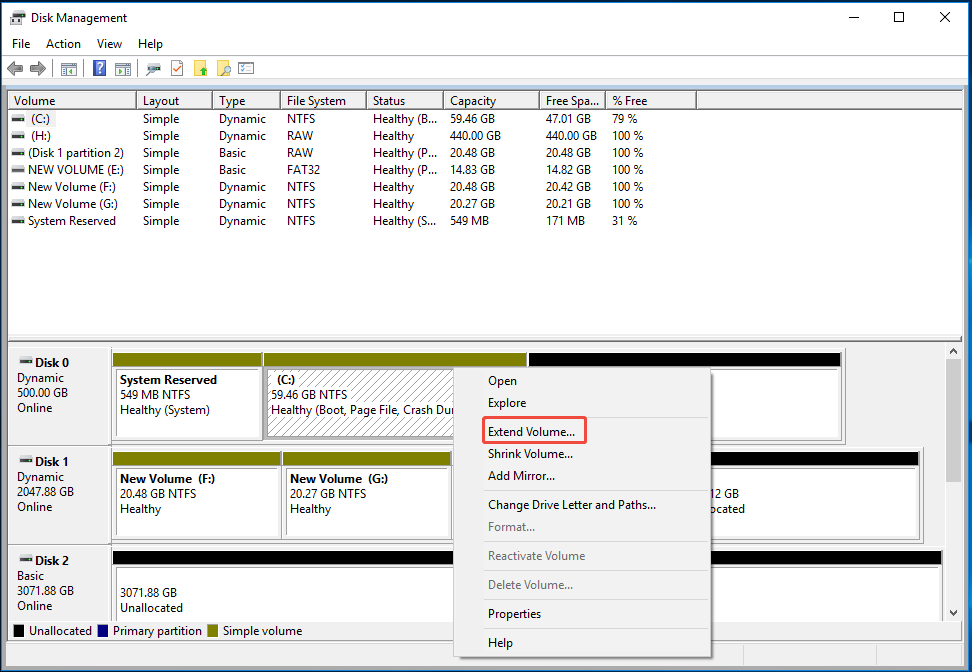
Step 1: Right-click the Start icon and then hit Disk Management on the prompted menu.
Step 2: Right-click the C drive and select Extend Volume.
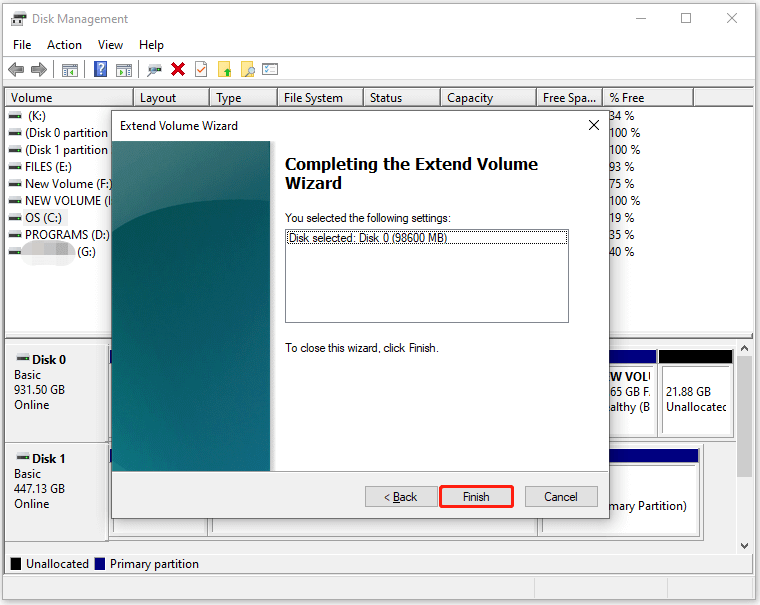
Step 3: Hit Next to move on.
Step 4: Select the amount of disk space to add by typing the specific number. Then click the Next button.

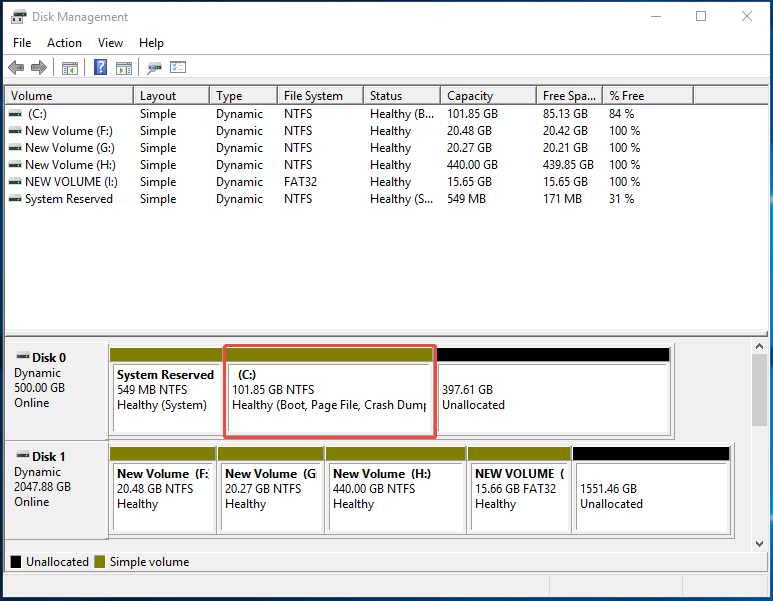
Step 5: Tap on the Finish button to save changes and execute the operation.
Method 2. Increase C Drive Partition via DiskPart
DiskPart is a Windows command-line utility that enables you to run various disk-related tasks by executing corresponding commands.
However, just like Disk Management, this tool requires adjacent unallocated space located directly behind the C drive, and the file system of the C drive is NTFS or ReFS.
Here, I will show you how to extend C drive via DiskPart.
Step 1: Open the Run window by holding the Windows and R keys.
Step 2: Type diskpart in the Run window and press the Ctrl + Shift + Enter keys.
Step 3: In the UAC (User Account Control) window, click Yes to continue.
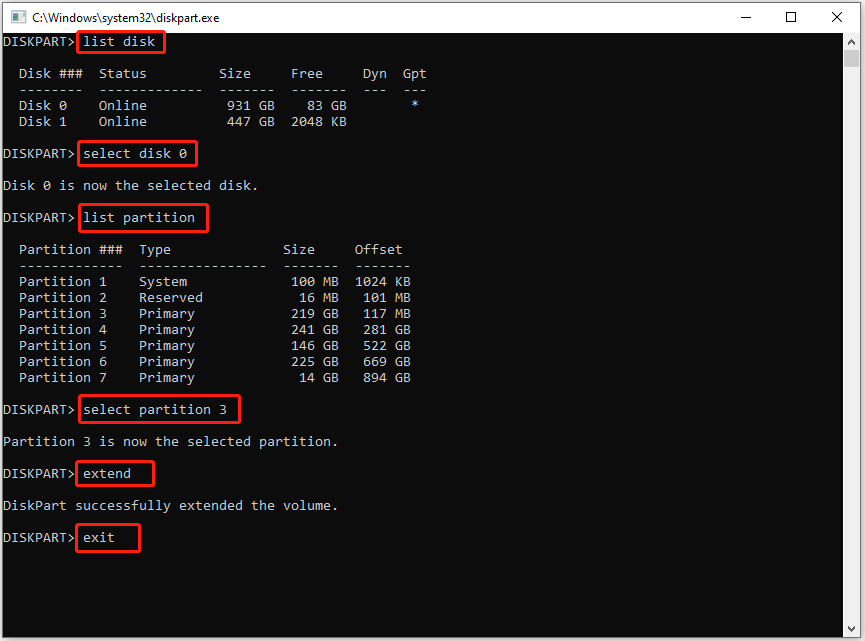
Step 4: In the DiskPart window, type the following commands in order and hit Enter after each.
- list disk
- select disk 0 (Replace 0 with the number of the disk that contains the C drive)
- list partition
- select partition 3 (Replace 3 with the partition number of the C drive)
- extend (This will take all the unallocated space adjacent to the C drive. To take the desired amount of free space, type extend size=x; x refers to the size in MB used to extend to the C drive.)
- exit
Method 3. Increase C Drive Partition via MiniTool Partition Wizard
MiniTool Partition Wizard, a free partition manager, offers 2 features to help you easily increase the C drive partition.
- Extend Partition: This feature can directly take free space from any other existing partitions. or unallocated space (not required to be adjacent to the right side of C) to expand a partition on the same disk.
- Move/Resize Partition: This feature is suitable when there is unallocated space before or after the partition.
Here are the steps to use the Extend Partition feature:
MiniTool Partition Wizard FreeClick to Download100%Clean & Safe
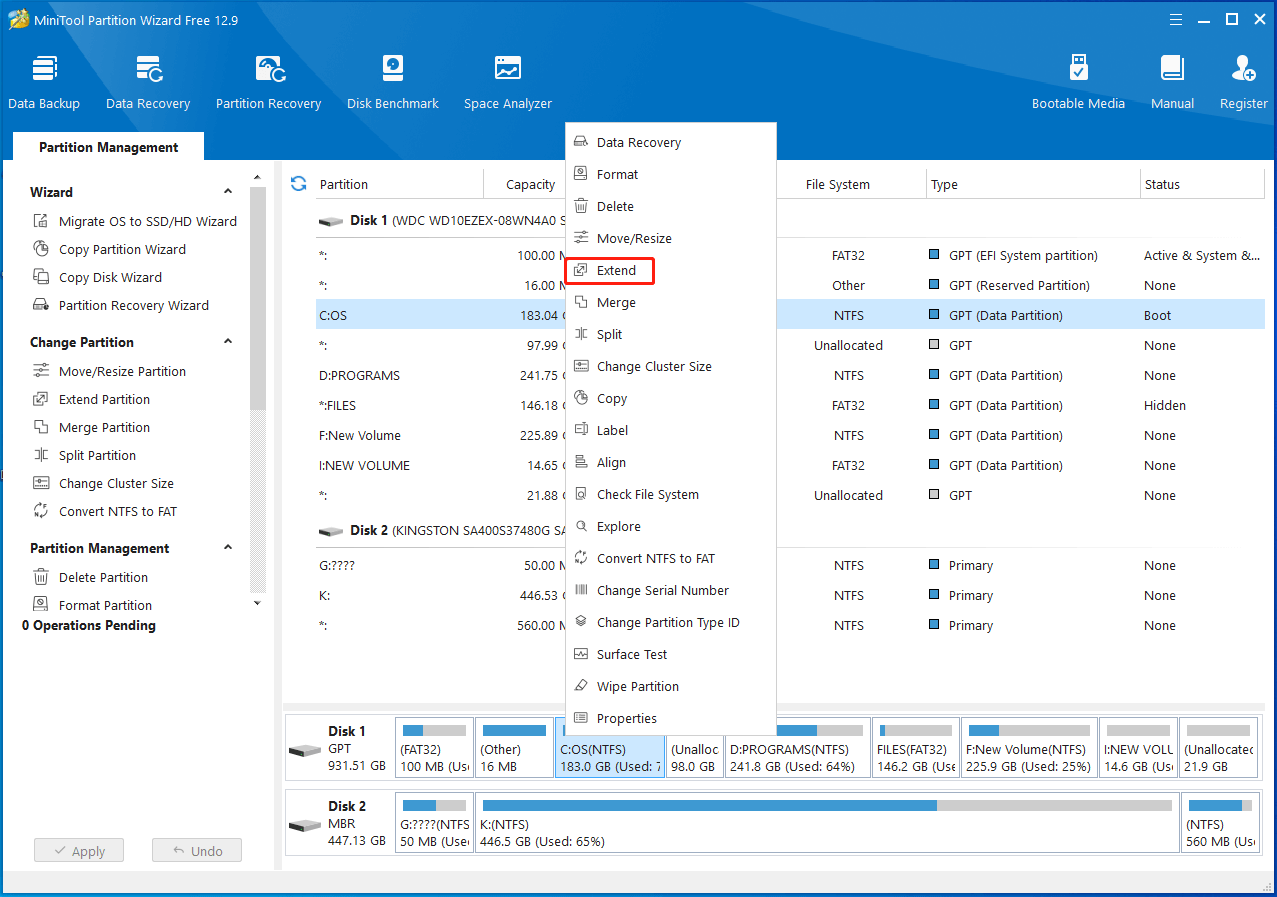
Step 1: Launch MiniTool Partition Wizard to enter its main interface.
Step 2: Right-click the C drive and hit the Extend option.
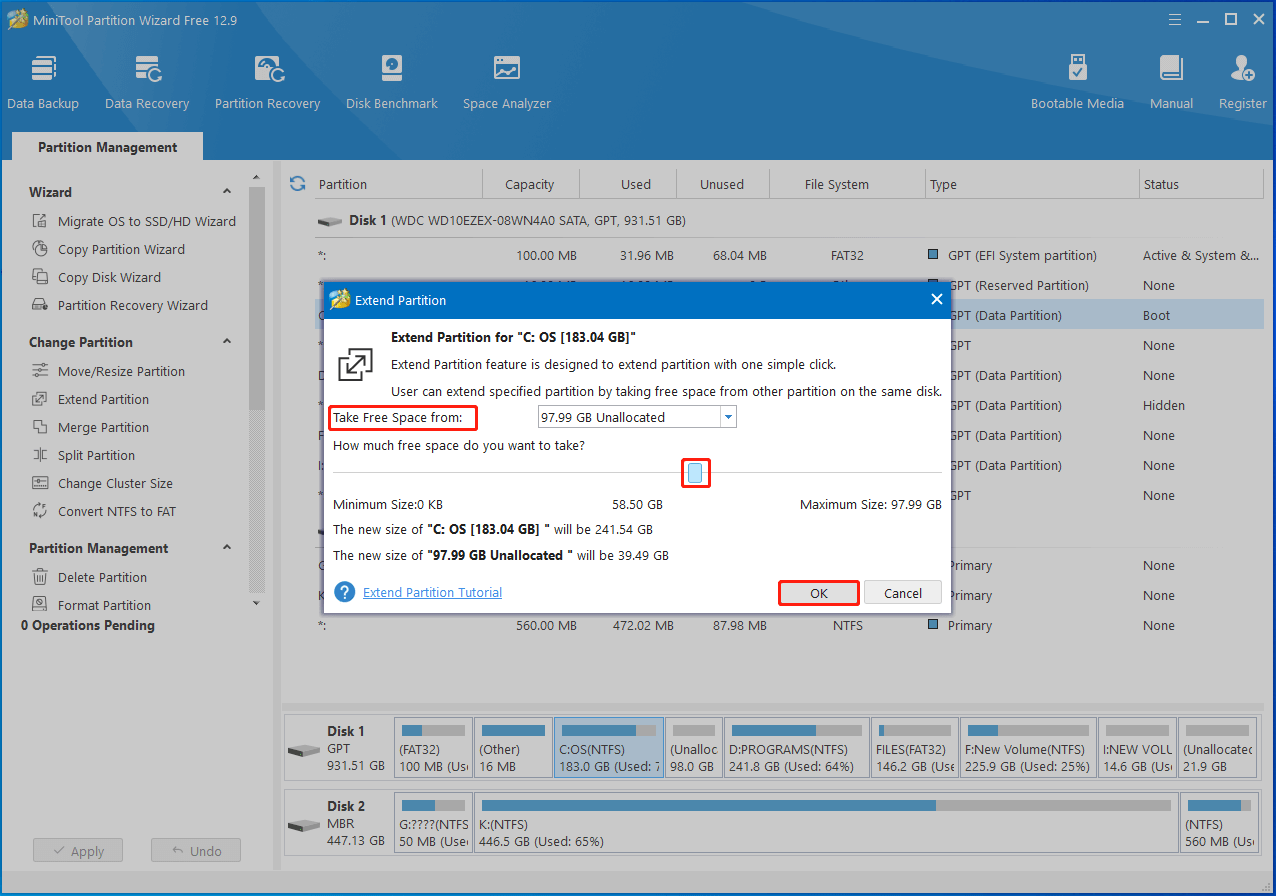
Step 3: Take free space and click OK to save changes.
- Open the Take Free Space from drop-down menu and select a partition or unallocated space.
- Move the blue slider to decide the amount of space to take.
- Hit the OK button.
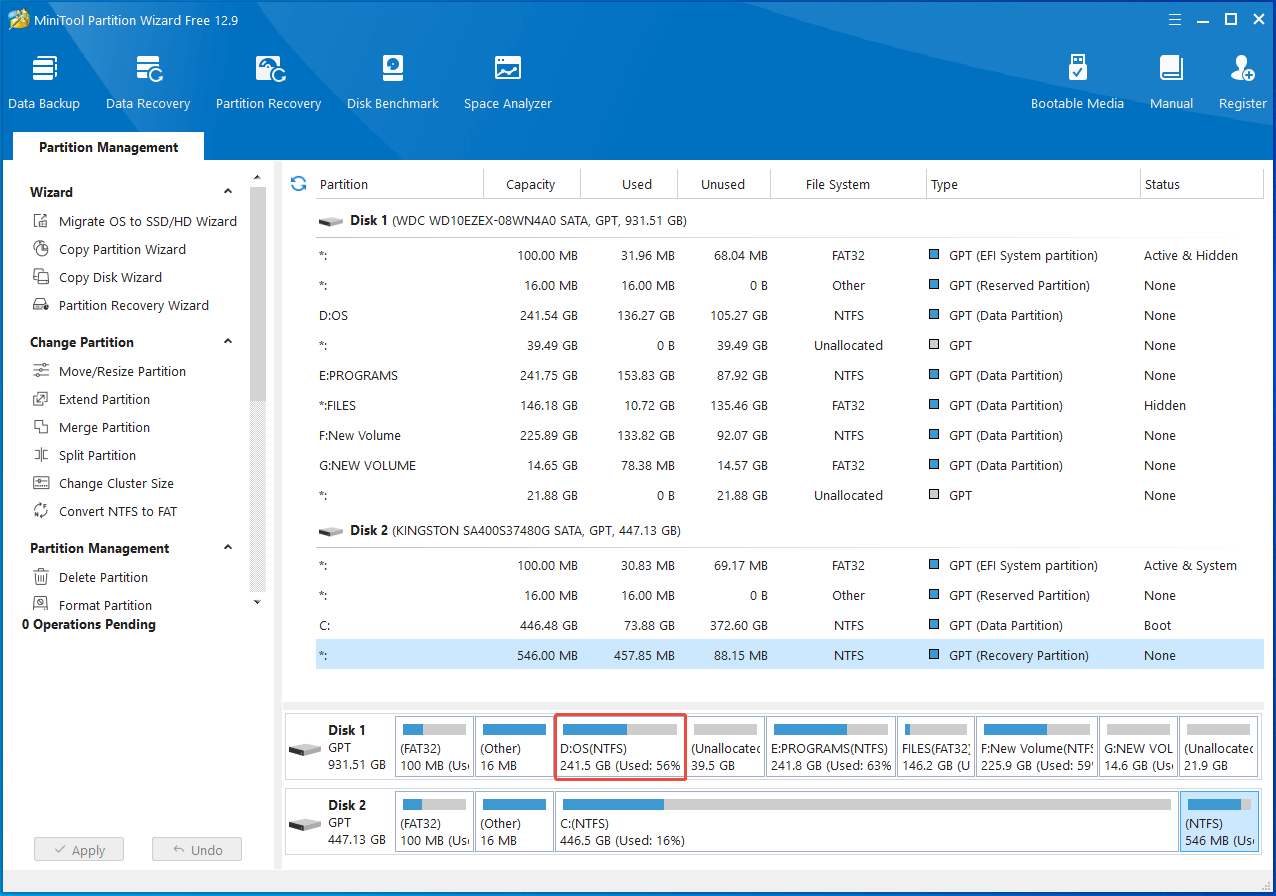
Step 4: Tap on Apply > Yes to execute the operation. Once done, the result will be displayed as follows.
How to enlarge a partition via the Move/Resize feature? Here’s the online tutorial. You can refer to it to increase C drive partition.
Increase C Drive Partition on a Dynamic Disk
How to extend C drive in Windows 10 if it is located on a dynamic disk? Two available methods have been shown to you. Pick one method to increase C drive partition now!
Option 1: Use Disk Management
Disk Management can also help you manage dynamic disks, including extending C drive. Similar to basic disks, dynamic disks require adjacent unallocated space behind the C drive as well. Otherwise, you can’t extend C drive with Disk Management successfully.
If there is unallocated space contiguous to the C drive, follow the steps below to expand C drive through Disk Management.
Step 1: Open Disk Management on your computer.
Step 2: Right-click the C drive and tap Extend Volume.
Step 3: Hit Next in the prompted window.
Step 4: Choose the amount of space to extend and click OK.

Step 5: Click the Finish button to carry out the operation. Then you can view the result.
Option 2. Use MiniTool Partition Wizard
For operations on a dynamic disk, MiniTool Partition Wizard can complete tasks, like delete/format/move/resize/copy volumes, etc.
MiniTool Partition Wizard DemoClick to Download100%Clean & Safe
Step 1: Run MiniTool Partition Wizard.
Step 2: Right-click the C drive and hit Move/Resize Volume. Alternatively, highlight the C drive and click Move/Resize Volume under the Dynamic Disk Management section in the left pane.
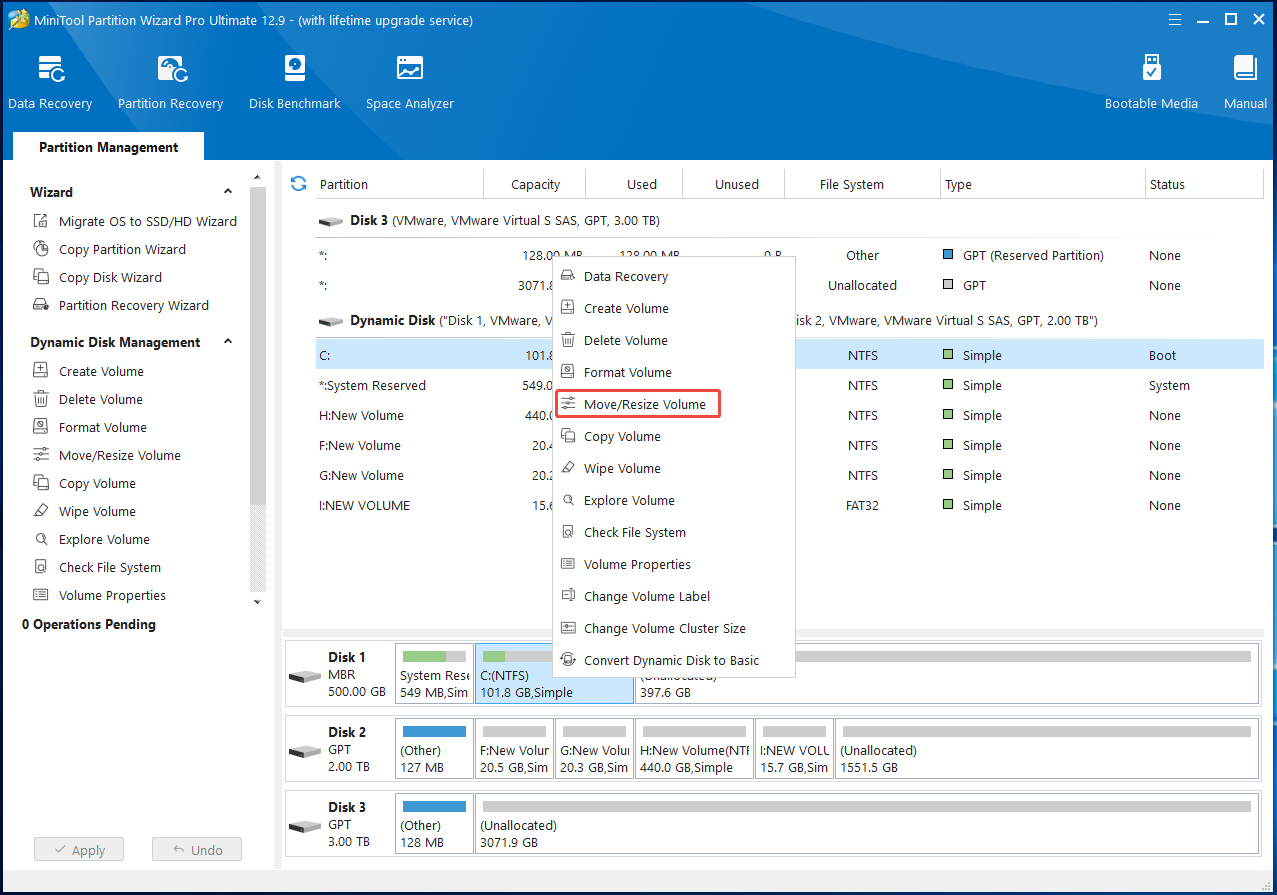
Step 3: In the prompted window, drag the arrow icon right forward to occupy the unallocated space. You can also type the desired volume size in the corresponding field. After that, click OK to save changes.
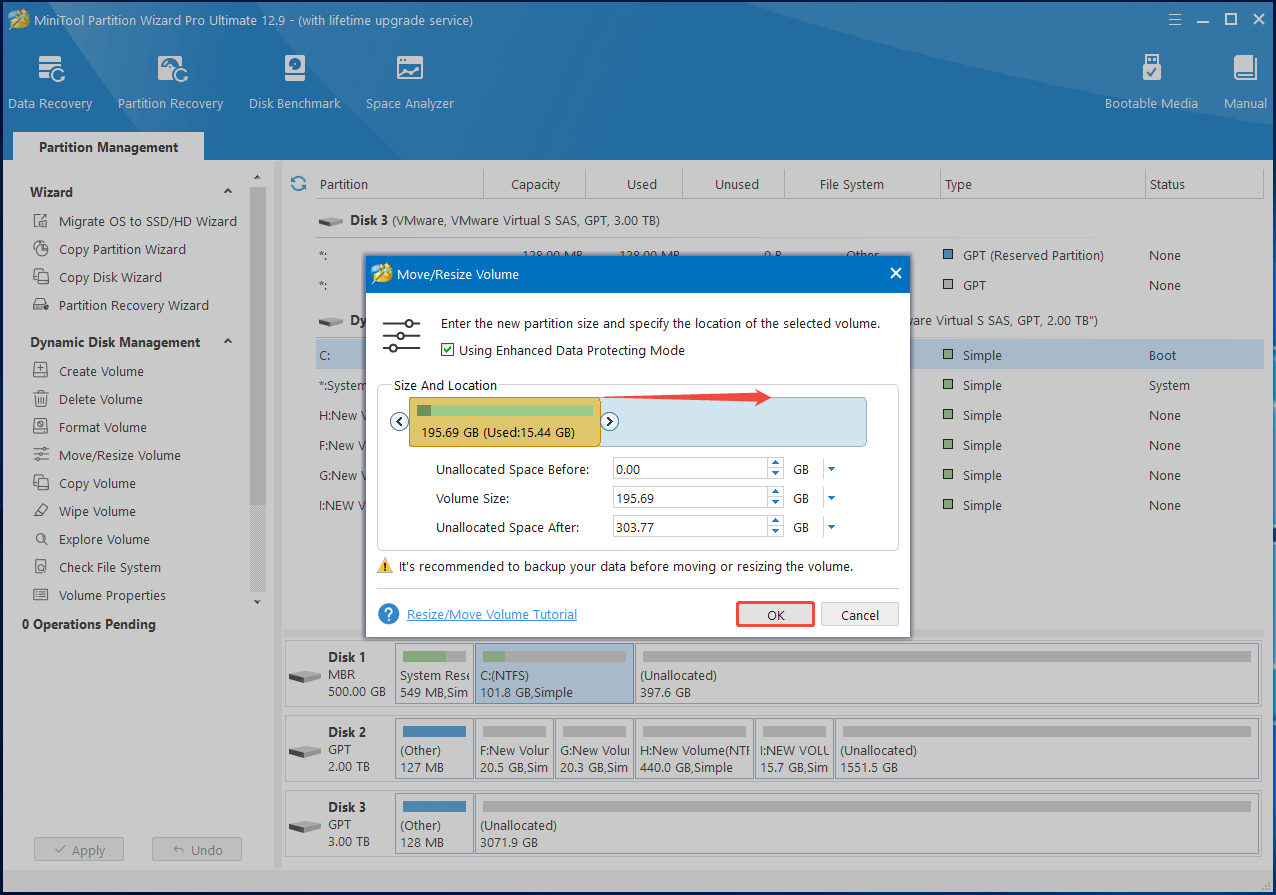
Step 4: Click on Apply > OK to execute the operation.
Further reading: How to prevent C drive from filling up again? Here are some key preventative actions:
- Enable Storage Sense
- Manage System Restore Points
- Move user folders/downloads
- Change default install location
- Run Disk Cleanup
Can’t Extend C Drive – How to Fix
As mentioned earlier, you sometimes fail to extend C drive. This can be caused by limitations of the tool you are using, or by the absence or incorrect location of unallocated space. According to the specific cause, take corresponding measures to resolve the problem.
- The unallocated space is not adjacent to the C drive: Windows built-in tools like DiskPart and Disk Management require adjacent unallocated space behind the C drive. In this case, you can utilize MiniTool Partition Wizard to extend the C drive or move the unallocated space to the desired location and extend it again.
- There’s no unallocated space on the disk: If so, you can’t increase C drive partition with Disk Management. To resolve the issue, you can either delete or shrink another partition to create unallocated space adjacent to C, or use a third-party partition manager, such as MiniTool Partition Wizard, to redistribute free space from other partitions on the same disk without manually creating unallocated space..
Increase C Drive Partition FAQ
However, backing up important data before resizing partitions is still recommended.
1. No adjacent unallocated space
2. The partition is FAT32
3. Unallocated space is on the wrong side
4. Disk layout limitations
5. System partition restrictions
In this case, you can move partitions, shrink another partition, or use MiniTool Partition Wizard.
In this case, Disk Management cannot extend the system partition directly.
You may need to move the partition first using advanced partition software, like MiniTool Partition Wizard.
Bottom Line
This post offers 3 tools to increase C drive partition. Among them, MiniTool Partition Wizard is the best one that offers the Extend Partition and Move/Resize features to do that. Just have a try.
If you have any problems or suggestions about MiniTool Partition Wizard, contact us by sending an email via [email protected]. We will get back to you as soon as possible.
About The Author

Position: Columnist
Vega enjoys helping people with computer problems, including disk management, data recovery, data backup, and more. She is constantly expanding her knowledge in related fields. And she will continue to bring more easy-to-understand professional articles to help people solve various problems on the PC.
User Comments :