
When a PC or laptop runs low on disk space—especially on the C drive—it can cause a range of performance and usability problems, including:
- Slow PC performance
- Windows Update failures
- Apps and games not installing
- Applications crashing or not responding
- Files not saving
Therefore, when you notice in File Explorer that disk space is running low, you need to take measures to free up or add space.
How to get more storage on a laptop or PC? Try the following methods.
How to Get More Storage on PC/Laptop by Deleting Files
This section mainly shows you how to free up disk space on a PC using Windows built-in tools.
#1. Use Storage Sense to Automatically Free Up Space
Storage Sense is a built-in Windows feature that automatically removes unnecessary files to free up disk space. It can clean the following items:
- Temporary files created by Windows, apps, or web browsers.
- Windows Update residual files.
- Recycle Bin contents.
- Files in your Downloads folder that you have not opened or used for a specific time frame (like 30 or 60 days).
- Local copies of files stored in OneDrive that you haven’t opened in a while can be changed to “online-only” status (removing the local copy from your PC, but keeping it in the cloud).
Here is how to run Storage Sense in Windows 11.
- Press Win + I to open Settings.
- Go to System > Storage.
- Turn on Storage Sense.
- Click Storage Sense.
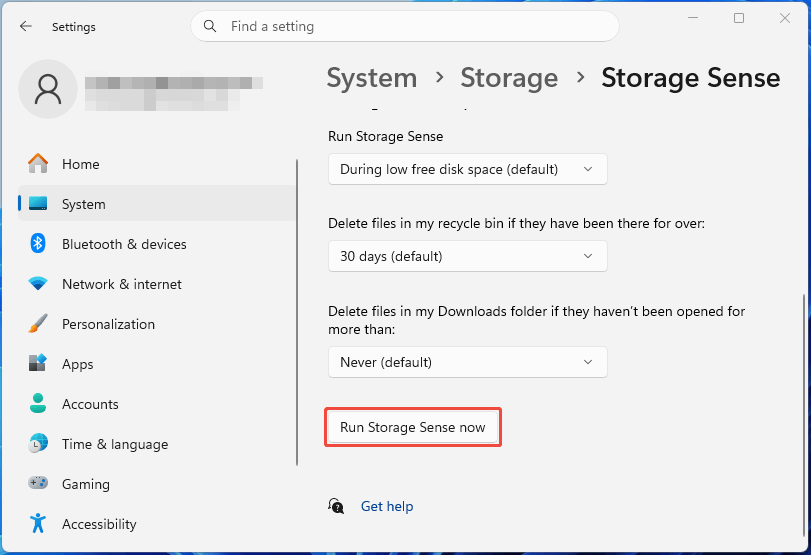
- Configure what files to delete.
- Click Run Storage Sense now to start the cleanup immediately.
#2. Run Disk Cleanup to Remove Unnecessary Files
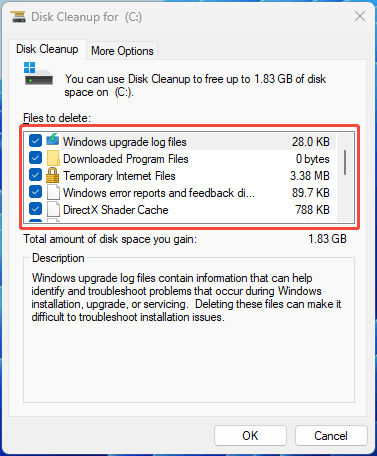
Disk Cleanup is also a built-in Windows utility. When it comes to how to get more storage on a PC, this tool is often recommended. It can clean the following items.
| File Category | What It Contains | Generally Safe to Delete? |
| Temporary Files | Files created temporarily by Windows and apps | Yes |
| Temporary Internet Files | Cached website files | Yes |
| Recycle Bin | Files you have deleted | Yes, if you don’t need to restore them |
| Thumbnails | Cached previews of pictures, videos, and documents | Yes |
| Downloaded Program Files | Temporary files downloaded by certain programs | Yes |
| DirectX Shader Cache | Saved game graphics data used to speed up loading times | Yes |
| Windows Update Cleanup | Old copies of already-installed updates | Usually, but use caution |
| Previous Windows Installations | Old system upgrade backups (Windows.old folders) | Use caution |
| Windows upgrade log files | Logs created during Windows upgrades | Yes |
| Temporary Windows installation files | Files left over from Windows installation/update processes | Usually |
| Delivery Optimization Files | Leftover data from sharing updates with other PCs | Yes |
| Windows Error Reports | Diagnostic logs sent to Microsoft | Yes |
| System error memory dump files | Information generated after system crashes | Usually |
| System error minidump files | Smaller crash-diagnostic files | Usually |
| Microsoft Defender Antivirus Files | Temporary scanner data no longer needed | Usually |
| Device driver packages | Older driver packages no longer needed | Usually, but use caution |
How to run Disk Cleanup? Here is the guide.
- Press Win + S and search for Disk Cleanup.
- Open Disk Cleanup from the search results.
- Select the drive you want to clean, usually C:, and click OK.
- At the bottom of the Disk Cleanup for (C:) window, click Clean up system files.
- Select C: and click OK again.
- Select the file categories you want to remove.
- Click OK and select Delete Files to confirm.
#3. Uninstall Unused Apps and Games
Uninstalling apps and games you no longer use is one of the easiest approaches to free up storage on a PC or laptop. Large games, creative software, and other applications can occupy tens or even hundreds of gigabytes.
Here is how to uninstall apps and games in Windows 11.
- Press Win + I to open Settings.
- Select Apps > Installed apps.
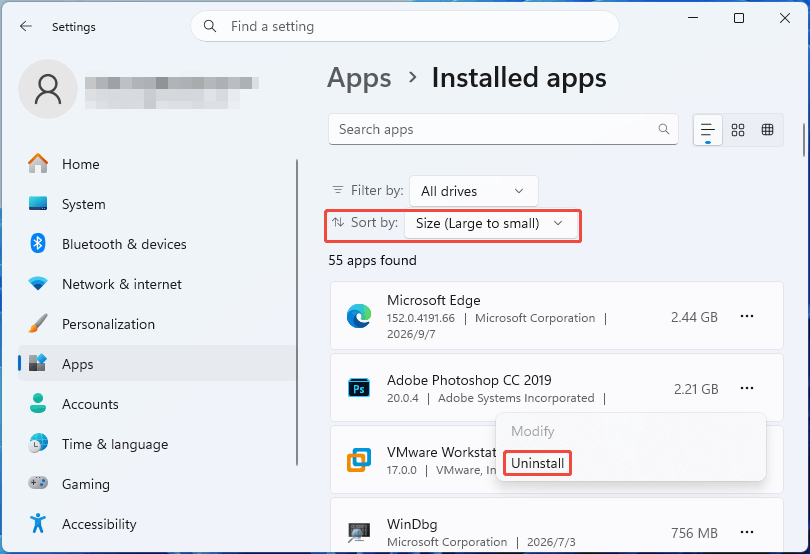
- Sort the list by Size (Large to small) to find the largest applications.
- Click the three-dot icon next to an app or game you no longer need.
- Select Uninstall and follow the on-screen instructions.
#4. Delete Unnecessary and Large Files
When it comes to how to get more disk space, deleting unnecessary or oversized files is another effective method. Large videos, old downloads, installation files, backups, and duplicate files can consume a significant amount of disk space without providing much value.
To find and delete unnecessary, large, and duplicate files, you can try MiniTool Partition Wizard Free. Here are the steps.
MiniTool Partition Wizard FreeClick to Download100%Clean & Safe
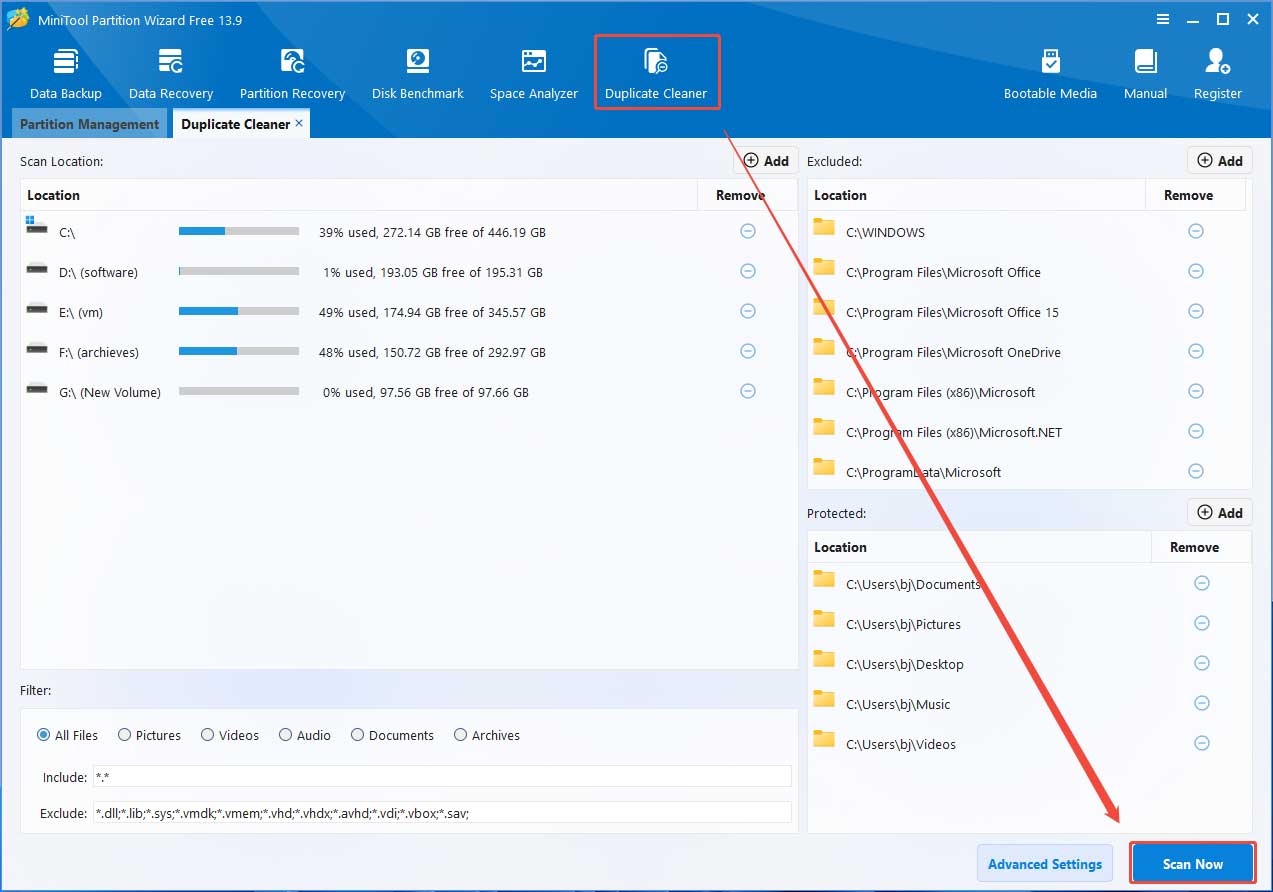
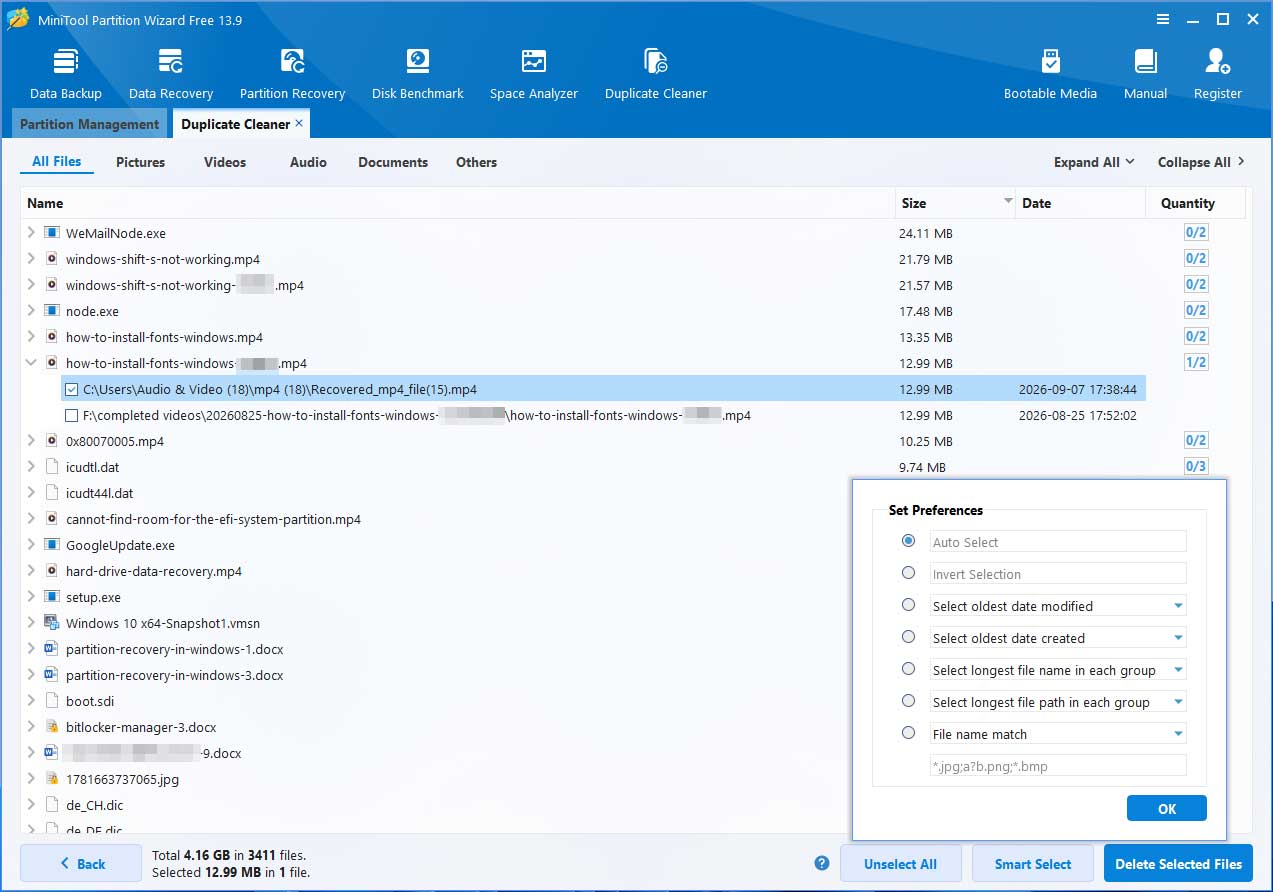
Step 1: Download and install MiniTool Partition Wizard. Launch this software and then click Duplicate Cleaner. Keep all default settings. Then, click Scan Now.
Step 2: Wait for the scanning to complete. Expand each item and then select the duplicate files you want to delete. You can also use the Smart Select feature to help you select files faster. Then, click Delete Selected Files and OK.
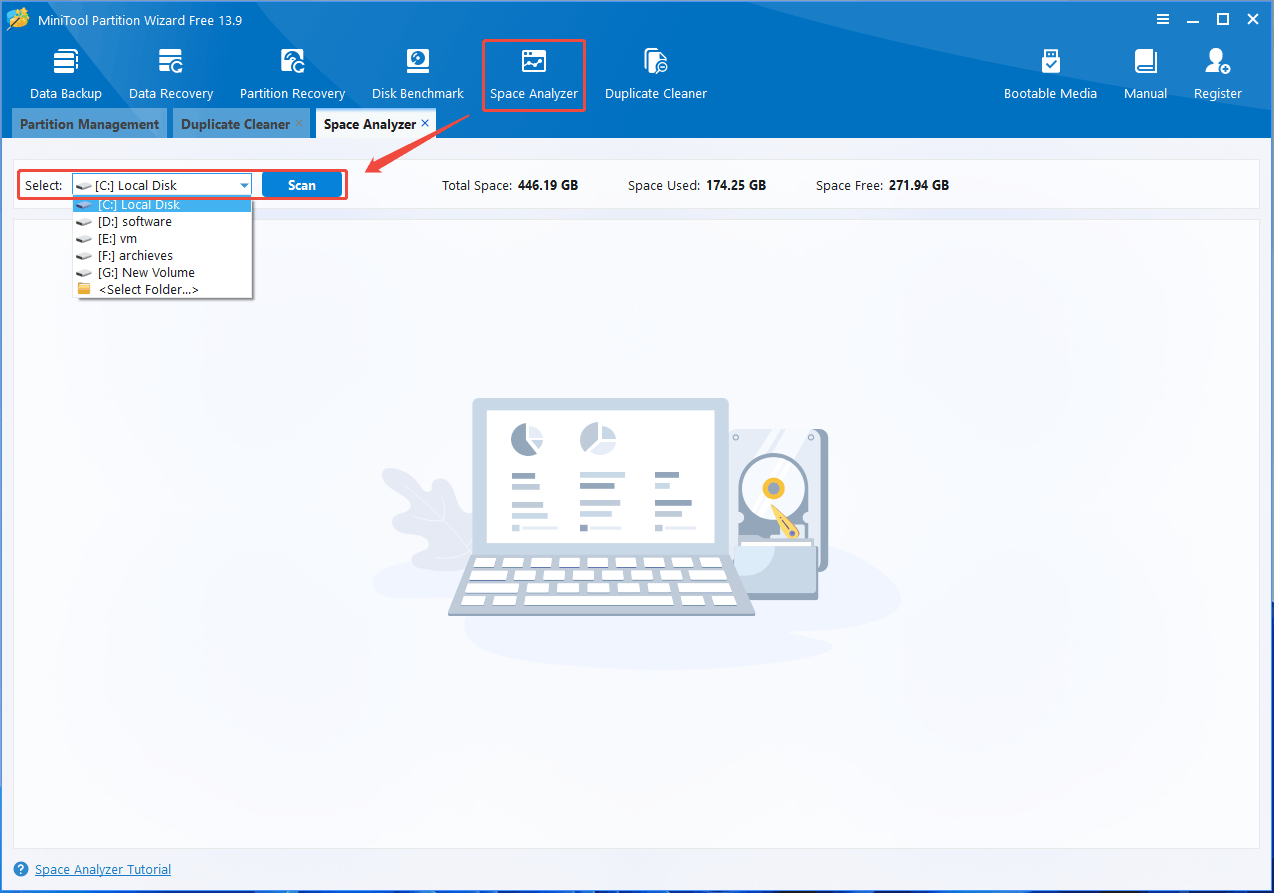
Step 3: Click Space Analyzer, select your C drive, and then click Scan.
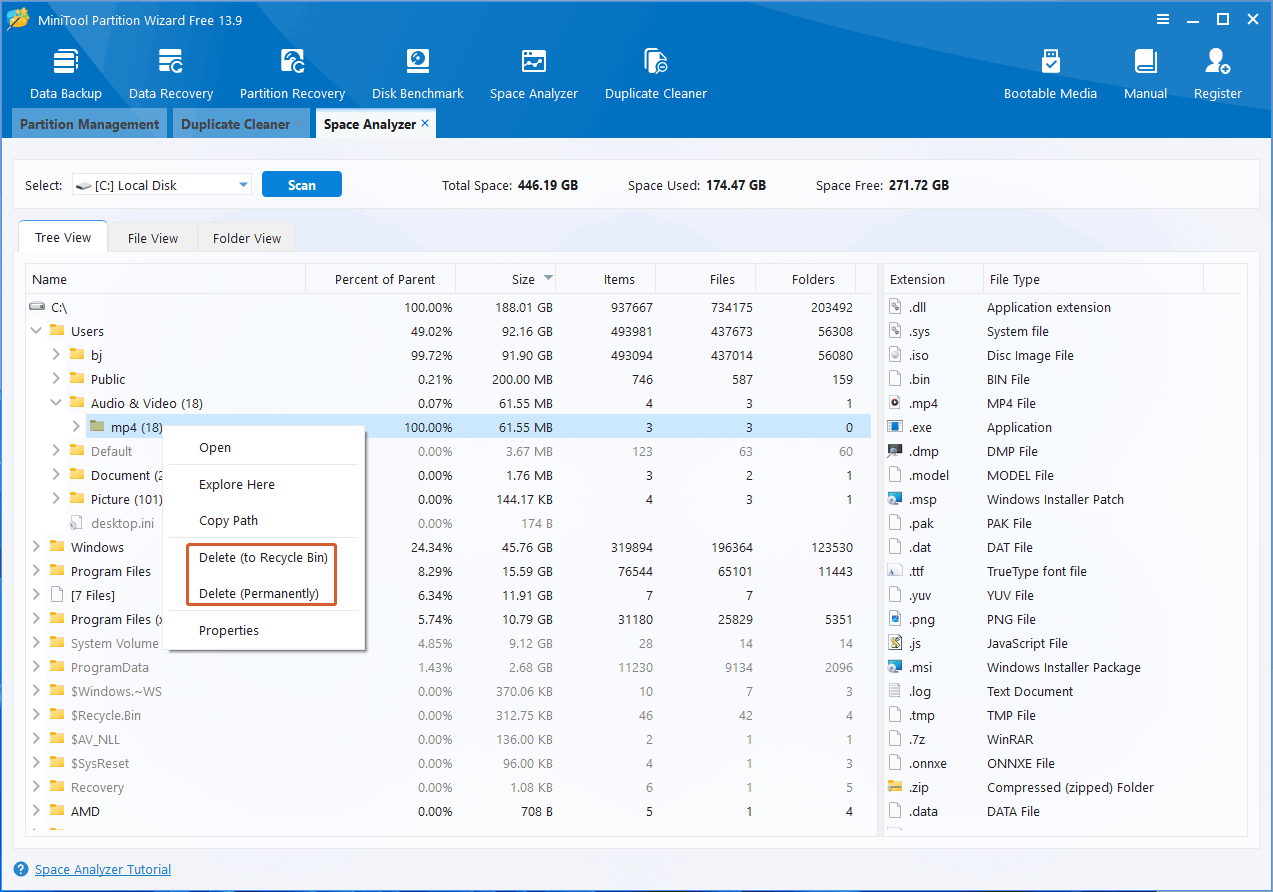
Step 4: Wait for the disk space usage analysis to complete. All files on the drive are sorted by size in descending order. Expand them to find files you want to remove. Right-click these files and choose Delete, then Yes. Don’t forget to empty the Recycle Bin.
#5. Reset Hibernation to Delete the Hibernation File
Hibernation is an energy-saving power state that saves all data currently in the computer’s memory to the hard drive and then completely cuts off power to all hardware.
Hibernation will create a “hiberfil.sys” file in the root directory of the system drive (C: drive). Typically, the size of this file is at most equal to the amount of physical memory installed (around 5–32GB).
If the Hibernation file is too large or you want to delete it to free up disk space, follow the guide below to reset Hibernation.
Step 1: Press Win + S, type “cmd”, right-click Command Prompt from the results list, and choose Run as administrator.
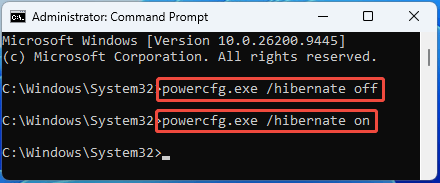
Step 2: Run the following commands.
- powercfg.exe /hibernate off
- powercfg.exe /hibernate on
#6. Delete System Restore Points
Restore points are snapshots of system files, installed applications, the Windows Registry, and system settings at specific points in time.
They are created periodically or manually by System Protection so that you can restore the system to a previous, stable, and fully functional state when your computer encounters malfunctions.
You can check exactly how much space the restore points are occupying under Settings > System > Storage > System & reserved. If they take up too much space, you can delete them. The steps are as follows:
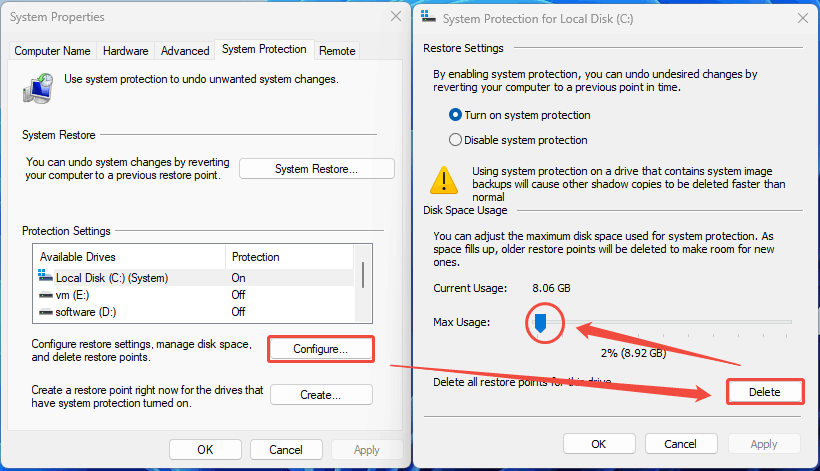
- Press Win + S, type “create a restore point”, and click the corresponding item from the results list.
- Click the Configure button.
- Click Delete, then Continue to remove all restore points.
- Drag the blue block to reduce the maximum disk space used for system protection.
- Click OK to save changes.
#7. Limit Virtual Memory to Reduce Paging File Size
When physical memory is insufficient, the system moves data that is not currently in use from memory to the hard drive. When a program requires this data again, it is read back from the hard drive into memory. This process is known as virtual memory.
Virtual memory will create a paging file (pagefile.sys) to store this data. For computers with 8GB or 16GB of physical memory, the initial paging file size allocated by the system typically ranges from a few GB to over ten GB.
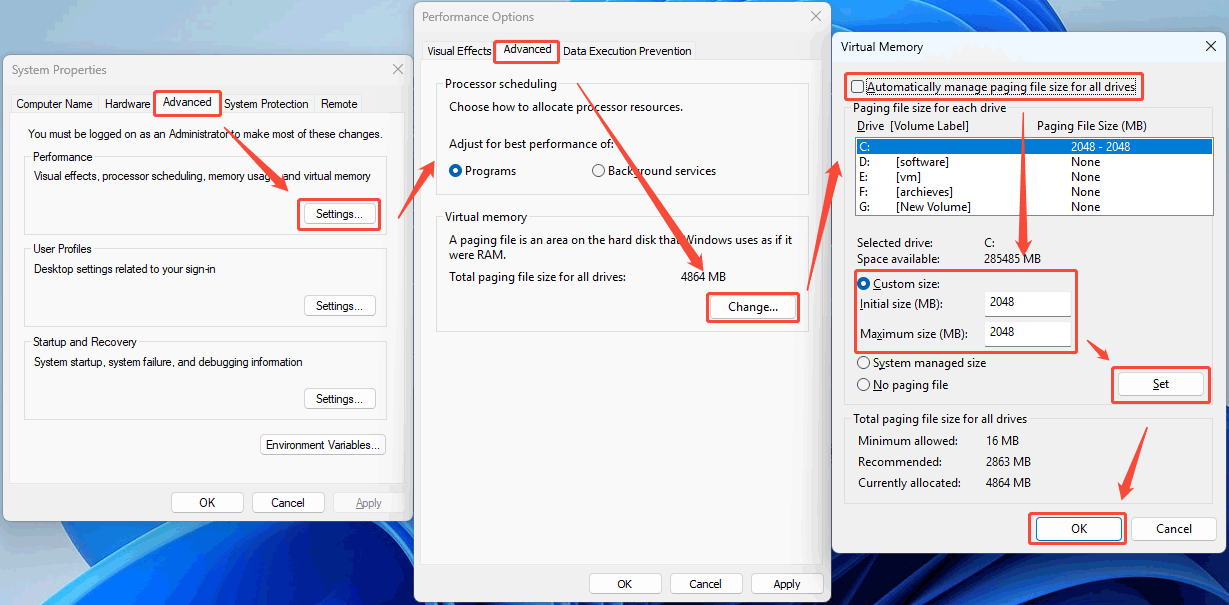
It is not recommended to completely disable virtual memory, but you can limit its size to free up space. Follow the steps below:
- Press Win + R, type “sysdm.cpl”, and press Enter.
- Open the Advanced tab.
- Under Performance, click Settings.
- Select the Advanced tab.
- Under Virtual memory, click Change.
- Uncheck Automatically manage paging file size for all drives.
- Select the drive containing the paging file.
- Select Custom size.
- Enter your desired values for Initial size (MB) and Maximum size (MB).
- Click Set > OK.
- Restart your PC when prompted.
![Windows 10 High Memory Usage [Causes and Solutions]](https://images.minitool.com/partitionwizard.com/images/uploads/2019/06/windows-10-high-memory-usage-thumbnail.jpg)
How to Get More Storage on PC/Laptop Without Deleting Files
This section mainly shows you how to add more storage to PCs. Then, you can get more space without deleting any files.
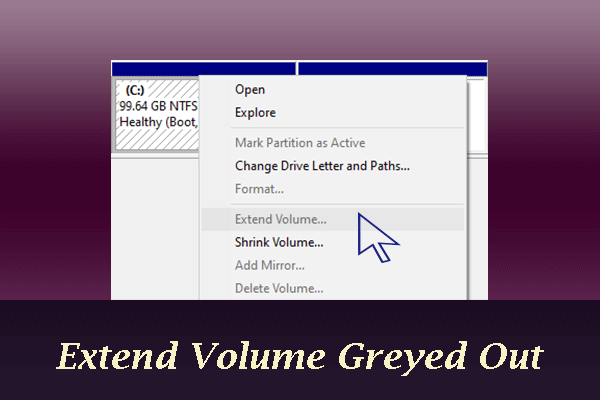
#1. Extend the C Drive to Get More Disk Space
Does your computer have any partitions other than the C drive, such as D, E, or F? Or does it have unallocated space? If so, you can extend the C drive by taking space from D/E/F or other partitions, as well as the unallocated space.
MiniTool Partition Wizard, the free partition manager, can help you do that. Here are the steps.
MiniTool Partition Wizard FreeClick to Download100%Clean & Safe
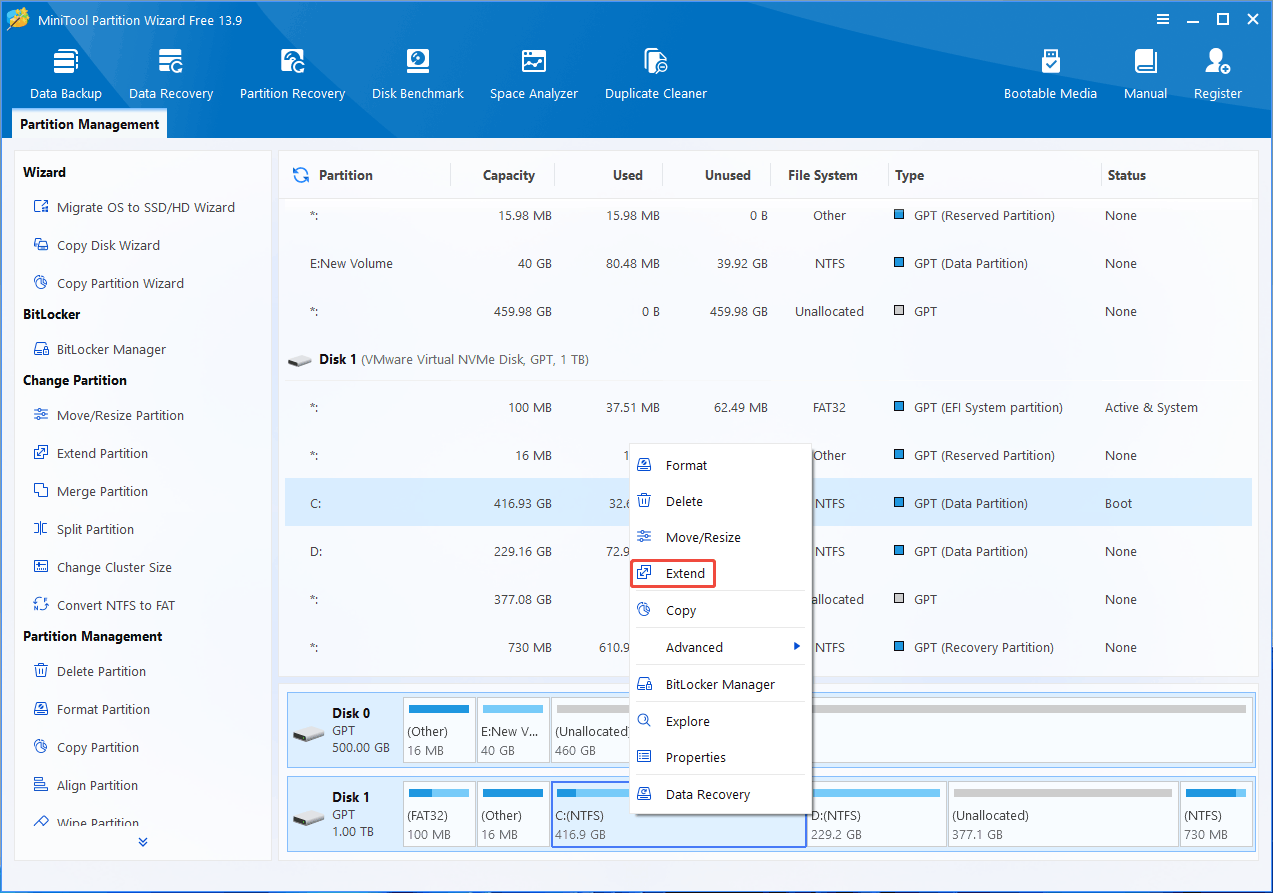
Step 1: Launch MiniTool Partition Wizard. Right-click the C drive and then choose Extend.
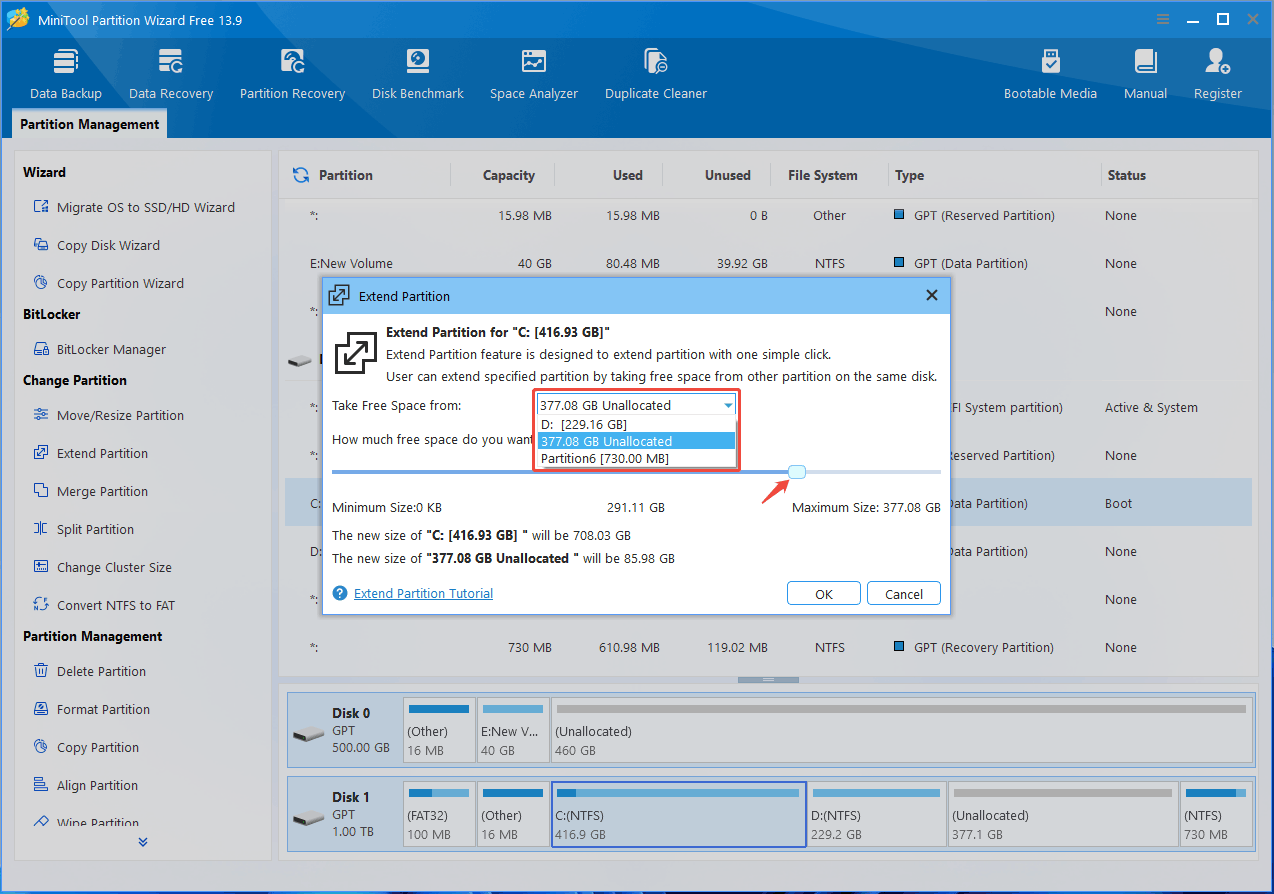
Step 2: On the pop-up window, expand the menu to choose where to take free space. Both an existing partition and unallocated space are OK. Drag the block to determine how much free space to take. Then, click OK.
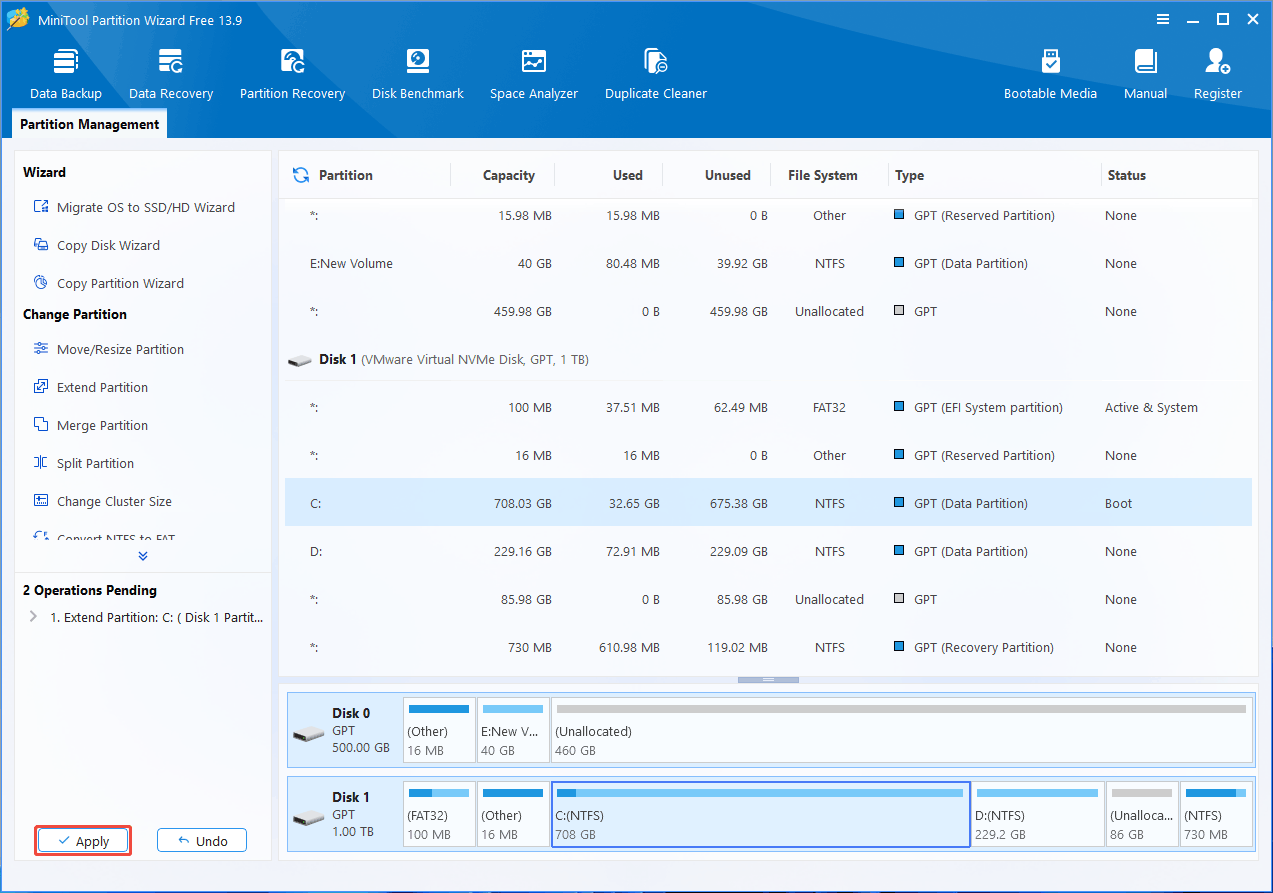
Step 3: Click Apply to execute the extending operation.
#2. Add an External Storage Device
Adding an external storage device is one of the simplest measures to get more storage on a PC or laptop without replacing the internal drive. External HDDs and SSDs connect through USB ports and provide additional space for files, backups, games, and applications.
Common Types of External Storage Devices
| Device | Advantages | Best For |
| External SSD | Faster, quieter, more durable | Games, apps, frequently accessed files |
| External HDD | Cheaper and offers more capacity | Backups, photos, videos, archives |
| USB Flash Drive | Small and portable | Transferring files |
| Memory Card (SD/microSD) | Convenient for supported laptops | Photos, videos, lightweight storage |
#3. Use Cloud Storage to Store Files Online
Using cloud storage is another approach to get more storage on a PC or laptop without upgrading the internal drive. Cloud storage services allow you to store files online and access them from different devices, helping reduce the amount of data stored locally.
Common files to move to cloud storage include photos, videos, documents, work or school files, large project files, backups, and archived data.
You can build a NAS—your private Cloud storage—or use Cloud storage services like OneDrive, Google Drive, Dropbox, etc.
#4. Install an Additional Internal SSD or HDD
Adding an internal SSD or HDD is one of the best methods to increase storage capacity on a PC. Unlike cleaning files or using cloud storage, installing an additional internal drive provides permanent physical storage space for applications, games, documents, and media files.
This method is especially suitable for desktop PCs, while some laptops may support a second internal drive depending on their design.
If you want to try this method, follow the process below.
- Open your PC case or view the laptop model specifications or manual to check if the computer supports adding an internal hard drive.
- If supported, check the supported disk type—SATA or M.2. If it supports SATA hard drives, check if the drive bay is 2.5 inch or 3.5 inch.
- Purchase a suitable disk and install it directly.
- Boot into Windows and open Disk Management. Initialize the disk to MBR or GPT according to your situation. Then, create new partitions on the new disk for use.
Here is a video guide showing how to install an SSD into a PC.
#5. Upgrade the Existing SSD or HDD
How to add more storage to laptops if there is only one hard drive bay? Upgrading to a larger SSD or HDD is an effective method.
The general process should be as follows.
- Check the disk type supported by the laptop and then purchase a suitable hard drive.
- Back up data on the computer.
- Install the new hard drive into the laptop and then install Windows on the new hard drive.
- Install necessary software and move backup data back to the laptop.
If you don’t want to reinstall Windows and software, you can use MiniTool Partition Wizard to migrate the OS.
- Purchase a new hard drive and a SATA/M.2 to USB adapter.
- Connect the new hard drive to your laptop via the USB adapter.
- Use MiniTool Partition Wizard to migrate the OS.
- Install the new hard drive in your laptop.
Here is how to migrate the OS using MiniTool Partition Wizard.
MiniTool Partition Wizard DemoClick to Download100%Clean & Safe
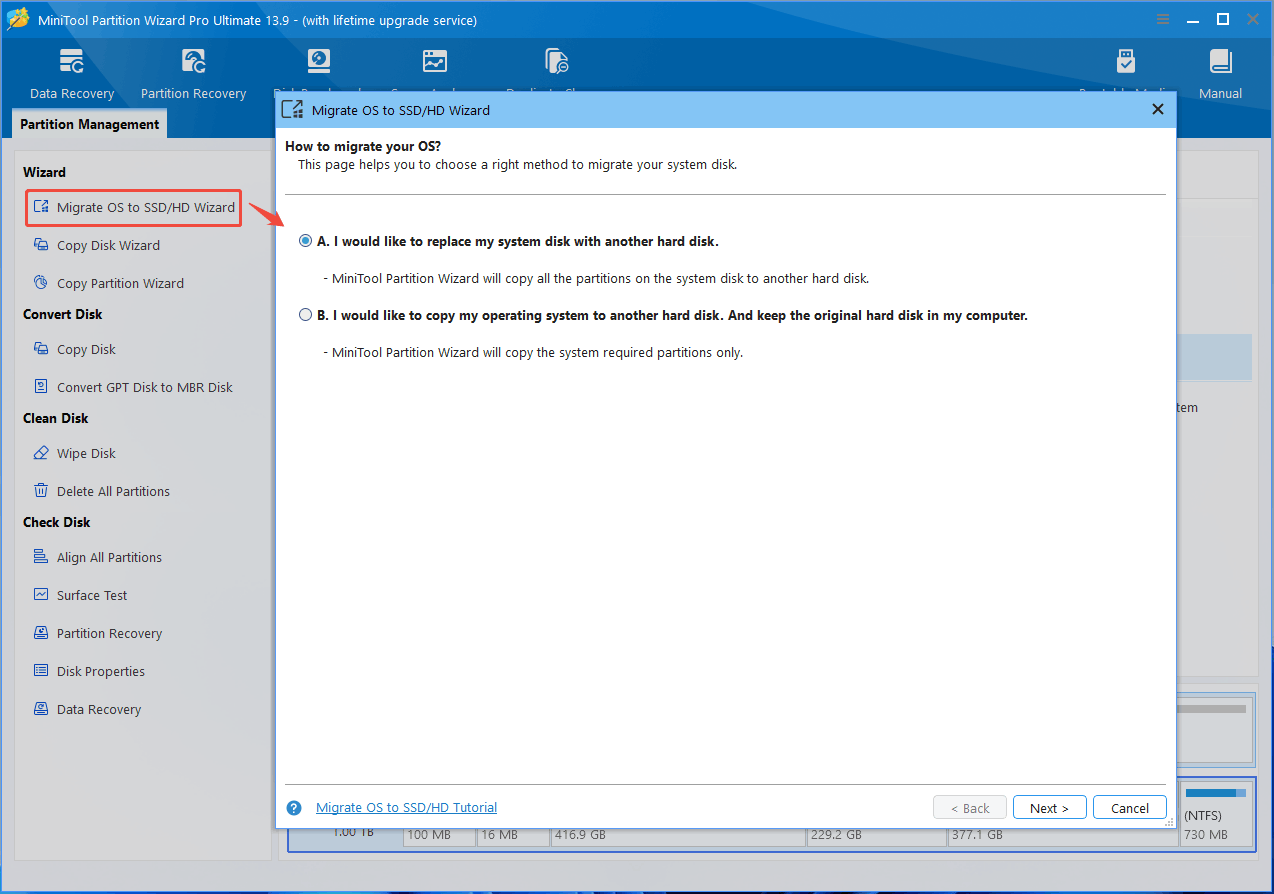
Step 1: Launch this software. Click Migrate OS to SSD/HD Wizard. Then, determine how to migrate your OS. Option A is recommended. It will clone the entire system disk to the new disk.
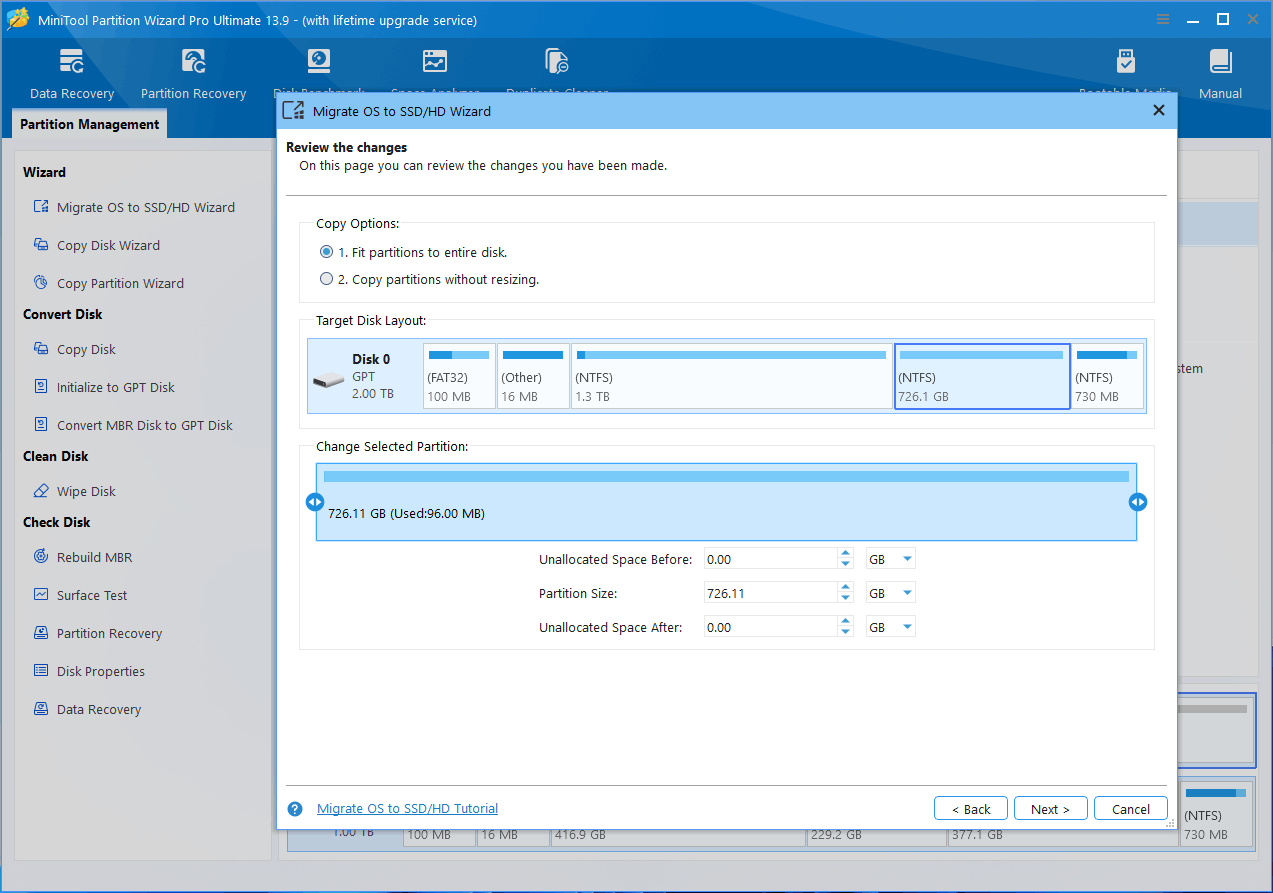
Step 2: Select the new disk as the destination disk. Then, review the changes. The default copy option is recommended. However, you may need to change the Target Disk Layout. For example, shrink drives D, E, and F, then extend drive C.
Step 3: Click Finish. Then, click Apply to start the OS migration operation.
How to Get More Storage on PC FAQ
Bottom Line
Getting more storage on a PC or laptop can mean freeing up existing disk space or increasing your device’s physical storage capacity.
Start by using Storage Sense, Disk Cleanup, uninstalling unused apps, and using MiniTool Partition Wizard to remove duplicate & large files and extend the C drive. If you need more long-term capacity, consider adding an internal or external SSD/HDD, upgrading your existing SSD, or using cloud storage.
If you encounter issues when using MiniTool Partition Wizard. Don’t hesitate to contact us for help. The email address is [email protected].
About The Author

Position: Columnist
Linda has been an editor at MiniTool for seven years. She continuously learns about computers and puts her knowledge into practice. Moreover, she is particularly knowledgeable in disk management, data recovery, system installation, and PDF editing. Her articles typically reference multiple examples or are based on her own experience, providing users with the most suitable solutions.
User Comments :