Games not installing/downloading/updating issue appears on PC due to insufficient storage, network issues, or antivirus interference. This post offers solutions to fix these issues by checking the network or extending disk space using MiniTool Partition Wizard.
Many people may have encountered the games not downloading/installing/updating issue. This problem commonly affects:
- Steam
- Xbox App
- Microsoft Store
- EA App
- Epic Games Launcher
Games usually fail to install because of:
- Insufficient disk space
- Corrupted download cache
- Antivirus blocking installers
- Damaged system files
- Storage drive errors
- Permission problems
- Internet interruptions
Here are recommended fixes for the specific game issues:
| Problem | Likely Cause | Recommended Fix |
| Installation stuck at 0% | Corrupted cache | Clear launcher cache |
| Installation stopped | Disk issue | Check storage health |
| Steam disk write error | Drive permission issue | Run Steam as admin |
| Not enough disk space | Small partition | Free or extend storage |
| Games fail after Windows update | Corrupted system files | Run SFC/DISM |
You can try the following methods one by one to get rid of games not installing/downloading/updating.
Because there are various game distribution platforms, some solutions to the games not downloading/installing/updating issue may only work on a certain game distribution platform.
Method 1. Restart the Launcher and PC
Temporary launcher bugs may interrupt installations. You can try restarting the launcher and PC. The steps are as follows:
- Close the launcher completely.
- Open Task Manager.
- End all launcher-related processes.
- Restart the PC.
- Launch the installer again.
This often fixes temporary installation failures.
Method 2. Check Available Disk Space
Modern games may require:
- Large installation packages
- Temporary decompression space
- Additional patching space
For example, a 50GB game may temporarily require much more free storage during installation.
If the partition is small, you may need to:
- Delete unused files
- Move games to another drive
- Extend the partition
#1. Delete Unnecessary Files
This method is very easy. You just need to open Windows File Explorer and then open every directory to delete files that you don’t need. No third-party software is needed. Here is the guide:
Step 1: Open Windows File Explorer and then show hidden files. Some files are hidden and they take up a lot of space.
- For Windows 10: Click File in the left upper corner and choose Change folders and search options. Skip to the View tab and check Show hidden files, folders, and drives. Click Apply and OK to save changes.
- For Windows 11: Click View on the ribbon and click Show > Hidden items.
Step 2: Open each directory to delete unnecessary files. The key is which files can be deleted and which cannot. In general, I don’t recommend you delete .sys, .dll, and other system-related files. You can delete personal files and programs, hidden folders whose names start or end with $, and the Backup folder under the WinSxS directory.
#2. Move Games to Another Drive
If you have another large drive, you can choose to move the game to this drive.
- Move Steam games to another drive
- Move Origin games to another drive
- Move EA games to another drive
- Move Uplay games to another drive
- Move Blizzard games to another drive
- Move Epic games to another drive
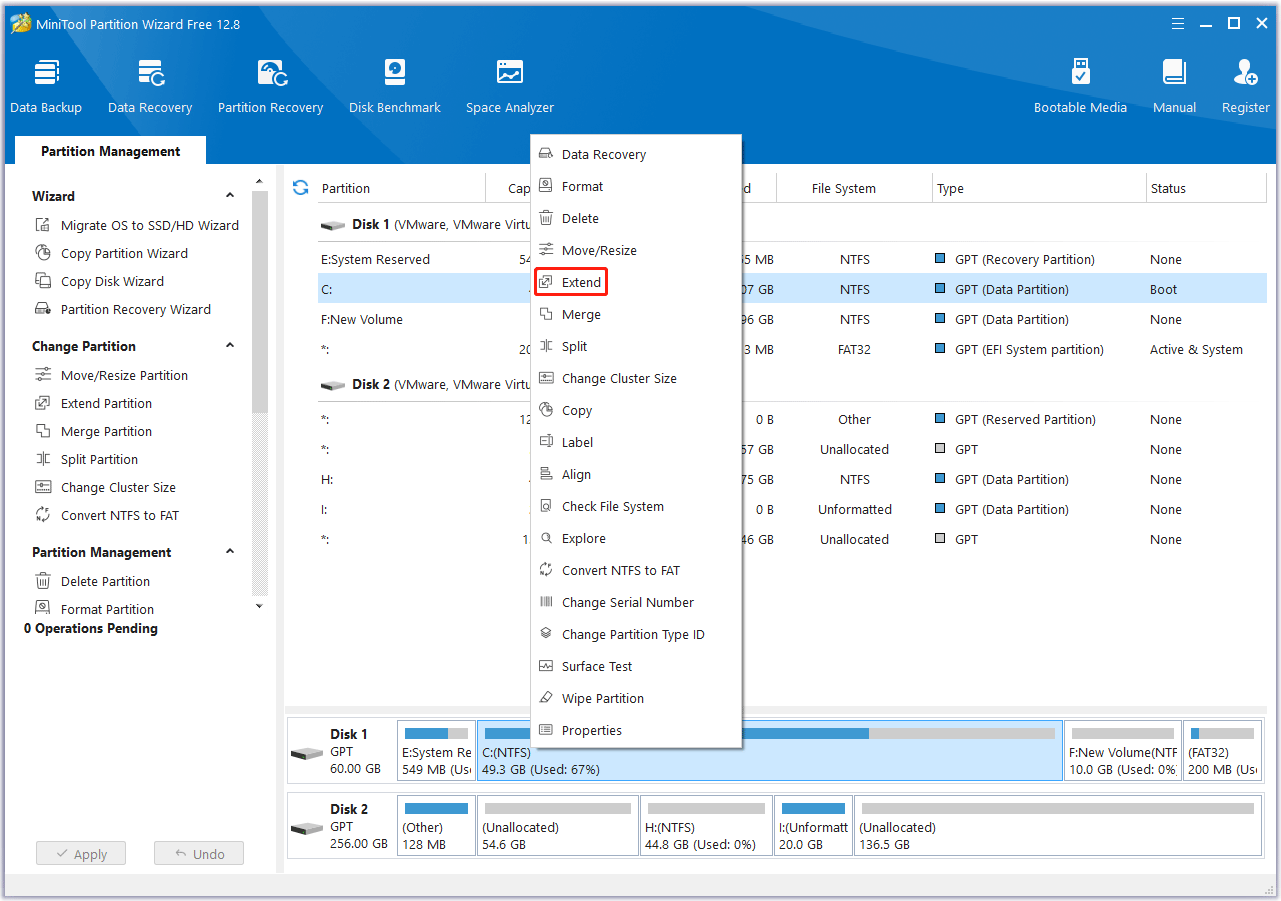
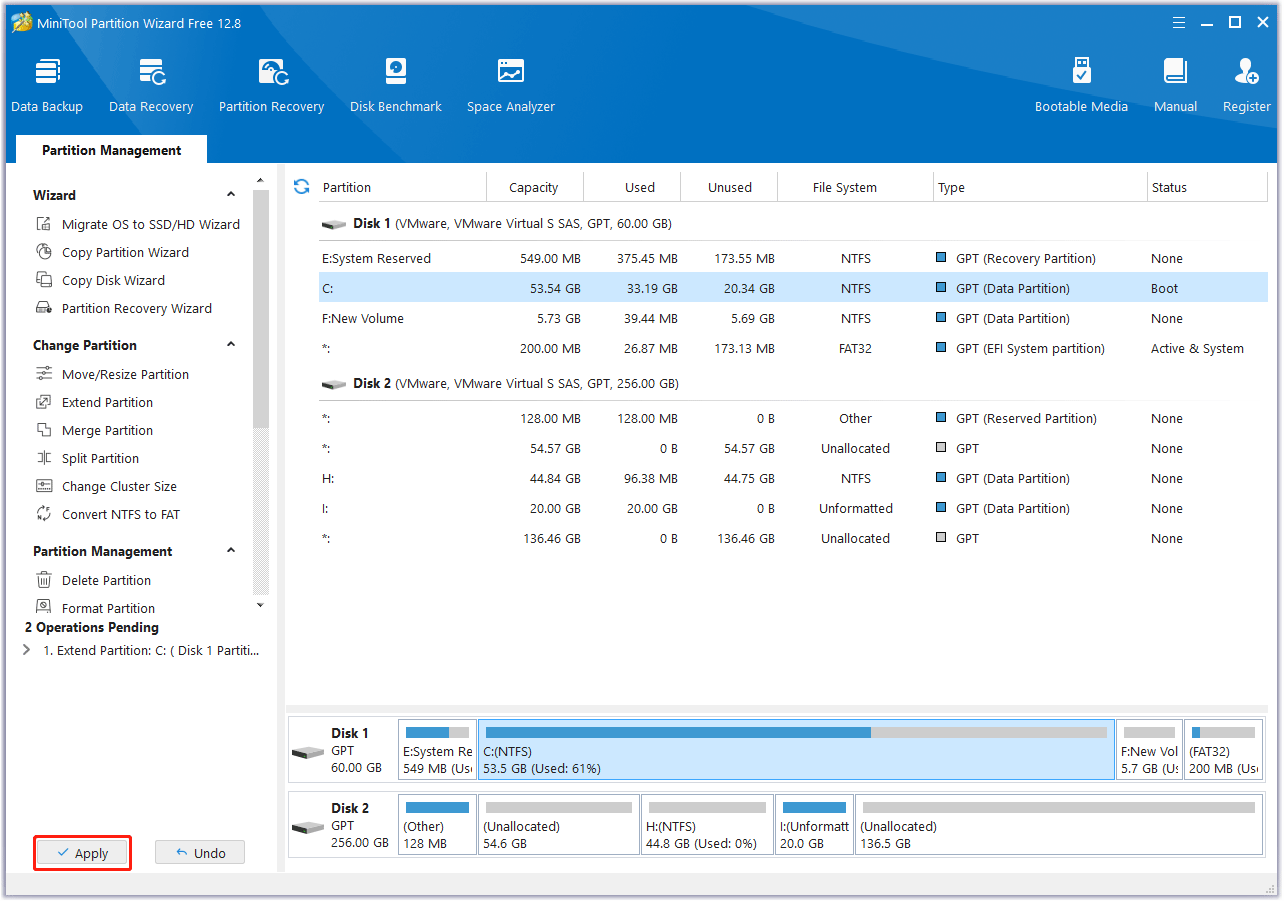
#3. Extend a Partition
This method is available only when there is unallocated space on the disk or unused space on the other partitions on the disk.
You can use MiniTool Partition Wizard to do that. In addition, this software can also migrate OS, clone hard drives, recover hard drive data, convert MBR to GPT without data loss, etc.
Here is the guide:
MiniTool Partition Wizard FreeClick to Download100%Clean & Safe
Step 1: Launch MiniTool Partition Wizard. Right-click the partition you want to extend and choose Extend.
Step 2: On the pop-up window, choose where to take space from. You can choose unallocated space or an existing partition. Then, drag the blue block to decide how much space you want to take. After that, click OK.
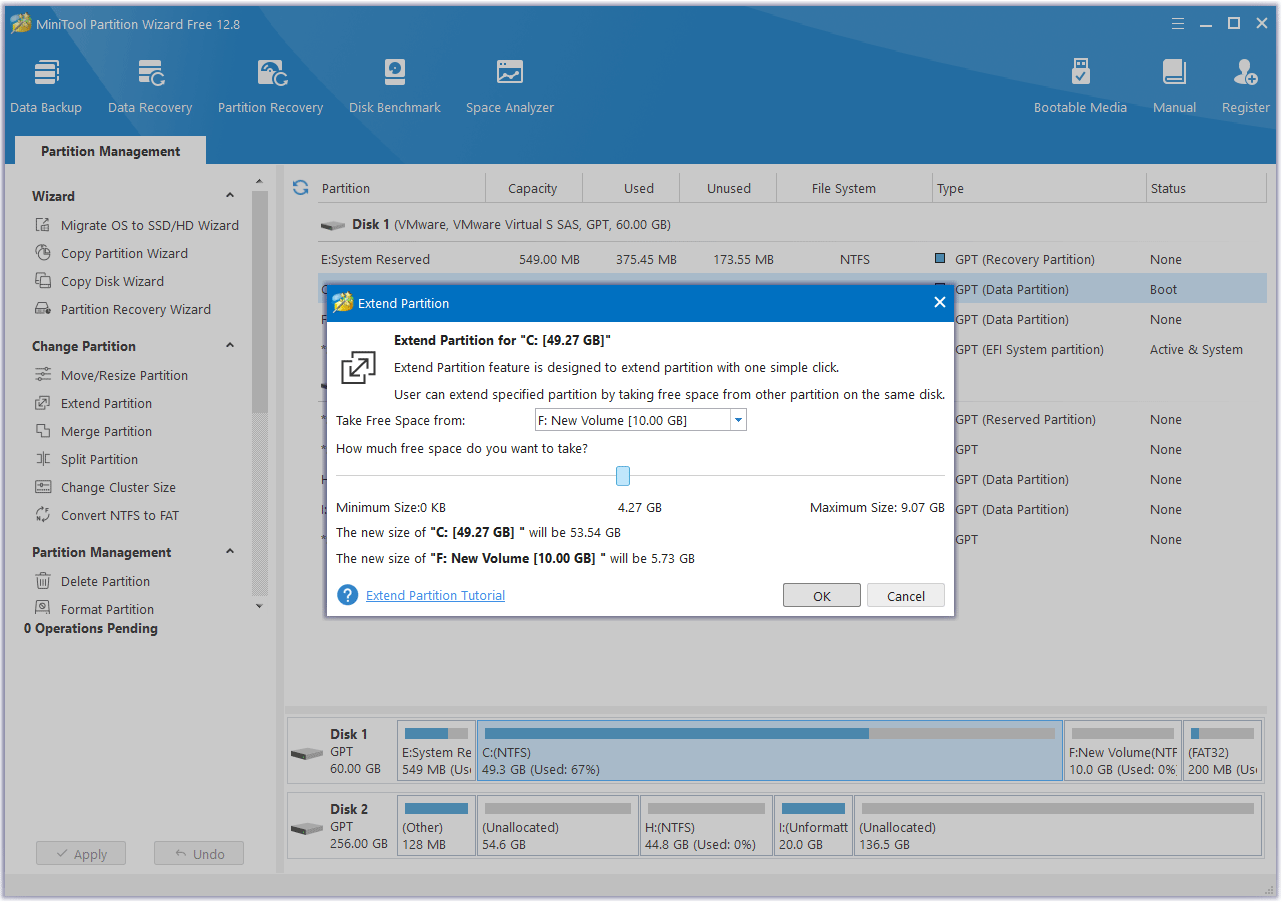
Step 3: Click the Apply button to execute the pending operation.
Method 3. Troubleshoot the Network Issue
After looking for many posts, I found some network troubleshooting methods and many people report that these ways work for the discussed issue in the post. You can try these ways.
#1. Refresh the Local Network
- Press the Windows logo key + R to open the Run dialog box.
- Type “cmd” and press Enter to open Command Prompt.
- In the Command Prompt window, type ipconfig /release and press Enter.
- Type ipconfig /renew and press Enter.
The current IP address will be released and the new IP address can be assigned.
#2. Reboot the Home Network
Many Eero users report that rebooting the Eero network can solve the games not installing/downloading/updating issue. If you are also using an Eero router, you can try this method. You just need to go to the Eero app > Settings > Network settings > Restart network.
Even if you are using other routers, you can also try this method, but you should search online for the specific router rebooting method.
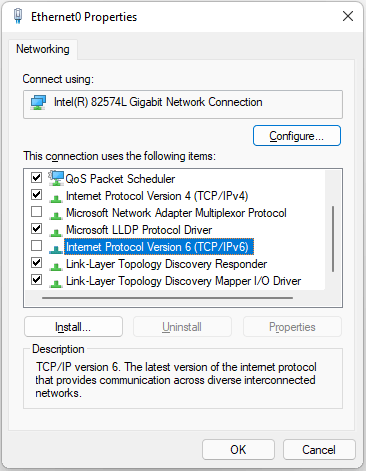
#3. Disable IPv6
If your Xbox games won’t install from Microsoft Store, this method may work.
- Press the Windows logo key.
- Search for “View Network Connections” and open it.
- Right-click on the connection you are using, and press Properties.
- Scroll down to “Internet Protocol Version 6 (TCP/IPv6)” and uncheck it. Then, press OK.
- Restart the PC and then retry any game install.
#4. Ensure the Network Speed
If games won’t update/install, the reason may be the slow network speed. First, you can run some network speed tests to see if the network speed is fast enough. Then, make sure you have turned off settings that may slow down the network speed (like the limit IP tracking feature).
Then, if you are using a VPN, you can try another one or turn off it to see if the issue is solved.
Method 4. Turn off the Antivirus Software Temporarily
Windows Defender is a built-in antivirus feature. It may prevent the game from being downloaded to your PC. You can follow the guide below to turn off it:
- Press “Win + R” keys to open the Run box.
- Type “gpedit.msc” and press Enter to open Local Group Policy Editor.
- Go to Computer Configuration > Administrative Templates > Windows Components > Windows Defender Antivirus and then double click Turn off Windows Defender Antivirus.
- Check Enabled and then click the Apply and OK buttons to save changes.
Then, you can download or update the game again to see if the issue is solved. In addition, if games won’t update/install, you can also allow the game or the game download client app through the Windows Defender firewall. Then, see if the game can be downloaded or updated.
Method 5. Troubleshoot the Incompatibility Issue
If the games not updating/installing/downloading issue is caused by incompatibility, you can try the following ways to solve the issue.
#1. Run the Game Launcher as Administrator
Running an app as an administrator can avoid many incompatibility issues. Many Epic Games users report that this method works when games won’t install. Therefore, you can also have a try.
Just need to right-click on the game launcher and choose Run as administrator. Then, games should install normally. If you encounter the games not updating issue, run the game as administrator.
#2. Perform a Clean Boot
Performing a clean boot can help you find which program is incompatible with the game. Then, remove this program and then the game installation or update should go on normally.
Method 6. Troubleshoot the Game Client App
Sometimes, the games not downloading/installing/updating issue is caused by glitches in the game distribution platforms. In this case, troubleshooting these client apps can solve the issue.
#1. Change the Download Region
This method may work for Steam.
- Open the Steam client and sign in.
- Go to Steam > Settings (on Windows) or Steam > Preferences (on Mac).
- Click Downloads on the left.
- Click the Download Region drop-down list and choose a new region.
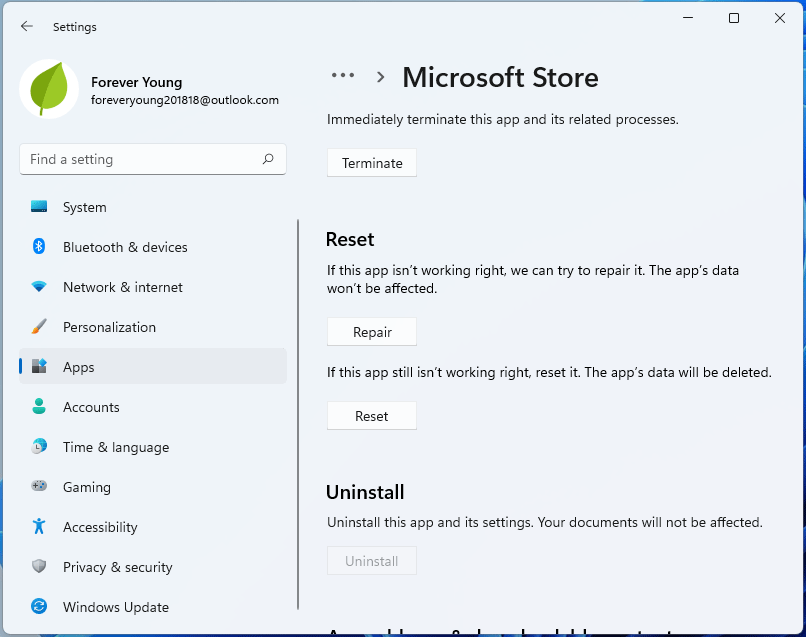
#2. Clear Cache of the Game Client App
For Microsoft Store:
- Press the Windows logo key + I to open Settings.
- Go to Apps > Apps & features.
- Scroll down to find Microsoft Store.
- Click the vertical three-dot icon and choose Advanced options.
- Scroll down to find the Reset section and then click the Reset button.
For Steam:
- Open the Steam client.
- Click Steam in the top-left corner and then choose Settings or Preferences.
- Navigate to the Downloads tab in the left sidebar and click the Clear Cache button in the right pane.
For Epic Games:
- Exit Epic Games.
- Press Win + R, type %localappdata%, and then press Enter to open File Explorer.
- Open the EpicGamesLauncher > Saved folder.
- Delete files: webcache, webcache_4147, and webcache_4430. There may only be one or two of the files present.
If you are using macOS, the process should be as follows:
- Exit Epic Games.
- Open Finder.
- Click on Go then Go to Folder.
- Type ~/Library/Caches/com.epicgames.EpicGamesLauncher and press Enter.
- Drag the webcache folder to the Trash.
- Empty the Trash and then relaunch the Epic Games Launcher.
#3. Verify the Integrity of Games Files
For Steam:
- Launch Steam and then either right-click the game in your Library or click the gear icon from the game’s Library page on the far right.
- From the drop-down menu, select Properties.
- Select the Installed Files tab and click the Verify integrity of game files button.
For Epic Games:
- Open the Epic Games Launcher.
- Find the game in your Epic Games Library.
- Click the three dots on the right side of the game line.
- Select Manage.
- Click the Verify button.
Method 7. Give Full Disk Access
Some people report that this method works for them. You can also have a try.
On Windows 11/10:
Go to Start > Settings > Privacy & security (or Privacy) > File system and make sure Let apps access your file system or Allow apps to access your file system is turned On.
On macOS:
- Click on the Apple icon on the top left corner of your screen.
- Select System Preferences.
- Go to Security & Privacy Preferences > Privacy and click Full Disk Access from the left panel.
- Tick the checkbox for C2 Backup (If the lock at the bottom left is locked, click it to unlock the Privacy pane). Then, close the window.
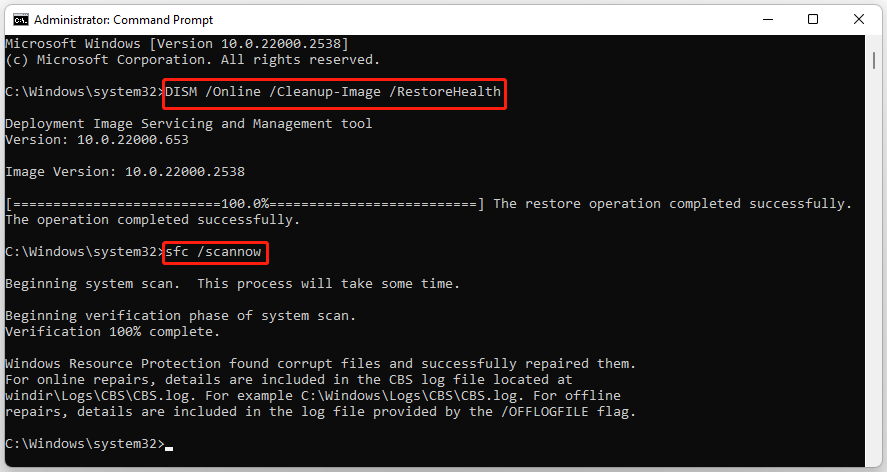
Method 8. Repair Corrupted System Files
Many users on Reddit report installation failures after Windows updates or launcher cache corruption. Damaged Windows files may prevent games from installing. To repair the corrupted system files, here are the steps:
- Type cmd in the search bar, right-click Command Prompt, and then select Run as administrator.
- Type DISM /Online /Cleanup-Image /RestoreHealth and press Enter.
- After the DISM process finishes, type sfc /scannow and press Enter.
Method 9. Check Disk Health
Failing drives may interrupt game installations. So, you should follow the steps below to check the disk for errors.
- Open the Command Prompt as administrator.
- Type chkdsk c: /f /r and press Enter. (Replace C: with your specific drive letter.
After that, restart your PC and try to install the game again.
Games Not Installing/Downloading/Updating FAQ
Bottom Line
Games may fail to install on PC due to insufficient storage space, a corrupted launcher cache, antivirus interference, permission issues, or broken gaming services.
For most users, the fastest fixes are clearing the launcher cache, checking disk space, and running installers as an administrator.
In addition, if you encounter problems when using MiniTool Partition Wizard, please feel free to contact us via [email protected]. We will get back to you as soon as possible.
About The Author

Position: Columnist
Vega enjoys helping people with computer problems, including disk management, data recovery, data backup, and more. She is constantly expanding her knowledge in related fields. And she will continue to bring more easy-to-understand professional articles to help people solve various problems on the PC.
User Comments :