Possible Causes for the “Unable to Display Current Owner” Error
A great many people encounter the “unable to display current owner” error when attempting to take ownership of a file or folder on Windows. Another error message pops up “You have been denied permission to access this folder/file” when you continue.
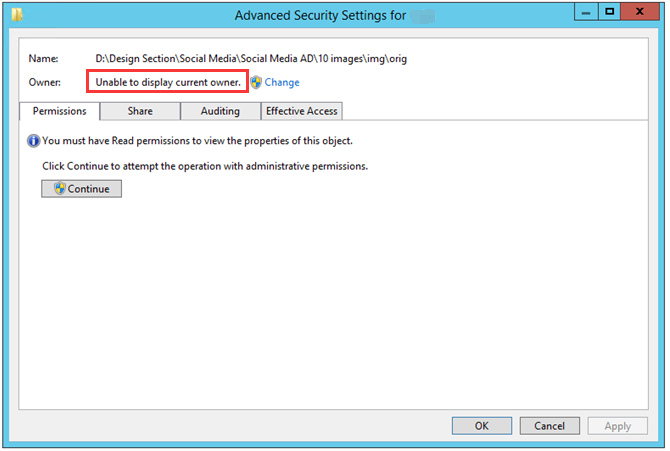
What causes this problem? According to a survey, the error often appears when a folder is read-only, the folder doesn’t have enough permission, or the folder is used by a program. If the system user or group doesn’t have full control privileges, you will encounter the Windows 10 unable to display current owner error.
In addition, there are many other common scenarios that can provoke this error. Here we list them as follows:
- Folder Lock software: The folder locker or other similar programs can block your current user account from accessing a file/folder.
- Disabled administrator accounts: If any administrator accounts are not activated on your system, you may encounter the “takeown access denied” error.
- Insufficient permissions: Lacking full control in the file permission is one of the most common reasons.
- Corrupt file system: Sometimes, the Windows unable to display current owner error can be caused by file system corruption.
Here, we recommend you try the following solutions one by one until you fix the problem.
Top 7 Solutions to the “Unable to Disable Current Owner” Error
- Make Sure the File/Folder Is Not Read-only
- Uninstall Folder Lock or Any Similar Software
- Allow Full Control to All Authenticated Users
- Check File System Errors
- Enable Windows Built-in Administrator Account
- Grant the File Ownership to All Administrators
- Enable the Built-in Administrator Account in Safe Mode
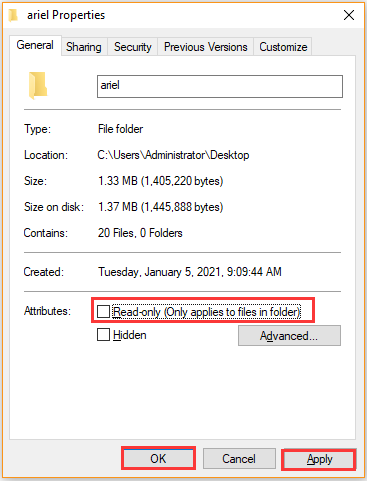
Solution 1. Make Sure the File/Folder Is Not Read-only
As mentioned above, the read-only option of a folder can trigger the error “unable to display current owner.” So, the first thing you should do is to unselect the read-only option. Then you can follow the steps below:
Step 1. Right-click the file or folder that states the error and select Properties.
Step 2. In the Properties window, uncheck the Read-only box next to the Attributes section.
Step 3. Click on OK and Apply to execute this change.
Now, you can try accessing the file again and see if the error “takeown access denied” disappears.
Top recommendation: How to Get Permission from TrustedInstaller in Windows 10/7.
Solution 2. Uninstall Folder Lock or Any Similar Software
Folder Lock or any other similar software is used to protect important files and folders via password encryption. However, these programs are known for throwing some issues like unable to display current owner. If you tweak a file using Folder Locker software, you may find that the file becomes inaccessible for another administrator account.
So, we recommend you uninstall Folder Lock or other similar software like AX Crypt, AES Crypt, and Easy File Locker.
Step 1. Press Win + R keys to open the Run dialog box, and then type appwiz.cpl in the box and hit Enter.
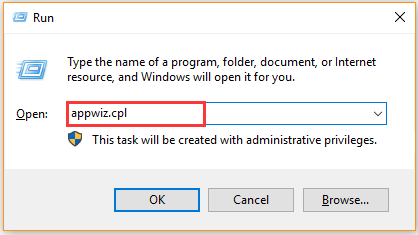
Step 2. In the Programs and Features window, scroll down the list of installed programs to find Folder Lock or other similar programs. Right-click it and select Uninstall. After that, you need to follow the on-screen instructions to complete the uninstallation.
Step 3. Now, you can restart your computer and regain ownership of the file.
If Windows 10 unable to display the current owner issue still appears, here are some other solutions.
Solution 3. Allow Full Control to All Authenticated Users
Windows unable to display current owner error can occur when lacking full control to the permissions for a file/folder. In order to fix the issue, you can allow full control to all authenticated users of a file. Here’s a step-by-step guide.
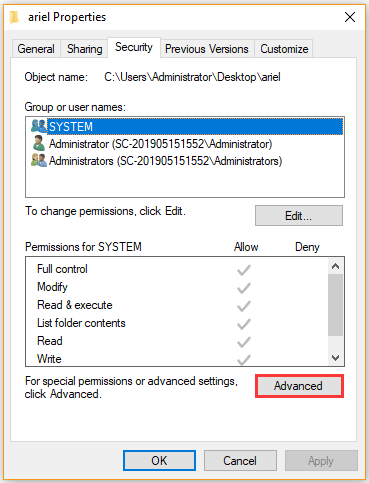
Step 1. Right-click the file or folder that states the error and select Properties from the context menu.
Step 2. In the Properties window, navigate to the Security tab and click on the Advanced button.
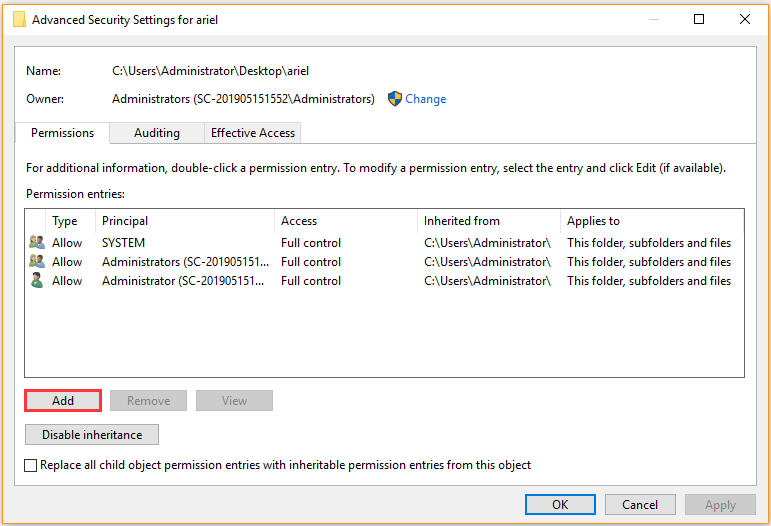
Step 3. Now the Advanced Security Settings window pops up, and then go to the Permissions tab and click the Add button at the bottom.
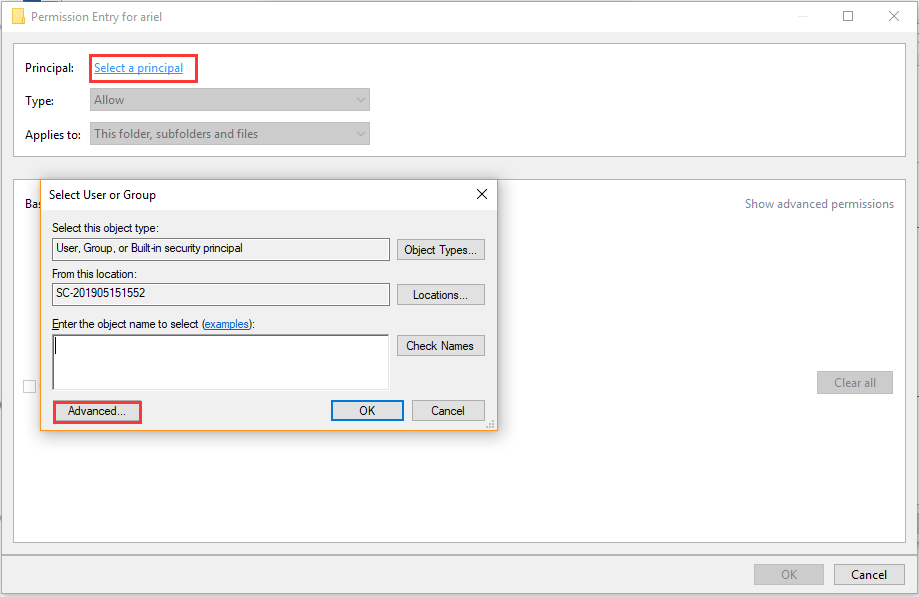
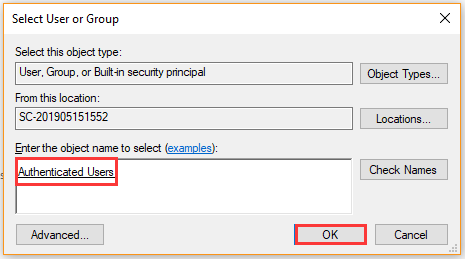
Step 4. Click on the Select a principal link in the pop-up window and click on the Advanced button.
Step 5. In the new window, click on Find Now button. Then scroll down the list of search results and double click Authenticated.
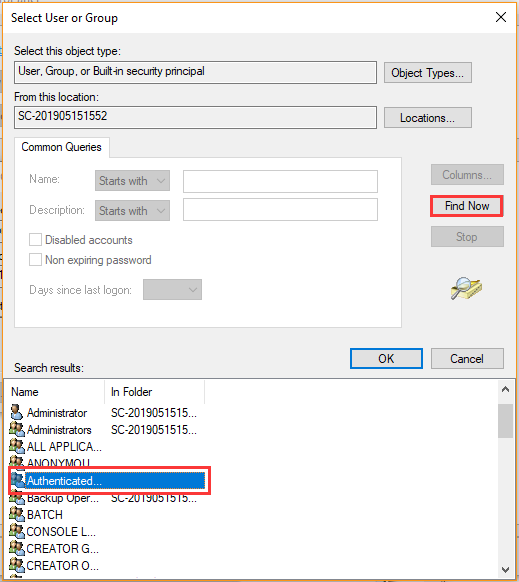
Step 6. Then you will find that the Authenticated Users is set as an object name. After that, click on OK.
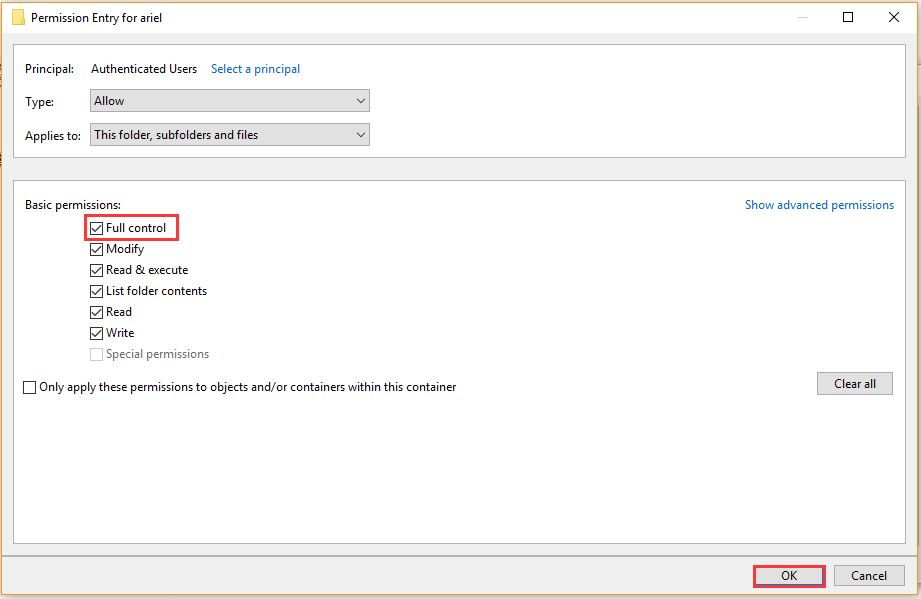
Step 7. In the Permission Entry window, select the checkbox for Full control and click on OK to save the changes.
After that, you can check if the Windows 10 unable to display current owner error still persists.
Solution 4. Check File System Errors
As pointed out above, the Windows unable to display current owner issue can be caused by any file system errors. In this case, you need to scan for file system errors. Here are 2 simple utilities – CHKDSK and MiniTool Partition Wizard to check the file system.
Steps for Using CHKDSK:
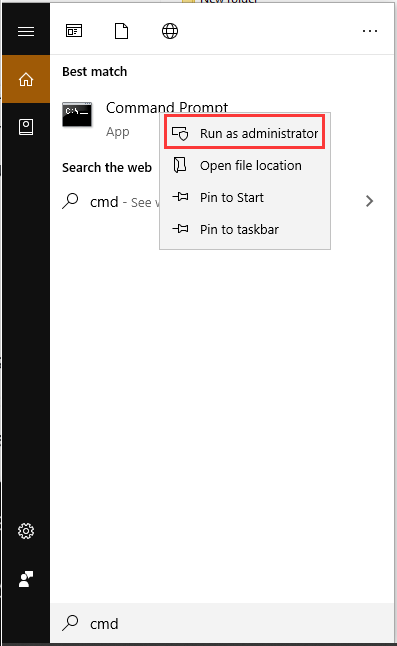
Step 1. Type cmd in the search box, and then right-click the Command Prompt app and select Run as administrator.
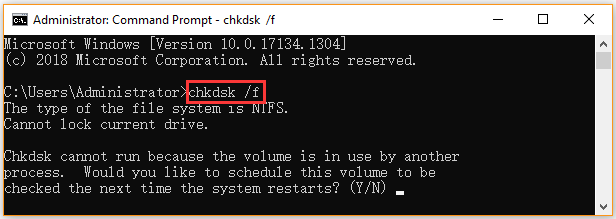
Step 2. In the elevated Command Prompt, type chkdsk /f and hit Enter. If the folder or files is located in the C drive, you will be prompted to scan it at the next system start. Type Y and hit Enter to confirm.
This process may take you some time to complete. Besides, this scanning is not always smooth. You may encounter various issues like CHKDSK write protected error, CHKDSK gets stuck, etc. So, we highly recommend you use a more effective tool – MiniTool Partition Wizard.
Steps for Using MiniTool Partition Wizard:
MiniTool Partition Wizard is an ideal choice for helping you check file system errors with just a few clicks. It is a trusted partition manager that focuses on data recovery, hard drive optimization, and file system conversions. This tool has helped users fix lots of errors like Recuva unable to determine file system type, green screen of death, and file system error – 2147219196.
MiniTool Partition Wizard FreeClick to Download100%Clean & Safe
Let’s see how to check the file system using this tool:
Step 1. Launch this software to enter its main interface.
Step 2. Select the drive that contains the affected folder or file and click on Check File System from the left pane.
Step 3. In the pop-up window, select the second option – Check & fix detected errors and click on the Start button. After that, this tool will scan the whole drive for errors and fix them automatically.
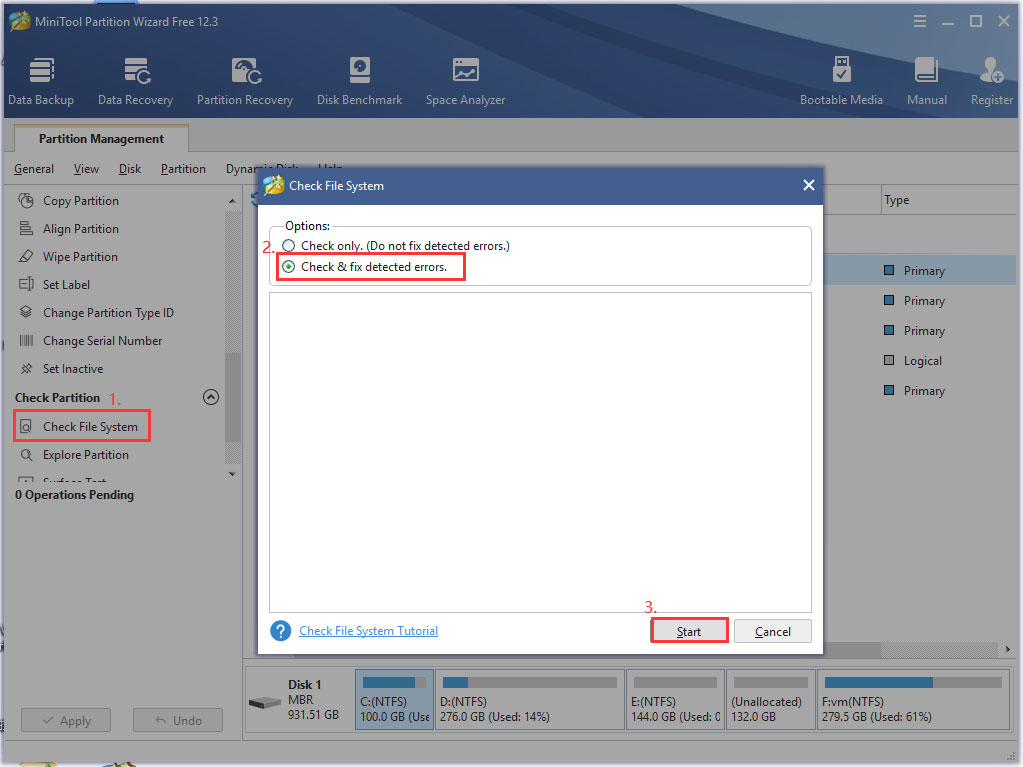
Once you have finished the above steps, reboot your computer and see if the file is still unable to display current owner.
Solution 5. Enable Windows Built-in Administrator Account
As you might know, all the older Windows versions have a built-in administrator account that was created by default. However, this hidden account still exists on Windows 10/7, but it is not enabled.
Since this administrator account has more privileges than other regular administrator accounts, try enabling the built-in administrator account to fix the file permission error. Here’s how to do that.
Step 1. Open the elevated Command Prompt window by utilizing the steps in Solution 4.
Step 2. Type net user administrator /active:yes in the elevated Command Prompt window and hit Enter to enable the administrator account.
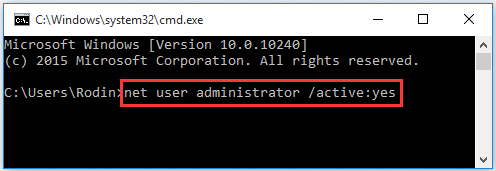
Step 3. Once the process completes successfully, restart your computer and log out of your current user account and log in a new user account named Administrator.
Now, you should log in to the built-in administrator account and access the folder again to see if the issue pops up.
Solution 6. Grant the File Ownership to All Administrators
In addition, you can try granting file/folder ownership to all administrator accounts. This method assumes that you have enabled the built-in administrator account and logged in to it. To do so, follow the step-by-step guide below:
Step 1. Open the elevated Command Prompt window again.
Step 2. Type the takeown /F “complete path of folder or file” /a /r /d y command and hit Enter. If this command fails and returns the error message “the system can’t find the file specified”, copy the exact path of the file/folder in File Explorer and go on.
Step 3. Type icacls “complete path of folder or file” /grant administrators:F /t in the elevated Command Prompt window and hit Enter. If the operation complete successfully, you can try accessing the folder/file and see if the issue is resolved.
If this problem still appears, you need to run net user administrator /active:no command to disable the built-in administrator account and try the following method.
Solution 7. Enable the Built-in Administrator Account in Safe Mode
If the error “unable to display current owner” still happens after you have tried all the above methods, you may consider enabling the built-in administrator account in Safe Mode. Now, follow the steps below to enter Safe mode and access the file/folder via the built-in administrator.
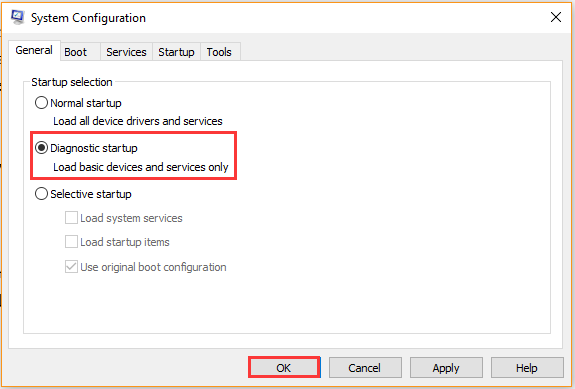
Step 1. Press Win + R keys to open the Run dialog box, and then type msconfig in the box and hit Enter.
Step 2. In the System Configuration window, select the Diagnostic startup option and click on OK to save the changes.
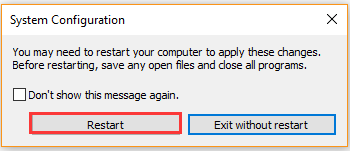
Step 3. Click on the Restart button in the pop-up window and wait for your Windows to reboot. Once your computer boot into Safe Mode, you can access the folder and see if the issue is resolved. If not, continue with the steps below.
Step 4. Open the elevated Command Prompt window again and enable the built-in administrator account by running net user administrator /active:yes. Then you need to log in to the account and try accessing the folder to see if the issue is fixed.
Step 5. After you have made changes to the folder successfully, you need to disable the built-in account by running net user administrator /active:no command.
Now, you can open the System Configuration window again via the above steps and select the Normal startup option. Then click OK and restart your computer into normal mode.
Bottom Line
This post mainly focuses on how to fix the “unable to display current owner” error on Windows. If you are struggling to fix it, you can try the given methods one by one until the problem is resolved. If you have any suggestions or ideas on this topic, you can leave them in the comment area. You can send us an e-mail via [email protected] if you have any questions about the MiniTool software.
User Comments :