About The System Cannot Find the File Specified
It can be annoying when you encounter the error message “the system cannot find the file specified”. You may get this error in various scenarios:
- While accessing the drive
- While accessing folders
- While installing drivers
- While backing up the system
- While running commands in Command Prompt or PowerShell
- While launching an app
Depending on your situation, the solutions to the problem can vary. In this guide, we’ll break down the cause of this error and provide step-by-step solutions to fix it.
Why The System Cannot Find the File Specified?
Why the system cannot find the file specified? This error usually appears due to various reasons. Here, we list some possible reasons, and you can learn about them.
- Missing or deleted files: The file or directory that the system is looking for has been accidentally deleted, moved, or is not present in the expected location.
- Incorrect file path: A typo in a command, shortcut, or script (for example, writing “documets” instead of “documents”) can cause the path to disappear.
- Corrupted system files: Essential system files may be corrupted or damaged, preventing the system from finding the necessary components.
- Driver issues: Missing or corrupted drivers can lead to this error, as the system cannot find the necessary driver files.
- Registry issues: Incorrect or corrupted entries in the Windows Registry can point to non-existent files or locations, causing the error.
- Malware or virus infection: Malware or viruses can sometimes delete, corrupt files, leading to the system being unable to find them.
- Disk errors: Bad sectors or file system corruption on the hard drive can make files inaccessible, resulting in the error.
How to Fix The System Cannot Find the File Specified?
In this section, we will show you 12 ways to fix the issue “the system can not find the file specified”.
You can try verifying the path and filename, repairing corrupted system files, checking the disk for errors, updating/reinstalling drivers, scanning for malware, formatting the USB drive, etc.
To know the detailed steps, please keep reading.
Fix 1. Verify the File Path and Filename
This error occurs when the path or file name specified in the command, program, or configuration is incorrect. For example, if the folder is named “User” instead of “Users,” a path like “C:\Users\Name\File.txt” will not work.
So, you should double-check the path and filename for accuracy, ensuring there are no typos and that the file actually exists at the specified location.
Fix 2. Search for the Missing File
If the file may have been moved, renamed, or deleted, the system cannot find the file specified. Therefore, you should manually search for the file to confirm its presence and location.
If you accidentally deleted a file, you can first check the Recycle Bin to see if it’s still there. Open the Recycle Bin and search for the file. If you find it, right-click, click Restore to restore it to its original location.
If you can’t find the files you need in the Recycle Bin, you can seek help from third-party data recovery software to recover them. MiniTool Partition Wizard is a good choice.
Its Data Recovery feature can help you recover various file types from various storage media (such as hard drives, USB drives, memory cards, and more). This feature can also help you recover files from formatted partitions, logically damaged partitions, and RAW partitions.
Furthermore, this versatile partition manager allows you to perform various operations related to hard drives and partitions. Specifically, it allows you to create/format/resize/move/extend/delete/copy/restore partitions.
It can also convert MBR to GPT without data loss, rebuild the MBR, convert FAT to NTFS, migrate OS to an SSD/HDD, clone a hard drive, and more.
To use MiniTool Partition Wizard to recover deleted files, you can follow these steps:
Step 1: Download and install MiniTool Partition Wizard on your computer. Then launch it to enter its main interface.
MiniTool Partition Wizard DemoClick to Download100%Clean & Safe
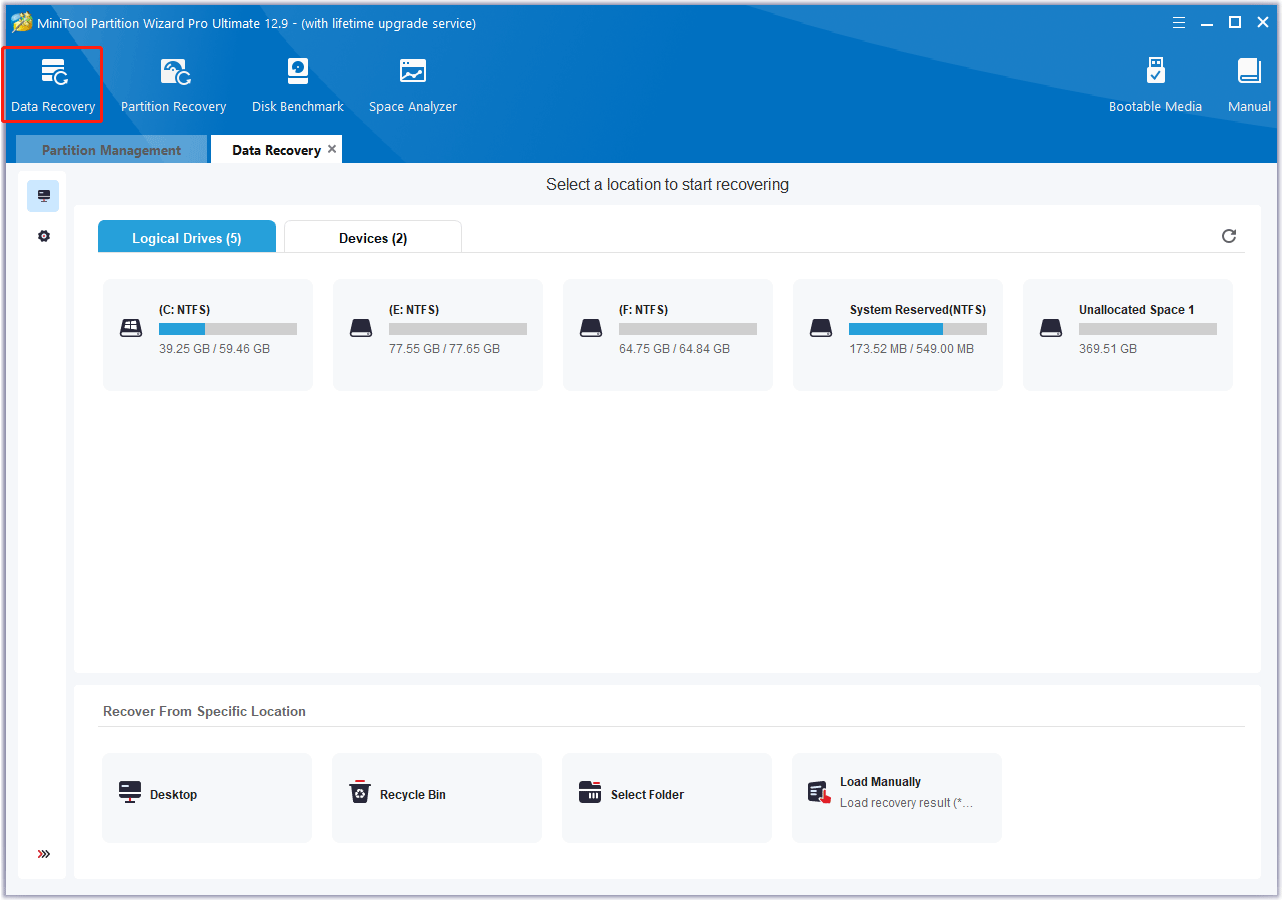
Step 2: Click Data Recovery on the top toolbar. Here, it will list three sections, each with different functions.
- Logical Drives: This section displays lost partitions, unallocated space, and all existing partitions on your PC, including removable devices like USB drives.
- Devices: This section lists all hard drives connected to your computer. You can select a hard drive to scan.
- Recover from Specific Locations: This section allows you to scan and recover lost files from three specific locations: the Desktop, the Recycle Bin, and a folder. The “Manual Load” option allows you to load the results of a previous scan to directly check recovered files without performing another scan.
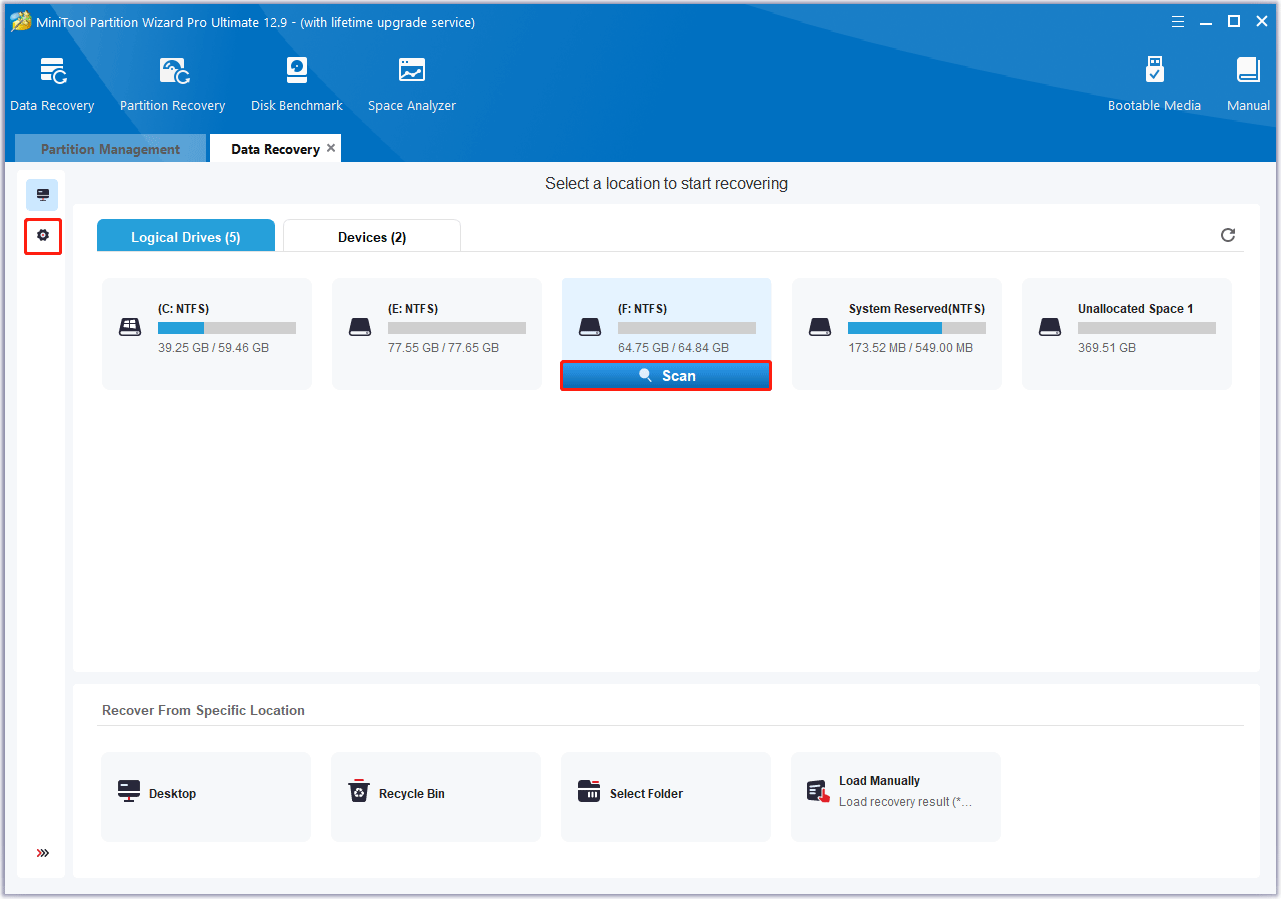
Step 3: Now, select the target hard drive and click Scan to begin the scan.
Step 4: Then, wait for the scan to complete. If the desired data is found, you can click the Pause or Stop icon to get instant data recovery.
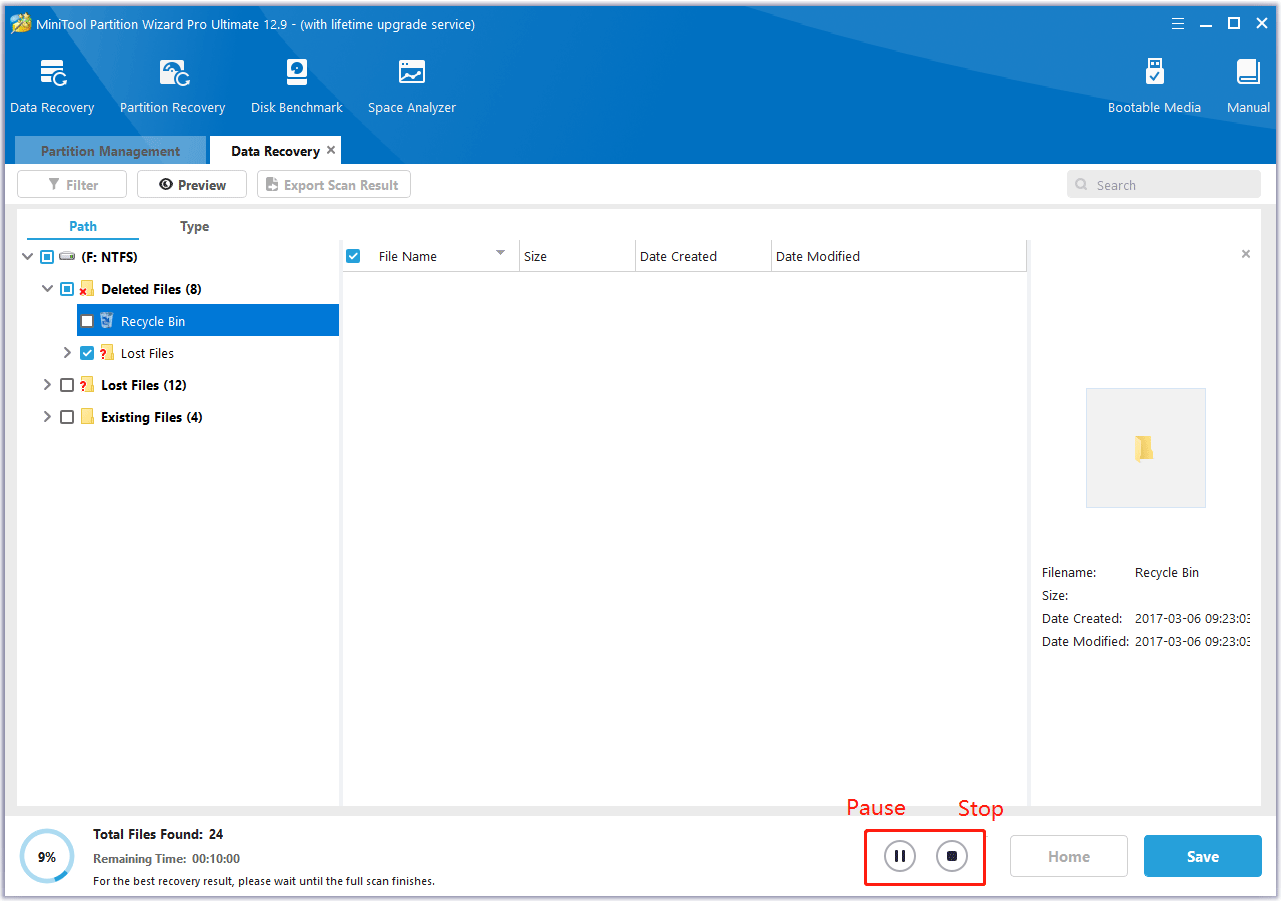
Step 5. Make sure to tick the checkboxes of the folders/files you want to recover and click Save.
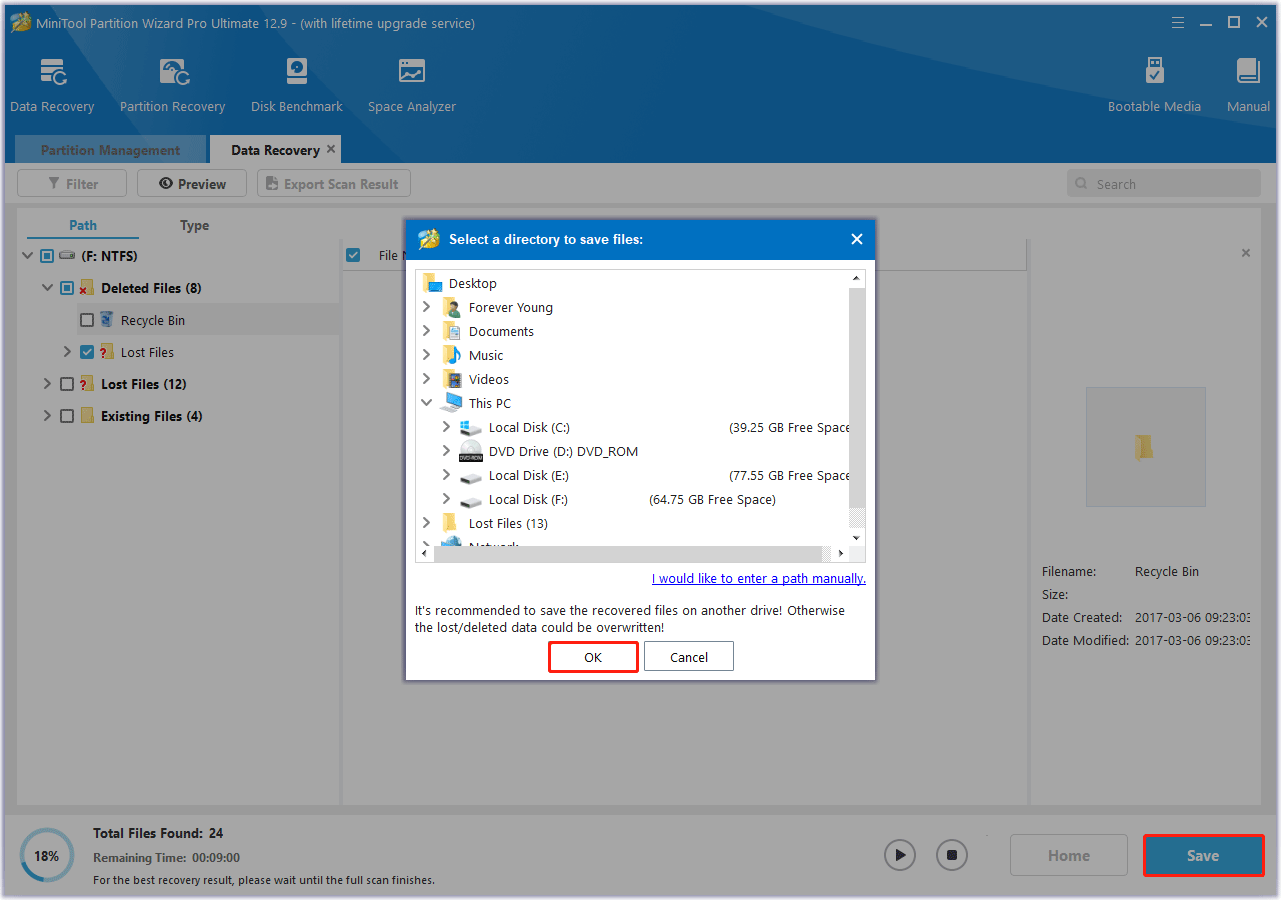
Step 6: In the window that pops up, select a directory to save the recovered files to and click OK. It’s better to save the recovered files to another drive. Otherwise, the lost/deleted data may be overwritten.
Fix 3. Repair Corrupted System Files
System files are critical to Windows’ operation. If these files are missing or corrupted, you may encounter a “File Not Found” error. You can use built-in Windows tools to scan and repair these files.
Use System File Checker (SFC)
SFC is a command-line tool that scans for corrupted system files and replaces them with cached copies from the Windows component store.
Step 1. Open a command prompt as an administrator.
- Type CMD in the Search box.
- Right-click Command Prompt and choose Run as administrator.
- If a User Account Control (UAC) prompt appears, click Yes.
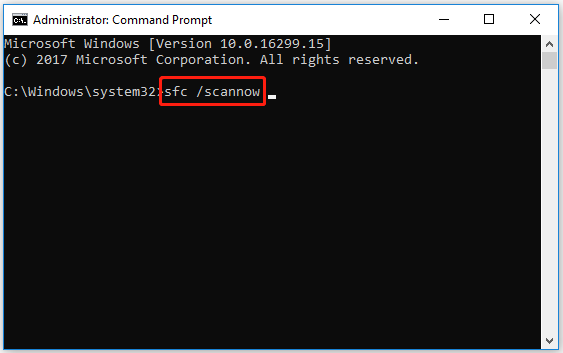
Step 2. Run an SFC scan.
- Type the sfc /scannow command and press Enter.
- The scan may take 10-15 minutes. Do not close the window during the scan.
Step 3. Restart your computer.
If SFC doesn’t resolve this issue, try another tool to repair the corrupted system file.
Use Deployment Image Servicing and Management (DISM)
DISM is used to repair the Windows image itself, which SFC relies on. This tool is particularly useful if SFC cannot repair corrupted files.
Step 1. Open Command Prompt as an administrator (same method as above).
Step 2. Type the DISM /Online /Cleanup-Image /Restorehealth command and press Enter.
Step 3. After DISM completes, you need to restart your computer and then re-run sfc /scannow.
Fix 4. Check the Disk for Errors
Errors on your drive can make files inaccessible. Windows’ built-in tool, the Command Prompt tool chkdsk, can scan for and repair these errors.
Step 1. Open Command Prompt as an administrator again.
Step 2. Type chkdsk *: /f /r (* represents the drive letter) and press Enter.

Alternatively, MiniTool Partition Wizard can also help you check the hard drive errors, including file system errors or bad sectors. This tool is simple and easy to use, and more friendly to people who are not familiar with the chkdsk commands.
To check your drive for errors with MiniTool Partition Wizard, you can follow the steps below.
MiniTool Partition Wizard FreeClick to Download100%Clean & Safe
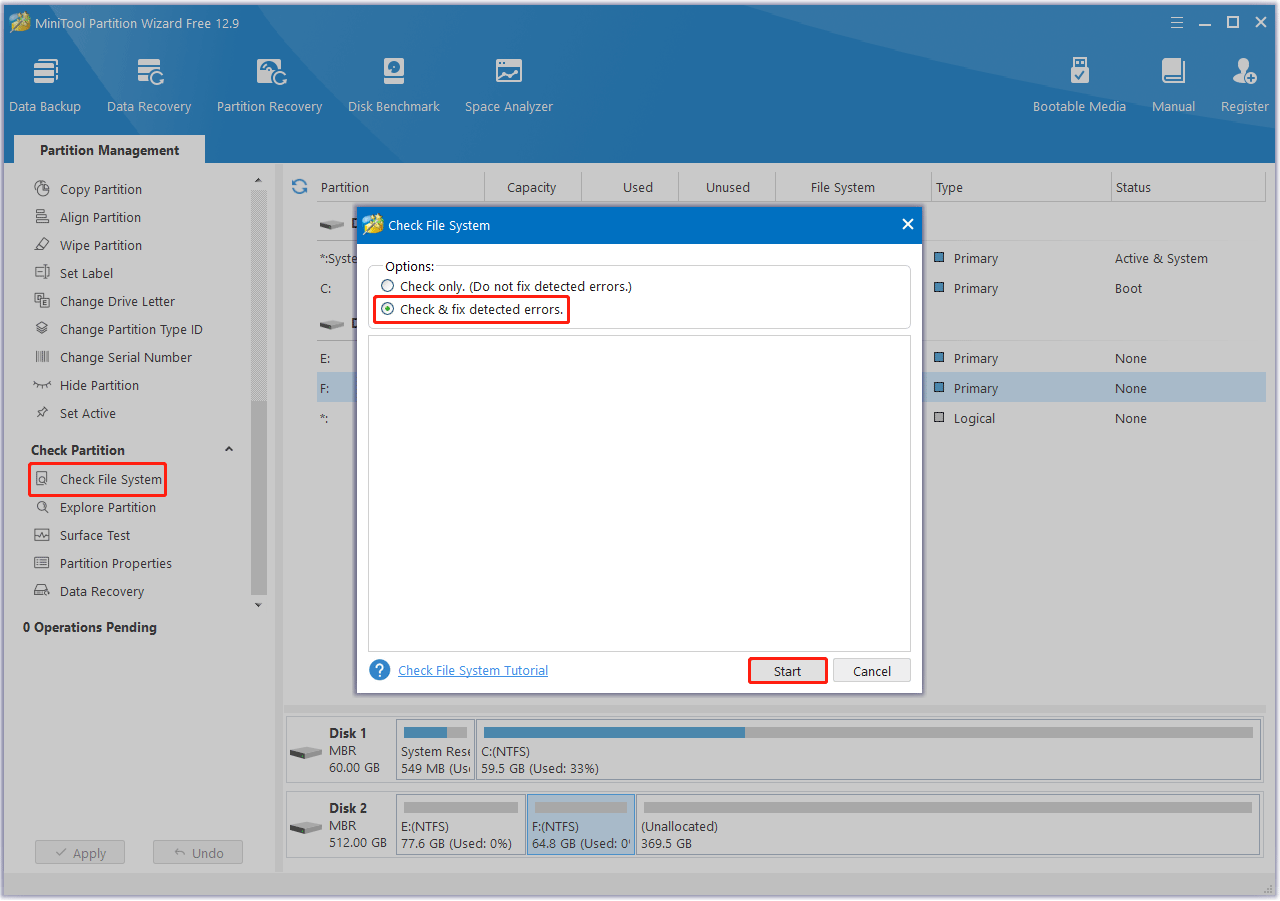
Step 1: Launch MiniTool Partition Wizard on your computer and enter its main interface. Click on the target partition and select Check File System from the left action panel.
Step 2: Select Check & fix detected errors and click on the Start button.
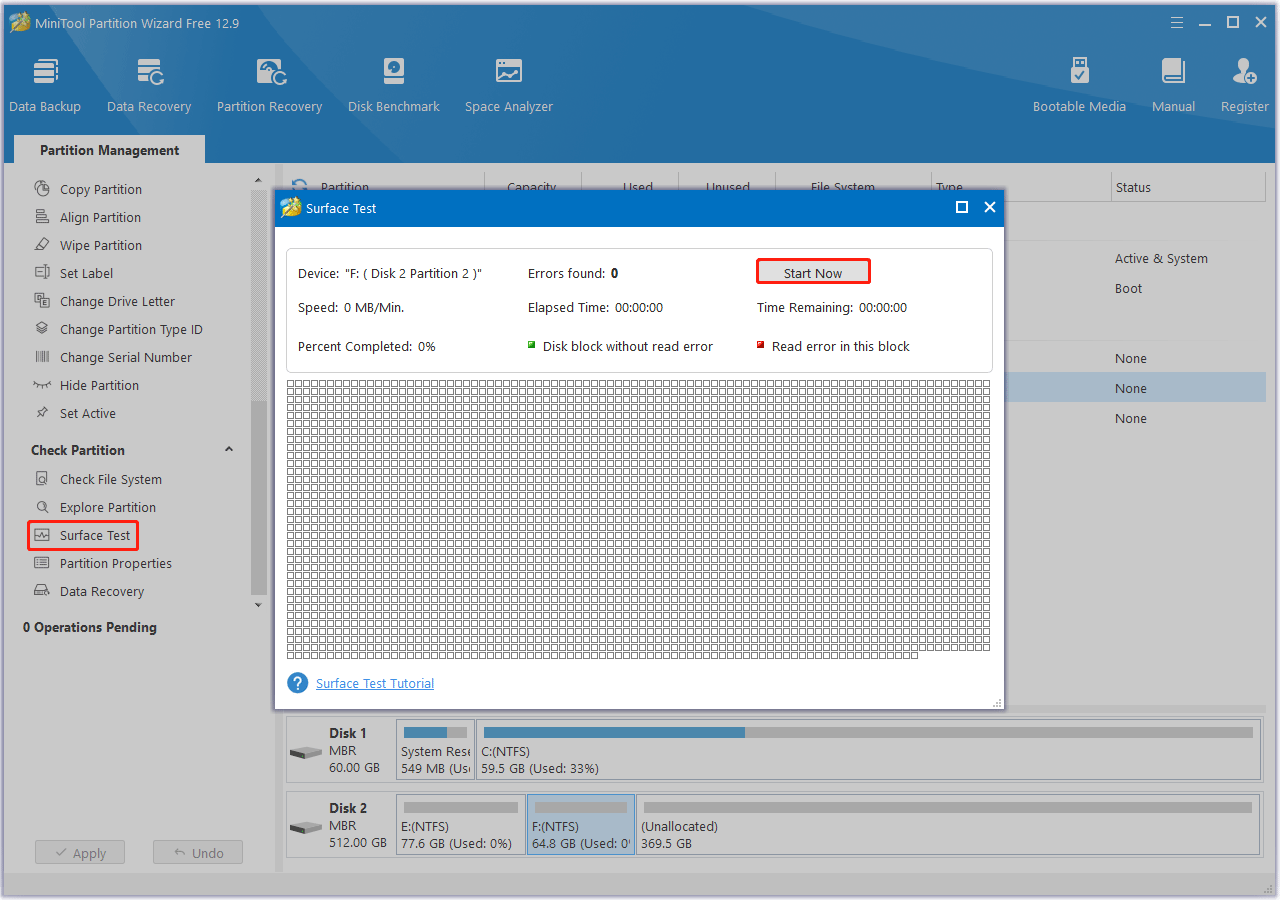
Step 3: After the process ends, any detected file system errors will be fixed. If you want to know if the hard drive has bad sectors, return to the main interface. Then click on your hard drive and select Surface Test.
Step 4: In the pop-up window, click on the Start Now button to start scanning for bad sectors. If any block is marked red, it means there are bad sectors on the hard drive.
Fix 5. Update or Reinstall Drivers
If the error occurs during hardware operation, update or reinstall the relevant drivers. To do that, the steps are as follows:
Update drivers:
Step 1. Right-click Start and select Device Manager.
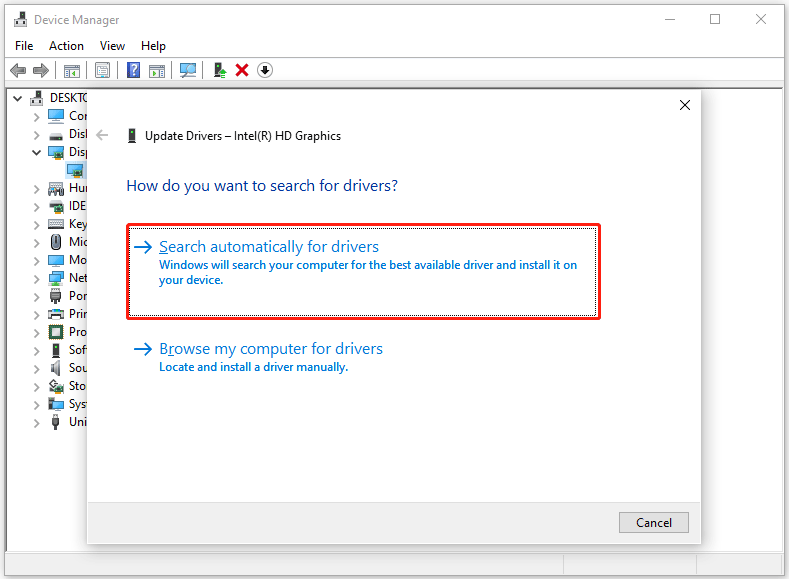
Step 2. In the Device Manager window, locate the device you want to update, right-click on it, and select Update driver from the drop-down menu.
Step 3. In the new window, click on Search automatically for drivers. Then follow the on-screen instructions, and the drive should be updated to the latest version.
Reinstall drivers:
Step 1. Open Device Manager and locate the device.
Step 2. Right-click on the device and select Uninstall device.
Step 3. Restart your computer, and Windows will automatically find and reinstall the driver.
If Windows doesn’t automatically reinstall the driver, you may need to manually install it from the manufacturer’s website using the method described above.
Fix 6. Scan for Malware
Malware can cause “the system cannot find the file specified” errors by deleting files, modifying paths, or corrupting system resources. A full system scan using Windows Defender can detect and remove threats. Here is the guide:
Step 1. Press the Win + I key to open Settings. Then go to Update & Security > Windows Security.
Step 2. Click Virus & threat protection > Scan options.
Step 3. Select Full scan and click Scan now. This may take over an hour, so please allow the scan to complete.
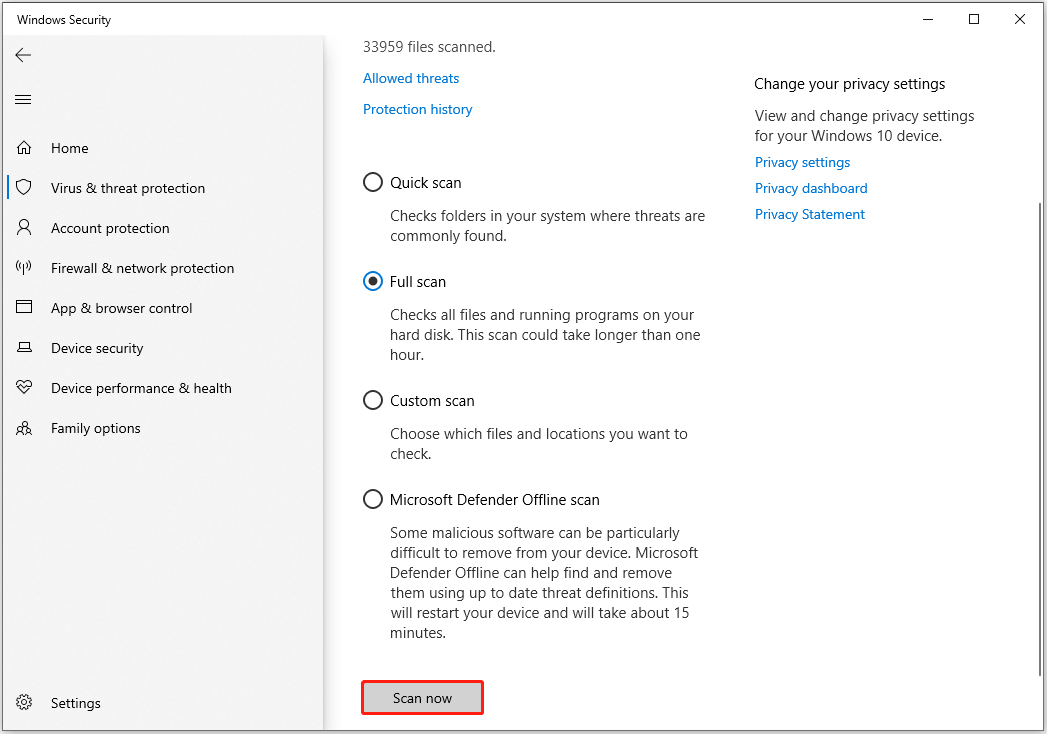
Step 4. If threats are found, follow Windows Defender’s instructions to quarantine or remove them.
You can also run a full system scan using third-party antivirus software such as Norton or McAfee.
Fix 7. Repair or Reinstall the Problematic App
If this error occurs when launching a specific app, the app’s executable file (.exe) or related DLL files may be missing or corrupted. Try the following steps:
Step 1. Open Windows Settings.
Step 2. Click App > Apps & features from the left-hand menu, then locate and select the app you want to repair.
Step 3. Under the app’s name, select Advanced options (this option is not available for all apps).
Step 4. If available, click the Repair button.
If the repair fails, try uninstalling the app and then reinstalling it. In Apps & features, click the app and click Uninstall. Restart your computer, then reinstall the app from the official source.
Fix 8. Format Your USB Flash Drive
If the “the system can not find the file specified” error occurs when you insert your USB flash drive or any other removable storage device, you can try to format it.
To do so, you can right-click the USB drive in Windows File Explorer, choose Format, and follow the guide to finish the formatting operation.
If you fail and receive the error message “Windows was unable to complete the format”, you can use MiniTool Partition Wizard. This free partition manager can easily format your drive to NTFS, FAT32, or exFAT.
It can also format drives larger than 32GB to FAT32, which Windows usually cannot do. It even allows you to convert drives between FAT32 and NTFS without losing data.
MiniTool Partition Wizard FreeClick to Download100%Clean & Safe
Here is the step-by-step guide to formatting a USB drive with MiniTool Partition Wizard:
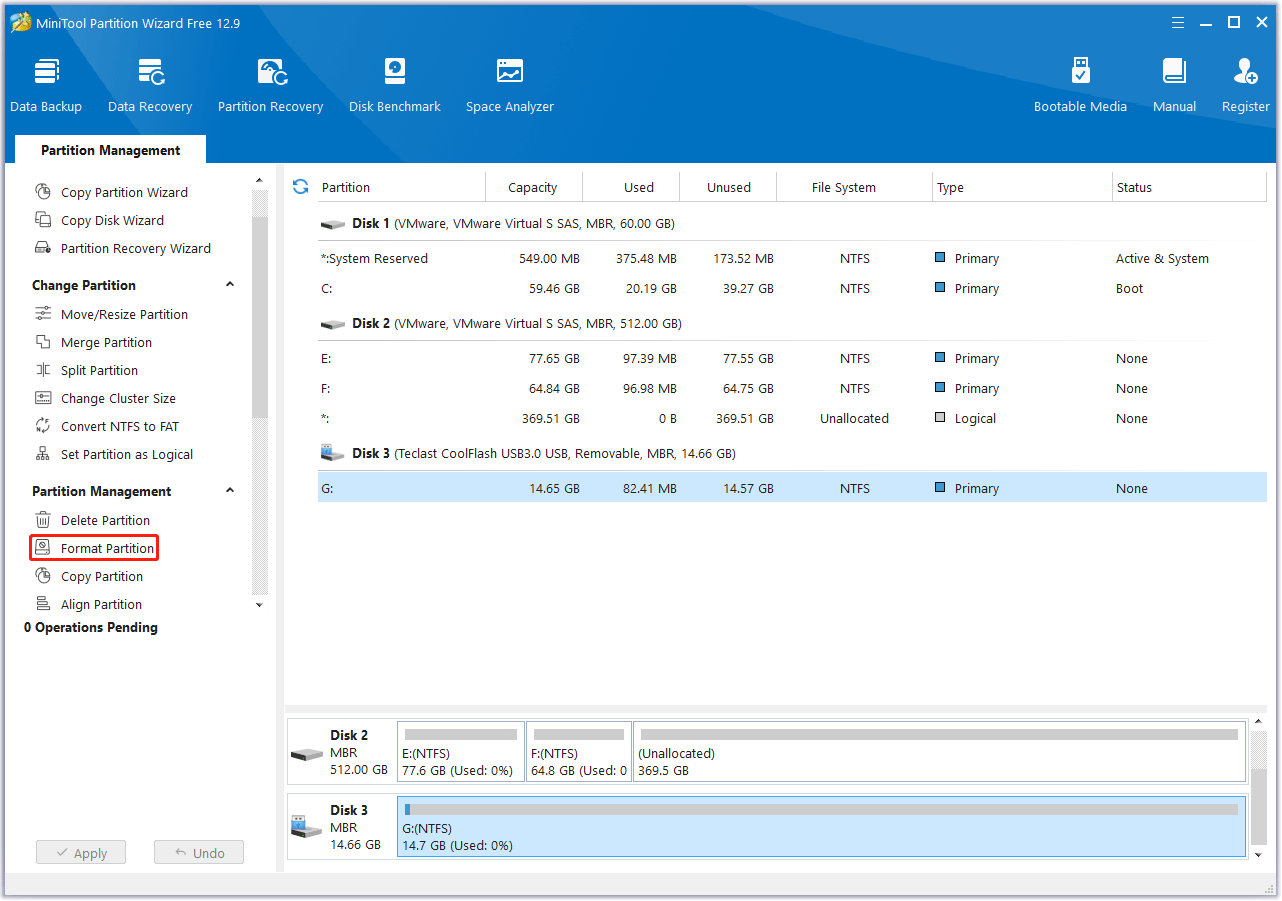
Step 1. Choose the partition on the USB drive.
- Open MiniTool Partition Wizard after installation.
- Choose the specific partition on the USB drive that you want to format.
- Select the Format Partition feature from the left action panel.
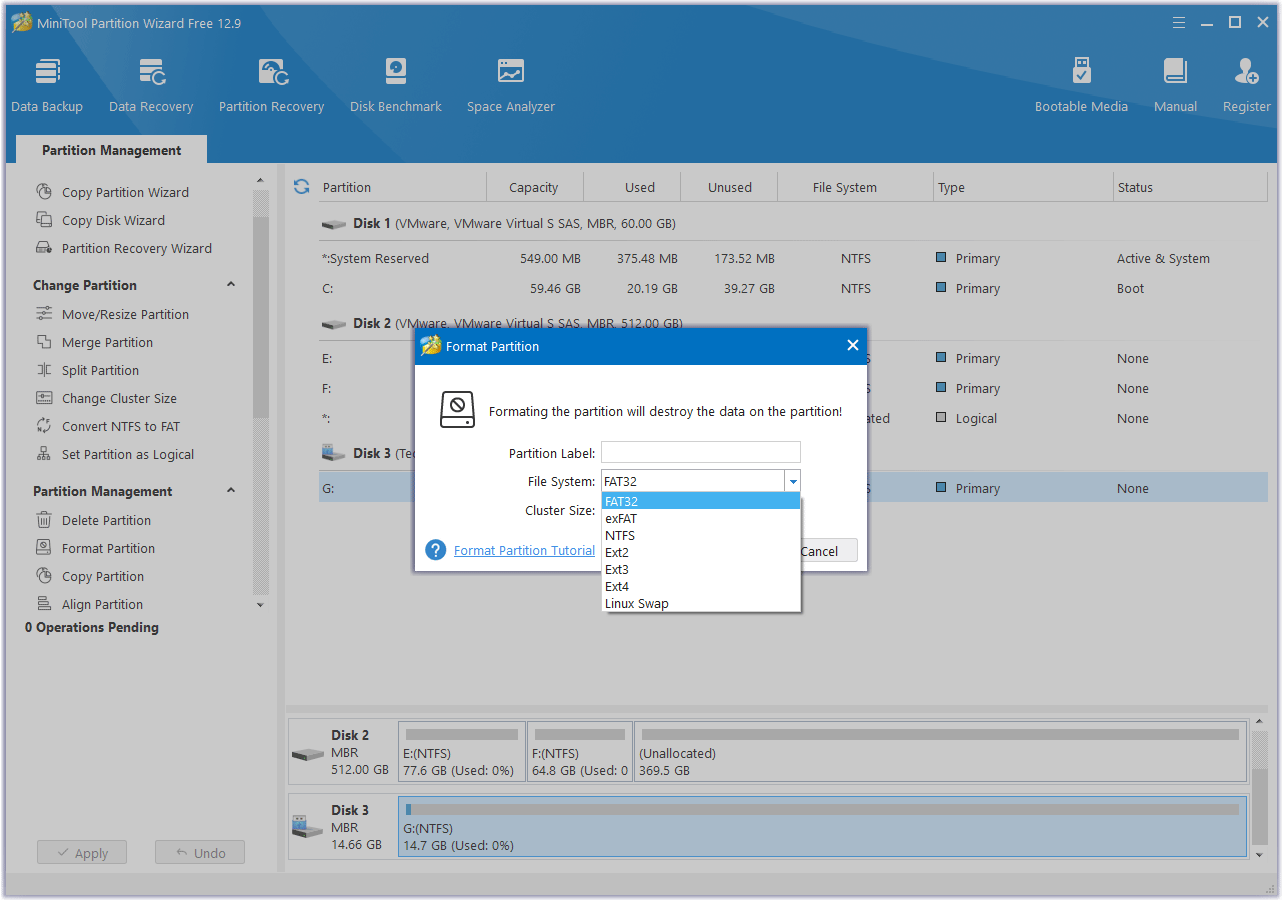
Step 2. Configure the formatting settings.
In the Format Partition window, you will need to do:
- Select a file system: Choose NTFS, FAT32, exFAT, or Ext 2/3/4.
- Assign a volume label (optional): Give your formatted drive a name.
- Set cluster size: This determines the size of data blocks on the drive. The default is usually fine.
Step 3. Apply the changes and confirm.
- Click OK on the Format window.
- Then click Apply to start the formatting process.
- Click Yes to proceed when this tool prompts.

Fix 9. Check the System Log Files
You can try to check the system log files to fix this error. Here are the steps:
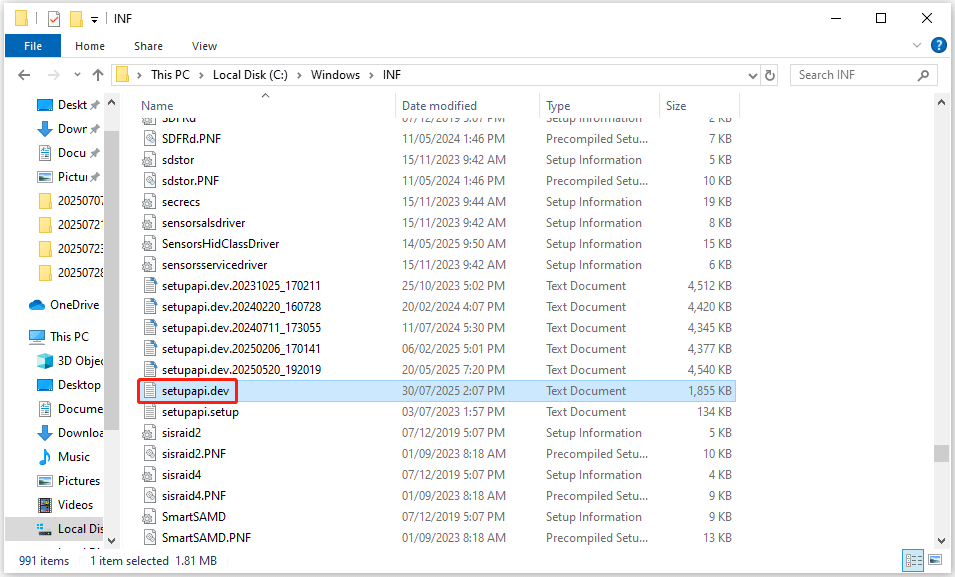
Step 1. Open Windows File Explorer.
Step 2. Navigate to the C:/Windows/inf directory and open the Inf folder.
Step 3. Locate the setupapi.dev or setupapi.dev.log file, and double-click to open it.
Step 4. Press the Ctrl + F key to open the Find box. Then type “cannot find the file” in the box.
Step 5. Press Enter to run the search. You should get the missing file.
Step 6. Copy and paste it into the Windows/inf folder.
The missing file should isolate the problematic system driver. Reinstall it and reboot the system.
Fix 10. Install Windows Update
Outdated versions of Windows may contain vulnerabilities that cause file-related errors. Updating to the latest version can resolve these issues.
Step 1. Press the Win + I key to open Settings.
Step 2. Go to Update & Security > Windows Update.
Step 3. Click Check for updates. If any updates are available, download and install them.
Step 4. Restart your computer when prompted.
Fix 11. Change the Registry Key
You can modify the registry key to fix the error. To do so, take the following steps:
Step 1. Press the Windows + R key to open the Run dialog. Then type regedit in it and press Enter.
Step 2. To secure your current registry condition, create its backup. For this purpose, click File > Export.
Step 3. Enter the name for the registry backup and select All under Export Range. Then click Save to save the backup.
Step 4. Then navigate to the following path:
HKEY_LOCAL_MACHINE\\SOFTWARE\\Microsoft\\Windows\\CurrentVersion
Step 5. Find the RunOnce key. If such a key doesn’t exist, click on the CurrentVersion key and select New > Key. Type RunOnce to name the key.
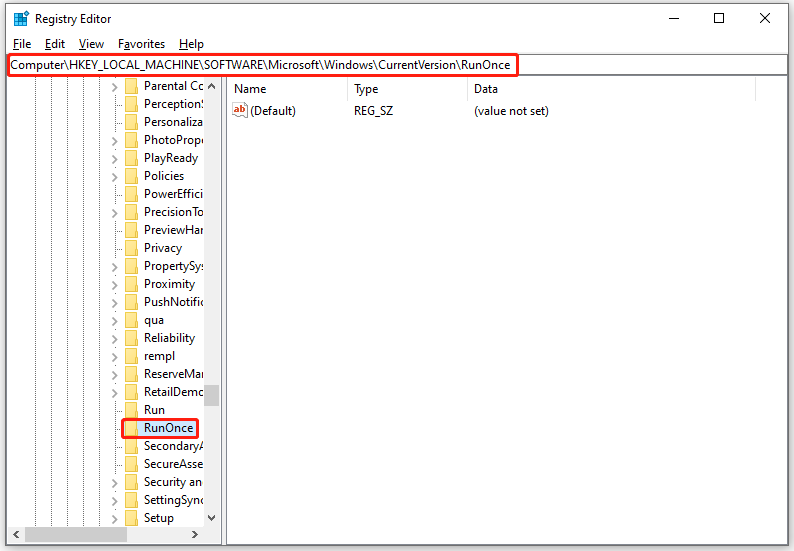
Step 6. Now, go to the following path:
HKEY_CURRENT_USER\\Software\\Microsoft\\Windows\\CurrentVersion
Step 7. Expand it and check if the RunOnce has successfully been created
After that, close Registry Editor and restart Windows.
Fix 12. Delete the ProfileImagePath Key
This method applies for someone who encountered “The system cannot find the file specified” error when creating system’s image or backup.
Step 1. Open Registry Editor again.
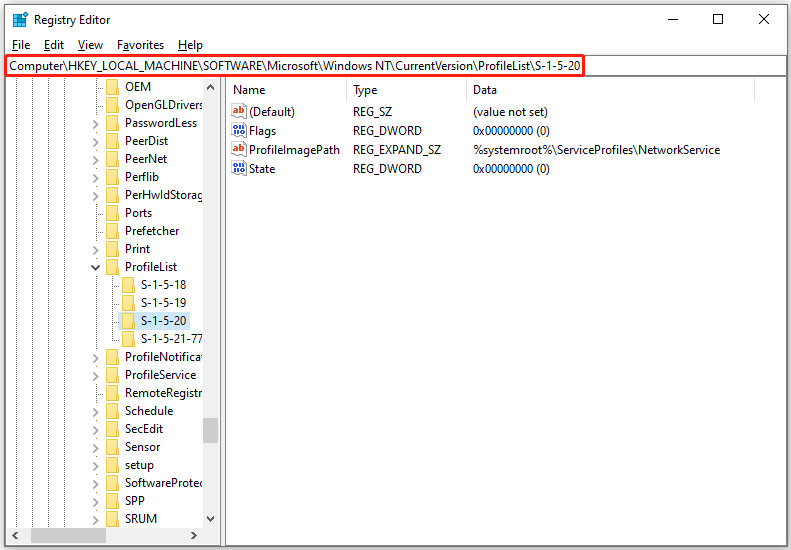
Step 2. Navigate to the HKEY_CURRENT_USER\\Software\\Microsoft\\WindowsNT\\CurrentVersion\\ProfileList and expand the ProfileList key.
Step 3. Check all sub-keys if they have ProfileImagePath value in the right pane.
Step 4. If any of these sub-keys lack the ProfileImagePath value or if the value is empty, right-click it and choose Delete to remove that specific sub-key.
Bottom Line
The “The system cannot find the file specified” error is a common and resolvable problem in Windows. By systematically checking for missing files, scanning for malware, and addressing disk or system file corruption, you can resolve this error in most cases.
Using the steps outlined in this guide, you’ll be able to diagnose and fix this error, ensuring your Windows system is running smoothly again.
If you have any questions or suggestions on how to use MiniTool Partition Wizard, please do not hesitate to contact us via [email protected].
The System Cannot Find the File Specified FAQ
1. Verify the file name and path.
2. Search for the file.
3. Check file permissions.
4. Scan for malware.
5. Check for disk errors.
About The Author

Position: Columnist
Vega enjoys helping people with computer problems, including disk management, data recovery, data backup, and more. She is constantly expanding her knowledge in related fields. And she will continue to bring more easy-to-understand professional articles to help people solve various problems on the PC.
User Comments :