
Quick answer: The Format option in Disk Management usually goes greyed out in one of two situations: you selected the system (C:) drive, which Windows never lets you format, or the target drive itself has a problem — it’s write-protected, corrupted, infected, or using an unsupported file system.
Pick the correct non-system drive first; if it’s still greyed out, work through the 7 fixes below, starting with a restart and, if needed, formatting via DiskPart or a third-party partition manager instead of Disk Management.
What Causes Format Option Greyed Out and SSD Not Formatting
Many users run into the “Disk Management Format option greyed out” issue — here’s a real example from Reddit:
Hello! I’m trying to format a new SSD of mine in order to repeat the cloning process as I’ve been having problems with Windows thinking it’s not genuine. However, the new drive has “Format” greyed out on the Disk Management menu. Any help on how to get past this would be much appreciated!-reddit.com
The most common trigger is right-clicking the C drive, which Windows never lets you format unless you’re reinstalling the OS.
On a non-system drive, the option usually greys out because the volume is write-protected, corrupted, infected, or unrecognized — run a virus scan or a hard drive test if you’re unsure which applies.
In short, the usual causes are:
- The inserted SSD is write-protected.
- The hard drive is corrupted.
- There are malware attacks on the SSD.
- There are unsupported or outdated drivers on the disk.
- The file system is corrupted or not supported.
- The SSD is physically damaged.
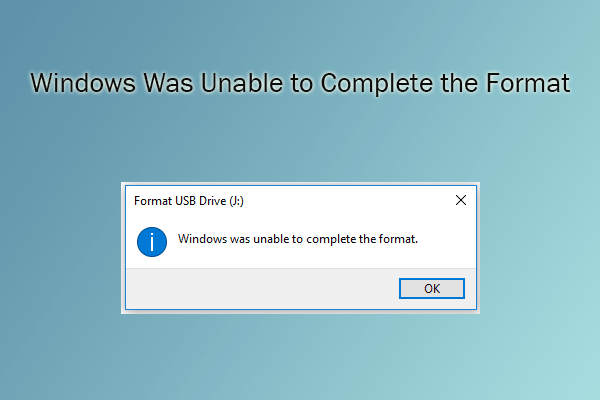
Solution 1: Restart the Computer
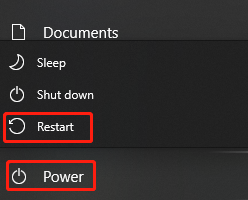
A simple way to solve the “Format option greyed out Windows 10” error is to restart the computer. As you know, many PC issues can be repaired by performing a restart. Here, you can also have a try. To do that, click on the Windows icon at the bottom left corner of the computer and then click the Power button. Finally, tap on the Restart option.
After your computer boots up again, open Disk Management from the Start menu, and then right-click on a partition to see if the “Format option greyed out Windows 10” error disappears. If not, try other solutions immediately.
Solution 2: Format the Drive via Disk Management Alternatives
If the “Format option greyed out” issue occurs in Disk Management, try formatting the SSD using other tools. Though Disk Management works well most time, it sometimes may go wrong. It also prompts errors due to its limits. You may receive the following error while using Disk Management. Then you can consider its alternatives like MiniTool Partition Wizard, File Explorer, Diskpart, etc.
- FAT32 format option is not available
- no exFAT format option
- Extend volume grayed out
- Delete volume greyed out
#1. MiniTool Partition Wizard
It is a third-party partition manager with almost all the features of Disk Management. Besides, it boasts some advanced functions like Disk Benchmark, Space Analyzer, Data Recovery, Surface Test, and so on. It is an ideal choice after the “Disk Management Format option greyed out” issue occurs.
In addition to SSD, other connected storage devices on the Windows PC like SD cards, USB flash drives, and external hard drives can also be formatted via MiniTool Partition Wizard. As for file system formats, it offers you more options than other tools including FAT32, exFAT, NTFS, Ext2/3/4, and Linux Swap.
You can choose the best file system in your mind from the drop-down menu for your device. Here are the steps for formatting a drive with MiniTool Partition Wizard.
Step 1: Download and install this Windows partition manager on your computer.
MiniTool Partition Wizard FreeClick to Download100%Clean & Safe
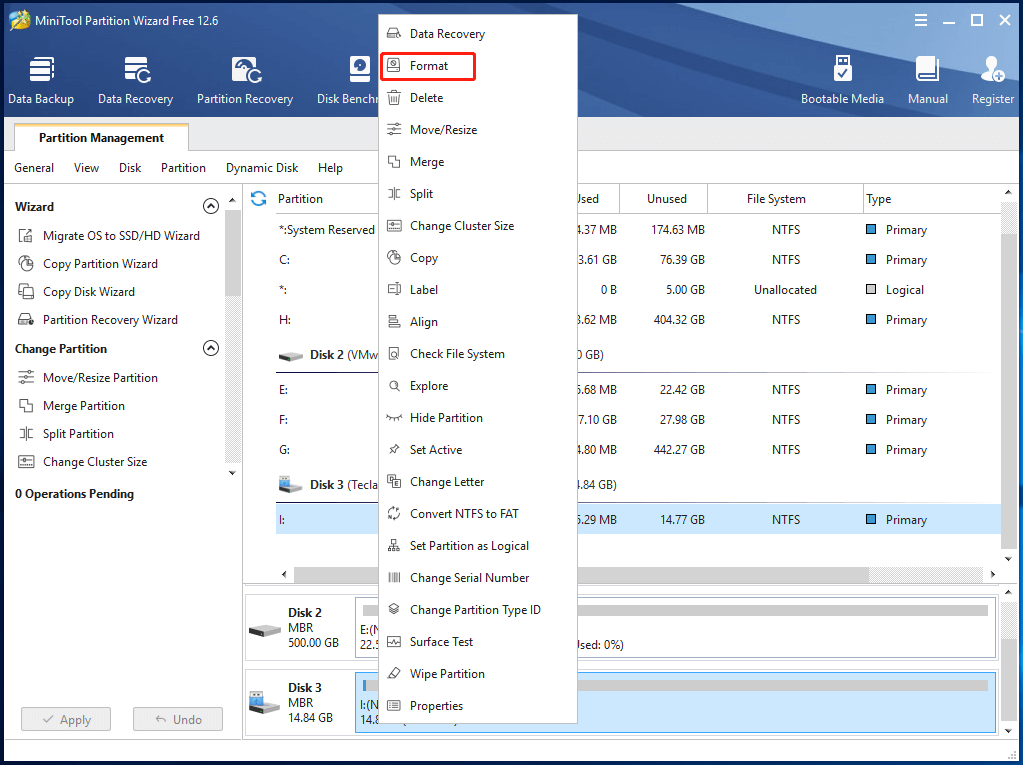
Step 2: After launching this software, right-click on your drive and click Format.
If you are going to format a removable device or external hard drive, connect it to your computer in advance.
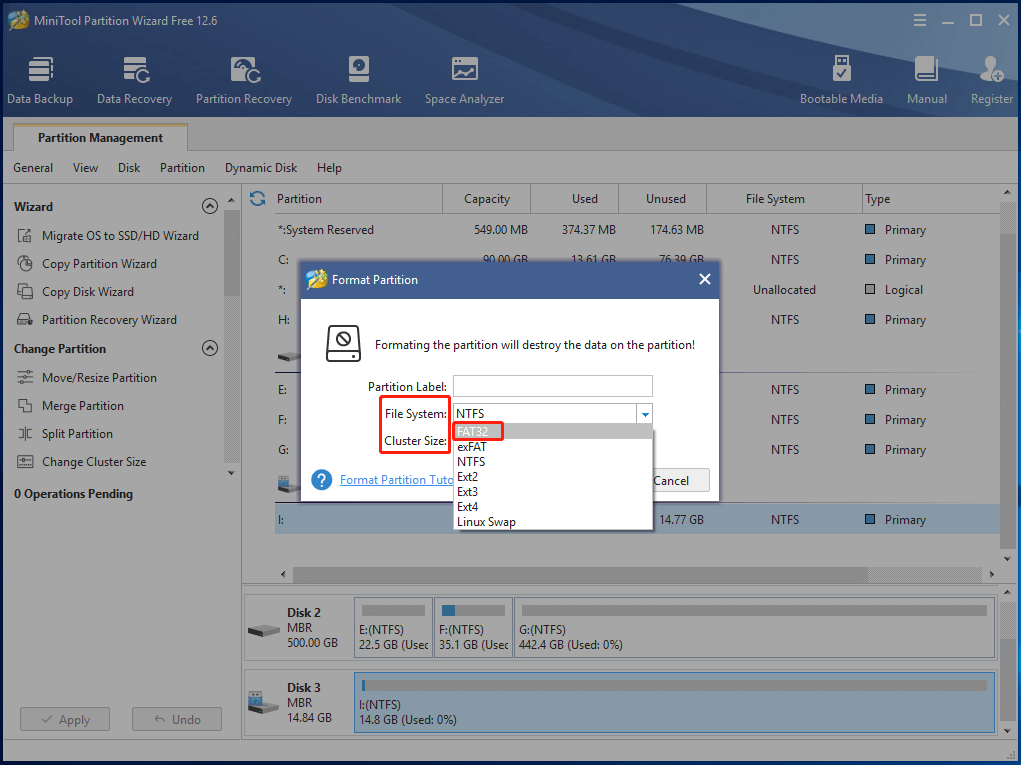
Step 3: In the Format Partition window, configure the partition label, file system, and cluster size according to your demands. After that, click OK to save changes.
Step 4: After returning to the main interface, click Apply to execute the operation.
Also read: 2 Easy and Effective Ways to Shrink Volume with Unmovable Files
#2. File Explorer
Like Disk Management, File Explorer is also a built-in tool in Windows system. It can help you format storage devices as well. Try using this utility to complete the format process if you fail due to the Disk Management Format option greyed out error.
Step 1: Open File Explorer by clicking Windows and E keys.
Step 2: Click This PC in the left pane, and then move to the right section of the window. Right-click on the target drive and tap Format.
Alternatively, you can also find and right-click on the target drive in the left pane, and then click Format.
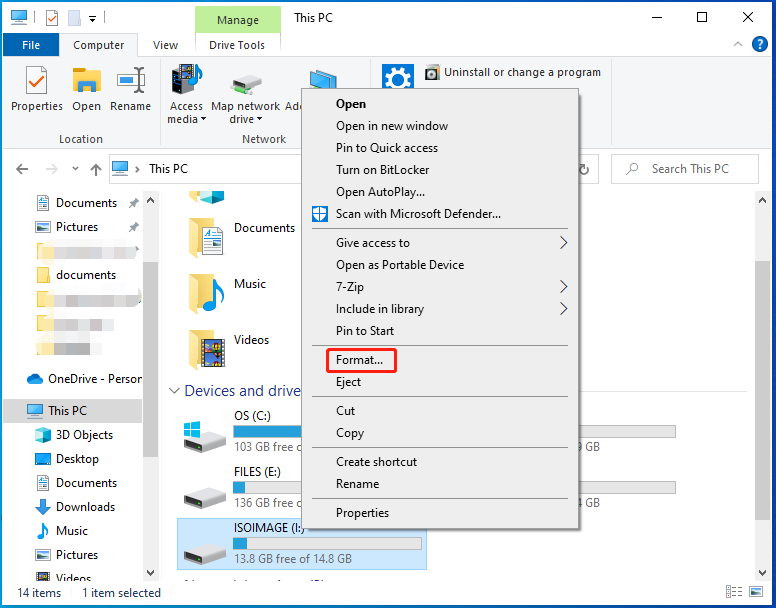
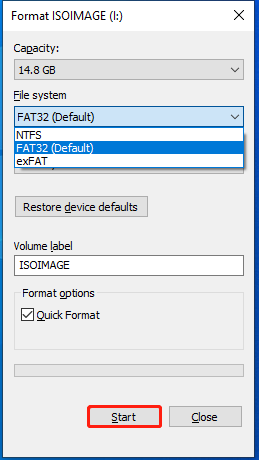
Step 3: In the prompted window, choose a file system from the given options and click Start.
It is recommended to check the Quick Format option while formatting a drive. To learn the difference between quick format and full format, read this post.
#3. Diskpart
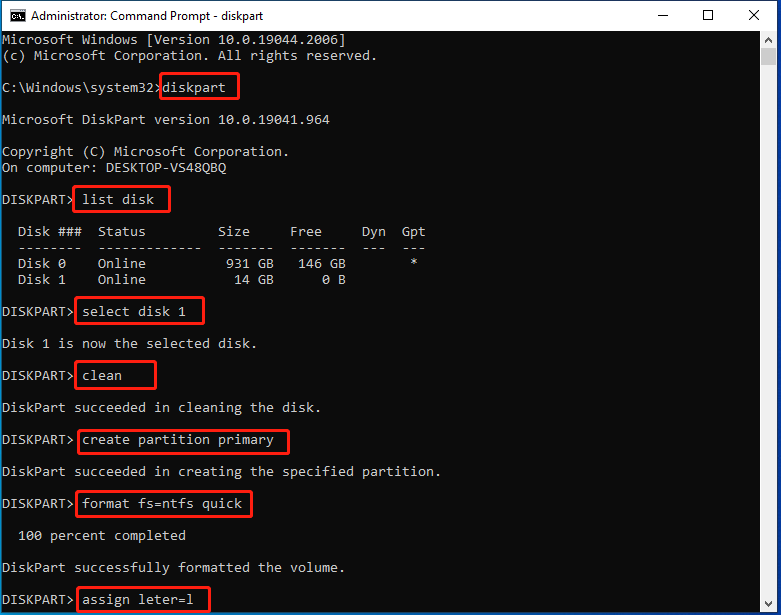
Diskpart enables you to format an SSD through command lines. Here are the steps to run it.
Step 1: Type cmd in the search box and then click Run as administrator under the Command Prompt app.
Step 2: In the opened window, type the following commands and hit Enter after each to execute them.
- diskpart
- list disk
- select disk n (n stands for the number of the target disk)
- clean
- create partition primary
- format fs=ntfs quick (you can replace ntfs with a needed file system format)
- assign letter=l (you can replace I with a desired letter)
Solution 3: Remove Write Protection
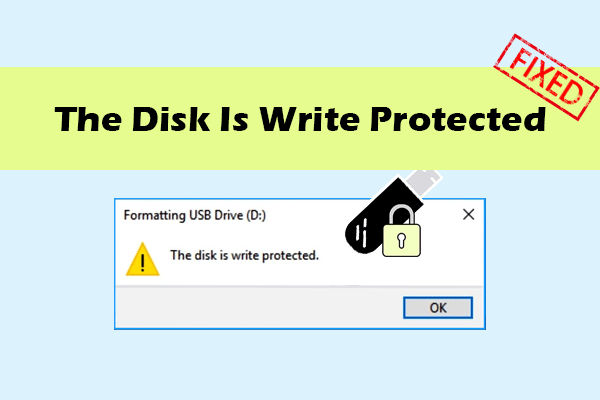
As SSD won’t format if it is write-protected, you should check its status once you receive the error. Then remove write protection with these steps.
Step 1: Run Command Prompt as administrator in the search box.
Step 2: Then type and execute the commands below.
- diskpart
- list disk
- select disk n
- attributes disk clear readonly
After finishing the process, format the SSD in Disk Management again to see if the format option is still greyed out.
Solution 4: Perform a Virus Scan
To check if your SSD is corrupted because of virus infection, simply run a virus scan on the computer. You can use either the Windows Defender or a piece of third-party anti-virus software like Malwarebytes. Here, we show you how to scan computer for virus with Windows Defender.
1. Open Settings by pressing Windows and I keys.
2. Click Update & Security > Windows Security > Virus & threat protection.
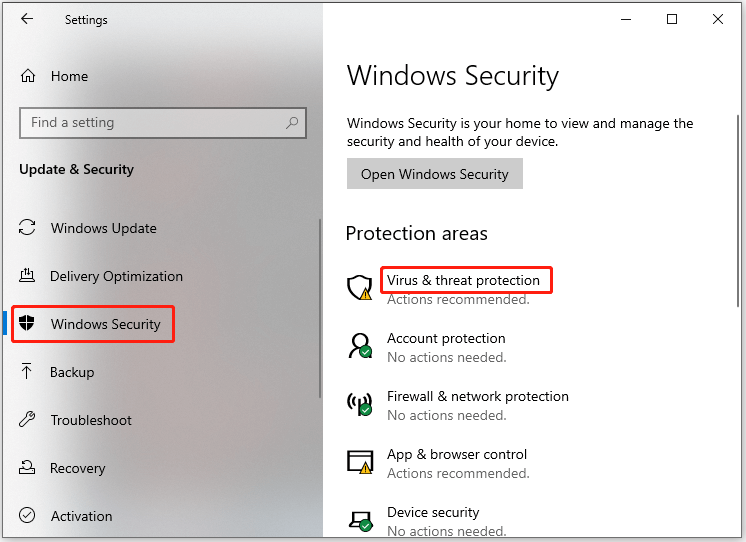
3. Click Scan options > Full scan > Scan now.
Solution 5: Initialize the SSD Drive
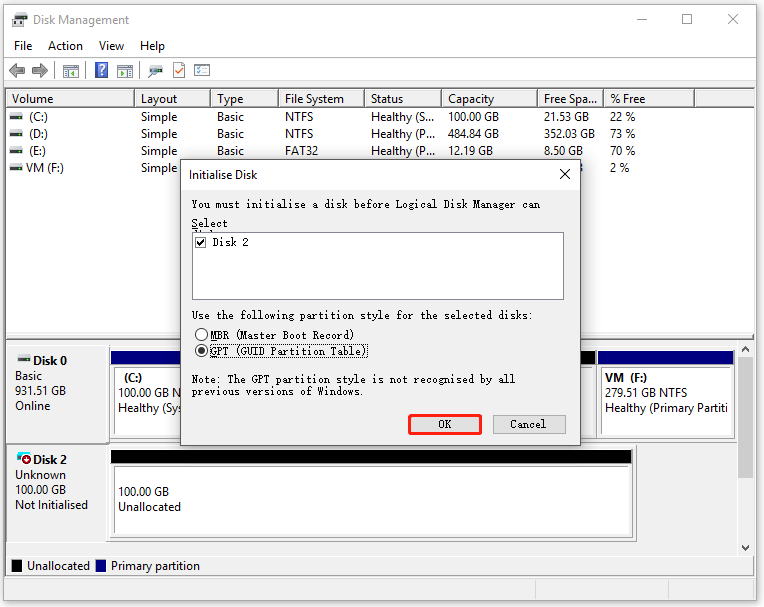
After you install a new hard drive, you need to initialize it. Otherwise, you may receive errors like “You must initialize the disk before Logical Disk Manager can access it”, disk unknown not initialized, etc. What’s worse, you can’t make changes to it like creating and formatting partitions.
It is very easy to initialize a drive. You just need to open Disk Management, right-click on the target disk, and click Initialize Disk. Then choose a partition style (MBR or GPT) based on your need and click OK.
Solution 6: Check File System Corruption
To check if there are any file system errors on the SSD, run MiniTool Partition Wizard. It can help you check and fix detected errors associated with file system. Additionally, it enables you to finish the process within a few clicks.
MiniTool Partition Wizard FreeClick to Download100%Clean & Safe
Step 1: After installing MiniTool Partition Wizard on your computer, run it to enter its main interface.
Step 2: Right-click on the target hard drive or partition, and then click Check File System in the prompted menu.
Step 3: Highlight the Check & fix detected errors option and click Start. Then wait for the finish of the process.
Solution 7: Check If Your Hard Drive Has Bad Sectors
In addition to file system errors, MiniTool Partition Wizard can also detect if there are bad sectors on the hard disk. If you suspect that, follow the given steps to scan the disk or partition sector by sector to find bad sectors.
Step 1: Run MiniTool Partition Wizard by double-clicking on its icon on the desktop.
MiniTool Partition Wizard FreeClick to Download100%Clean & Safe
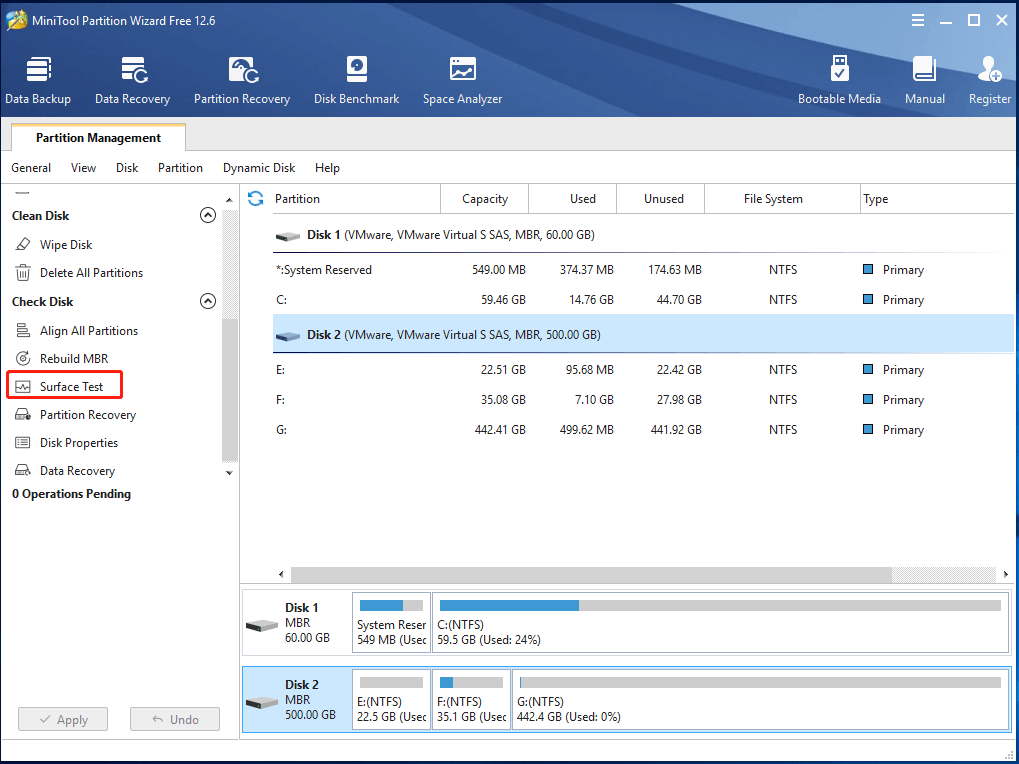
Step 2: Highlight the target hard disk or partition and tap Surface Test in the left panel.
Step 3: In the Surface Test window, click the Start Now button to begin the scan process.
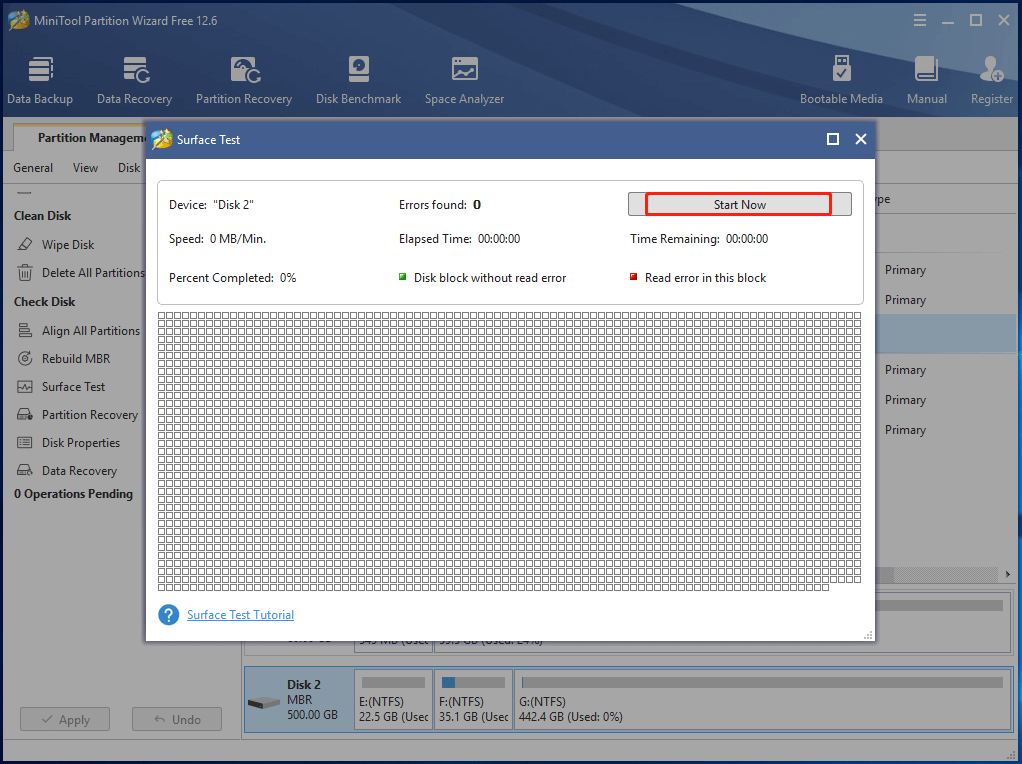
Step 4: After the surface scan finishes, you will see the entire result. If there are any bad sectors on the selected disk or partition, they will be marked with red. In this case, you can refer to this bad sector repair guide to fix them. You need to purchase a new hard drive for your PC if there are physical bad sectors.
Format Option Greyed Out FAQ
Either way, back up anything important before formatting rather than relying on recovery as a safety net.
If only Delete Volume is unavailable while Format works, it may be due to an active page file or a currently used mounted system component.
Bottom Line
The Format option may be greyed out in Disk Management because the target drive is a system or protected partition, is write-protected, has file system errors, is uninitialized, or has other disk problems.
Depending on the situation, you can restart Windows, use an alternative formatting tool, remove write protection, initialize the disk, or check for file system errors and bad sectors.
If you still cannot format the drive after trying these methods, the disk may have a more serious hardware or partition problem. If you encounter issues while using MiniTool software, contact us via [email protected].
About The Author

Position: Columnist
Charlotte is a technology columnist with a strong focus on the Windows operating system, specializing in disk management, backup, and data recovery. She is passionate about analyzing computer errors, identifying root causes, and delivering practical solutions. In her free time, she stays updated on the latest developments in computer systems and hardware while continuously learning new technologies to broaden her expertise. Her writing style is clear and easy to understand, making complex technical topics accessible even to users with limited computer knowledge.
User Comments :