How to fix “the disk is write protected” error? This post from Partition Magic finds that the error is mainly caused by the a read-only switch, a full flash drive, or a virus infection, etc. To fix the error, you can format the device, remove write protection, scan viruses, and more.
What Does “The Disk Is Write Protected” Mean?
The disk is write protected error means that the storage device, such as a USB drive, SD card or external hard drive, is set to read-only mode, which prevents you from modifying or deleting files.
In short, you can open and view files, but you can’t delete, edit, copy, or save new files onto the disk.
What Causes “The Disk Is Write Protected” Error?
The reasons behind the “This disk is write protected” are:
- Physical Lock Switch: Many USB drives and SD adapters have a switch that, when set to “lock,” makes the drive write-protected.
- Hardware Failure: A failing drive may automatically protect itself from writing due to bad sectors or internal malfunctions.
- File System Corruption: Corrupted file systems can cause Windows to restrict write operations to prevent further damage.
- Registry or OS Settings: Windows settings or group policies might prevent writing to removable drives, often due to specific registry configurations.
- Virus Infection: Malware can make a drive appear write-protected by corrupting files or filling it with junk.
- Disk Full: A full drive may trigger write-protection errors since it can’t store new data.
After knowing the reasons for the USB write protected error, you may want to know how to remove write protection on USB drive. Keep reading to find out how.
How to Recover Data from a Write-Protected Device
Before you fix the write-protected device, you can use a data recovery tool to retrieve your data to a safe location. To do that, I highly recommend MiniTool Partition Wizard.
It offers the Data Recovery feature to help you recover all the lost data from various storage devices, including SSD/HDD/USB disk/SD card, etc. Here’s how to do that:
Step 1. Launch MiniTool Partition Wizard Pro Platinum or higher edition on your PC.
MiniTool Partition Wizard DemoClick to Download100%Clean & Safe
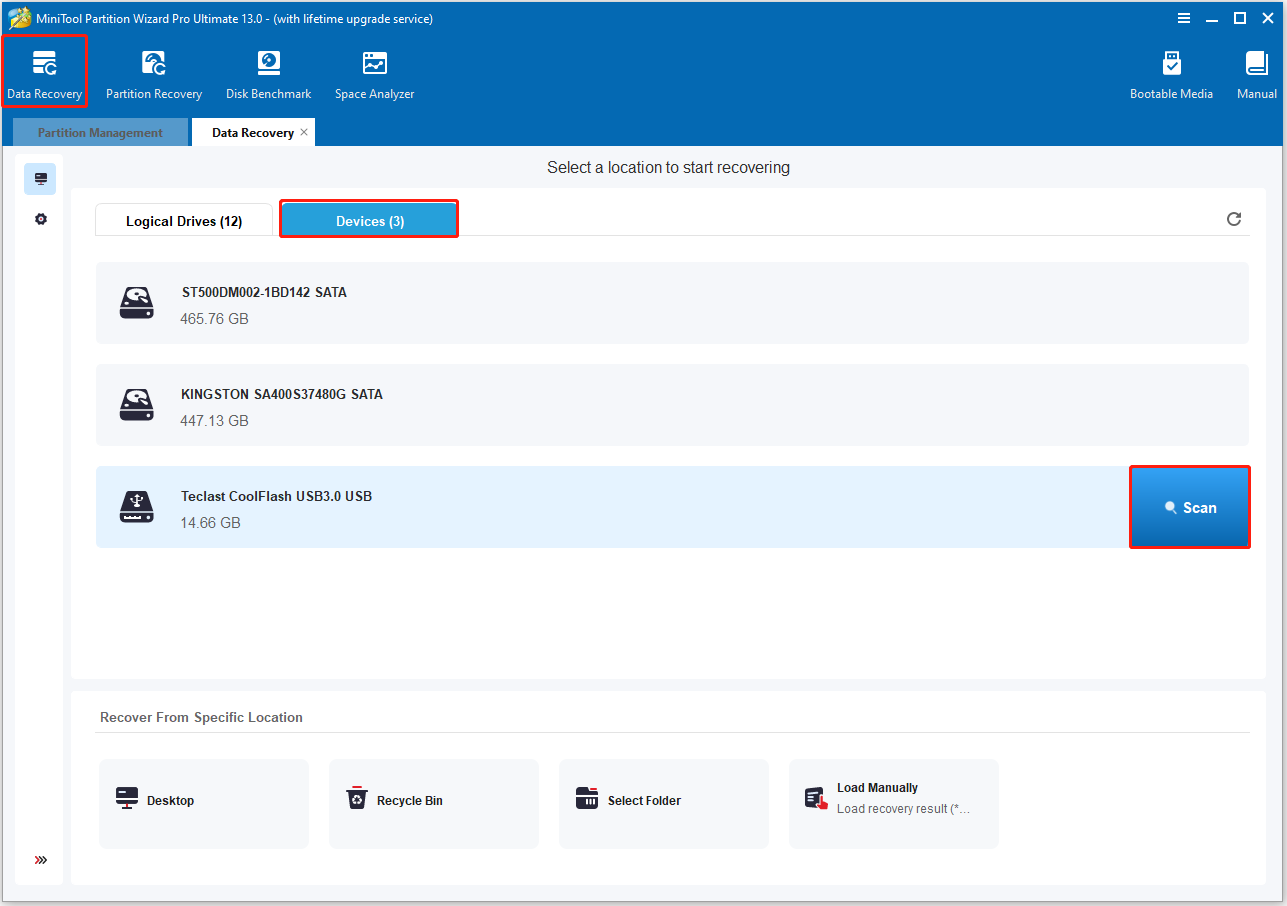
Step 2. Click Data Recovery from the top toolbar. Then, go to the Devices tab, select the write-protected device, and click Scan.
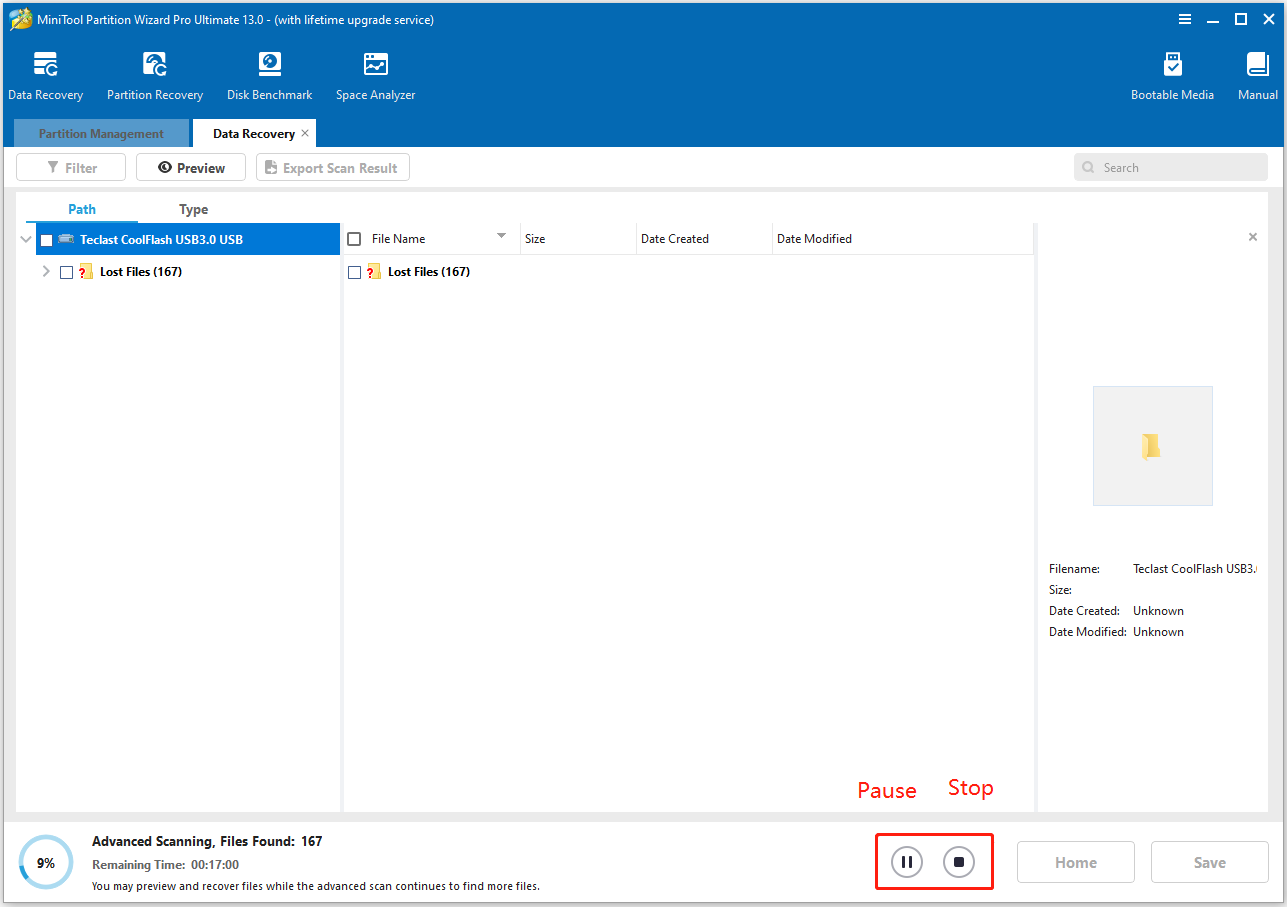
Step 3. During the scan, you can preview the detected files and click the Pause or Stop buttons to end the scan when you find what you need.
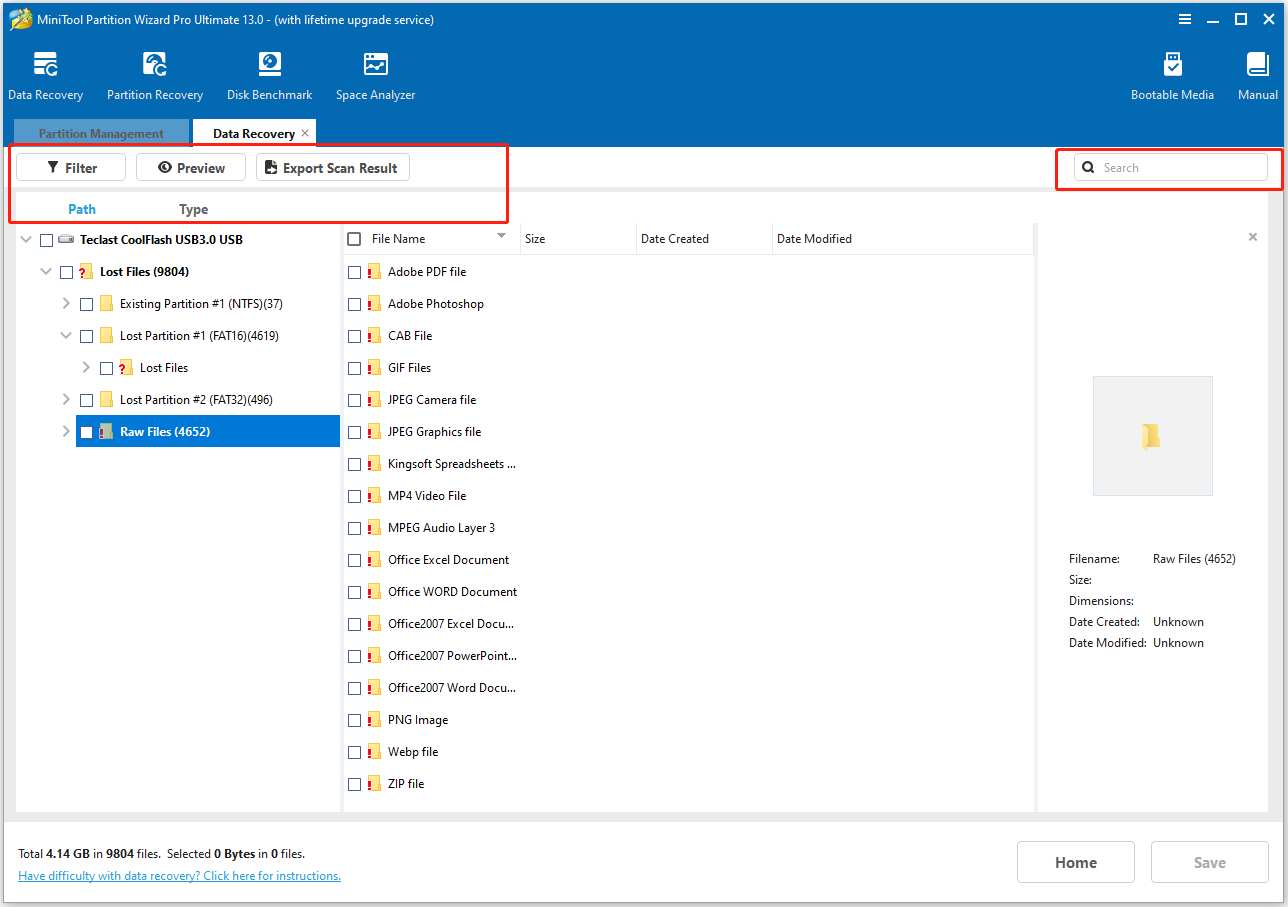
Step 4. Once the scanning process is complete, all the found files will be listed under the Path tab. Here are some useful features:
- Path: All lost files here are listed in directory order.
- Type: All lost files here are classified by type.
- Search: You can search by file name or extension, if you remember the file name or type you want to recover.
- Filter: You can use this feature to filter files by File Type, Date Modified, File Size, and File Category.
- Preview: You can use this feature to preview numerous types of files, such as mkv, mp4, mp3, doc, xlsm, pptx, etc.
- Export Scan Result: You can export the scan results to avoid rescanning later. Use this feature if you don’t want to recover lost files immediately after the scan.
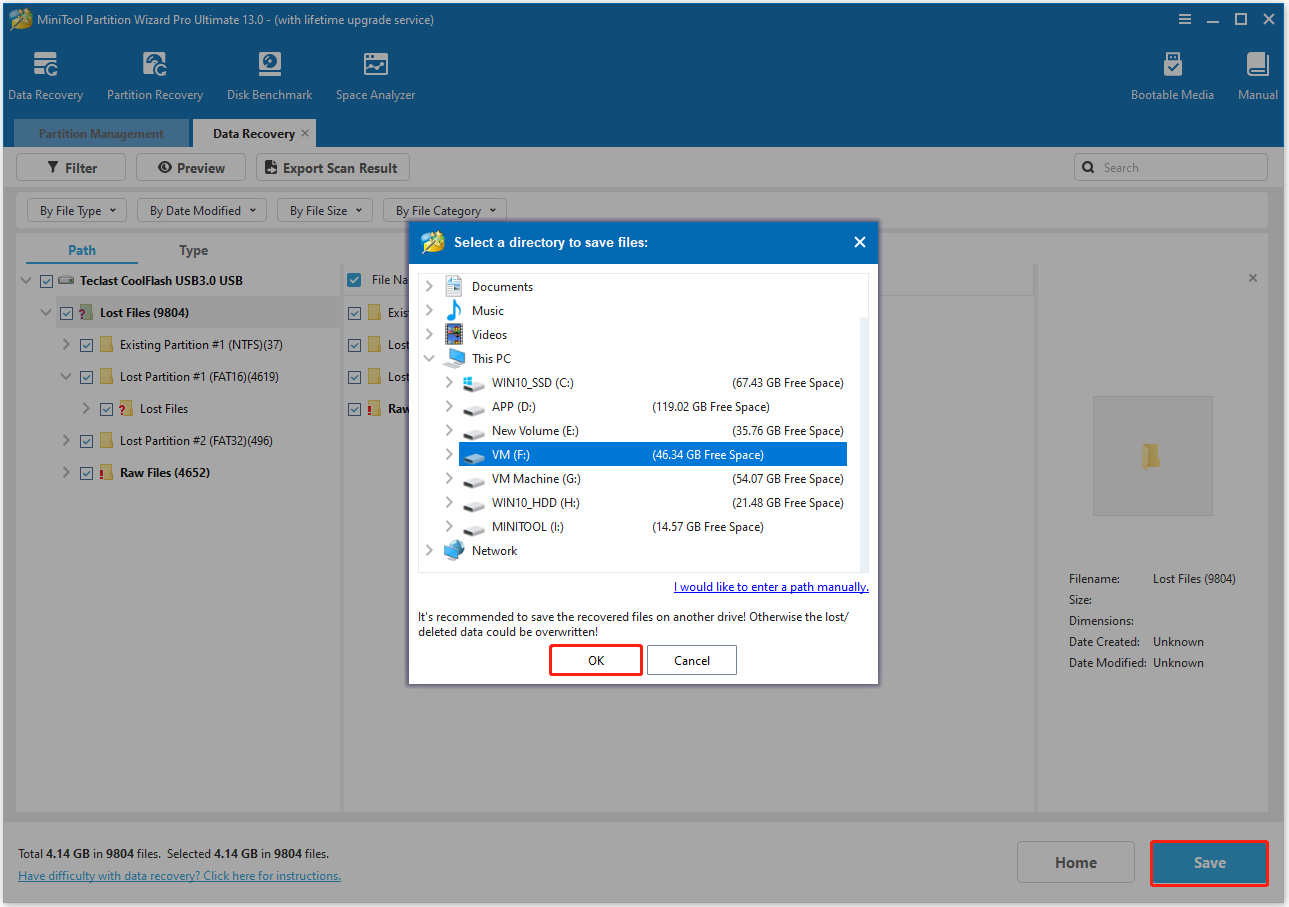
Step 5. Check all the files that you want to recover, and click Save at the bottom right corner. Then, choose a location for the recovered files and click OK to continue.
How to Fix “The Disk Is Write Protected” Error?
How to remove write protection on USB drive? After recovering all the data to a safe location, you can try the following methods to fix the USB write protected error without worrying about data loss. Follow these steps:
Here is a video guide:
Method 1. Check the Physical Lock Switch
Some devices have a physical lock switch on their side. If the switch is set to “lock”, your Windows operating system blocks all writing to the disk. In this situation, you can try the following tips:
- If it’s an SD card, look for a small Lock/Unlock switch on the side. If it’s a USB drive, check for a sliding switch (some models have it).
- Move it to the Unlock position.
Method 2. Make Sure the USB Drive Isn’t Full
If your USB drive is running low on free space, you may encounter a “the disk is write protected USB” error when trying to save files to the drive. Checking the available space can help determine if this issue is the cause.
Step 1. Double-click on “This PC” on your desktop to open Windows File Explorer.
Step 2. Locate your USB drive, right-click on it, and select “Properties.” A pie chart will appear, showing the used space and free space on the drive.
If there is very little or no free space available, you may easily encounter the USB is write-protected error when attempting to save files. Then, you can try to delete some files or transfer them elsewhere to free up disk space to solve the error.
Method 3. Remove Write Protection via Diskpart
You can modify the read and write attributes of your USB drive or SD card using the Command Prompt with a straightforward set of commands. Follow these steps to remove the write protection attribute from USB flash drives or SD cards: Here’s the guide:
Step 1. Press Win + R to open the Run window.
Step 2. Type “cmd” and press Enter. In the Command Prompt window, type “diskpart” and press Enter. If the User Account Control (UAC) window pops up, click Yes to confirm.
Step 3. Type the following commands one by one to remove write protection from USB flash drive, and do not forget to press Enter after each command:
- list disk (This command displays all the disks connected to your computer.)
- select disk # (# is the disk number for your USB drive that reports “The disk is write protected” error.)
attributes disk clear readonly (This command clears the read-only attribute from the selected disk.)
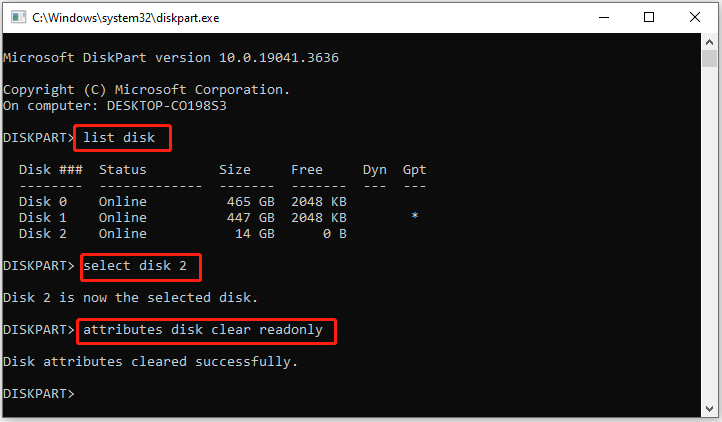
Step 4. Open File Explorer and check if you can now write to the USB drive
Method 4. Check Account Permissions
Sometimes, write protection is caused by file permission settings. If you suspect “The disk is write protected” error is caused by insufficient account permissions, you can do the following steps to fix the error:
Step 1. Press the Win + E to open File Explorer.
Step 2. Select This PC from the left panel, right-click the USB flash drive, and select Properties.
Step 3. Go to the Security tab, and verify whether the Write permission under the Permissions for Everyone section is selected.
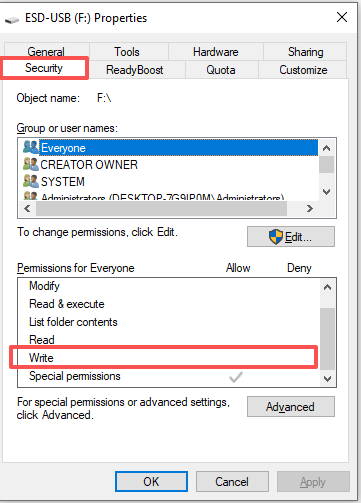
Step 4. If the Write feature is not allowed, select your account and click Edit.
Step 5. Click Add and enter the account name in the “Enter the object names to select” box.
Step 6. Click OK, and then make sure the Write permission is ticked.
Method 5. Check the Windows Registry
Registry Editor can help fix write-protection errors for USB devices, SD cards, or HDD/SSD drives. It’s an advanced procedure, so proceed with caution, as incorrect changes can cause issues.
Step 1. Connect your write-protected removable device to the PC.
Step 2. Open the Registry Editor by pressing the Windows + R keys, typing “regedit” in the Run box, and pressing Enter.
Step 3. Click on HKEY_LOCAL_MACHINE and expand System.
Step 4. Click Current Control Set and then click on Control.
Step 5. Look for the key named “StorageDevicePolicies” and open it. If it doesn’t exist, create it by right-clicking on “Control,” selecting “New,” then “Key,” and naming it “StorageDevicePolicies.”
Step 6. Modify the newly created key. Double-click the key that you’ve just created and set the Value data to 0. Click OK to save the changes.
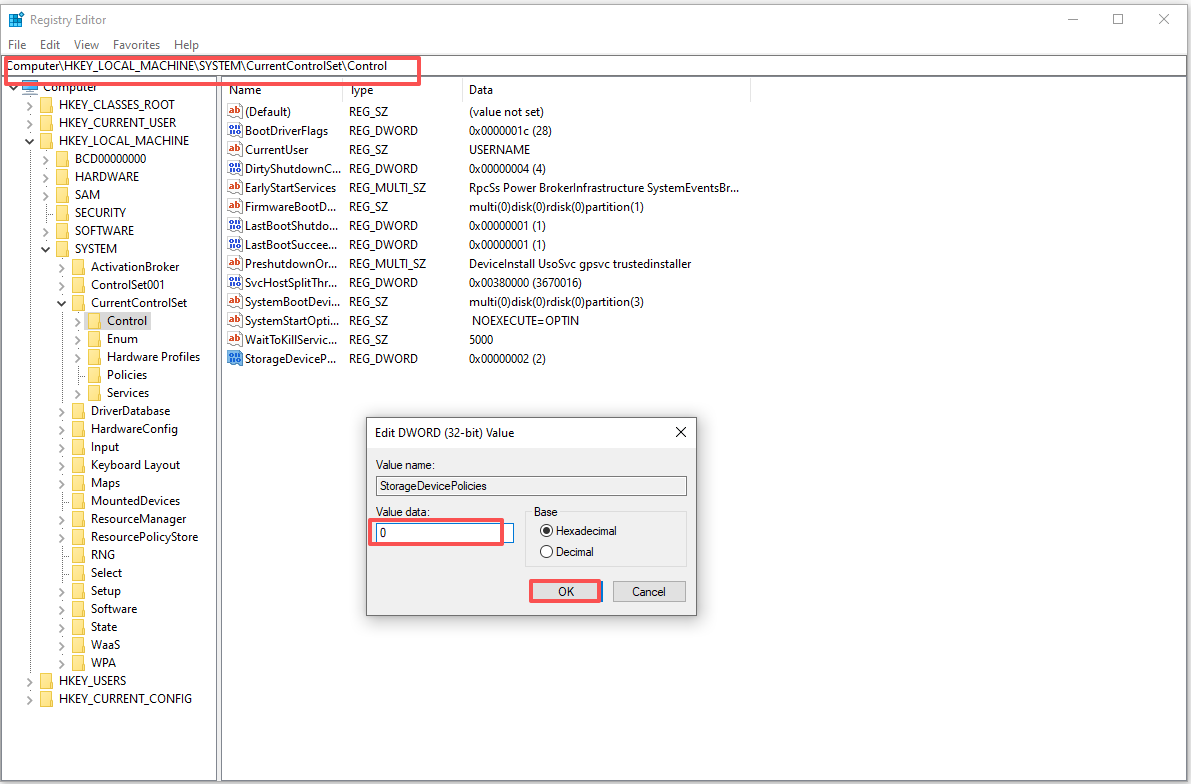
Step 7. Replug your USB drive. Close the Registry Editor and unplug your USB drive. After reconnecting the drive, the write protection should be disabled, and you should now have full access to read and write data.
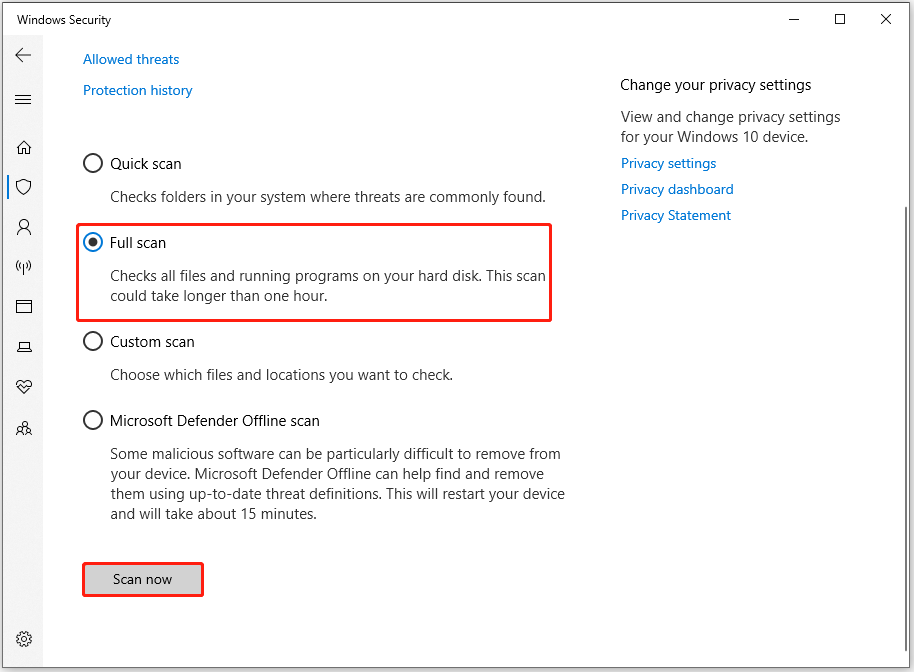
Method 6. Scan for Malware
Malware infection can also result in the “The disk write protected” error. Therefore, you can run a full virus scan on your PC to fix the error. Here’s the guide:
Step 1. Press the Win + S to open the Search window, type “virus & threat protection” and press Enter.
Step 2. Click Scan options in the pop-up window.
Step 3. Choose Full scan and click Scan now.
Method 7. Turn Off BitLocker
If your USB drive has the error “The disk is write protected” and is enabled with BitLocker, try turning off BitLocker to remove the write protection.
Step 1. Open File Explorer, then right-click on your BitLocker-protected partition or USB drive, and select “Manage BitLocker.”
Step 2. Choose the locked device and click on “Turn off BitLocker.”
Step 3. Wait for BitLocker to decrypt the drive.
Once BitLocker is turned off, you will be able to manage your data on the USB drive and save new files to it again.
Method 8. Use MiniTool Partition Wizard
To fix “The disk is write protected” error, you can use MiniTool Partition Wizard’s Format Partition feature. It can help you format the write-protected device easily. Here’s the way:
Step 1. Launch MiniTool Partition Wizard on your PC.
Step 2. Choose the USB device’s partition from the disk map.
Step 3. Select Format Partition from the left panel. Then, set Partition Label, File System, and Cluster Size. After that, click OK.
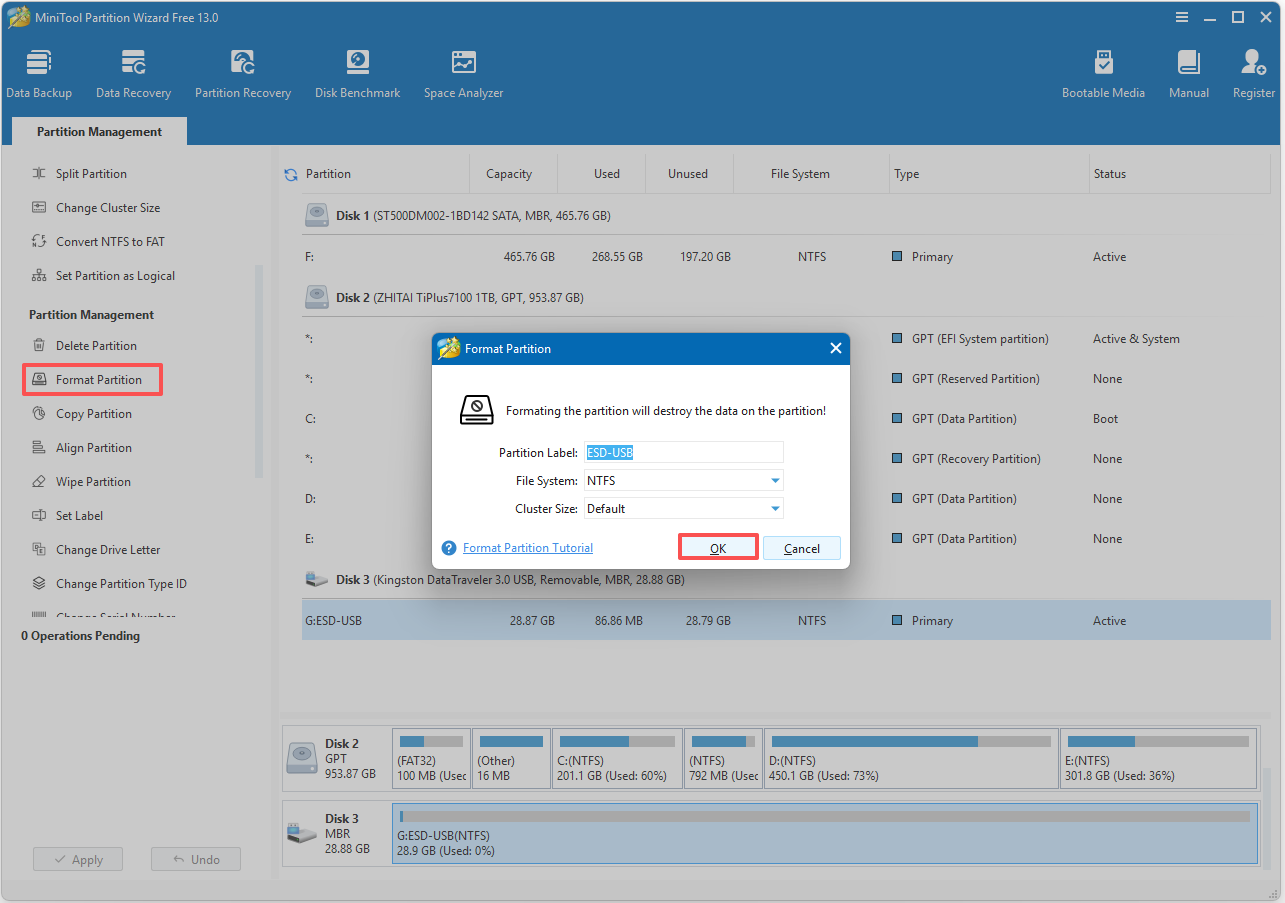
Step 4. Click Apply and Yes sequentially to execute the pending operations.
Once done, you can remove write protection from USB devices successfully.
Method 9. Check for Damaged Sector
Bad sectors on a disk can also trigger the write protection error. If you suspect the disk write-protected error of your SD card/USB devices on your PC is caused by this reason, you can try using MiniTool Partition Wizard’s Surface Test feature to scan bad sectors. Here’s the way:
Step 1. Launch MiniTool Partition Wizard to enter its main interface.
Step 2. Choose the write-protected partition from the disk map, and then select Surface Test from the left panel.
Step 3. In the pop-up Surface Test window, click Start now.
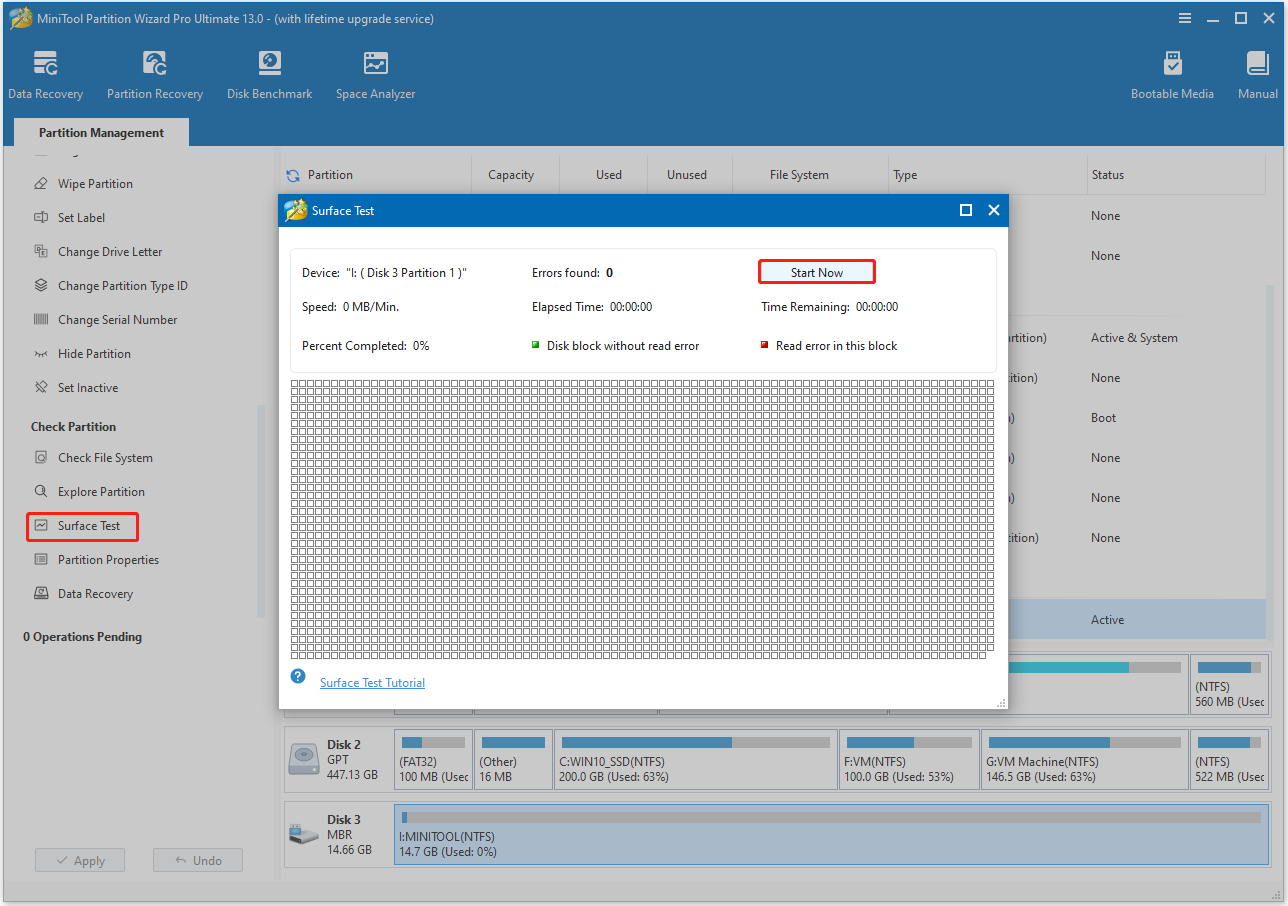
Step 4. Once done, click OK to confirm, and you can see normal sectors in green while bad sectors are in red.
If the Surface Test scanning reveals any bad sectors on your disk, you can use the CHKDSK command with the parameters /r and /x to resolve the issue. Here’s what each parameter does:
- /r: This option locates bad sectors and attempts to recover any readable data. Please note that the disk must be locked for this operation, and it includes all functions of /f along with physical error analysis.
- /x: This option forces the volume to dismount if necessary, invalidating any open handles, and also includes all functions of /f.
To run the CHKDSK command with the /r and /x parameters, follow these steps:
- Open Command Prompt as an administrator.
- Type chkdsk F: /r /x in the elevated Command Prompt window and press Enter.
- Then, the CHKDSK check will begin.
- Once the process is complete, all identified bad sectors will be marked.
Tips for Preventing Future Write Protection Errors
To prevent “the disk is write protected SD card/USB devices” from happening in the future, consider the following practical tips:
- Check the physical lock switch on your storage device.
- Always safely eject drives before removing them.
- Keep your storage devices clean and free from damage.
- Avoid excessive rewrites on your storage devices.
- Perform regular disk checks to maintain functionality.
- Ensure that your antivirus protection is always enabled.
- Update your device drivers and firmware regularly.
- Use storage devices from reliable brands.
- Backup important data regularly.
- Following these guidelines can help you avoid potential issues with write protection.
Wrapping Things Up
Various reasons can trigger the write-protected error, including enabling the physical switch of write-protected, BitLocker protection partition, third-party encryption, and virus infection, etc. When you encounter the error on your PC, you can try the methods mentioned in this post.
What’s more, if you encounter issues or have some suggestions while using MiniTool Partition Wizard, you can send an email to [email protected]. We will respond to you as soon as we receive it.
The Disk Is Write Protected FAQ
1. Connect it to your computer.
2. Press Win + E to open File Explorer.
3. Select This PC.
4. Right-click the USB drive.
5. Select Format.
6. Set the File system, Allocation unit size, and Volume label as you like.
7. Then, click Start.
1. Press the Win + X to open Quick Link.
2. Select Device Manager.
3. Expand the Disk drives category.
4. Double-click the target drive.
5. Go to the Policies tab.
6. Uncheck the box of Enable write caching on the disk and click OK.
About The Author

Position: Columnist
Charlotte is a technology columnist with a strong focus on the Windows operating system, specializing in disk management, backup, and data recovery. She is passionate about analyzing computer errors, identifying root causes, and delivering practical solutions. In her free time, she stays updated on the latest developments in computer systems and hardware while continuously learning new technologies to broaden her expertise. Her writing style is clear and easy to understand, making complex technical topics accessible even to users with limited computer knowledge.
User Comments :