When Windows warns that “you must initialize the disk before Logical Disk Manager can access it”, your disk may turn uninitialized and unallocated suddenly. Well, you don’t have to worry about this issue with the help of MiniTool.
You Must Initialize a Disk
If Windows Disk Manager can’t find partitions, the “You must initialize the disk before Logical Disk Manager can access it” message will appear. The error usually occurs when you connect a new hard disk or SSD without partition table created to a computer and try to access it. It means that the hard disk, SSD, or removable device is unallocated or not partitioned.
In some cases, the disk will become not initialize all of a sudden. Even if you follow the prompts, it still appears repeatedly. What causes the “You must initialize a disk” error? Well, various factors can trigger the error. For instance, it may result from the wrong installation of the external hard disk, disk drive corruption, bad sectors on the drive, etc.
What Does Initializing a Disk Mean
What is disk initialization?
Disk initialization is a process in which a certain hard drive is formatted and initialized to become usable by the Windows system.
Why do you need to initialize a disk before using it?
After you get a brand new external hard drive, you are required to initialize it before putting it into use. Otherwise, it may not appear in File Explorer. As it doesn’t contain data in it, you can initialize the disk at your will.
Initializing the disk will rebuild the MBR on the disk so that Windows system can access the target disk.
Does initializing a disk erase data?
Initializing a disk removes everything on it and prepares it for use by Windows. Therefore, you need to recover the missing data after initializing. Besides, you have to partition and format the disk to make it usable again.
Solution 1: Initialize the Disk to MBR or GPT
Part 1: MBR or GPT
You are required to choose a partition style while initializing a disk. There are two options (MBR and GPT) for you. To learn the difference between the two partition styles, you can refer to MBR vs GPT.
After choosing a suitable partition table for your disk, initialize it by following the given steps in the next part.
Part 2: How to Initialize the Disk
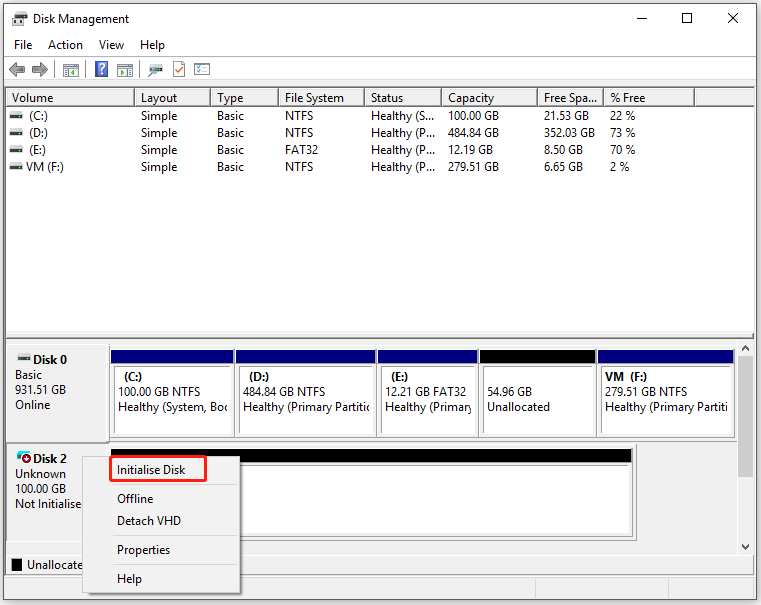
Here, we will show you how to initialize a hard drive in Disk Management.
Step 1: Open the Run window by pressing Windows and R keys.
Step 2: Type diskmgmt.msc and hit Enter to open Disk Management.
Step 3: Right-click on the uninitialized disk and click Initialise Disk.
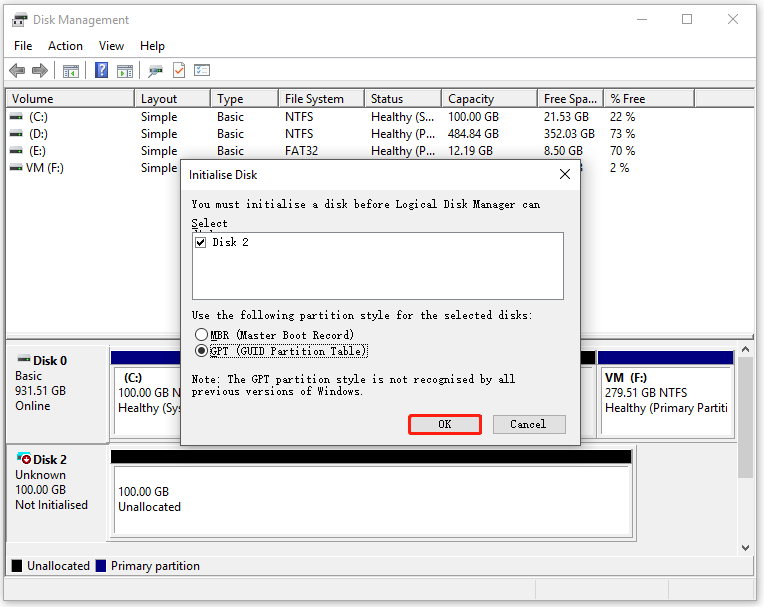
Step 4: In the prompted window, choose a partition style based on your situation and then click OK to save the changes.
If you want to change the partition style, right-click on the disk and then choose either Convert to MBR Disk or Convert to GPT Disk according to the situation. Alternatively, you can also use an MBR2GPT tool to convert the partition style. MiniTool Partition Wizard is such a program, which helps you convert a data disk to MBR or GPT freely. To convert the OS disk to GPT, you have to get the pro or more advanced editions.
MiniTool Partition Wizard DemoClick to Download100%Clean & Safe
Step 5: After the disk is initialized, you can create partitions and then save files on them. For doing that, right-click the disk and choose New Simple Volume. Then follow the on-screen instructions to finish the process.
Part 3: Recover Missing Data After Initializing
If you initialize an old disk, the data may get lost during the initialization process. How to initialize disk without losing data? An effective way is to recover the missing data with a professional data recovery after initializing the disk.
MiniTool Partition Wizard is a powerful partition manager. Its Data Recovery feature enables you to recover data from formatted/damaged/inaccessible/lost drives. If you are suffering from data loss, you can have a try.
MiniTool Partition Wizard DemoClick to Download100%Clean & Safe
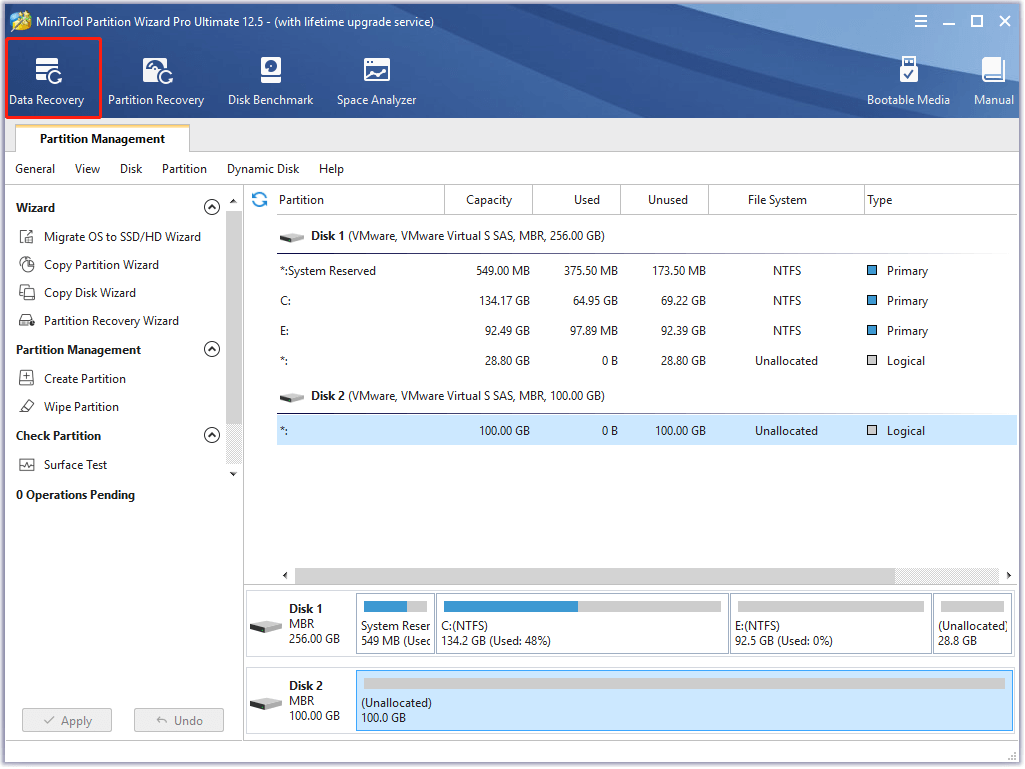
Step 1: After downloading and installing MiniTool Partition Wizard, launch it to enter its main interface.
Step 2: Click on the Data Recovery option at the upper left corner of the interface.
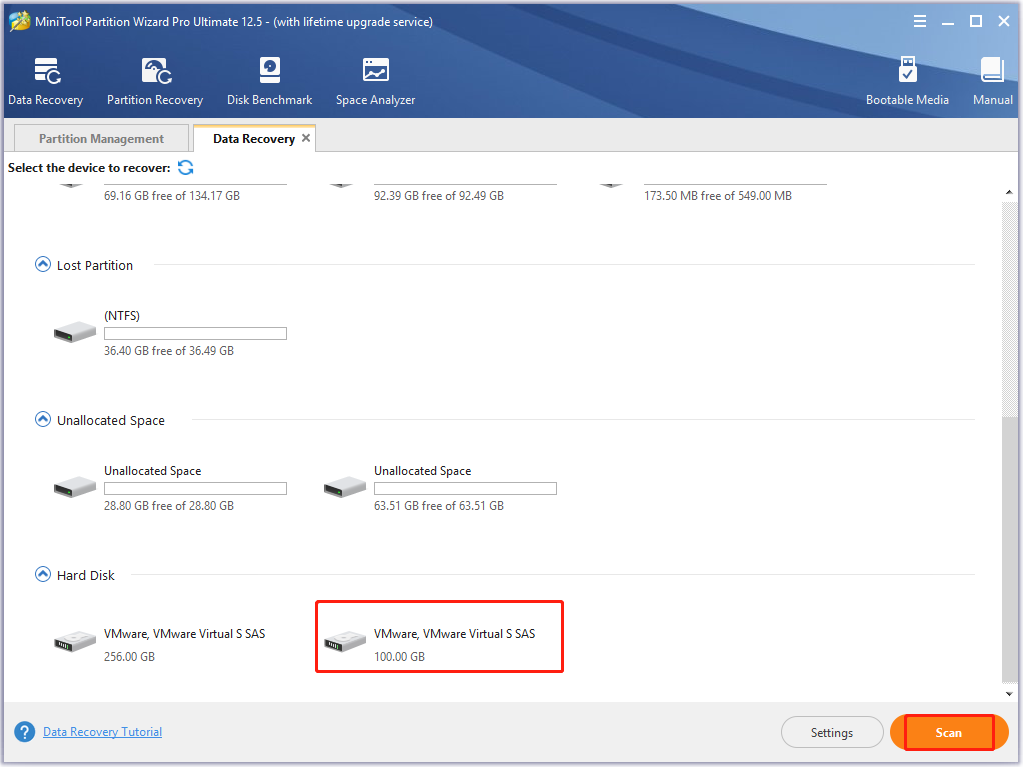
Step 3: In the next window, choose the disk that has been initialized and click Scan.
Step 4: Once you click on the Scan button, the process starts. You can view the scan progress. If you find the needed files in the process of scanning, click on the Pause or Stop button to suspend the process. Choose the recovered data and click Save.
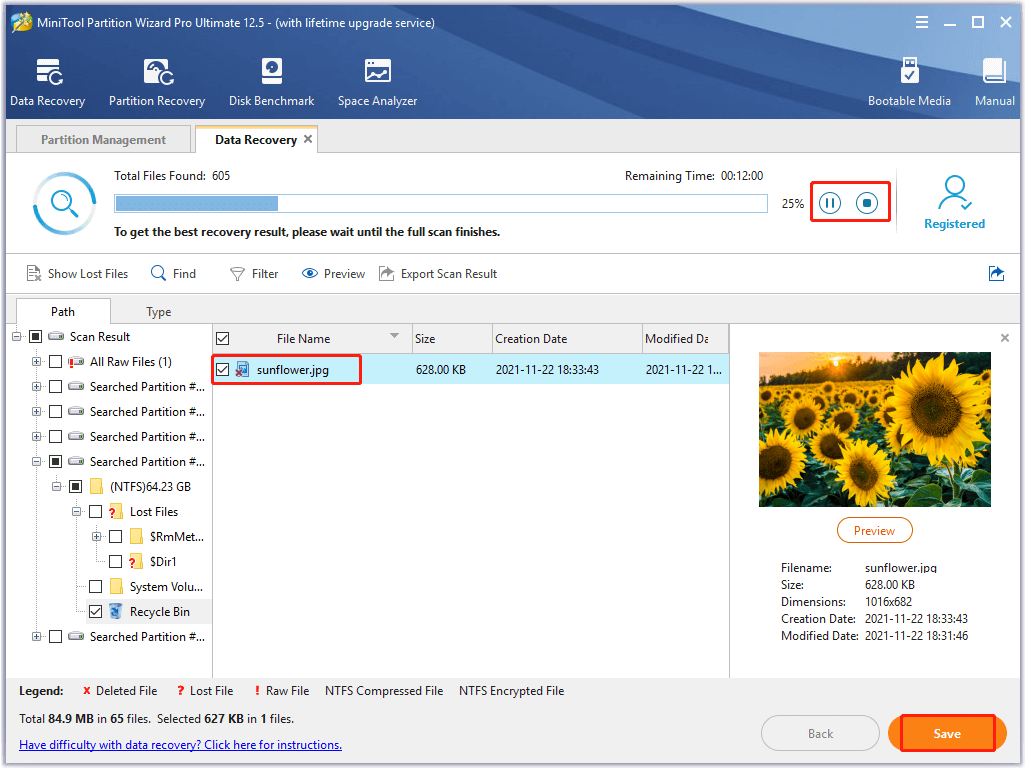
Step 5: Select a directory for the recovered data and then click OK to save the changes. After that, follow the prompted instruction to finish the operation.

Solution 2: Update Disk Drivers
A PC recognizes any external component connected to it by using drivers. Hence, an outdated driver could make your computer malfunction leading to the discussed error in the post. In this case, update the disk driver with these steps.
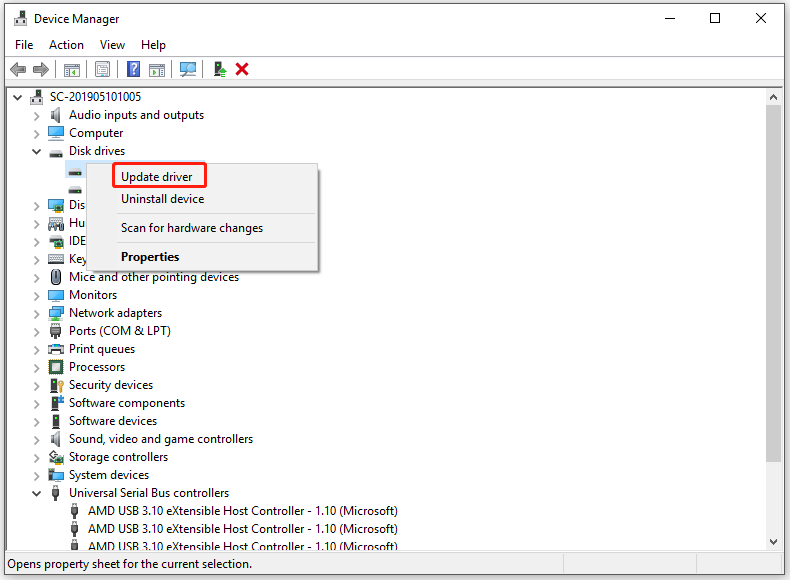
Step 1: Right-click on the Windows icon on the desktop and click Device Manager.
Step 2: Double-click Disk drives to expand it. Then right-click on your disk driver from the expanded list and click Update driver.
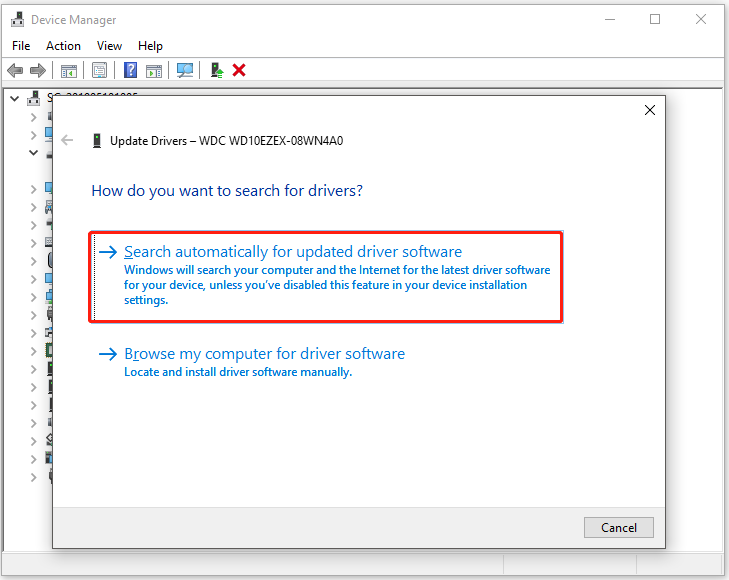
Step 3: In the next window, click the Search automatically for updated driver software option.
Step 4: Once the searching and updating process ends, restart your computer and check if the “You must initialize a disk before Logical Disk Manager can access it” message still appears. If so, try the next solution.
![[Fixed] Feature Update to Windows 10 Version 20H2 Not Installing](https://images.minitool.com/partitionwizard.com/images/uploads/2021/10/feature-update-to-win10-version-20h2-not-installing-thumbnail.jpg)
Solution 3: Remove and Reinstall the Driver for the Not Initialized Disk
By uninstalling and reinstalling driver for the not initialized disk from the PC, Windows can automatically detect the device issues and resolve them.
Step 1: Open Device Manager, and then right-click on your disk driver under the Disk drivers tab and click Uninstall device.
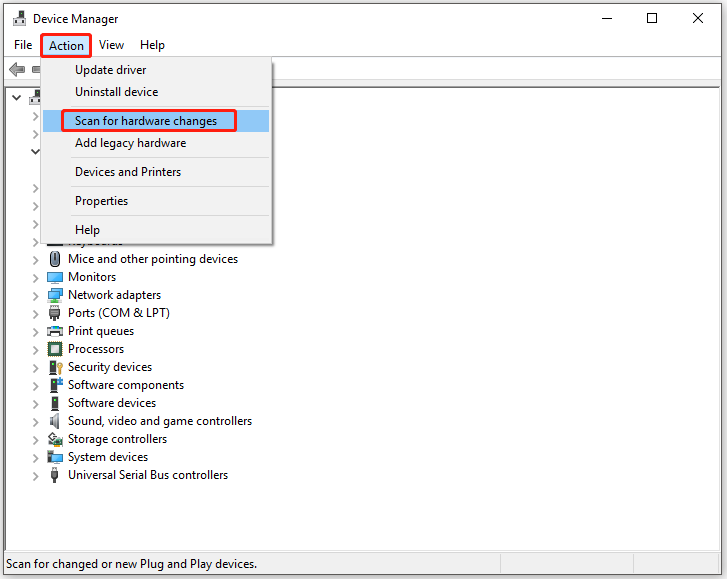
Step 2: After uninstallation, click Action > Scan for hardware changes to reinstall the disk driver.
Also read: 6 Solutions to Remove the Checksum Error WinRAR [New Update]
Solution 4: Reinstall USB Controllers
If the “You must initialize the disk before Logical Disk Manager can access it” message prompts after a USB drive is connected, it is likely that the USB device driver is not installed properly.
Then you need to reinstall USB controllers. Here are detailed steps for doing that.
Step 1: Open Device Manager again.
Step 2: Expand Universal Serial Bus controllers by double-clicking on it.
Step 3: Right-click on the USB controller and tap Uninstall device.
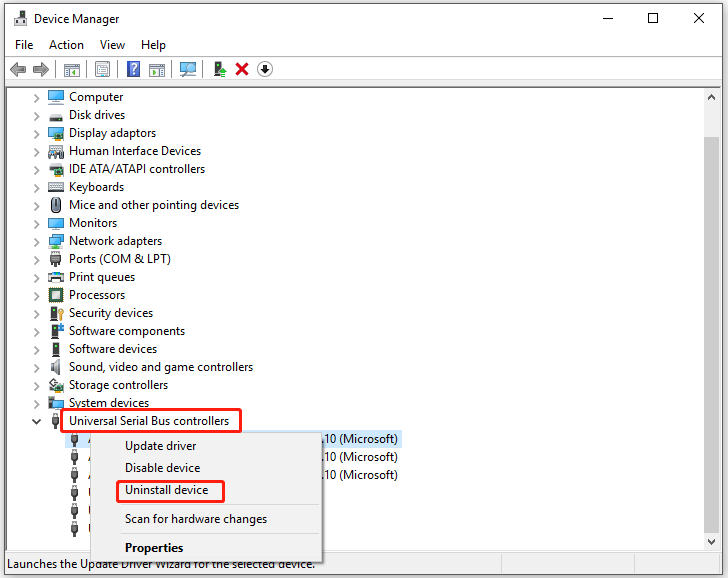
Step 4: Repeat Step 3 to uninstall all the USB controllers on the list.
Step 5: Restart your computer and then reconnect the USB drive. Then the device will reinstall all the USB controllers automatically.
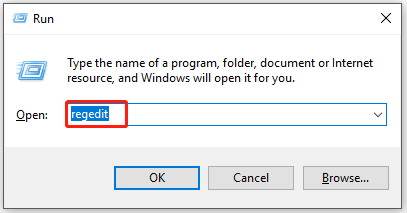
Solution 5: Modify Registry Values
Some users claim that registry values like “UpperFilters” and “LowerFilters” can make Windows can’t access the external hard drive. An applicable way to the “You must initialize the disk before Logical Disk Manager can access it” error is to check and delete these registry values.
Here’s the full tutorial.
Step 1: Open Registry Editor from the Run window.
- Open the Run window by pressing Windows and R keys.
- Type regedit in the Run window and then hit Enter.
Step 2: After the Registry Editor opens, follow the path below to navigate to the destination.
ComputerHKEY_LOCAL_MACHINESYSTEMCurrentControlSetControlClass{36fc9e60-c465-11cf-8056-444553540000}
Step 3: Move to the right pane, and then right-click on the UpperFilter key and tap Delete. Delete LowerFilters with the same operation.
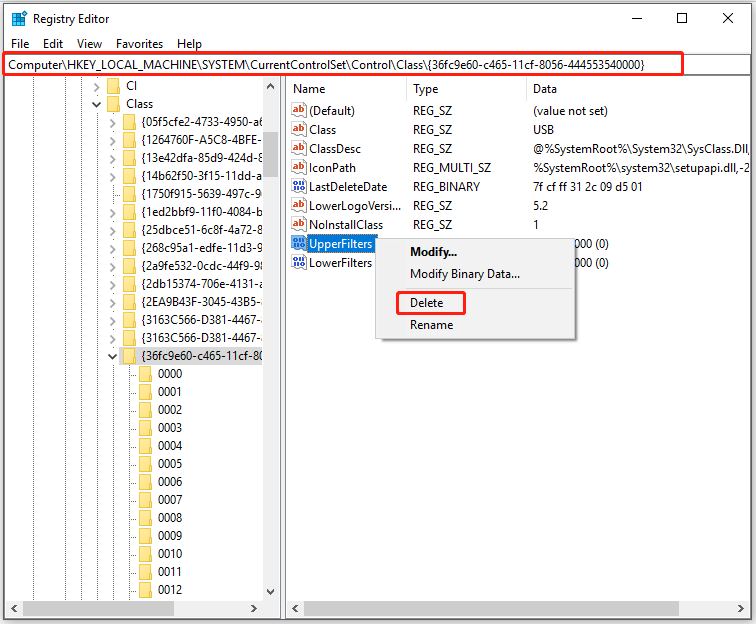
Step 4: Restart your computer to see if the issue is solved.
Solution 6: Reset CMOS Settings
Due to incorrect CMOS settings, Windows may warn you that You must initialize a disk or SSD before Logical Disk Manager can access it. It is recommended that you reset the CMOS settings in this case.
Step 1: Turn off the computer.
Step 2: After a while, turn on the device again. When the computer logo shows up on the screen, press a BIOS key to enter the BIOS setup.
Step 3: Check the status of the Virus Warning. If it is disabled, enable it manually. If the status is “Enable” already, disable it and then enable it.
Step 4: Save the changes and exit the current page by clicking F10 and Enter.
You may also like this: How to Initialize SSD in Windows 10/8/7? Here Is the Full Guide
Solution 7: Check If There Are Bad Sectors on the Hard Drive
When your hard drive includes bad sectors, the partition information can get lost and then the disk will be recognized as uninitialized. Therefore, an available way to fix the “you must initialize the disk” error is to check if there are bad sectors on the hard drive.
The Surface Test feature of MiniTool Partition Wizard enables you to do that quickly. Besides, this program also allows you to check file systems errors on the hard drive.
To check if your hard drive has bad sectors via MiniTool Partition Wizard, please refer to these steps.
Step 1: Download and install MiniTool Partition Wizard by clicking the button below.
MiniTool Partition Wizard FreeClick to Download100%Clean & Safe
Step 2: After installation, run the program to enter its main interface.
Step 3: Highlight the disk that prompts the “you must initialize the disk” message and click Surface Test.
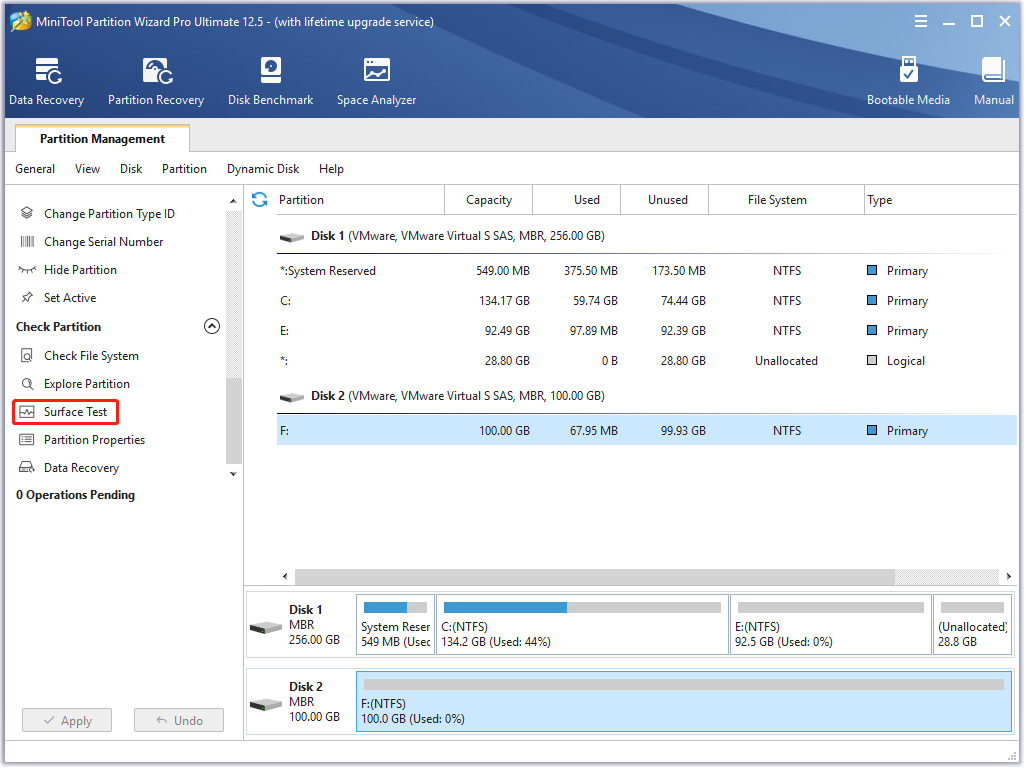
Step 4: In the Surface Test window, click on the Start Now button to begin the scanning process.
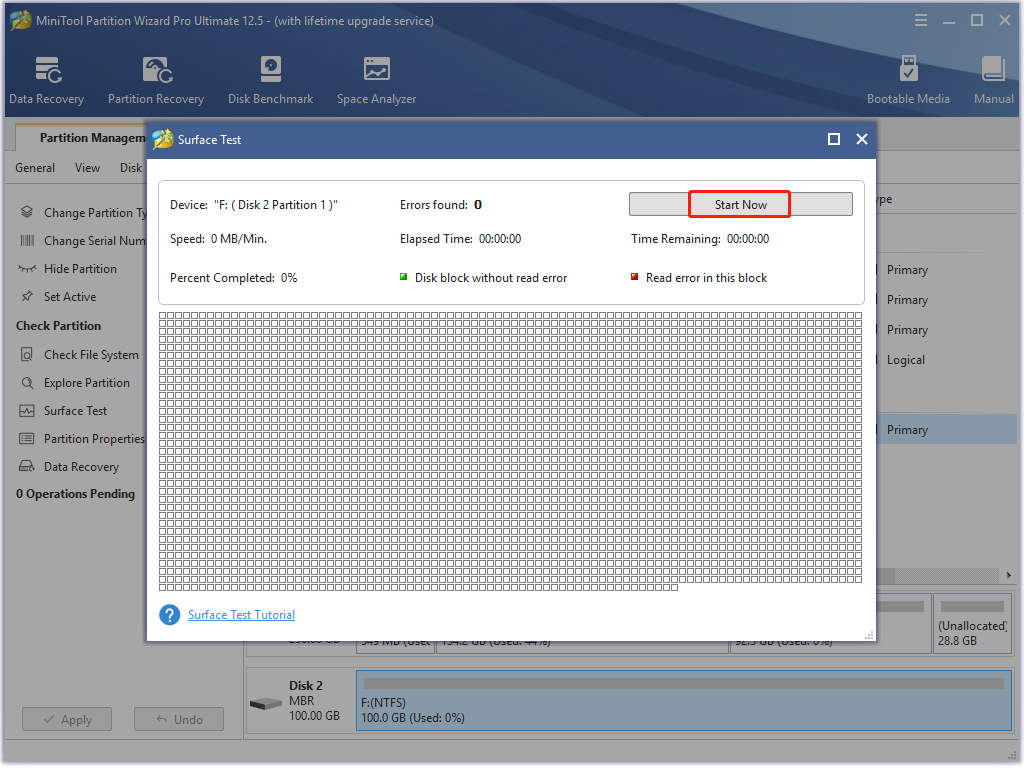
Step 5: The scanning result appears gradually as the process proceeds. When the scanning process ends, you will get the complete result. If there are any blocks marked with red colour in the scanning area, it means that there are bad sectors on the hard drive. If so, you can read this bad sector repair guide to solve them.
Bottom Line
Well, this post offers you top 7 solutions to the “You must initialize a disk before Logical Disk Manager can access it” error. If you are bothered by the issue, pick one method from these methods to get rid of it.
If you have other effective methods to fix the discussed issue, you can tell us in the comment area below. For any issues while using MiniTool Partition Wizard, directly contact us via [email protected].
User Comments :