Due to various reasons, you may receive the external hard drive not showing up Windows 11 issue. This is annoying and frustrating. Fortunately, you can get it solved by taking some action. Here, MiniTool Partition Wizard offers you several solutions to the Windows 11 not recognizing external hard drive error.
The external hard drive is often used to increase disk space for PCs, back up Windows/data, and transfer files between different devices. You need to connect the external hard drive to your computer and then perform operations on it.
However, you may fail to carry out operations because of the external hard drive not showing up Windows 11 error. How to get the external hard drive detected by the computer? Before that, you should find the possible reasons for Windows 11 external hard drive not showing up.
The section below collects the potential causes of the issue. You can take them as a reference. Then make use of the provided methods in the post to troubleshoot the error.
You may be interested in:
Best External Hard Drive for Xbox Series X (SSD & HDD)
Best SSD for Steam Deck in 2024: Top 7 Selected SSDs
Causes of External Hard Drive Not Showing Up Windows 11
The external hard drive not showing up Windows 11 error can be triggered by multiple factors. Possible reasons for Windows 11 not recognizing external hard drive are listed as follows.
- The connected USB port is not working.
- The device is hidden in Windows 11.
- The device driver is corrupted or out of date.
- External hard drives can get unreadable if they are physically damaged because of drops, or exposure to extreme temperatures or humidity.
- The power supply is insufficient.
- The file system of the external hard drive is incompatible with the PC.
- There’s no drive letter on the hard disk partition.
In addition to external hard drive not showing up Windows 11, you may also receive the following error variations.
- Internal hard drive not showing up Windows 11
- USB not showing up Windows 11
- Portable hard drive not showing up Windows 11
- External drive not accessible Windows 11
- WD, Toshiba, and Seagate external hard drive not showing up Windows 11
- Windows 11 not detecting hard drive but BIOS does
![Wipe or Erase a Hard Drive from BIOS [2 Effective Methods]](https://images.minitool.com/partitionwizard.com/images/uploads/2023/06/wipe-or-erase-a-hard-drive-from-bios-thumbnail.jpg)
Way 1: Check the Cable and USB Connection
A USB cable is required to connect the external hard drive to a computer. Therefore, you need to check the cable and USB connection first after you encounter the external hard drive not showing up Windows 11 error. If the connection is loose, you may not see the external hard drive in Windows File Explorer.
In this case, remove the hard drive and reconnect it again. Besides, ensure that you have turned on the device after connecting to the computer because some external hard drives come with a dedicated power button. Inspect the cable closely and replace it if you find any physical damage on the stock one. You should avoid using the cable from another company’s hard drive.
Way 2: Use Other Available USB Ports
The Windows 11 not recognizing external hard drive issue can occur when the USB port that you’re connecting malfunctions. If so, solve the USB port not working error or directly try other available USB ports on the computer. Check if the external hard drive not showing up Windows 11 issue disappears after plugging the cable into other USB ports. If not, try other methods in this post to troubleshoot the error.
Also read: How to Fix an Unformattable and Unusable USB Drive? Solved
Way 3: Enable Auto Mounting
Once you connect a new external hard drive to a Windows computer, it assigns a letter to the device and maps the location of the drive. This process is called auto mounting. However, you sometimes need to enable automatic mounting manually. To do that, simply execute a command line in Command Prompt.
Step 1: Press Windows and R keys to open the Run window.
Step 2: Type cmd in the Run window and press Ctrl + Shift + Enter keys to open Command Prompt as administrator.
Step 3: In the elevated Command Prompt window, type mountvol /E and hit Enter. This will enable the Auto Mount function.
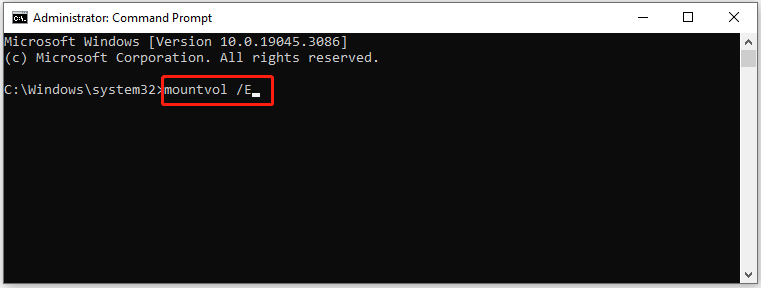
Step 4: Restart your computer and connect your external hard drive to see if it shows up on your computer.
Also read: Quickly Remove “Unable to Read from Disk – Error Code 1117”
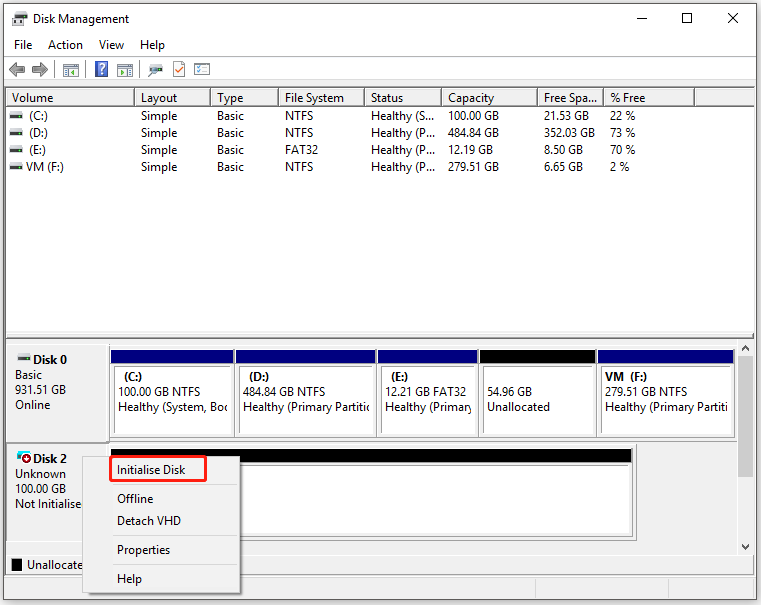
Way 4: Initialize the External Hard Drive
You need to initialize the new hard drive before you use it. Otherwise, error messages like “Initialize the disk before Logical Disk Manager access it” will keep popping up.
Besides, you may experience the Windows 11 external hard drive not showing up error in File Explorer. In this scenario, initialize and format the disk with the steps below.
Step 1: Right-click on the Windows icon and click Disk Management from the prompted Start menu.
Step 2: Find the connected hard drive in the Disk Management window. Then right-click on it and tap on the Initialise disk option.
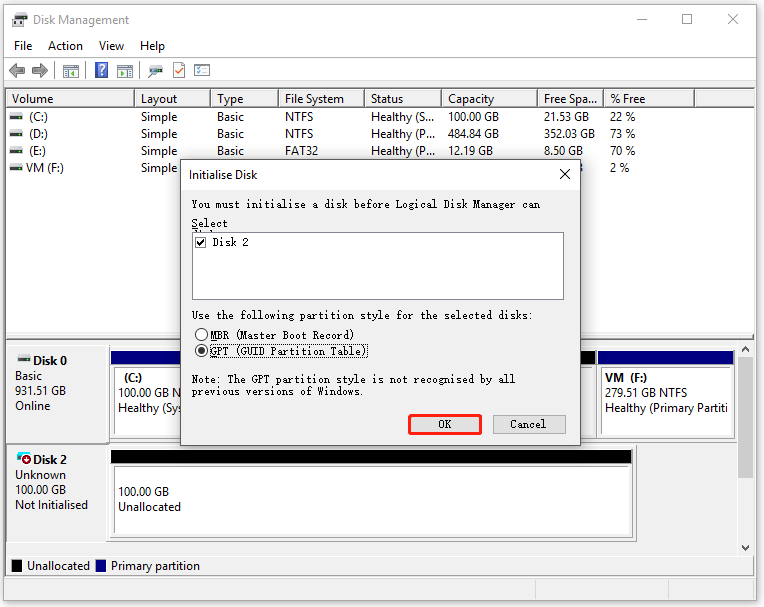
Step 3: In the pop-up window, choose a partition style based on your situation and click OK.
Step 4: Then right-click the unallocated space and click New Simple Volume.
Step 5: Follow the on-screen instructions to assign the drive letter and format the volume.
Also read: Fixed: Disk Management Format Option Greyed out | SSD Wont Format
Way 5: Format the External Hard Drive
If your external hard drive is an old one, directly format or add the drive letter for it. Since a hard drive without drive letter won’t show up in File Explorer, you need to assign a drive letter for the drive to make it visible. Open Disk Management, right-click on the drive, and click Change Drive Letter and Paths. After that, follow the prompted instructions to complete the operation.
Formatting the hard drive is a frequently used way to fix various logical issues on internal and external hard drives. If the missing file system results in external hard drive not showing up Windows 11, format the hard drive and allocate a file system for the storage device.
Here’s the tutorial on how to format an external hard drive via MiniTool Partition Wizard.
Step 1: Click the button below to download MiniTool Partition Wizard, and then run the setup file and follow the elevated instructions to install the program.
MiniTool Partition Wizard FreeClick to Download100%Clean & Safe
Step 2: Launch this free partition manager to access its main interface.
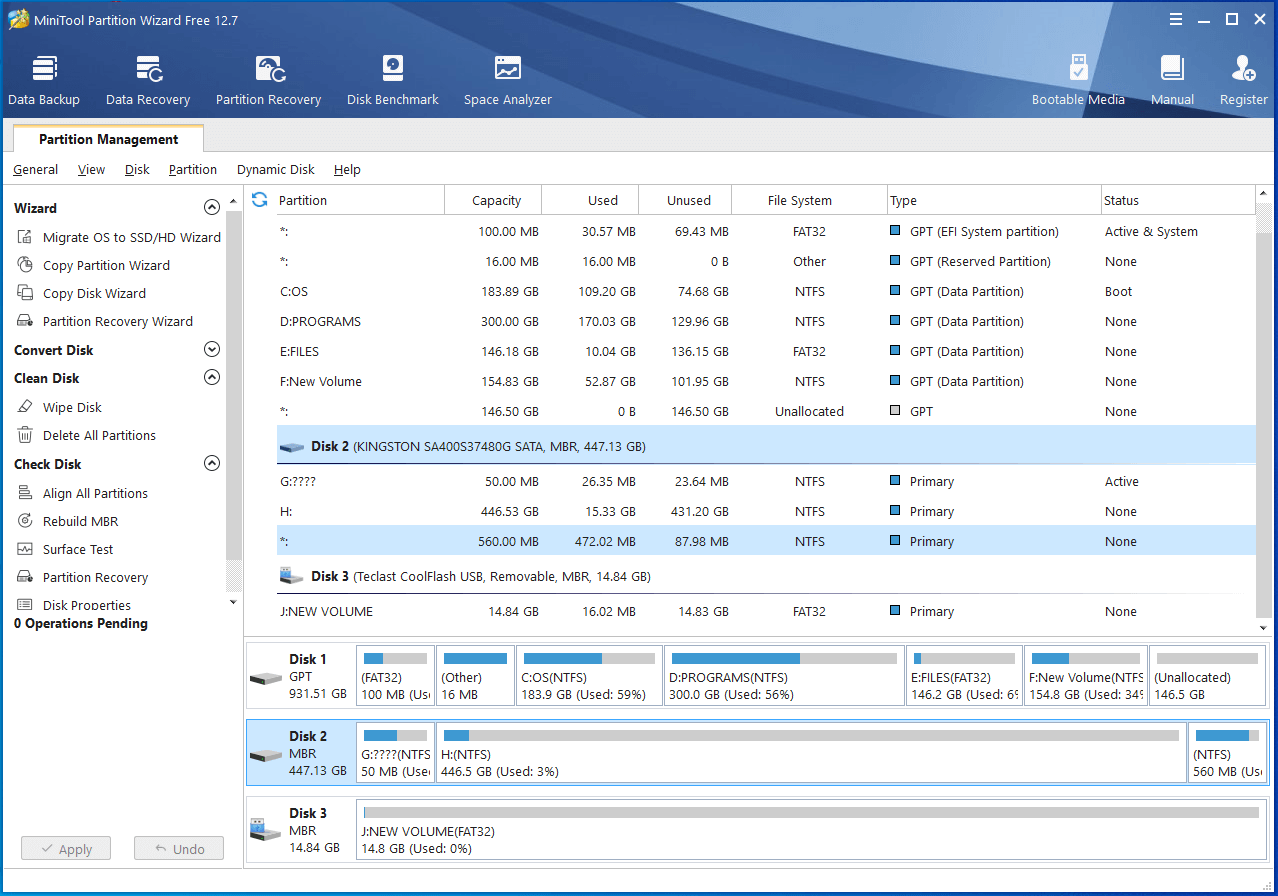
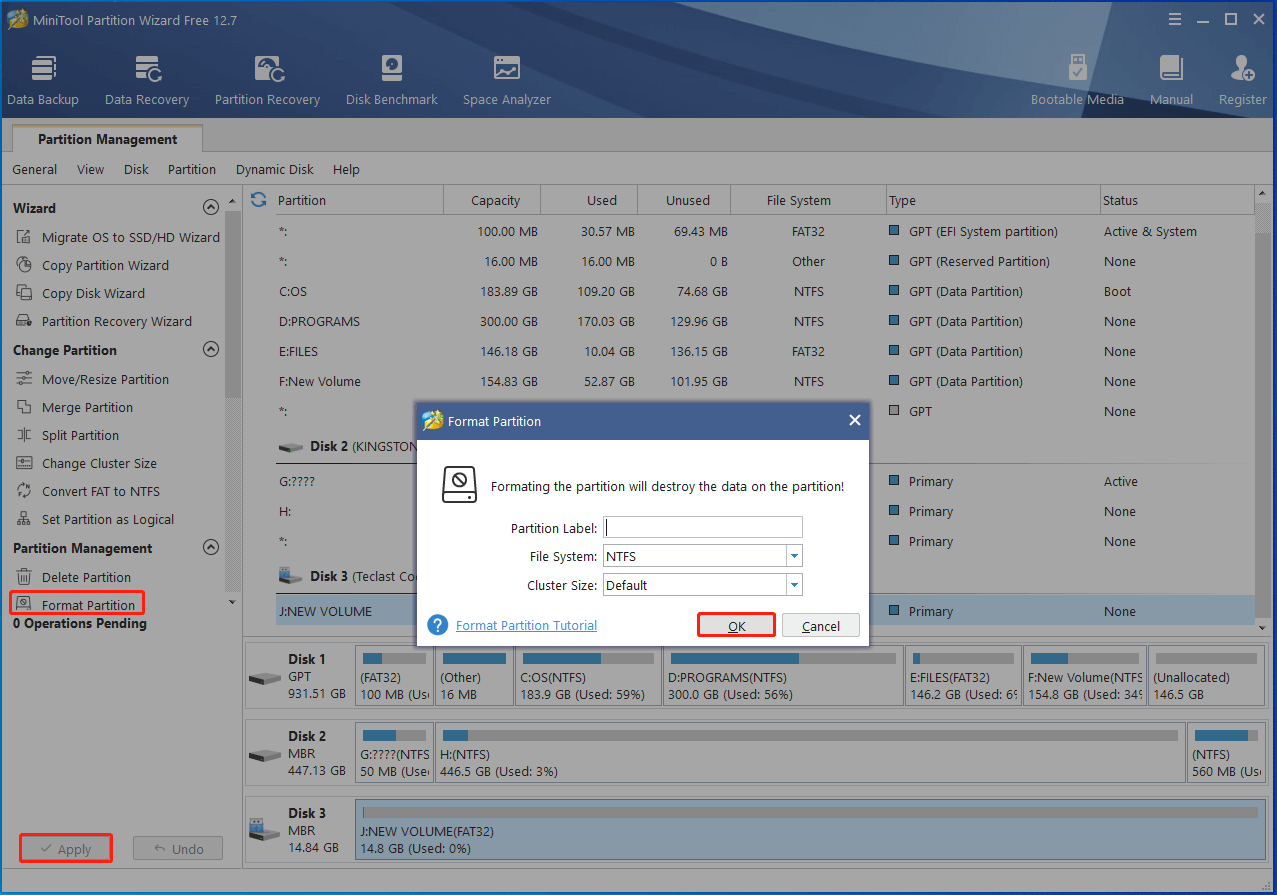
Step 3: Highlight the hard drive partition and click Format Partition in the left panel. In the prompted window, configure parameters like partition label, file system, and cluster size based on your needs. Then click OK to save changes you’ve made.
Step 4: Tap on the Apply button to carry out the operation.
Way 6: Enable Device from Device Manager
The external hard drive not showing up Windows 11 in File Explorer issue happens if the system disables your external hard drive. If so, you just need to enable it through Device Manager by following these steps.
Step 1: Right-click on the Windows icon at the bottom left corner of the screen to open the Start menu. Then tap on the Device Manager option on the menu.
Step 2: Double-click Disk drives to expand this category.
Step 3: Find and right-click the connected hard drive from the list and then hit the Enable device option.
Step 4: Do as what prompts you to finish the process.
Also read: 5 Methods for Steam Not Recognizing External Hard Drive
Way 7: Run Hardware and Devices Troubleshooter
Hardware and Devices Troubleshooter is a utility that comes with the Windows system. It helps you fix issues related to your hardware and device. Here, you can use it to fix the Seagate external hard drive not showing up Windows 11 issue.
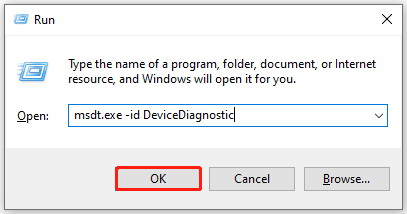
Step 1: Open the Run dialog window.
Step 2: In the Run window, type msdt.exe -id DeviceDiagnostic and click OK.
Step 3: In the pop-up window, click Next to run the Troubleshooter.
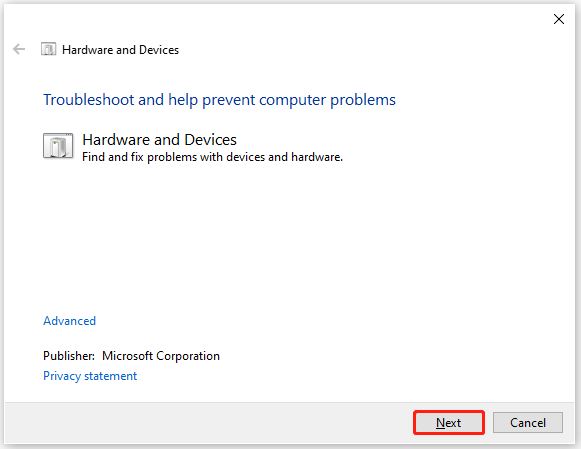
Step 4: Then the Troubleshooter will diagnose and fix hardware and devices issues on your computer.
Way 8: Update the Hard Disk Driver
The Windows 11 external hard drive not showing up issue can also be caused by the outdated hard drive driver.
Step 1: Open the Search box by pressing Windows and S keys, type Device Manager, and then click the Open option in the right panel.
Step 2: In the Device Manager window, expand Disk drives by double-clicking on it.
Step 3: Find and right-click the target driver and pick the Update driver option in the context menu.
Step 4: Choose a way to update the driver. If you want to update the driver automatically, tap on the Search automatically for drivers option. On the contrary, click Browse my computer for drivers instead.
Step 5: Wait for the finish of the driver installation process.
Make a Comment
To sum up, this post collects possible reasons and available troubleshooting methods for the Windows 11 not recognizing external hard drive issue. You can take it as a reference when you receive this error.
If you encounter any issues while using MiniTool Partition Wizard, please feel free to contact us to seek help. Simply send an email to [email protected]. We will make a reply as soon as possible.
User Comments :