Does initializing a disk erase data? A lot of users are confused about this question. In this post, MiniTool will explain this question in detail and show you how to initialize disk without losing data on Windows 10/11.
Why You Need to Initialize Disk
When adding a new HDD/SSD to your computer, you must initialize the disk to MBR or GPT before using the disk. Why? If you haven’t the disk initialized, you can’t create partitions and format them to supported file systems for further use. That’s to say, Windows can’t read and write data on that disk without initialization.
In addition, sometimes you need to reinitialize the disk if you encounter some issues like “you must initialize the disk before Logical Disk Manager can access it”, “disk unknown not initialized”, or “disk is offline because of policy set by an administrator”, etc. Thus, there are 2 main situations under which you may need to initialize a hard disk.
- Completely new disk: The new disk will be shown as “Unknown” before you initialize it on Windows Disk Management.
- Used and uninitialized disk: If the disk gets corrupted and shows as “Unknown, not initialized” after a long time of use, then you need to initialize the disk for rebuilding MBR. After that, you need to partition and format the disk for further use.
Does Initializing a Disk Erase Data
Will initializing a drive erase data? The answer is “No”. This is because initializing the disk is a process of rebuilding MBR (Master Boot Record). MBR is the first boot sector that stores information to organize logical partitions and file systems on that storage medium.
Thus, the initializing disk process only impacts the 0 sectors in MBR, which won’t delete data on the hard drive. If the hard disk has been used for a long time and its MBR gets corrupted, the disk will show up as “Unknown, Not Initialized” and you need to initialize it to rebuild MBR.
However, only initializing the disk can’t make it usable. To use and store data on the hard drive, you need to further partition and format the disk. This is no doubt that it will erase all data on the disk. So, initializing itself won’t erase data on the disk, but later partitioning and formatting will erase data.
Can I Initialize a Disk Without Data Loss
Can I initialize a disk without losing data? Yes! As discussed in “Does Initialize a Disk Erase Data”, the initializing disk process only affects the 0 sector in MBR, and the data saved on the disk are still there. So, you can initialize disk MBR or GPT without losing data.
To make the initialized disk visible and workable, you need to create partitions and format them to supported file systems. This process will erase data on that disk. So, is there an effective way to initialize disk without losing data? Let’s keep reading.
How to Initialize Disk Without Losing Data on Windows 10/11
How to initialize disk without losing data on Windows 10/11? Here we divide this process into the following 2 parts. Make sure to follow the steps carefully and orderly.
# 1. Very Important! Recover Data from the Uninitialized Disk First
First of all, the most important thing is to recover all data from the uninitialized/unknown disk as soon as possible. When the hard drive gets corrupted and shows up as “Not initialized”, all partitions on the disk become unallocated and all data can’t be accessed. If you continue writing data on the disk, the previous data will be overwritten and can’t be recovered.
Here comes a new question – how to recover data from the uninitialized disk on Windows 10/11? MiniTool Partition Wizard can help you recover partitions from unallocated space easily. It is a professional data recovery and partition manager that boasts many powerful features such as data/partition recovery, OS migration, MBR rebuild, disk benchmark, etc.
Here’s how to recover partitions from unallocated space using MiniTool Partition Wizard.
MiniTool Partition Wizard DemoClick to Download100%Clean & Safe
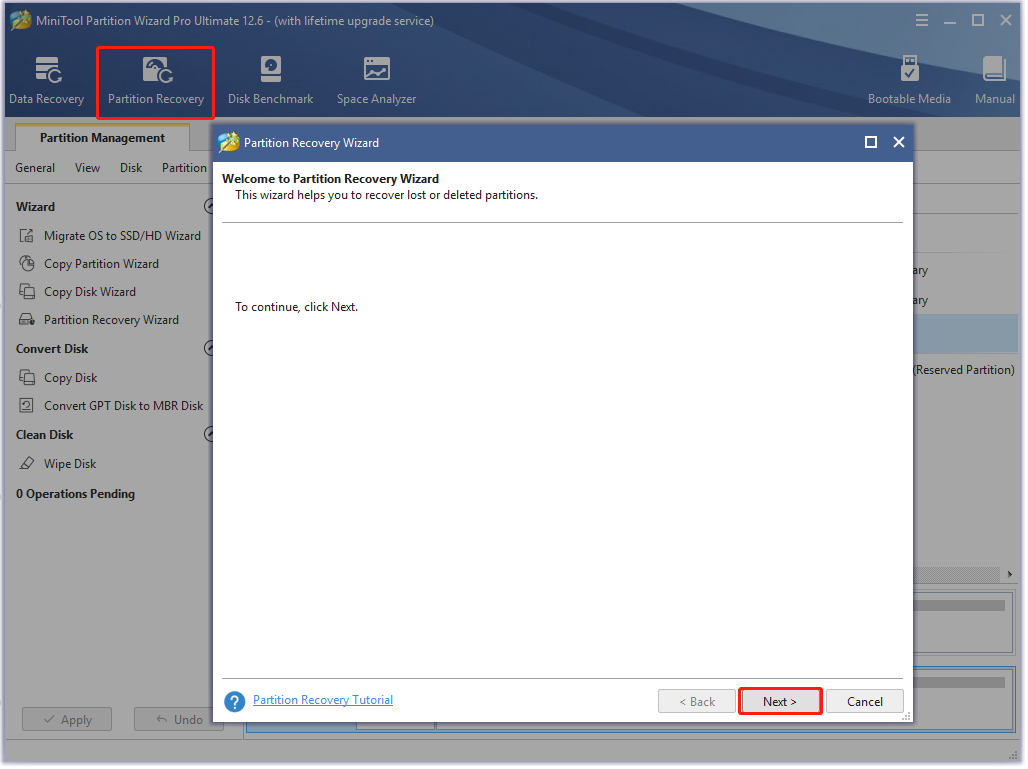
Step 1. Launch MiniTool Partition Wizard to enter its main interface, click on Partition Recovery from the top toolbar and click on Next to continue.
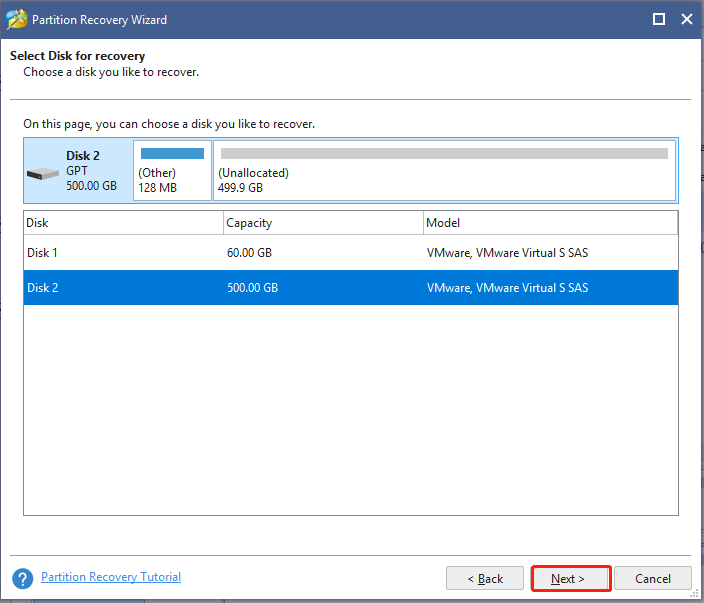
Step 2. Select the disk that you want to recover partitions from and click on Next.
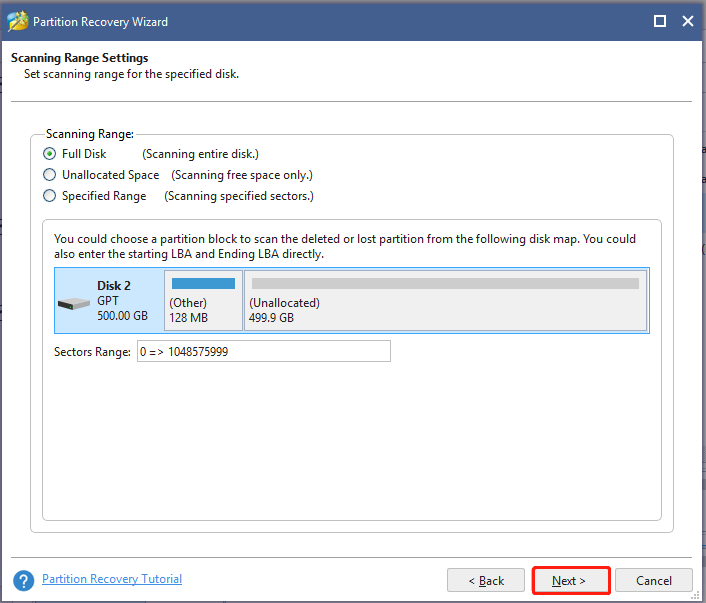
Step 3. Select the Scanning Range and click on Next. Here we recommend you select the Full Disk option.
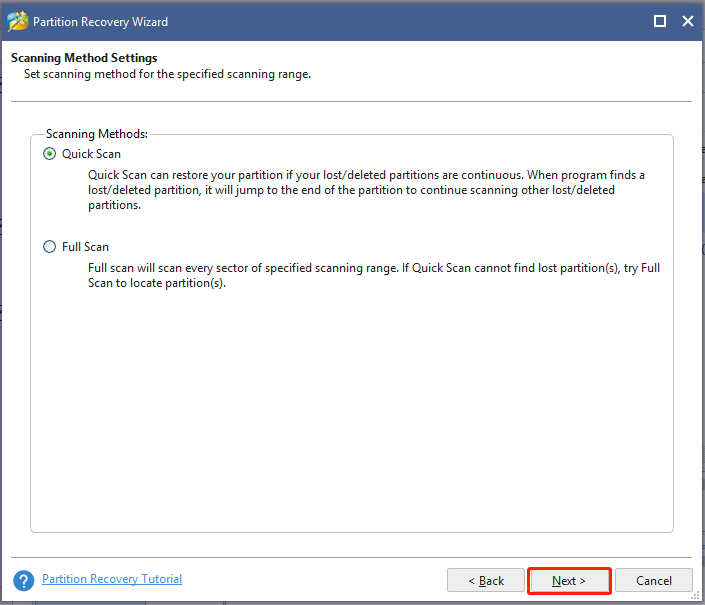
Step 4. Select the Scanning Methods according to your needs and click on Next. Here we take the Quick scan option for example.
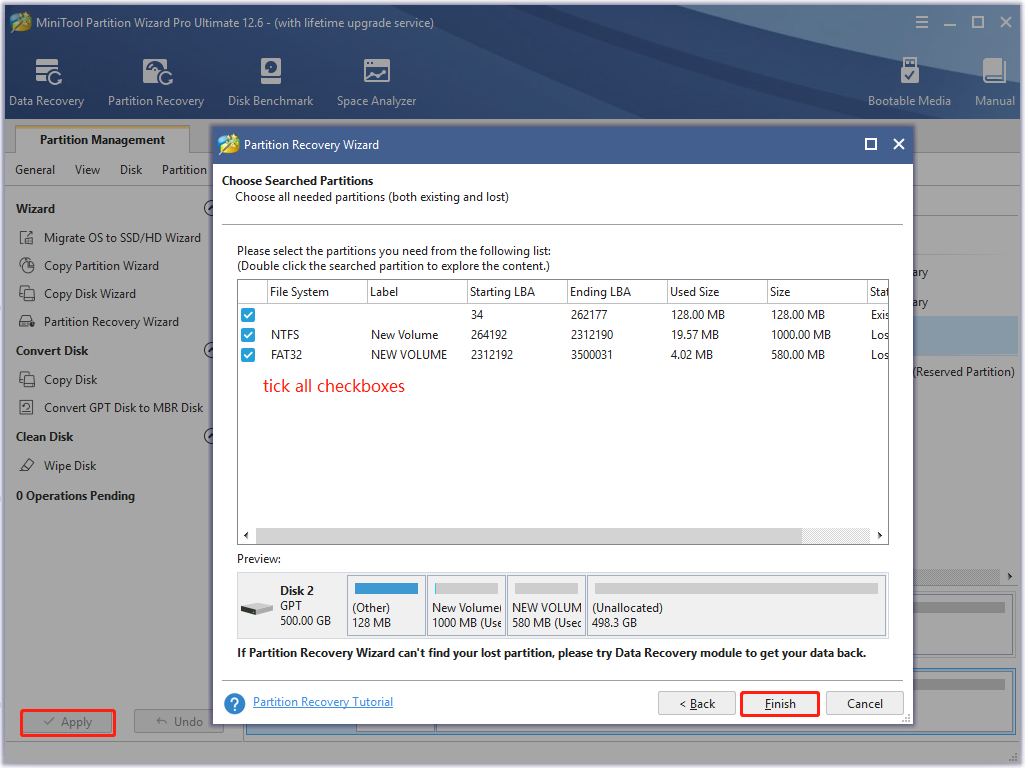
Step 5. Wait for the scanning to complete. Make sure you tick all checkboxes next to the needed partitions and click on Finish.
Step 6. Click on Apply in the main interface to restore all the partitions on that disk. Once done, you can initialize disk MBR or GPT without losing data.
# 2. Initialize Disk MBR or GPT Without Losing Data
Now, you can initialize the disk to MBR or GPT without data loss. How to do that? There are 3 accessible ways that you can choose according to your needs.
Method 1. Disk Management Initialize Disk
The first and most common way for disk initialization is to use the Windows built-in tool – Disk Management. Here are detailed steps on Disk Management initialize disk.
Step 1. Press the Win + R keys to open the Run dialog box, and then type diskmgmt.msc in the box and hit Enter to open the Disk Management window.

Step 2. Right-click the Unknown disk and select Initialize Disk.
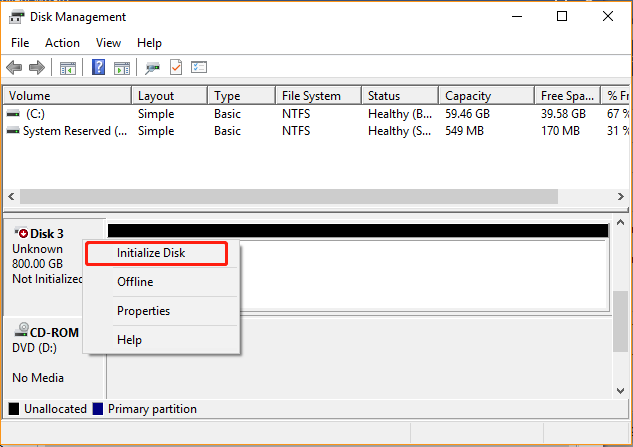
Step 3. In the pop-up window, select the partition style for the disk and click on OK. If you are not sure to select MBR or GPT, you can refer to this post.

However, for a used HDD/SSD that has been partitioned and data stored on it, you will find there is no “Initialize Disk” option when you right-click it in Disk Management. In this case, you have to initialize the disk using Diskpart.
Method 2. Diskpart Initialize Disk
Diskpart is also a Windows built-in disk partition management tool that uses different command lines to manage disks. Here you can use this tool to initialize disk MBR or GPT. However, this method needs you to delete all partitions on the disk and convert it to MBR or GPT.
If you have restored partitions first as we explained above, you can try this method without concern. Here’s how to initialize disk diskpart.
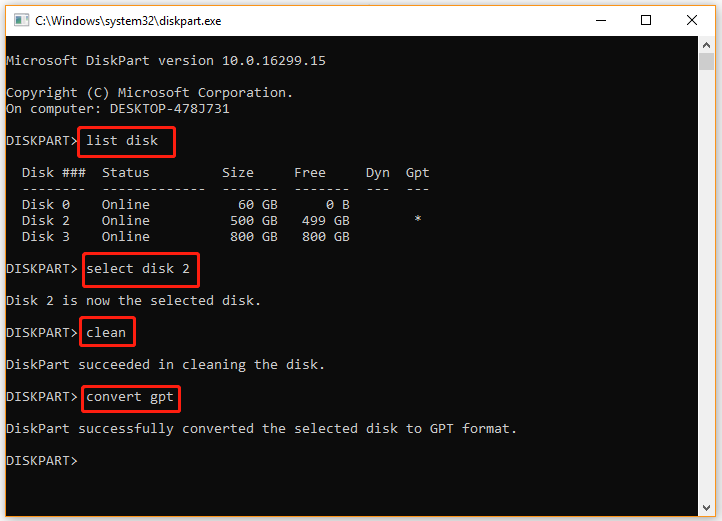
Step 1. Open the Run dialog box again, and then type diskpart in it and hit Enter. Then click on Yes in the UAC window to confirm this operation.
Step 2. In the DiskPart window, type the following commands in order and press Enter after typing each command.
- list disk
- select disk * (* represents the number of the disk that you want to initialize)
- clean
- convert gpt (or convert mbr if you are converting a GPT disk)
Method 3. MiniTool Partition Wizard Initialize Disk
The above two methods can help you initialize a disk, but they both have limitations. Disk Management can’t directly initialize a used and unknown disk, while diskpart requires you to delete all partitions first and convert the disk to MBR or GPT.
So, a better alternative to Disk Management/Diskpart initialize disk is to use a professional third-party disk manager application. MiniTool Partition Wizard is such a tool that can initialize to GPT/MBR disk and convert the disk to GPT/MBT without data loss.
Here’s how to initialize a disk using MiniTool Partition Wizard on Windows 10/11.
MiniTool Partition Wizard FreeClick to Download100%Clean & Safe
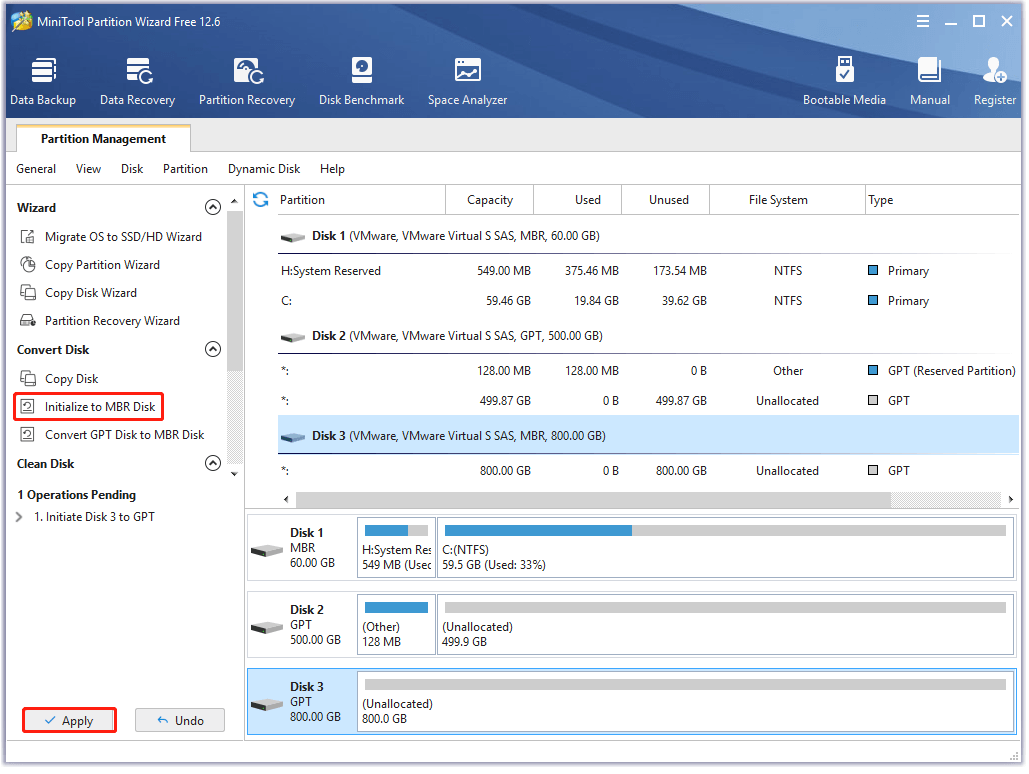
Step 1. Run MiniTool Partition Wizard to open its main interface and select the disk that you want to initialize from the disk map.
Step 2. Select Initialize to MBR disk/GPT disk from the left action panel and click on Apply to execute the pending change.
If you want to change the partition style without data loss, you can directly select the Convert MBR Disk to GPT Disk or Convert GPT Disk to MBR Disk option.
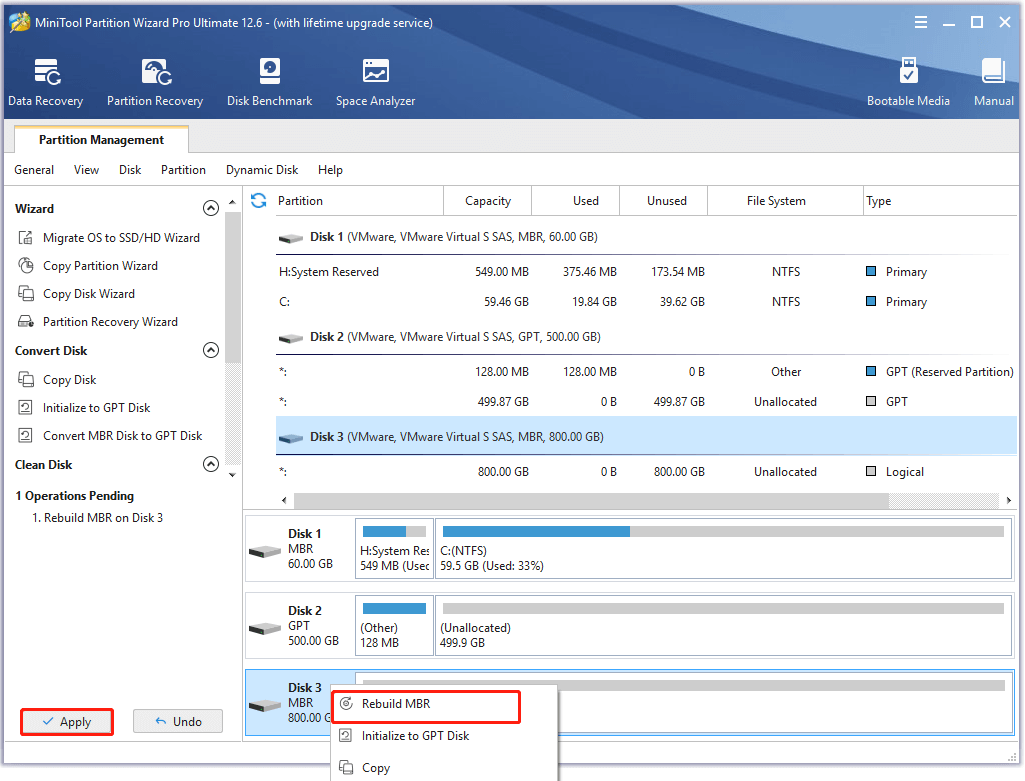
Step 3. If the disk becomes “Unknown, not initialized” due to MBR corruption, the MiniTool software can help you rebuild MBR. To do this work, right-click the corrupted hard disk and select Rebuild MBR from the right contextual menu. Then click on Apply to execute the operation.
Now, your hard disk should be initialized to MBR or GPT successfully and you can start partitioning the disk for further use. If you don’t know how to partition a hard disk, you can refer to this post “How Do I Create a Partition Using Diskpart”.
What’s Your Opinion
Will initializing a drive erase data? If you initialize a completely new disk, you won’t lose any data. However, if you want to initialize a used and corrupted disk, you need to delete all partitions on that disk first and initialize it to GPT or MBR.
How to initialize disk without losing data on Windows 10/11? The most effective way is to recover partitions from the uninitialized disk first using MiniTool Partition Wizard, and then you can initialize disk Diskpart/Disk Management. Alternatively, you can use the MiniTool software to initialize a disk to MBR/GPT.
If you have any other opinions or ideas about this topic, you can leave them in the following comment zone. If you have any difficulty using the MiniTool software, you can send us an email at [email protected] and we will help you as soon as possible.
User Comments :