Disk copy, also known as disk cloning, is the process of creating a replica of a disk. In this guide, MiniTool Partition Wizard introduces many details, including how disk copy works, when to copy a disk, how to clone a hard drive, and common issues with a disk copy.
Understanding Disk Copy
What Is Disk Copy
1. Introduction
Disk copy originally referred to a command-line tool in older MS-DOS and Windows versions for making exact floppy disk copies.
The modern usage usually refers to full hard drive cloning. It duplicates all the contents of an entire hard drive (either an HDD or SSD). This copy process involves every aspect of the source disk, including:
- Operating system: All system files, drivers, updates, and configurations necessary for Windows to run.
- Installed applications: All programs, along with their associated settings and configuration files.
- System settings and preferences: User preferences, network configurations, desktop settings, and other settings.
- User data and personal files: Videos, photos, documents, music, and other user data.
- Partition information and boot records: Master Boot Record (MBR) or GUID Partition Table (GPT), boot sectors, and partition layouts.
- File system and metadata: The structure of a drive, including hidden recovery partitions, system reserved partition, and file systems like NTFS, FAT, and other file systems.
- Empty space (in bit-for-bit cloning: Unused areas of the disk and remnants of deleted files.
Importantly, hard drive cloning creates a bootable replica of the original drive, allowing the cloned drive to boot immediately.
2. Disk Copy vs Disk Imaging
Disk copy and disk imaging are two methods used to create an exact duplicate of data from a storage drive.
The former creates an exact, uncompressed replica of the source drive on a target drive, while the latter creates a compressed image file of the storage drive.
However, they differ in purpose, execution, and other aspects.
Here is a detailed comparison.
| Features | Disk Copy | Disk Imaging |
| Storage device | Requires a second physical disk that has the same capacity as the source at least; each clone uses a separate drive. | Can store multiple compressed images on an internal/external disk, network location, or cloud storage. |
| Use Cases | – Upgrading or replacing a hard drive; – Quick system recovery on identical hardware; – Data transfer between similar systems. | – Backups and disaster recovery; – Standardized system configurations deployment across multiple computers; – Multiple system states archiving. |
| Bootability | The destination disk is immediately bootable after the copy. | The image file must be restored to a drive before it turns bootable. |
| Speed | Generally faster because it copies data directly from one disk to another disk. | Slower due to compression; recovery takes additional time. |
| Flexibility | Less flexible: each copy occupies a full disk. | Highly flexible: several image files can be stored on a single device. |
| Portability | Not portable. | Highly portable as image files can be moved. |
| Complexity | Straightforward process. | Requires specialized software for backup and recovery; more complex. |
Disk Copy
It creates a direct, exact, and uncompressed copy of one drive onto another. It is best for replacing an old or failing drive with a new one, upgrading to a larger drive, or performing data migration.
Hard drive cloning features immediate usability, simplicity, hardware compatibility (on identical hardware), and fast speed.
However, it also has some challenges, such as storage limitations (requiring a drive with the same or larger capacity), a lack of flexibility, and hardware dependency.
Disk Imaging
This method creates a single and compressed image file that holds all the data of a drive. It is ideal for comprehensive data backup and recovery.
It allows for multiple backup versions and saves storage space through compression, but this takes longer to create and restore.
3. Types of Disk Copy
Disk copy can be classified by both the copy method and the copy scope:
- By method, it includes sector-by-sector copy and file-based copy.
- By scope, it includes disk clone and partition clone.
By the Copy Method
#1. Sector-by-Sector Copy
Sector-by-sector copy is also known as bit-for-bit cloning. It copies every sector on the source drive to the target drive. Regardless of whether these sectors contain data, are blank, or have been marked as deleted, this method also copies them.
If the source drive contains bad sectors, the cloning process may attempt to preserve the disk structure. Logical bad sectors can be replaced with zeros or another predefined value, while physical bad sectors may cause errors or be skipped.
Pros
- Complete Data Preservation: It creates an identical, bit-for-bit copy, preserving all data, including deleted files, hidden areas, and slack space.
- File System Independence: Sector-by-sector disk cloning doesn’t rely on a file system and can work on Windows, Linux, macOS, and other types of OS. Even though the disk is not formatted, this method can operate properly.
- Enhanced Data Recovery: The process copies deleted files and data fragments, which is crucial for certain data recovery scenarios such as forensic analysis.
- Versatility in Cloning Devices: This mode helps users clone various types of storage devices, such as HDDs, SSDs, USB flash drives, SD cards, and others.
Cons
- Slower speed: Since it clones everything, the process can take longer.
- Large disk size on the target drive: The target drive must be at least as large as the source drive, or even larger, because it copies every sector. This leads to the inefficient utilization of storage space, especially when the source drive has a large amount of unused space.
- Affected by bad sectors: This method doesn’t skip bad sectors with corrupted data, making the new drive also have the same damaged data or resulting in a copy failure.
#2. File-Based Copy
This disk cloning type only copies individual files and folders to a target drive, rather than copying every sector. This process relies on the logical structure of the file system, such as file allocation tables and directory entries, to achieve data migration.
During the copying process, the file attributes such as timestamps, permissions, and other metadata are preserved.
Pros
- Optimized Storage Space: File-based cloning only copies the used files and directories, instead of unused disk space, thus saving storage space.
- Granular Control: Users can customize and select the specific files, folders, or file types to clone, to meet personalized requirements. Moreover, excluding large or unimportant files can improve the cloning efficiency.
- File Integrity: The cloned file retains its original attributes, ensuring file consistency and making it convenient for users to identify and access.
- Simplified Data Management: Cloned files can be directly accessed and used without special recovery tools.
Cons
- Cannot Fully Replicate the Disk State: This method cannot copy deleted, corrupted, or lost data that may still exist in unallocated blocks.
- Miss Certain Data: Specific data for the system or applications isn’t copied consistently.
- Subject to File System Integrity: If the file system of the source drive is damaged or incomplete, the file-based disk copy may not be able to correctly read and copy all files.
- Efficiency is low when dealing with a large number of small files: File-based cloning may be slower, as this method needs to handle the metadata and attributes of each file.
#3. Comparison
The following table summarizes the key differences between sector-by-sector cloning and file-based cloning.
| Feature | Sector-by-sector cloning | File-based cloning |
| What it copies | All sectors, including used, unused, and hidden areas. | Only files and folders. |
| Speed | Slower. | Faster. |
| Disk size | Requires the destination drive to be equal to or larger than the source drive. | Can clone to a smaller drive, as long as the target has enough space for the cloned files. |
| Use case | – Data recovery; – Digital forensics; – System migration; – Disk backup. | – Data migration; – Selective backup; – Upgrading to a smaller drive. |
By the Copy Scope
Disk copy can fall into two primary categories when categorized by the range of data being replicated: disk clone and partition clone.
#1. Disk Clone (Full Disk Copy)
This involves copying the entire hard drive, including all partitions, boot records, hidden sectors, unallocated space, and file systems.
The process creates an exact and bootable duplicate of the source disk, useful for backups or migrating to a new disk.
#2. Partition Clone (Partial/Selective Copy)
The method copies only specific partitions rather than the entire disk. It is best for backing up or migrating a single partition that contains data.
How Does Disk Copy Work
The primary mechanism of disk copy is sector-by-sector duplication, ensuring that the target disk is an exact replica of the source disk.
The core aspects of disk copy include the following.
1. Sector-Level Positioning
Modern disk copy operations use LBA (Logical Block Addressing) to locate data on the source disk.
LBA assigns a unique, sequential number (starting from 0) to each sector or block on the disk. The OS requests data by this single LBA number to abstract the physical details.
Then, the cloning software reads the data from a physical sector on the source drive and writes it to the corresponding sector on the target drive.
2. Data Transmission Mechanism
Disk cloning can be performed locally via direct physical connections such as SATA or USB, or remotely over a network for offsite duplication.
Option 1: Local Disk Cloning
For a local disk copy, data is transferred directly between the source drive and destination drive. Typically, it is managed by a dedicated hardware cloning device or a hard disk copy program on a computer that uses RAM as a temporary buffer.
This approach provides the fastest transfer speeds and commonly utilizes interfaces including:
- SATA (Serial ATA): The most common interface for internal drives in laptops and desktops.
- USB: External drive enclosures or adapters.
- NVMe: High-speed PCIe-based SSDs (often in the M.2 form factor).
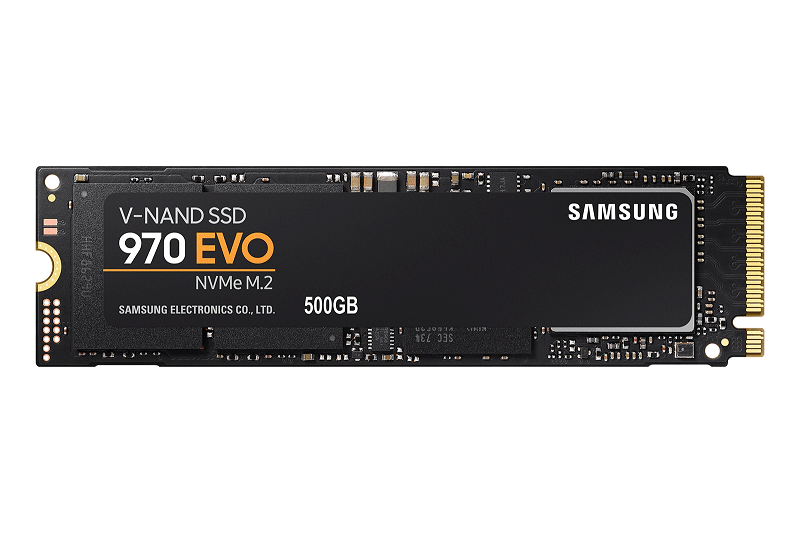
(image from Samsung)
Option 2: Network-Based Disk Copy
A network-based disk cloning is suitable for large-scale deployments and remote backups. This method divides data into smaller, manageable packets and transmits them across the network infrastructure. Common network protocols include iSCSI, NFS, FTP/SFTP, and others.
3. CRC Verification
CRC (Cyclic Redundancy Check) verifies data integrity.
During cloning a hard drive, the software calculates and compares checksums of data blocks on the source drive and the target drive. This confirmation step ensures that the cloned data is an exact, error-free match of the original drive.
- If the checksums match, the data is intact and valid.
- If the checksums do not match, a data error occurs during the copying process. The hard disk copy program can flag errors and attempt to re-read and re-transfer the data block. Or it stops the process and displays an error message.
When Do You Need to Copy a Disk
In the following cases, it is a good option to copy a disk.
1. Upgrading a hard drive
The system may run slowly due to an older HDD, or the drive may be running out of storage space. In this case, it is recommended to copy the old hard drive to a new, faster SSD or a larger hard drive.
This method can improve the system performance and offer more free space, avoiding the time-consuming process of reinstalling the system and apps from scratch.
2. Creating a Complete Backup
A full disk clone can serve as an immediate, bootable backup.
If the original hard drive fails, becomes corrupted, or is compromised by malware, the cloned drive can be used to boot the system. This minimizes downtime, thus avoiding a lengthy reinstallation process.
3. Transferring to a New Computer
When migrating to a new PC, all data including the operating system, files, settings, programs, and operating system can be effectively transferred to a new disk with minimal effort.
![How to Transfer Data from Old PC to New PC [2026 Guide]](https://images.minitool.com/partitionwizard.com/images/uploads/2025/10/transfer-files-data-from-old-pc-to-new-pc-thumbnail.png)
4. Setting up Multiple Systems
Disk cloning is also useful for deploying identical configurations across multiple computers. This approach saves time and guarantees that each device has consistent settings, applications, and system environments.
How to Clone a Hard Drive to SSD/HDD in Windows 11/10
A disk copy involves three main steps:
- Preparing the source and target drives for cloning.
- Performing the disk copy from the source drive to the SSD or HDD.
- Completing post-cloning steps to ensure the system functions properly.
The following are details.
Precautions for Hard Drive Cloning
1. Back up Important Data
Even though the hard disk copy program is reliable, it is necessary to create a backup for important files beforehand. That’s a critical step since accidental data loss can occur in case the cloning process fails.
Store that backup to a separate location, not the drive you are working with.
For data backup, use the professional PC backup software, MiniTool ShadowMaker.
This utility offers an all-in-one backup and recovery solution, involving the Windows operating system, selected partitions, a disk, files, and partitions.
Importantly, it supports various storage devices like an external hard drive, USB flash drive, NAS, DAS, and SD card.
What’s more, key features include scheduled backups, cloning HDD to SSD, file sync, and incremental/differential backups.
Learn how to back up files to an external hard drive.
MiniTool ShadowMaker TrialClick to Download100%Clean & Safe
Step 1: Connect your external disk to the computer via a USB cable and launch MiniTool ShadowMaker.
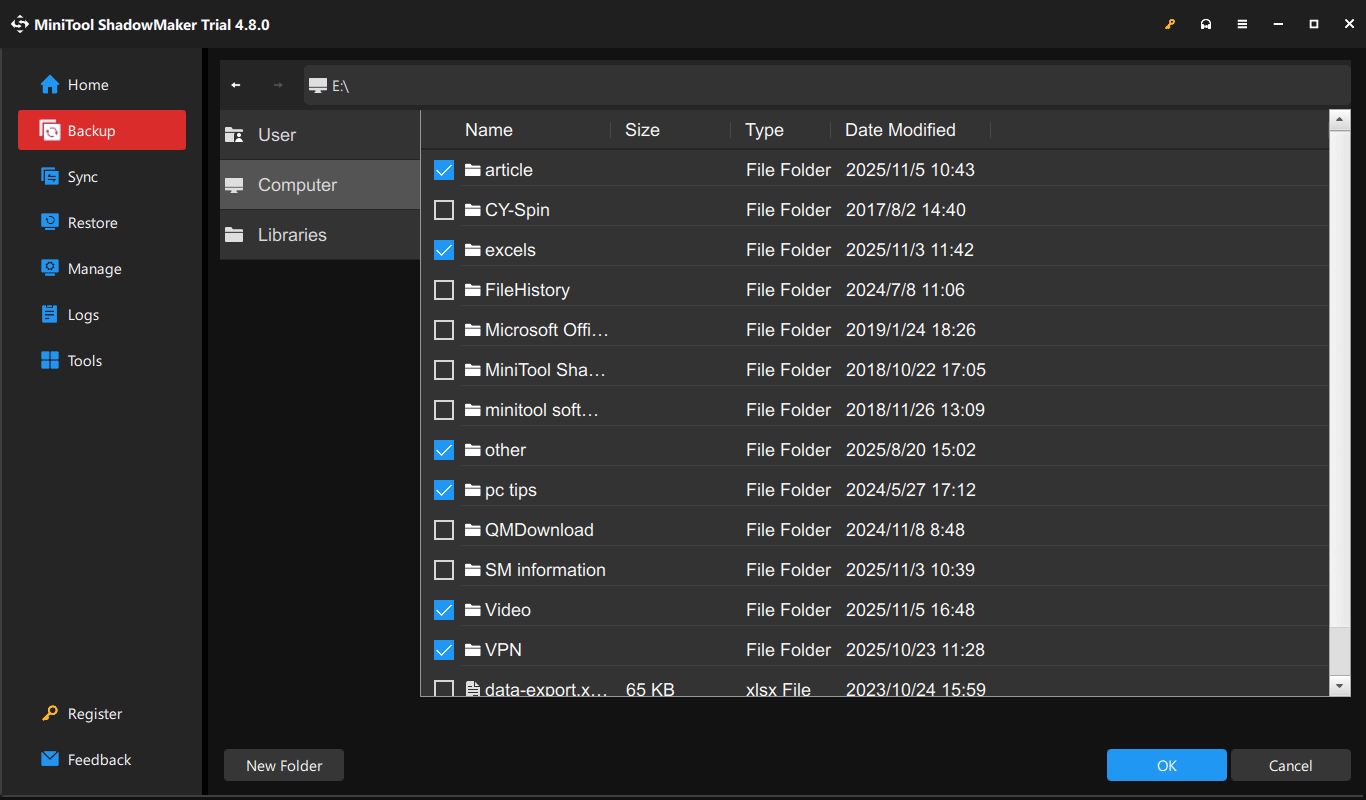
Step 2: Navigate to the Backup tab on the left side. To choose files that you want to back up, click SOURCE > Folders and Files, browse the computer, check the items for backup, and click OK.
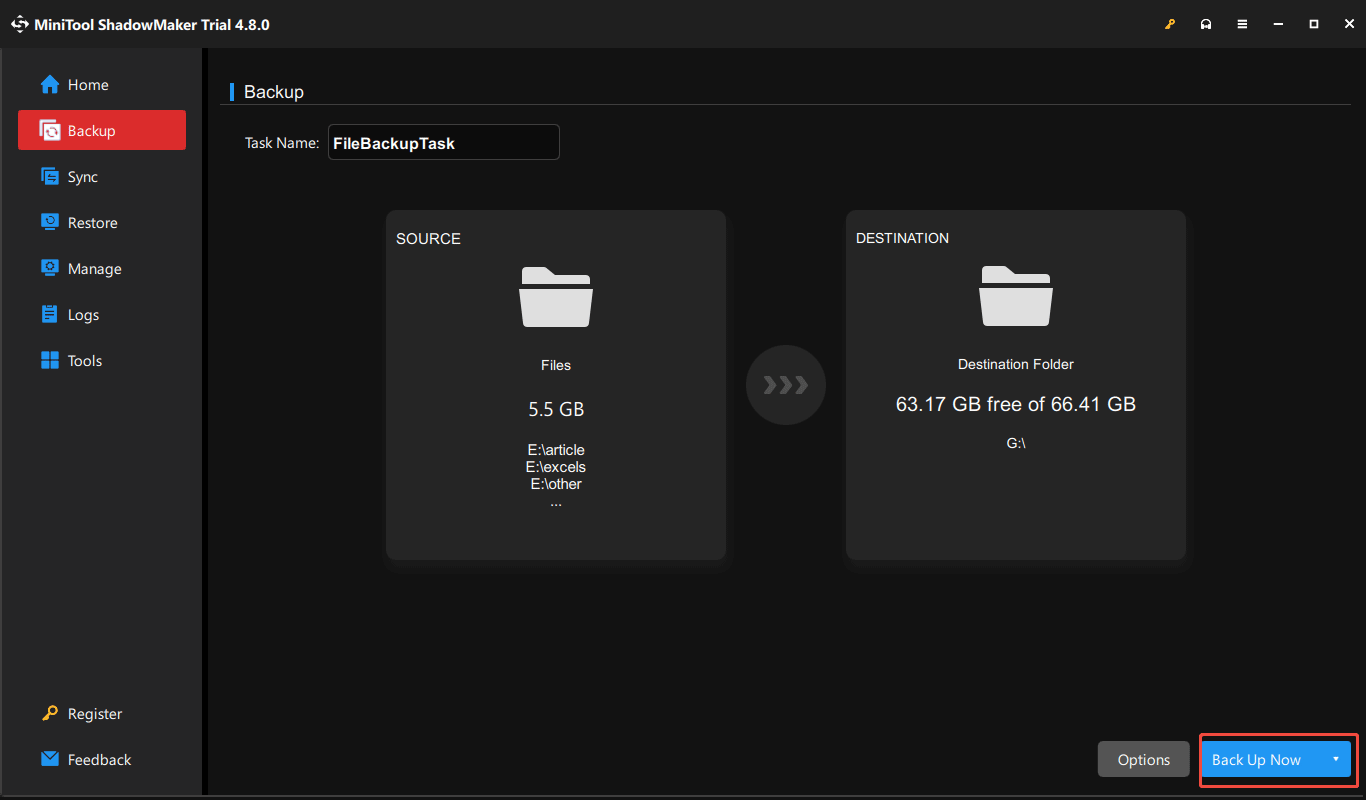
Step 3: Go to the DESTINATION section, select your external drive under Computer, and click OK to confirm the selection.
Step 4: Click Back Up Now to start the file backup process.
2. Prepare the Target Drive
After backing up the data on the source drive, you should prepare the target drive before cloning. This mainly involves ensuring sufficient capacity and hardware compatibility.
Here is a breakdown.
#1. Capacity
For a successful disk copy, the target disk should have enough storage space to accommodate all the data from the source disk. The best option is to use a larger drive than the source disk, avoiding any complex partition adjustments and streamlining the cloning process.
In addition, using a larger drive can eliminate the risk of errors that can occur when cloning to a smaller drive. Also, it offers room for future data growth and system updates, ensuring sufficient space for system use after cloning.
#2. Compatibility
The interface of your new drive should be compatible with the motherboard. Check if the machine has an available SATA port (for 2.5-inch or 3.5-inch HDDs) or M.2 slot (for NVMe or SATA SSDs). Then, purchase a proper hard drive from a reputable website or store.
If necessary, use a quality SATA-to-USB adapter or external enclosure to connect the SSD or HDD to your computer. Avoid using front USB ports where possible, as they may not supply enough power, triggering cloning failures.
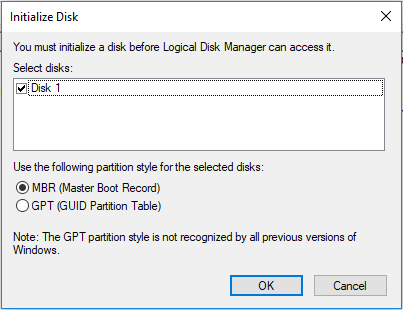
3. Initialize Destination Drive
Most disk copy software automatically handles the initialization and formatting process. However, some may require the new drive to be visible to the operating system. In such cases, initialize it before cloning.
To do that:
Step 1: Plug your new drive into the computer.
Step 2: Right-click on the Start icon and choose Disk Management.
Step 3: Locate the new disk, right-click on it, and select Initialize Disk.
Step 4: Select the partition style, like MBR or GPT, and click OK.
4. Clean up the Source Drive
Before cloning a hard drive, clean up the source disk. To do this, run a disk cleanup utility, uninstall unused programs, and empty the Recycle Bin. For an HDD, consider defragmenting it to improve read/write efficiency before cloning.
These steps can significantly reduce the amount of data to be cloned, ensuring a faster cloning process and a clean, efficient copy.
#1. Run Disk Cleanup
The built-in cleanup tool helps effectively remove temporary files, old Windows update files, and other unnecessary data.
Step 1: Open Disk Cleanup via the Search box.
Step 2: Choose a drive like C.
Step 3: Check the items you want to delete and click OK > Delete Files.
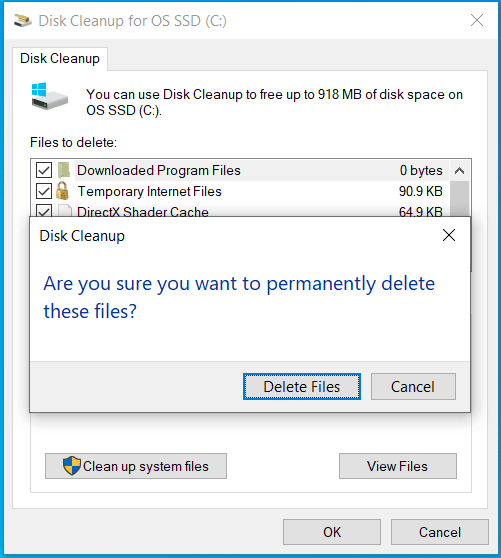
Step 4: Click Clean up system files and follow the on-screen instructions to delete unnecessary system files.
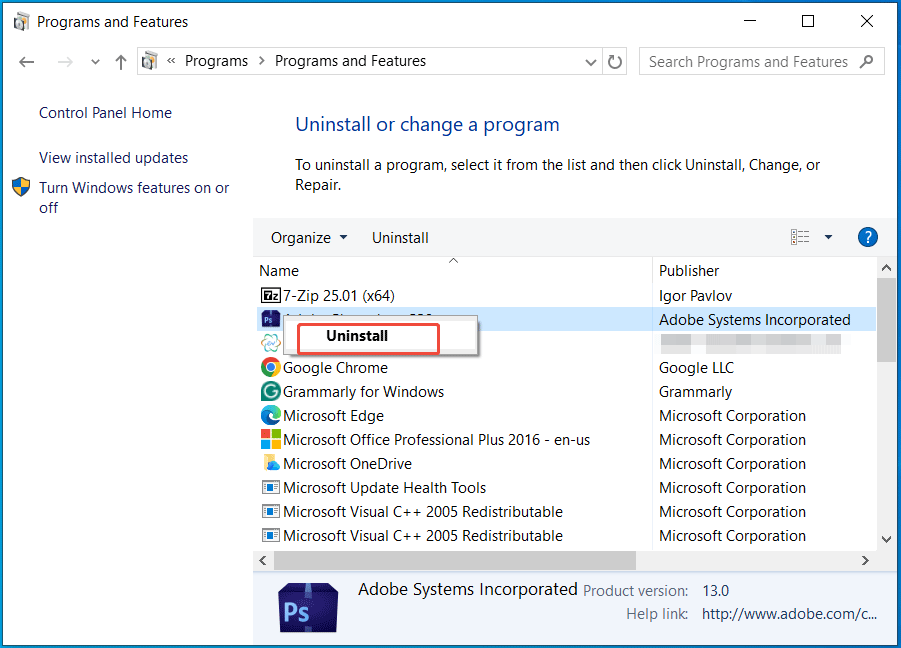
#2. Uninstall Applications in Control Panel
Uninstalling unnecessary or unused programs will free up much disk space, reducing the cloned data size.
Here are the steps:
Step 1: Type Control Panel in Windows Search and choose the best match.
Step 2: Select Category in the View by menu and click Uninstall a program from Programs.
Step 3: Right-click on the program and select Uninstall.
#3. Defragment an HDD
Disk defrag will reorganize fragmented data on a hard disk drive.
Step 1: In Search, type defrag and select Defragment and Optimize Drives.
Step 2: Select the drive that needs to be fragmented and click Optimize.
5. Check Disk Health
It is vital to check disk health before cloning to prepare for potential issues. This operation aims to assess how likely a successful clone is. A drive with few bad sectors may clone, but one that is completely unresponsive is unlikely to be cloned.
Step 1: Type cmd to Search and click Run as administrator to open Command Prompt with admin rights.
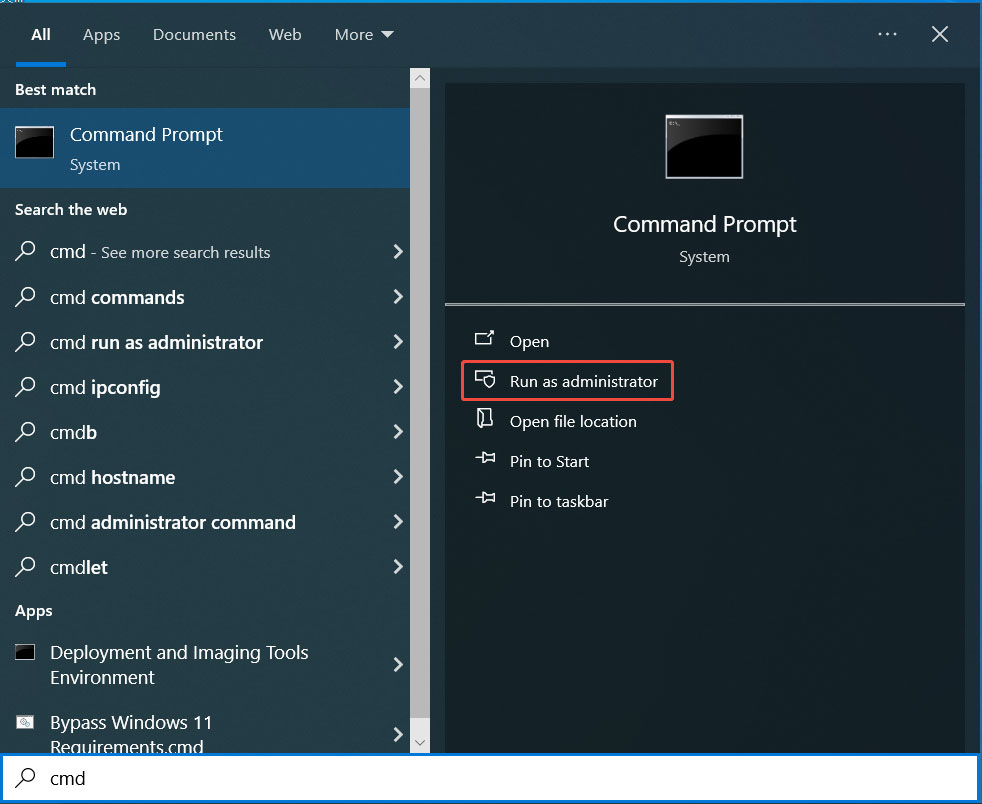
Step 2: Input chkdsk g: /f /r and press Enter. Replace g: with your drive letter. This command scans for file system errors and fixes them, locates bad sectors, and recovers unreadable data.
Repeat this step for other volumes on your source disk.
How to Copy a Disk with MiniTool Partition Wizard
To clone your hard drive to an SSD or HDD, use a disk copy software like MiniTool Partition Wizard.
As a free partition manager, this utility is worth recommending.
It provides the Copy Disk feature, which enables you to clone a smaller SSD to a larger SSD and migrate Windows to another drive with ease. This feature applies to system disks and data disks.
Moreover, its Migrate OS to SSD/HD Wizard plays an important role in cloning a system disk. It can copy all the partitions on the system disk to another hard drive or only copy the system-required partitions.
After connecting the target drive, follow the steps below to clone the disk.
Step 1: Install and launch MiniTool Partition Wizard.
1. Download this hard drive clone software.
MiniTool Partition Wizard FreeClick to Download100%Clean & Safe
2. Follow the instructions to install it on your computer.
3. Open this program to access its main interface.
Step 2: Select the Copy Disk feature.
1. Select the hard drive you want to clone from the available disks. Here, we choose the system disk.
2. Choose Copy Disk from Convert Disk in the left panel.

Step 3: Choose a target disk.
1. Select a disk to copy the content of the source drive to.
2. Click Next, then Yes to confirm.
Step 4: Choose a copy option according to your requirements.
1. Select whether to Fit partitions to entire disk or Copy partitions without resizing.
2. To improve performance for an Advanced Format disk or SSD, check Align partitions to 1 MB.
3. To clone the disk to a GPT disk, check Use GUID Partition Table for the target disk.
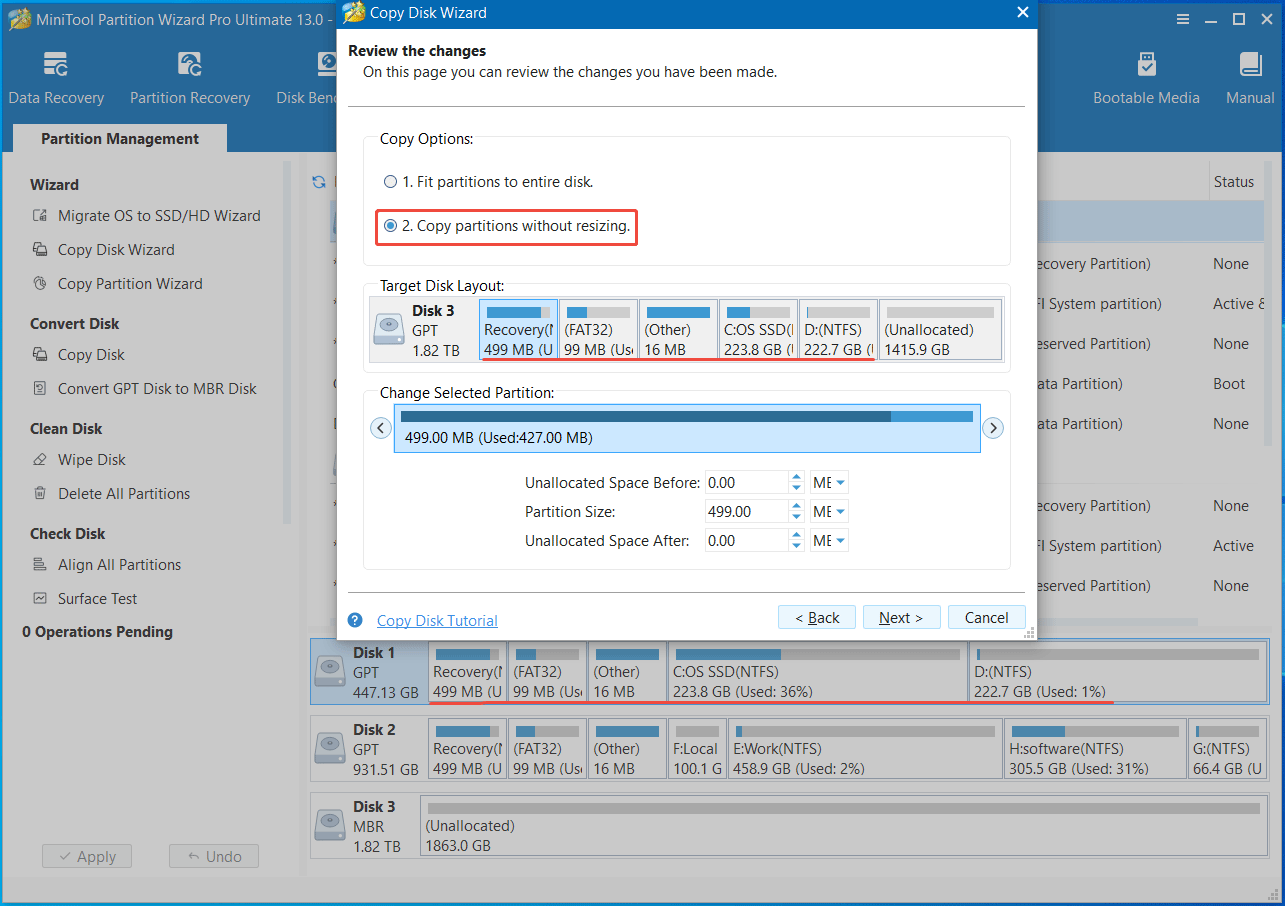
- Fit partitions to entire disk meansthe software will automatically adjust the target disk partition size to fit the whole hard drive. Copy partitions without resizing indicates the target disk has the same disk layout as the source disk, and the unused space becomes unallocated.
- You can review the changes you have made on this page.
- Moreover, the last two options may not display on the screen in different cases. In my case, they don’t show.
Step 5: Apply the disk copy.
1. Review the Boot from the Destination disk note and click Finish.
2. Preview the cloning result and click Apply to confirm the operation.
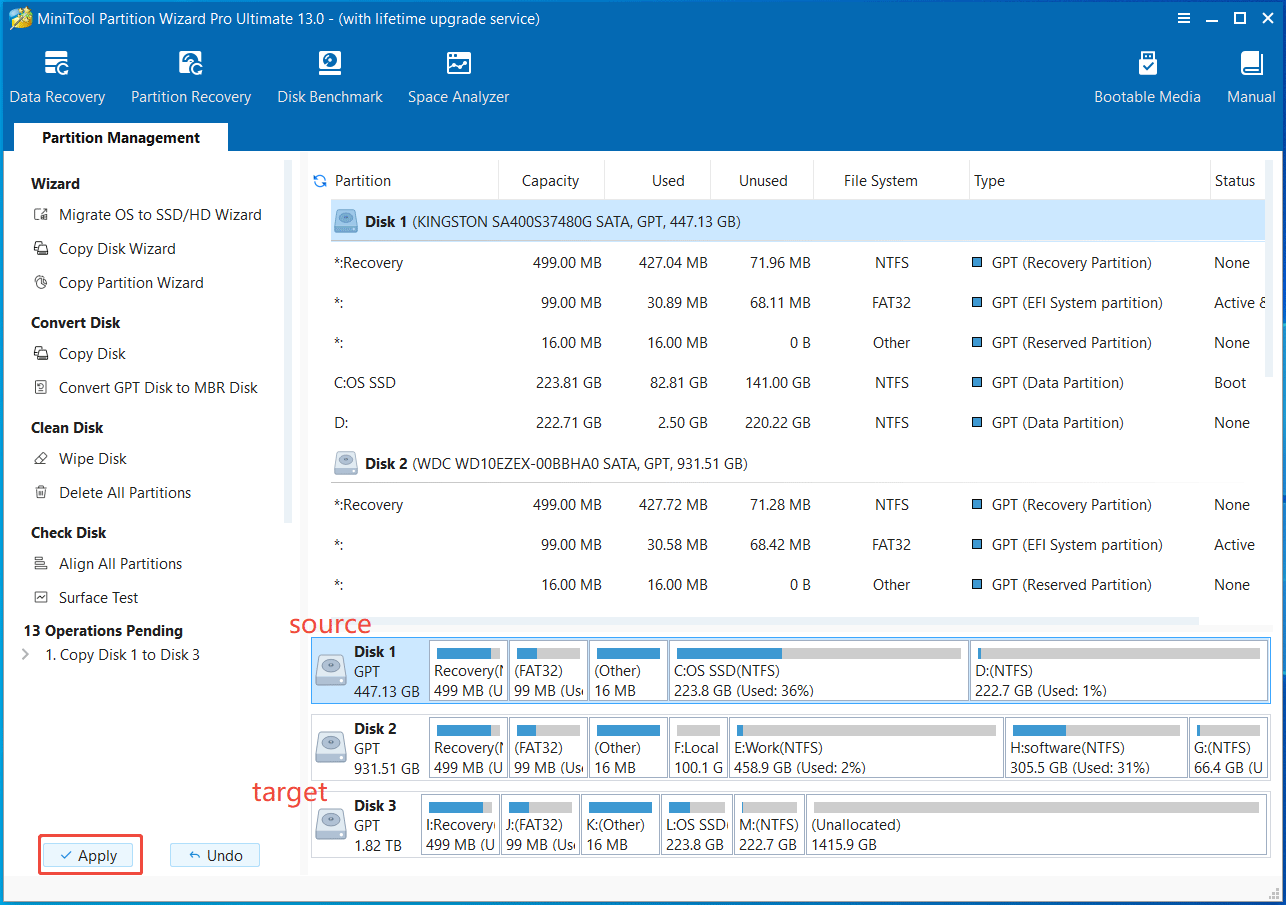
Then, MiniTool Partition Wizard begins the cloning process. It will reboot your computer and access WinPE (Windows Preinstallation Environment) to complete the entire operation.
Further Reading: Extension Methods for Disk Copy
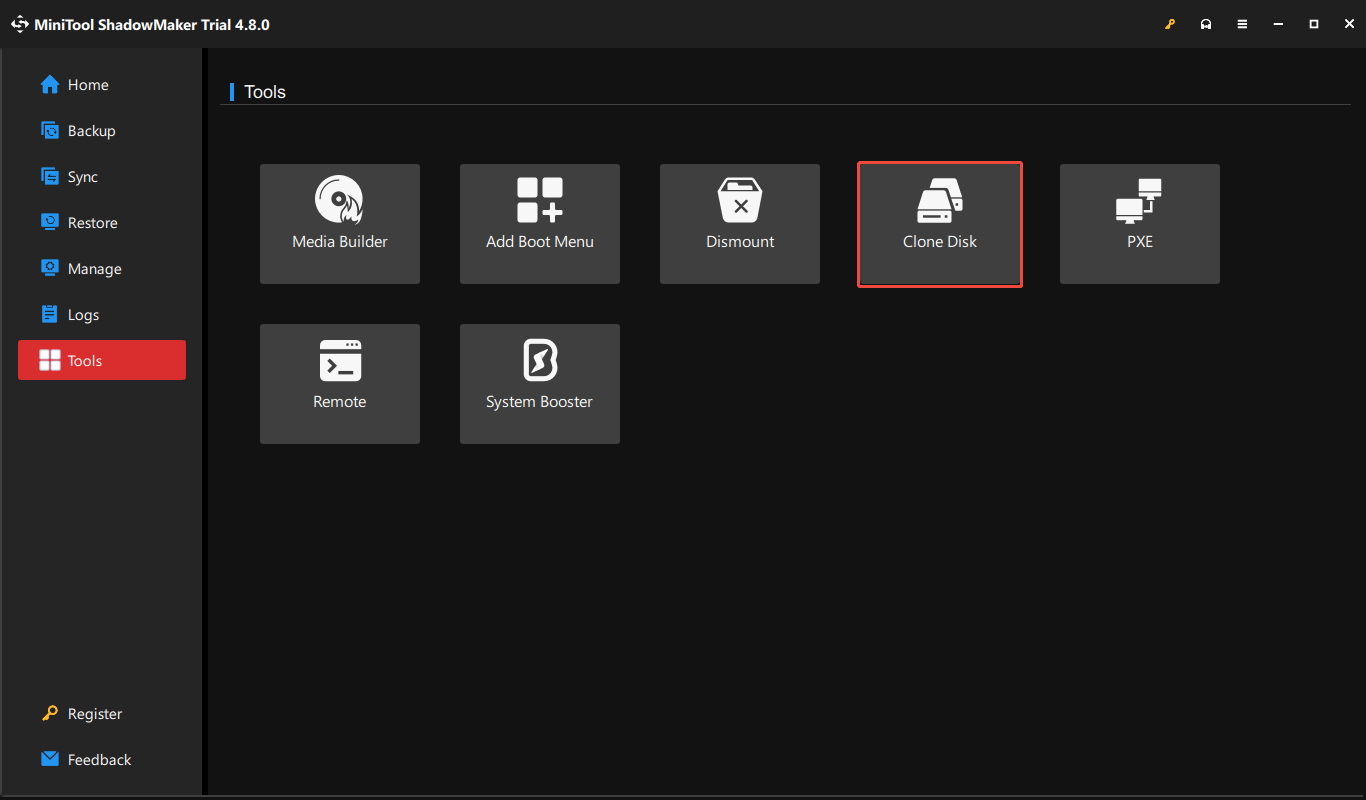
Alternatively, the hard drive clone software, MiniTool ShadowMaker, can effectively clone a hard drive to another disk, like an HDD or SSD. Its Clone Disk feature allows for the direct duplication of a hard drive’s contents and supports sector by sector cloning.
To clone a hard drive, launch MiniTool ShadowMaker, go to Tools > Clone Disk, choose the source drive and target drive, then begin cloning.
In addition, the diskcopy command is another method for disk copy. This command tool from Microsoft is available for Windows Server 2025, 2022, 2019, 2016, Windows 11/10, and Azure Local 2311.2 and later.
It copies the contents of the floppy disk to a formatted or unformatted floppy disk. Here is the command:
diskcopy [<drive1>: [<drive2>:]] [/v]
- drive1 specifies the drive that contains the source disk, while drive2 refers to the drive that contains the target disk.
- /v verifies that the information is copied correctly.
What to Do After Hard Drive Cloning
You have successfully cloned your hard drive to an SSD or HDD. After that, follow the instructions to complete the final setup.
Case 1: Use the Cloned Disk as a Backup
In this case, keep the original drive in your machine. You only need to remove the target disk from your computer and put it in a safe location. Once disk data gets lost, recover it from the cloned disk.
Case 2: Start Windows with the Target Disk
If you want to boot the operating system from the cloned hard drive, follow these instructions.
Option 1: Replace the Old Disk with the New One
You need to remove the original disk and install the new drive in the same slot. In this case, your PC only has one internal hard drive.
Follow these steps:
Step 1: Turn off your computer, disconnect the power, and open the computer case of a desktop or the bottom cover of a laptop.
Step 2: Locate and disconnect the old hard drive. Then, remove it from the computer.
Step 3: Install the new, cloned drive into the same slot, make sure it is securely mounted, and connect the power cables.
Step 4: Close the computer case or bottom cover.
Step 5: Restart the OS, access the BIOS menu, and check if the new drive is listed. Then, continue booting into the operating system.
Option 2: Keep the Source and Target Drive in Your Computer
To keep both drives installed, you need to:
- Install the cloned disk in the device.
- Change boot order.
- Prepare the old disk for data storage.
- Optimize the new disk.
#1. Install the Cloned Disk in a PC
To boot the OS from the new disk, first, physically install it as the internal disk in the PC.
Step 1: Shut down the computer completely and unplug the power cord.
Step 2: Open the computer case or bottom cover (some laptops have two disk bays).
Step 3: Locate an available drive bay, insert the new drive, and secure it with screws.
Step 4: Connect all the power and data cables to the motherboard.
Step 5: Reattach the case panel or bottom cover, plug all peripherals back in, and turn on your PC.
#2. Change the Boot Order
Step 1: Restart the computer.
Step 2: Press F2, Del, or another key specified by the manufacturer to enter the BIOS menu.
Step 3: In the Boot menu or a similar one, use the arrow keys to select the target disk as the primary boot device.
Press F10 to save the changes. Windows will load correctly to the desktop.
#3. Prepare the Old Drive (Formatting)
Step 1: Press Win + X to open the menu and choose Disk Management.
Step 2: Right-click on each volume on your old disk and select Format.
Step 3: Specify the volume label, file system, and allocation unit size. Ensure to tick Perform a quick format and click OK.
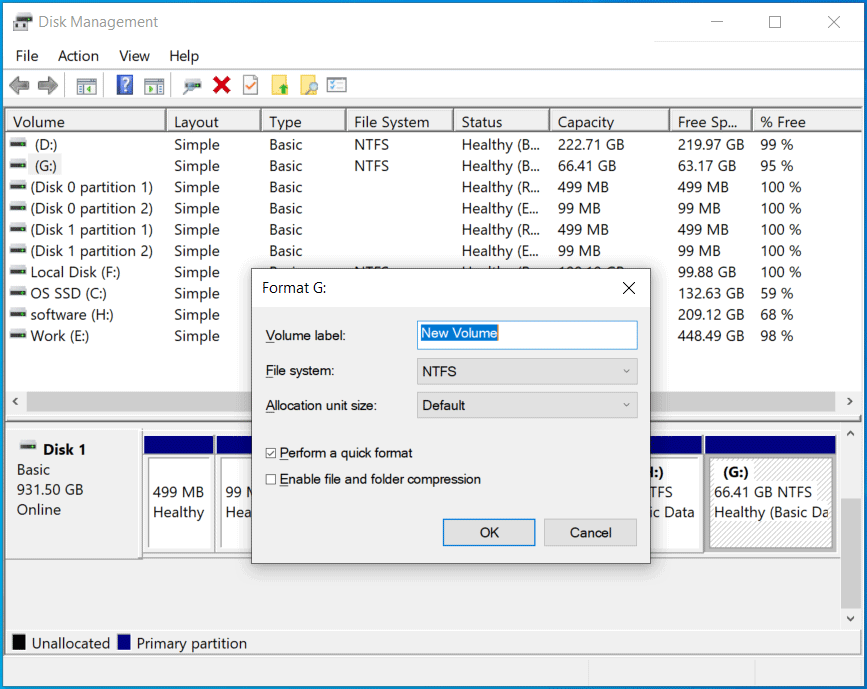
Step 4: Click OK to confirm and begin formatting to store new data.
Alternatively, to format your disk, run the Diskpart command or use File Explorer. Learn how to format a hard drive with ease.
#4. Optimize Your New Drive
After the disk copy, optimize the new cloned disk for optimal system performance.
Check for Driver Updates
It is necessary to update the driver for your new drive to ensure optimal performance.
To do that:
Step 1: Right-click on the Start icon and select Device Manager.
Step 2: Expand Disk drives, locate the new disk, right-click on it, and choose Update driver.
Step 3: Choose the first option, and Windows will search the system for the best available driver and install it.
Alternatively, you can visit the website of the disk manufacturer and go to the support or downloads section. Then, search for the correct driver, download the driver file, and install it on your computer.
Enable TRIM
After cloning a hard drive to an SSD, enabling TRIM helps extend the drive’s lifespan and maintain stable performance. TRIM will inform the drive which data blocks are no longer in use. This allows the SSD to more efficiently manage space and prepare blocks for new writes.
To enable SSD TRIM:
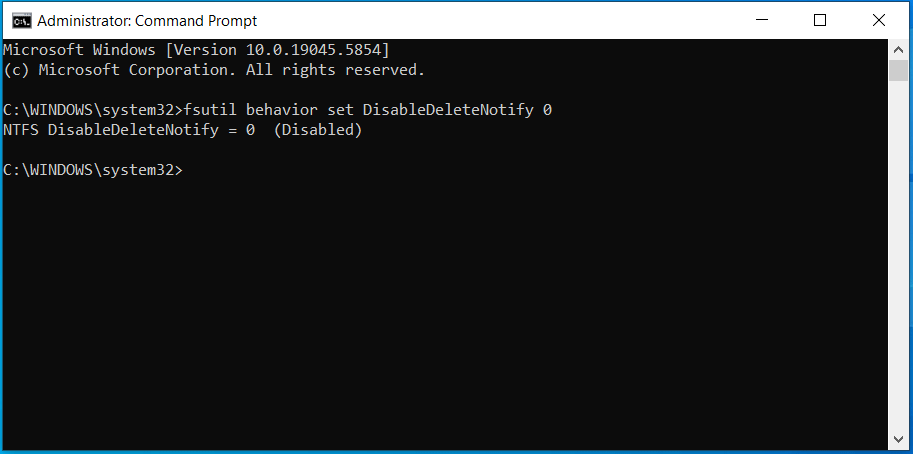
Step 1: Run an elevated Command Prompt.
Step 2: Type fsutil behavior set DisableDeleteNotify 0 and press Enter.
The screen will display NTFS DisableDeleteNotify = 0 (Disabled), indicating that TRIM is enabled.
These steps complete the recommended tasks before, during, and after a disk copy. Following them helps ensure stable operation on the new drive.
Common Issues and Solutions to Disk Copy
During disk cloning, several issues may occur, including:
- Cloning is slow.
- Cloning fails.
- The cloned disk won’t boot.
Here is the breakdown.
Slow Cloning Speed
A slow hard drive clone is often caused by a slow drive (SSD or HDD), power cable connections, or software conflicts.
To improve the speed:
- Check the cables and connection interface (use SATA instead of slower USB).
- Use a quality hard drive and reliable disk copy software like MiniTool Partition Wizard.
- Defragmenting the source drive, especially the HDD.
- Disable antivirus software and unnecessary background processes.
Learn more information on how to fix a slow disk clone.
Cloning Failure
Disk cloning may fail due to locked partitions, incorrect partition sizes, corrupted source drive, or issues with the cloning software itself.
To troubleshoot:
- Check the disk health with the CHKDSK command (as stated above).
- Clone the disk from a bootable USB drive to bypass locked partitions.
- Make sure to use a reputable cloning tool like MiniTool Partition Wizard. This tool offers the Bootable Media feature to create a bootable USB flash drive for disk cloning and other partition management operations.
Cloned Disk Not Booting
Sometimes the Windows operating system fails to boot from the cloned disk due to incorrect boot order, incorrect boot mode, corrupted clone, or improper drive connections.
To fix this issue:
- Ensure the cloned SSD is properly installed using a SATA cable.
- Set the cloned disk as the primary boot device.
- Select the appropriate boot mode: Legacy for MBR disks or UEFI for GPT disks.
- Rebuild MBR.
- Set the system partition to active.
- Re-clone your disk using MiniTool Partition Wizard.
Learn these methods from our fixing cloned hard drive not booting guide.
Conclusion
The guide covers comprehensive information on disk cloning, including when to perform a disk copy and the recommended procedures before, during, and after cloning.
To upgrade or replace a smaller, slower, or failing hard drive, follow the instructions to easily finish the clone. Then, update drivers and enable SSD TRIM to run Windows from that new drive smoothly.
Moreover, contact us at [email protected] if you encounter issues with MiniTool software.
Disk Copy FAQ
About The Author

Position: Columnist
Vera has been working at the MiniTool Team for over 10 years as a technical editor and content writer. She mainly focuses on disk and partition management, data recovery, Windows backup and restore, and PC troubleshooting. Through in-depth software testing and hands-on experience, she has helped users solve a wide range of computer problems and better protect their data on Windows devices.
User Comments :