GParted is a popular open-source partition management tool used for disk partitioning on Linux and other systems. In this tutorial, you will learn how to use GParted on Windows to resize partitions and convert MBR to GPT safely. It also recommends MiniTool Partition Wizard as the best GParted alternative for Windows.
What Is GParted?
GParted (GNOME Partition Editor) is an open-source disk partitioning tool that supports multiple file systems, such as Ext4, NTFS, FAT32, and XFS. It helps you safely create, resize, move, and delete disk partitions.
So, can GParted be used directly on a Windows system?
The answer is no.
Because GParted is developed based on Linux, it cannot run directly in a Windows environment. If you need to use GParted on a Windows computer, you must create a GParted bootable USB drive to enter a standalone operating environment.
The following section will first explain how to create a GParted bootable USB drive.
How to Create a GParted Live USB for Windows
GParted cannot run directly in Windows. You need to create a bootable GParted live USB to use it outside the Windows environment.
Here are the steps:
- Go to the GParted website and download the latest version of the GParted Live ISO file.
- Download and install Rufus. Rufus is a tool for creating bootable USB drives in Windows systems.
Step 2: Create a Bootable USB Drive.
- Insert a USB drive into your computer (it is recommended to back up any important data on it beforehand).
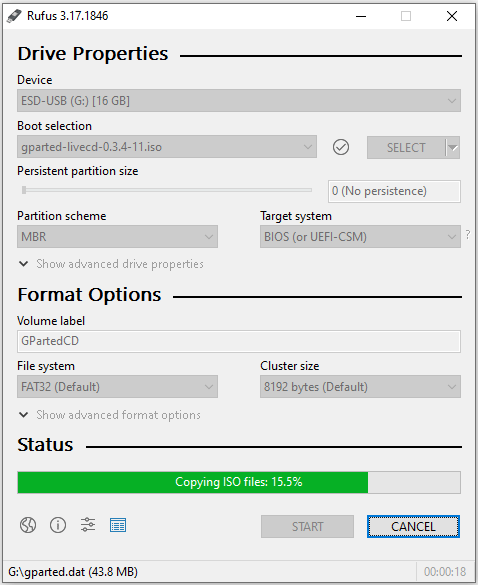
- Open Rufus, and select the USB drive you just inserted from the Device drop-down menu.
- Click the SELECT button in the Boot selection area, browse to and select the previously downloaded GParted ISO file, and then click Open.
- After confirming that the settings are correct, click START.
- If Rufus prompts you to download the syslinux file, click Yes to continue.
- If other confirmation windows appear, click OK.
- Wait a few minutes until Rufus completes the write process and displays a status such as completed.
Step 3: Run GParted from the Bootable USB Drive
- Keep the USB drive connected to your computer, then restart your computer.
- Normally, your computer will boot from the USB and enter GParted Live. If it fails to boot from the USB, enter the BIOS, set the USB device as the first boot device, and then restart your computer.
- Once you enter the GParted Live menu, the GParted Live option will be selected by default. Press Enter to continue.
- When the system asks for keyboard mapping settings, select Don’t touch keymap and press Enter.
- Next, follow the prompts to select the default language and boot mode. GParted will start automatically after completion.
- Once you successfully enter GParted, you will see the main interface, which displays the hard drive and its partition information, including the file system, capacity, and used space.

Now you can begin performing partition management operations.
How to Use GParted in Windows
After successfully launching GParted, you can begin managing your disks and partitions. GParted offers a variety of partition management features, including resizing partitions, deleting partitions, converting MBR to GPT, etc.
These features allow you to reorganize your disk space and optimize your partition layout.
The following section will detail how to manage disk partitions on a Windows computer using GParted, using resizing partitions and converting MBR to GPT as examples.
How to Resize a Partition on GParted
Resizing partitions is one of GParted’s most frequently used functions. Whether you want to expand a partition to gain more free space or shrink it to free up unallocated space, GParted can help you do it easily.
Below is a detailed explanation of how to resize partitions using GParted.
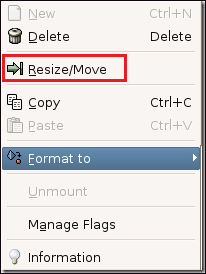
Step 1: Right-click the partition to be resized and then choose the Resize/Move option.
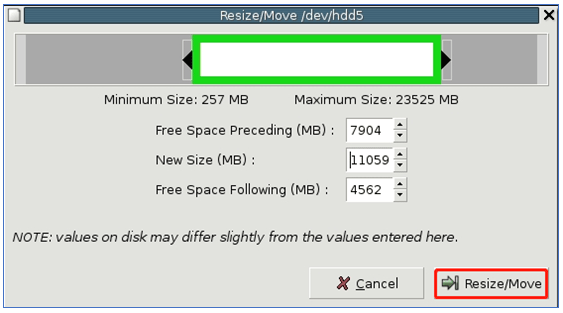
Step 2: In the Resize/Move window, drag the slider to resize the partition, or specify the target size directly in the input box. Then click the Resize/Move button.
Step 3: Once everything is set, click the Apply button at the top of the GParted window to start the resizing process.
![GParted Can't Resize NTFS Partition on Windows 10/11 [Resolved]](https://images.minitool.com/partitionwizard.com/images/uploads/2023/04/gparted-cant-resize-ntfs-partition-thumbnail.jpg)
How to Convert MBR to GPT on GParted
If you need to use UEFI boot mode or manage disks larger than 2 TB, you can convert an MBR disk to a GPT disk.
The following describes how to perform the conversion using GParted.
Step 1: Launch GParted to enter its main interface.
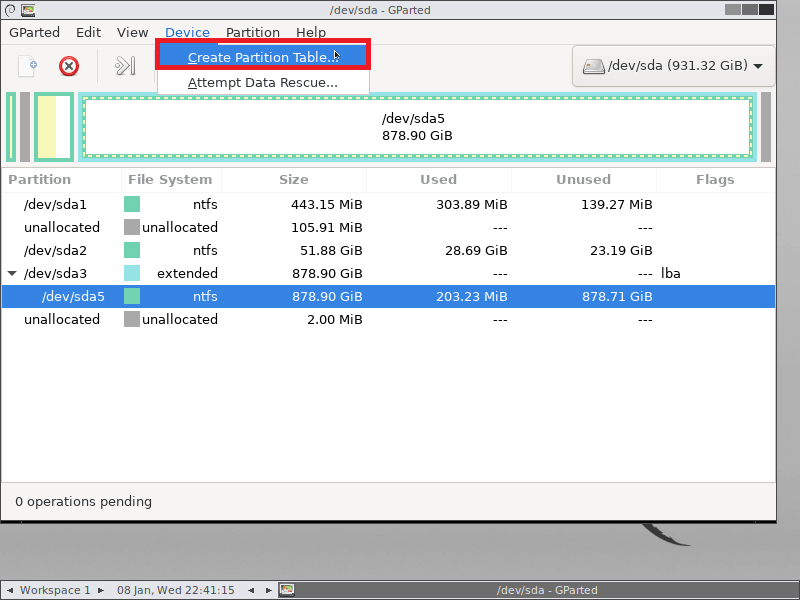
Step 2: Click the Device tab at the top and then choose the Create Partition Table option from the drop-down menu.
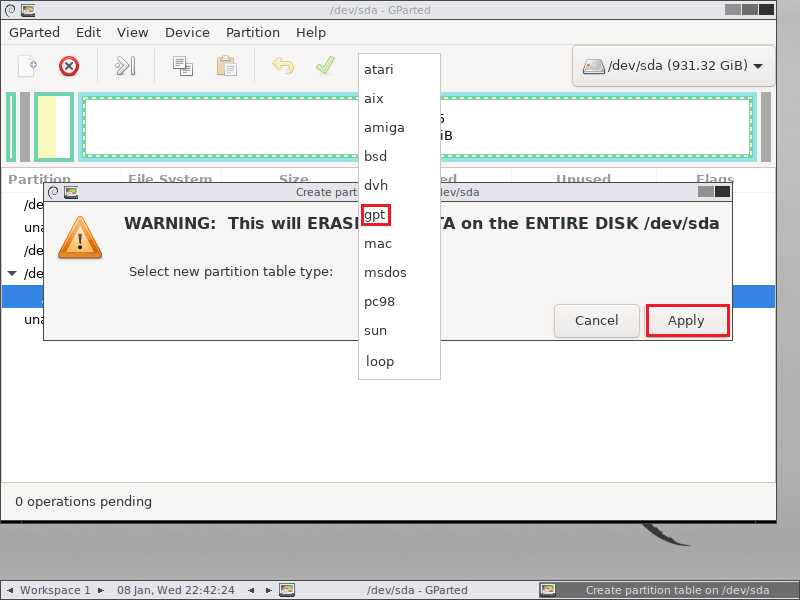
Step 3: Choose the gpt option from the Select new partition table type section and click the Apply button.
Step 4: Wait for GParted to complete the partition table conversion process.
While GParted is a powerful open-source partitioning tool, it’s not always the most convenient choice for Windows users.
It requires a boot disk and runs outside of Windows, and its learning curve is relatively steep for beginners.
Therefore, many users prefer an alternative that runs directly within Windows and is easier to use.
The following introduces an excellent alternative to GParted.
Best GParted Alternative for Windows Users
While GParted is a common open-source partitioning tool, many users encounter an “unable to resize” error when trying to adjust partition sizes on GParted.
Here’s a real-world example from Superuser:
I used GParted to resize C. In GParted, I see the resized C partition. In Disk Management View, I also see the resized C partition. My computer partition is still not changed. GParted shows the resized partition, the same as Windows 10 Disk Management, but this partition remains unchanged. What can I do in that case to extend my system partition?https://superuser.com/questions/1370229/unable-to-resize-system-partition-using-gparted
For Windows users who want to avoid complex troubleshooting, choosing a more intuitive Windows tool, such as the MiniTool Partition Wizard, will be more efficient.
MiniTool Partition Wizard FreeClick to Download100%Clean & Safe
MiniTool Partition Wizard is a free disk partition software that can enable you to create/format/resize/delete partitions, clone a hard drive, convert MBR to GPT without data loss, external hard drive recovery, etc.
Resize Partition via MiniTool Partition Wizard
MiniTool Partition Wizard offers two flexible ways to resize a partition, allowing you to extend, shrink, or move without reinstalling the operating system.
- Move/Resize Partition: Resize a partition by expanding, shrinking, or moving.
- Extend Partition: Increase partition size by taking free space from another partition or unallocated space on the same disk.
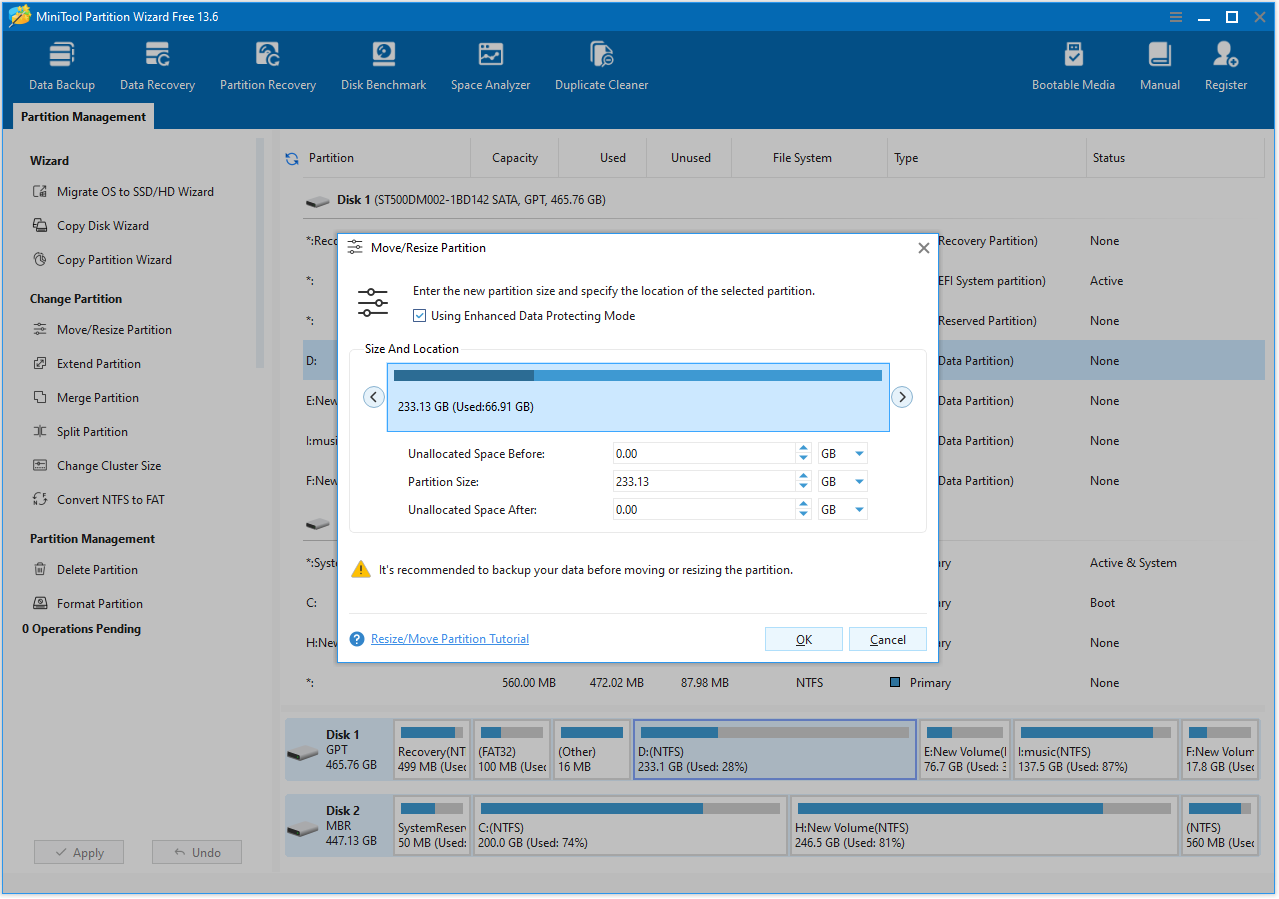
#1. Use Move/Resize Feature
- Launch MiniTool Partition Wizard and go to the main interface.
- Right-click the partition and select Move/Resize.
- In the new pop-up window, you can shrink, extend, or move the partition.
- Click Apply.
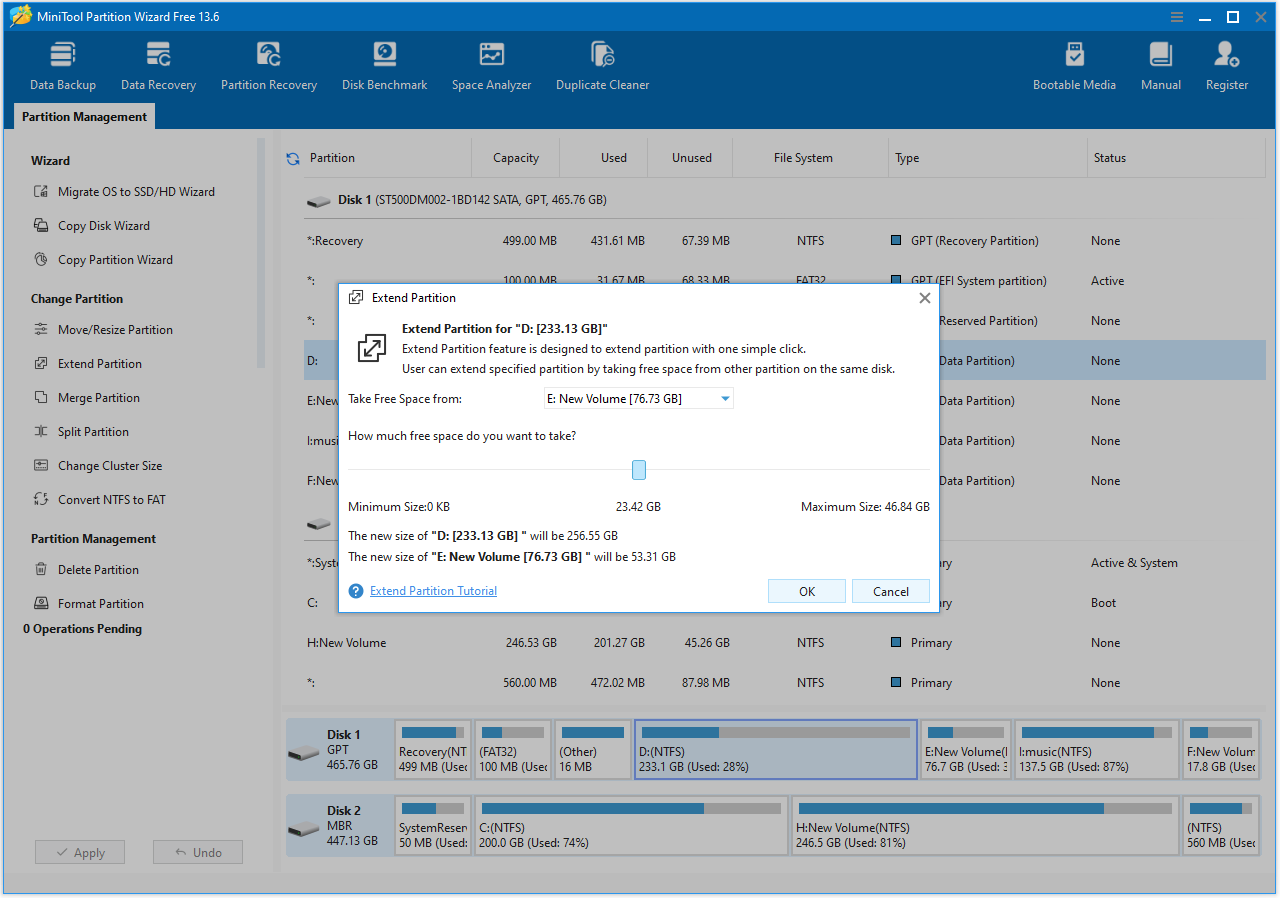
#2. Use Extend Feature
- Launch MiniTool Partition Wizard to its main interface.
- Right-click the partition to be extended and select Extend.
- Click the down arrow from Take Free Space From section and select the partition to get expansion space. Then click OK.
- Click the Apply button to perform all changes.
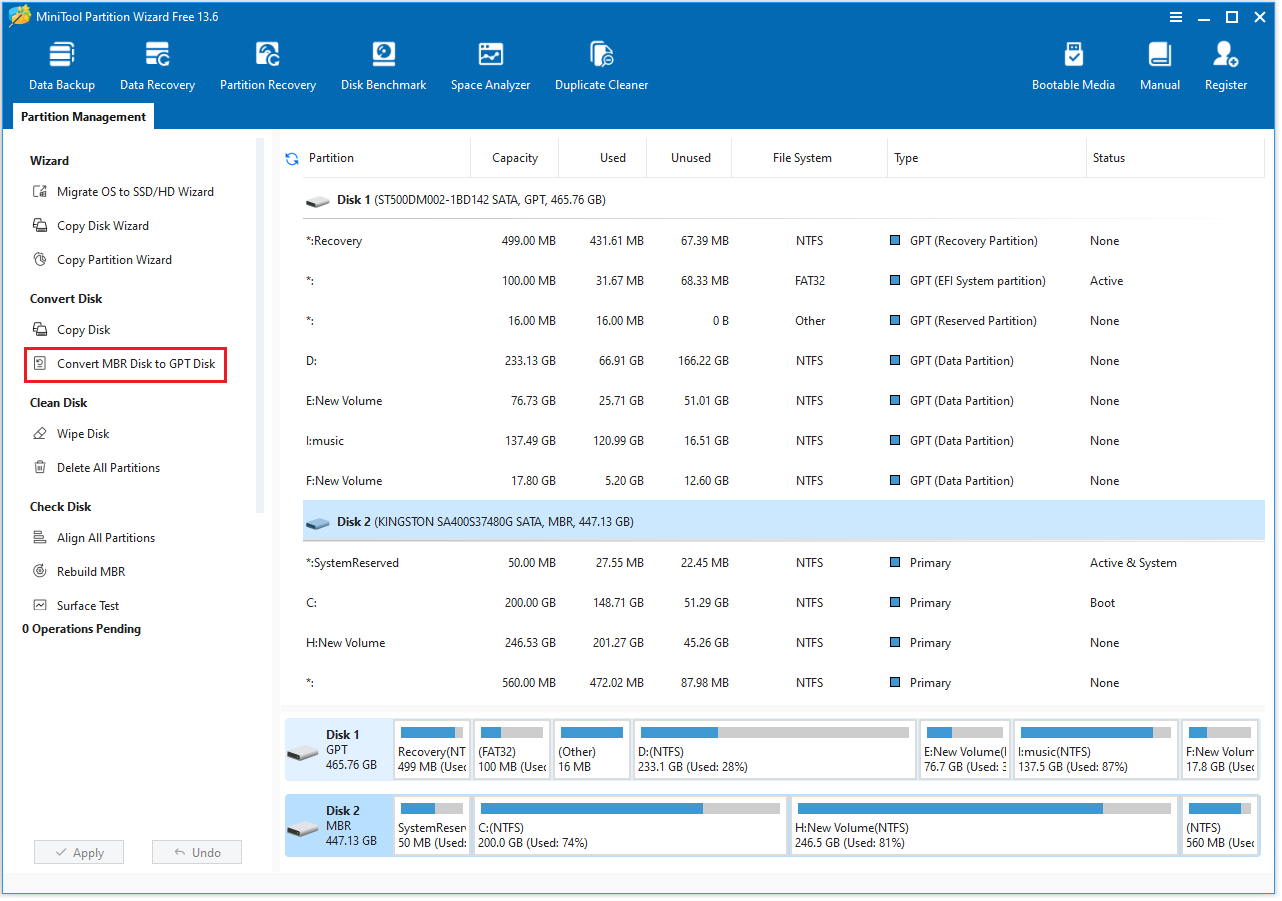
Convert MBR to GPT via MiniTool Partition Wizard
If you need to convert an MBR disk to GPT or convert GPT to MBR without losing data, MiniTool Partition Wizard provides a simple and secure solution.
Follow the steps below:
- Launch MiniTool Partition Wizard and locate the disk.
- Choose the Convert MBR Disk to GPT Disk option or the Convert GPT Disk to MBR Disk option.
- Click the Apply button to start the conversion.
This article describes how to use GParted and its Windows alternatives.Click to Tweet
How to Use GParted FAQ
However, Linux users can directly install and run GParted on their Linux systems.
GParted Live, on the other hand, is a bootable Linux system that comes pre-installed with GParted. You can create a bootable USB drive or CD-ROM from it.
Bottom Line
This post tells you how to install GParted, how to use GParted, and also tells you about a GParted Windows alternative: MiniTool Partition Wizard. If you have any questions or feedback about MiniTool Partition Wizard, feel free to contact our support team at [email protected] for additional help.
About The Author

Position: Columnist
Cecilia has been an editor at MiniTool for two years. She primarily focuses on disk and partition-related content, with particular expertise in disk cloning, partition recovery, and PDF document conversion. She is dedicated to providing users with clear and accurate solutions to help them efficiently resolve common computer problems.
User Comments :