Do you have a free software to resize partition so as to make the computer functions smoothly and enhance partition performance? This article provided by MiniTool Partition Wizard will show you how to resize partition Windows 10 with three best partition management freeware.
A partition is a logical section of a physical storage device. Resizing a partition means changing its storage capacity by either:
- Extending the partition to gain more space
- Shrinking the partition to free up space
- Moving partitions to reorganize storage
For example, if your C drive is almost full but the D drive has plenty of unused space, you can resize the partitions to allocate more storage to the C drive.
You can resize partitions for free in Windows using built-in tools or third-party partition managers.
The partition resizer free includes:
- Windows Disk Management
- DiskPart
- MiniTool Partition Wizard
For most users, Windows Disk Management is sufficient. However, if unallocated space is not adjacent to the target partition, a dedicated partition manager, such as MiniTool Partition Wizard, may be required.
Here is a direct comparison between these tools to help you choose the right tool for resizing a partition.
| Feature | Disk Management | DiskPart | MiniTool Partition Wizard |
| Move partition | No | No | Yes |
| Extend partition | Yes | Yes | Yes |
| Shrink partition | Yes | Yes | Yes |
| Supported file system | NTFS | NTFS | NTFS, FAT32, FAT |
| Difficulty | Easy | Advanced | Easy |
Now, follow the detailed steps below to resize partition Windows 10/11.
Resize a Partition Using Disk Management
Disk Management is the default graphical disk tool and a Windows-built-in tool. It supports basic operations like creating, deleting, formatting partitions, and simple shrinking/extending.
To resize a partition using Disk Management, you can either shrink it to create free space or extend it using empty space directly to its right.
Follow these step-by-step instructions for both processes:
First, open Disk Management.
- Press Win + X on your keyboard.
- Select Disk Management from the pop-up menu.
Option 1: How to Shrink a Partition (Reduce Size)
Use this option if you want to make a partition smaller to create a new drive letter.
- Right-click the partition you want to shrink and click Shrink Volume.
- Windows will query the volume for available shrink space (this may take a minute).
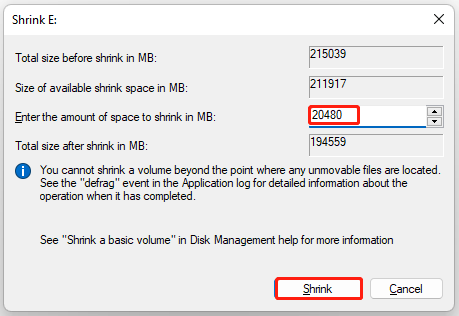
- In the box labeled “Enter the amount of space to shrink in MB”, type your desired size. For example, enter 10240 for 10 GB.
- Click the Shrink Volume button.
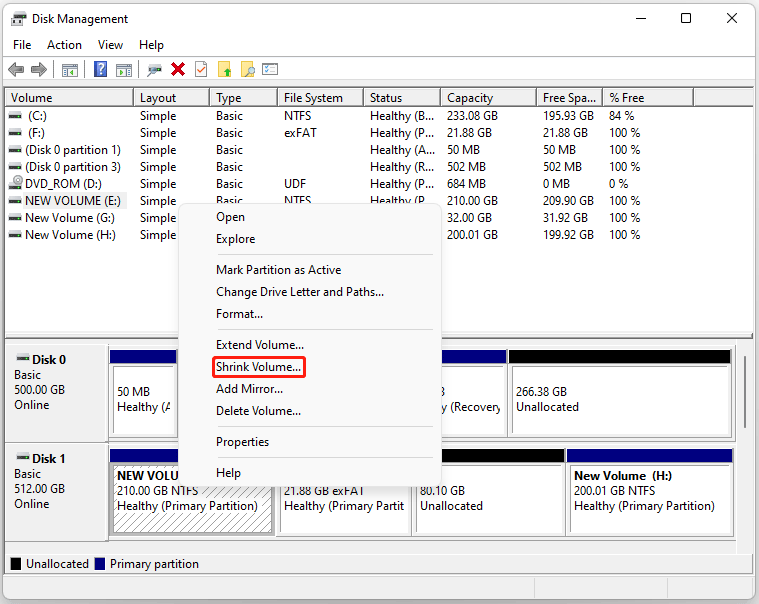
The freed space will now appear as black Unallocated space directly to the right of the partition.
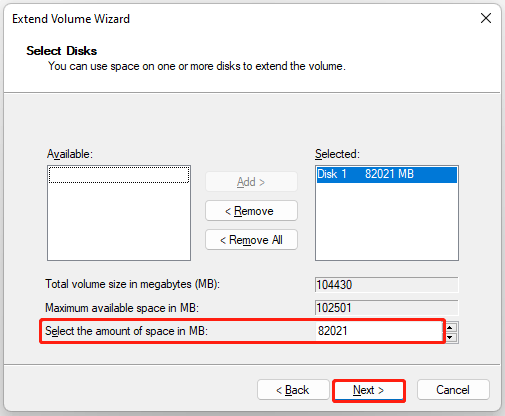
Option 2: How to Extend a Partition (Increase Size)
Use this option if your drive is running out of space and you want to make it larger. Before that, you should verify unallocated space if you have black Unallocated space located directly to the right of the drive you want to expand.
- Right-click the partition you want to expand and click Extend Volume.
- Click Next on the welcome screen.
- The wizard automatically selects all available unallocated space. Click Next to use it all, or adjust the amount in MB if you only want to use some of it.
- Click Finish to instantly merge the space.
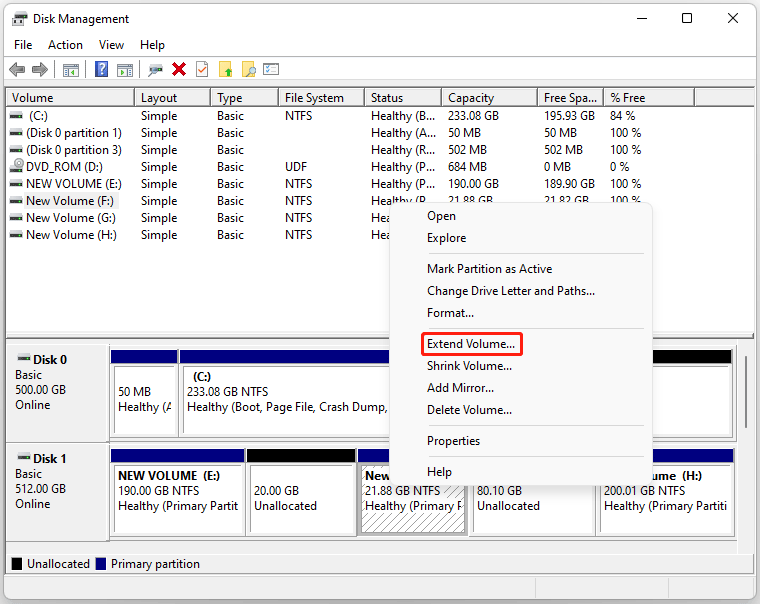
If the “Extend Volume” option is grayed out, it is because the unallocated space is not directly next to the right side of the partition you want to grow. Disk Management cannot jump over other partitions (like a Recovery partition) to claim space.
Here is a video guide:
Resize a Partition Using DiskPart
DiskPart is an advanced text-based tool for professional disk management. While more powerful than Disk Management, it retains the same core restrictions.
Using Diskpart requires exact commands because it executes actions instantly without safety warnings. You can use it to either shrink (decrease) or extend (increase) a partition.
Here is how to change partition size.
First, open DiskPart as administrator.
- Type cmd in the Search bar, right-click Command Prompt, and select Run as administrator.
- Type diskpart and press Enter.
Option 1: How to Shrink a Partition (Decrease Size)
Use this to reduce a partition’s size and create unallocated space to its right.
- Type list volume and press Enter to see all partitions.
- Identify the volume number you want to shrink.
- Type select volume <number> (e.g., select volume 3) and press Enter.
- Run one of these two commands:
- To shrink by a specific amount: Type shrink desired=<amount in MB> (e.g., shrink desired=20480 to shrink it by exactly 20 GB) and press Enter.
- To shrink to the maximum possible limit: Type shrink and press Enter (Windows will shrink it as much as unmovable files allow).

Option 2: How to Extend a Partition (Increase Size)
Diskpart can only extend a partition if there is unallocated space located directly to its right on the same physical disk.
- Type list volume and press Enter.
- Type select volume <number> (e.g., select volume 3) for the partition you want to expand and press Enter.
- Run one of these two commands:
- To use all available empty space: Type extend and press Enter.
- To add a specific amount of space: Type extend size=<amount in MB> (e.g., extend size=20480 to add 20 GB) and press Enter.
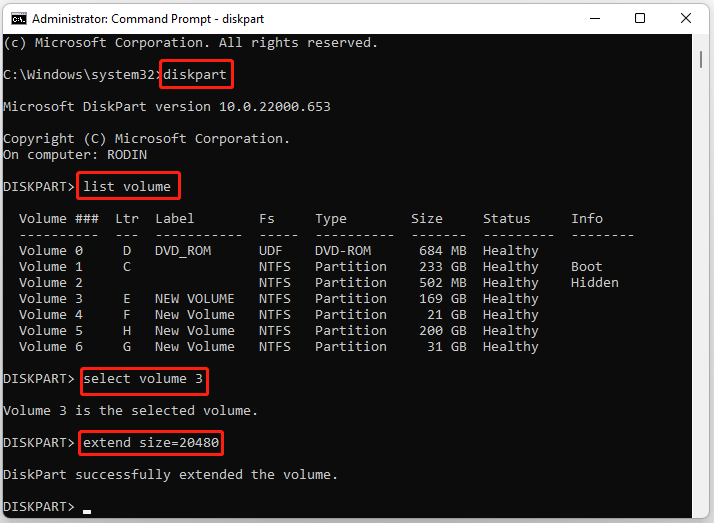
Once you see a success message, type exit and press Enter to close Diskpart.
Here are some common Diskpart errors:
- “The volume cannot be extended”: The unallocated space is either on a different disk or it is not directly to the right of your target partition.
- “The parameter is incorrect”: Double-check your numbers. Ensure you didn’t accidentally request to shrink or extend by a value larger than the available space.
Resize a Partition Using MiniTool Partition Wizard
MiniTool Partition Wizard provides:
- Move Partition
- Extend Partition
- Merge Partition
Unlike Disk Management, it can work with non-adjacent unallocated space in many scenarios.
This is especially useful when:
- Extend Volume is greyed out
- C drive is full
- Partitions need to be moved
Many users on Reddit recommend partition managers when Windows tools cannot resize partitions properly.
MiniTool Partition Wizard FreeClick to Download100%Clean & Safe
Here is how to use it step-by-step:
Step 1. Select your target partition.
- Open MiniTool Partition Wizard.
- Look at the visual disk map at the bottom of the window.
- Right-click the partition you want to change and select Move/Resize.
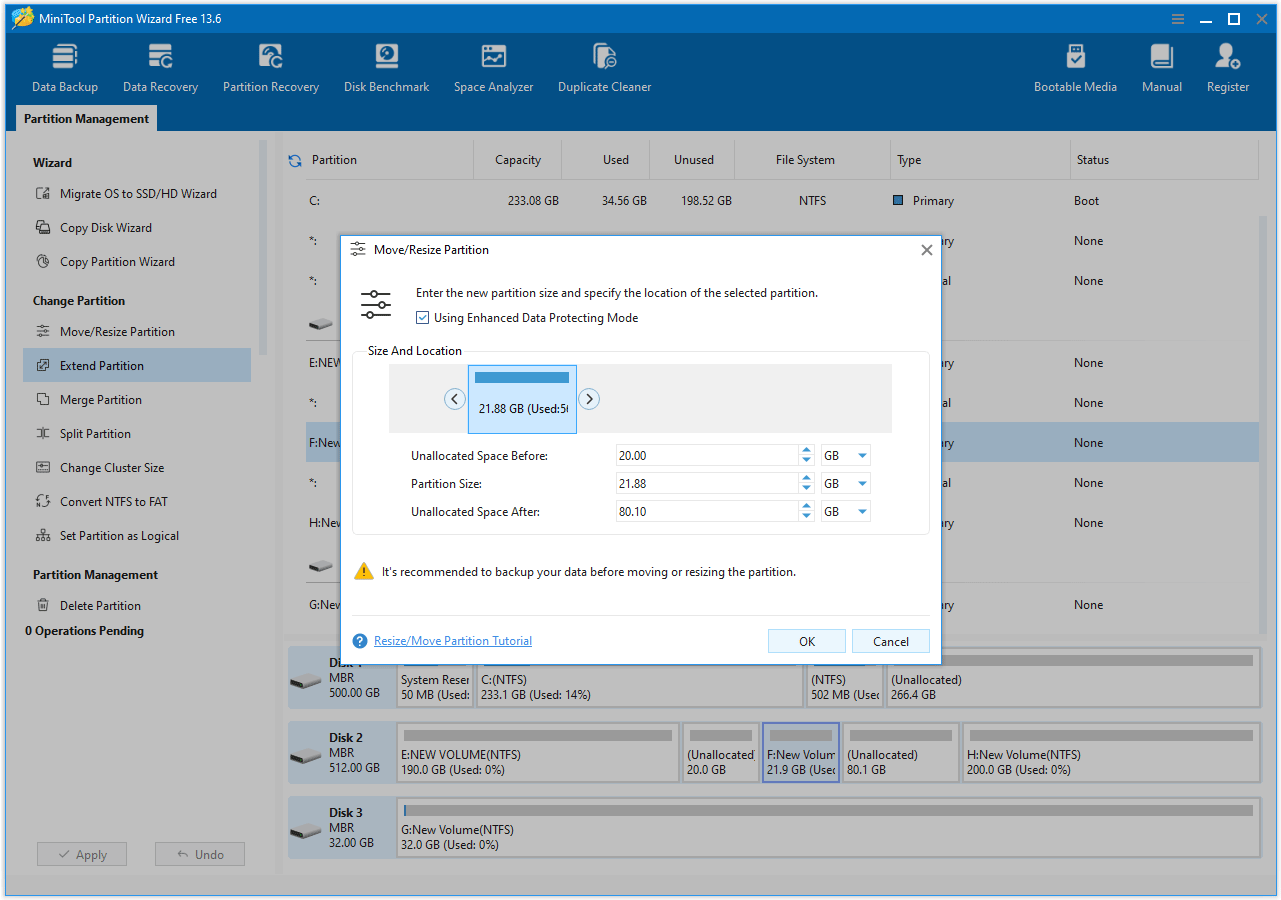
Step 2. Drag to adjust the size. A new window will appear with a visual slider representing your partition.
- To Shrink: Click and drag either the left or right edge of the partition handle inward toward the center. This creates unallocated space.
- To Extend: If there is unallocated space adjacent to the partition, click and drag the left or right edge outward to claim the empty space.
- To Move: Click and drag the entire middle block of the partition left or right to change its physical position on the drive (useful for moving unallocated space next to a drive you want to expand).
Alternatively, you can type exact gigabyte amounts into the Partition Size box below the slider. Click OK when you are done.
Step 3. Apply the changes.
- Review your new layout in the preview map at the bottom.
- If it looks correct, click the Apply button in the bottom-left corner of the main window.
- Click Yes to confirm and start the process.
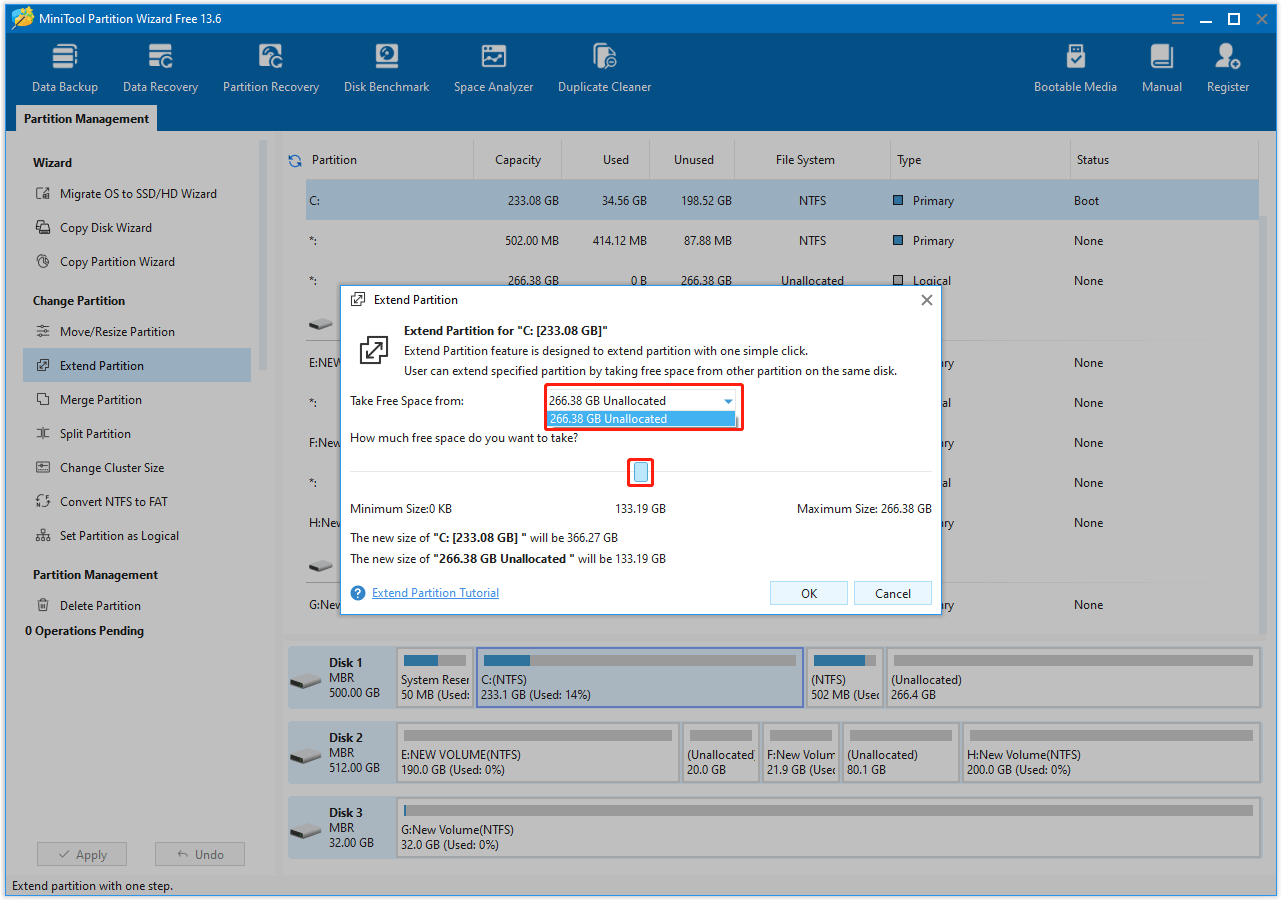
If you want to extend a partition to non-contiguous unallocated or free space, you can use the Extend Partition feature. This cannot be achieved using built-in tools (Disk Management and DiskPart).
- Open MiniTool Partition Wizard.
- Right-click the partition you want to expand (e.g., C:) and select Extend.
- Open the drop-down menu labeled Take Free Space from and select the drive or unallocated block you want to take space from.
- Drag the slider to choose exactly how much space to take.
- Click OK.
- Click Apply in the bottom-left corner to finish.
Free Software to Resize Partition FAQ
Free utilities like MiniTool can seamlessly resize NTFS and FAT32 file systems without requiring data deletion.
Even if you have 500 GB of free space, if a file like the Windows virtual memory pagefile (pagefile.sys), hibernation file (hiberfil.sys), or a System Restore Point is sitting physically at the 400 GB mark of the drive, you cannot shrink the partition below 400 GB using native Windows tools.
Bottom Line
Resizing a partition is one of the easiest ways to optimize disk space and solve storage problems without reinstalling Windows. Built-in tools such as Disk Management and DiskPart can handle basic partition resizing tasks for free.
However, if you need more advanced features such as moving partitions, extending volumes without adjacent unallocated space, or managing complex disk layouts, MiniTool Partition Wizard provides a more flexible and user-friendly solution.
If you have any questions related to MiniTool Partition Wizard, just contact us by sending an email via [email protected].
About The Author

Position: Columnist
Vega enjoys helping people with computer problems, including disk management, data recovery, data backup, and more. She is constantly expanding her knowledge in related fields. And she will continue to bring more easy-to-understand professional articles to help people solve various problems on the PC.
User Comments :