Is it safe to use the Disk Cleanup Compress your OS drive option to get free space when the C drive space is running out? In this post, MiniTool answers the question, shows the information about Compact OS, and offers other ways to help you get more free disk space.
Compress Your OS Drive Windows 10
According to users’ reports on Google, they saw the Compress your OS drive option listed under the Files to delete section when conducting Disk Cleanup.
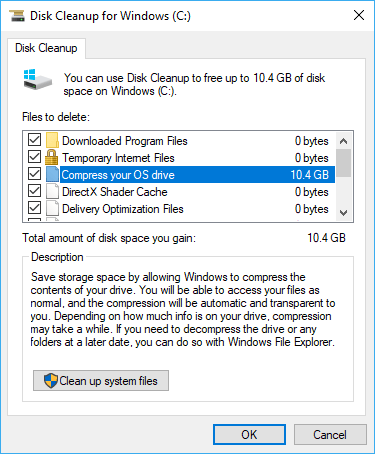
When your C drive is running out, you may launch Disk Cleanup and then you may find “Compress your OS drive” in the list.
As you can see in the above image, it seems that checking this option can free up about 10GB disk space and then you can get rid of running out disk space. However, the truth proves that it is not worth compressing your OS drive to free up space.
We have gathered 4 common questions related to Compress your OS drive Windows 10 from Google. After learning about the 4 questions, you may know whether it is worthwhile to check Disk Cleanup Compress your OS drive.
4 Questions Related to Compress Your OS Drive
Q 1: What is Compress your OS drive?
“Compress your OS drive” is not a file but an option you can check to free up your C drive. But this option shows up in the February 2019 Windows Updates, without appearing in the previous versions.
Q 2: What does Compress your OS drive do?
“Compress your OS drive” uses the newly introduced compression algorithms XPRESS and LZX in Windows 10’s NTFS.
After checking this option under Disk Cleanup, the files in C drive will be compressed (you will find blue arrows against every folder you have) and then you can get some free space.
Q 3: Is it safe to use Compress your OS drive?
It is safe to use “Compress your OS drive” to free up disk space. This option will not delete any files on your hard drive, so you do not worry about data loss.
Q 4: Should you compress your OS drive? Can I delete Compress your OS drive?
The reason why we list these two questions together is that they are the same. Let’s see the answer to these two questions.
If you have a computer with a faster CPU, you can probably check this option as your CPU can keep up with the decompression and compression.
But the truth is that even if you use quite fast CPU on your computer, the CPU may be busy when it comes to read and write files.
The reasons are that the files in C drive are compressed and it needs time to decompress these files when your Windows OS calls them. After using them, it also takes time to compress these files again. This is time-and-power-consuming and may slow down your computer (check other reasons for a slow computer).
Therefore, it is highly recommended you should not free up disk space by using Disk Cleanup Compress your OS drive due to the influence on computer performance.
If you have used this option to free up space, there is a way to decompress your OS drive.
Here is the tutorial on restoring your OS drive to its previous state:
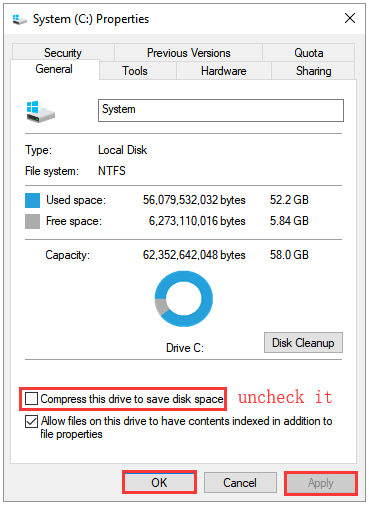
- Open File Explorer, find C drive, and right-click it.
- Select the Properties option in the right-click menu.
- Navigate to the General tab, and then uncheck the Compress this drive to save disk space box. Click the Apply and OK button to confirm and execute the changes. You need to wait for about 10 or more minutes (the time depends on how many files and folders you have) and it will be completed.
You may have noticed Compact OS on website. Is it different from Disk Cleanup Compress your OS drive?
Is “Compact OS” the Same as “Compress Your OS Drive”?
Compact OS is also a new feature on Windows 10. Using this feature, you can reduce the size of the operating system and you can also run it from compressed files, similar to WIMBoot.
Further reading:
WIMBoot (Windows Image Boot) is a feature in Windows 8.1. This feature is designed for Windows users to save space on devices with power memory. This tool just decompresses the files as and when needed and then again compress them back to the INSTALL.WIM.
The Compact OS feature is both supported by the UEFI- and BIOS-based devices (UEFI vs BIOS). Furthermore, it can significantly lower the OS footprint and this makes it easy to install and have some space left over for other software in low disk space devices.
But is “Compact OS the same” as “Compress your OS drive”? Will the computer performance become poorer after using the former?
For these two questions, there is no doubt that Compact OS will also impact performance when the computer reads and writes to its system files or Windows apps. But according to a user’s feedback, Compact OS does not hit the performance much as he benchmarked his Dell XPS 13, Broadwell edition before and after enabling this feature. Therefore, it could be said that these two features are not the same.
Considering that you may be in the dilemma that your C drive is running out, we offer you some ways of freeing up C drive in the following content. You can try any of them.
Free Up C Drive Space by Compressing This Drive
According to the above content, you have known that the Compact OS feature can help you save disk space with negligible influence on computer influence. You may have an interest in using it. But please note that this feature will cause disk fragmentation. So, it is not recommended you to use this feature if you are using an HDD.
To use Compact OS to free up disk space, you should follow the instructions below:
- Type cmd in Cortana’s search bar and then select Command Prompt. Right-click it and then choose Run as administrator.
- On the cmd window, type compact/compact OS:always and then hit Enter to execute this command.
- This process will require about 5 minutes. Do not shut down your computer unless the process comes to an end.
If you don’t use this feature anymore, you can type compact /compactOS:never to switch it off.
Free up C Drive Space by Removing Files
The second way you can get free space to C drive is removing files. Apart from deleting the temporary files, you can also try deleting the large and unnecessary files or moving files to another location.
Delete Temporary Files via Disk Cleanup:
- Click This PC on your desktop and then select the Properties option after tight-clicking C drive.
- Click the Disk Cleanup button and then check the files you won’t need in the new window.
Remove Large Files from C Drive:
To find large files saved on your C drive with ease, you can refer to the methods mentioned in the following recommended article. Furthermore, it also shows you what large files you can delete without any potential damage.
How to Find Large Files Taking up Hard Drive Space on Windows 10
You may find the hibernate file taking up a large space on your C drive if you have enabled the Hibernate mode. This file is created by OS when computer goes into the Hibernate mode. You can directly delete the hibernation file if you don’t need the Hibernate mode anymore, or reduce the size of the hibernation file to remain this mode on your computer.
Move Files to Another Location:
If there are lots of pictures, audios, and videos on C drive, you can move them to another location to free up space.
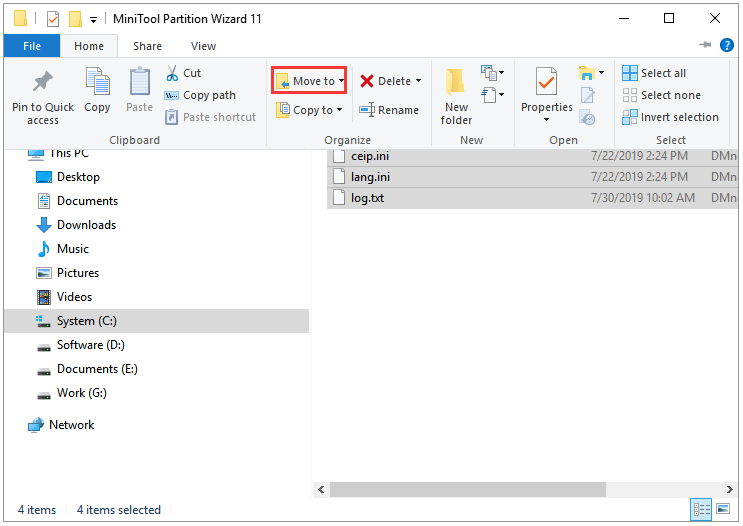
- Open File Explorer, select C drive, and then select the files you want to move.
- Go to the Home tab on the ribbon. Select Move to and then Choose location.
- Select the target location from the list and then select Move.
Free up C Drive Space by Enlarging This Drive
Apart from removing files from C drive, you can also try enlarging the space of C drive. After enlarging C drive, your C drive has enough free space and your computer can run faster than before.
To enlarge C drive safely and easily, you can utilize the free and reliable program – MiniTool Partition Wizard. This program offers two features, that are Extend Partition and Move/Resize Partition, to help you modify the partition size with ease.
MiniTool Partition Wizard FreeClick to Download100%Clean & Safe
Now, let’s see how to modify the size of C drive by using these two features respectively.
Activate Move/Resize Partition to Enlarge C Drive:
Step 1: Download MiniTool Partition Wizard by clicking the download button in the above content. When the downloading process comes to an end, install it and then launch it to get its main interface.
Step 2: Highlight C drive in the Disk Map and then choose the Move/Resize Partition feature, or right-click C drive to call out the Move/Resize feature.
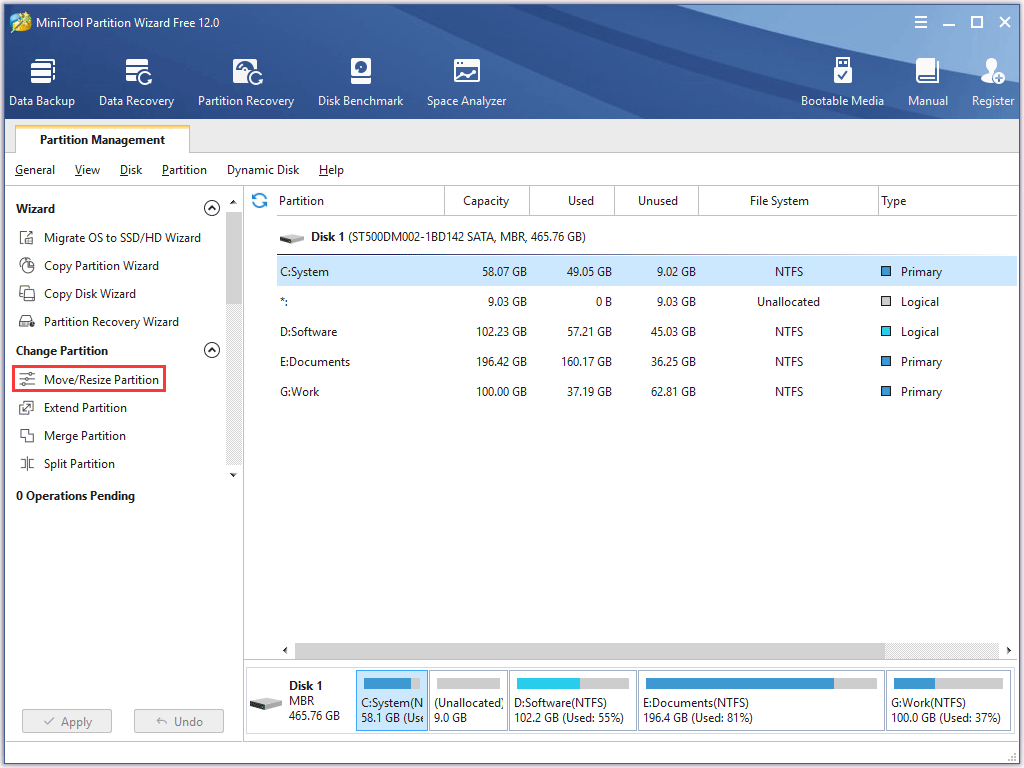
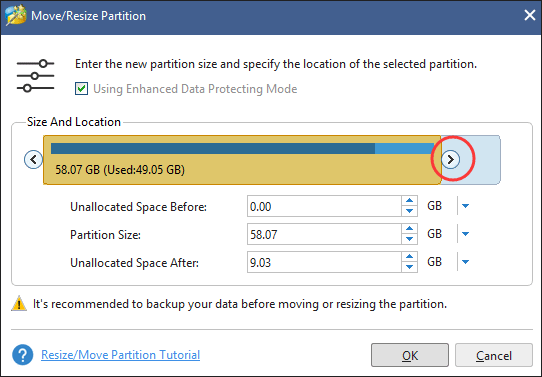
Step 3: On the Move/Resize Partition window, please view there is any unallocated space.
If your case is similar to what the following image shows, you can drag the handle bar rightward and click the OK button to extend C drive.
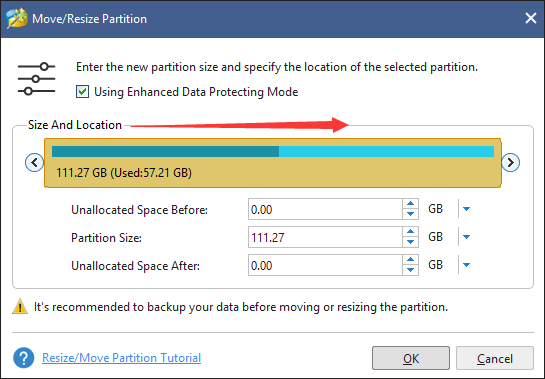
If not, you need to create an unallocated space by using the Move/Resize feature. To do that, you need to go back to the main interface, click the partition next to C drive, activate the Move/resize Partition feature, and shrink the selected partition by dragging the handle bar rightward. After that, you get an allocated space that is next to C drive. Now, you can extend your C drive.
Step 4: On the main interface of MiniToool Partition Wizard, please click the Apply button to execute all changes.

Now, the tutorial on using the Move/Resize Partition feature to enlarge C drive comes to an end. Let’s see how to use the Extend Partition feature to enlarge C drive.
Activate Extend Partition to Enlarge C Drive:
It is far easier to use the Extend Partition feature to enlarge C drive than to use the Move/Resize Partition feature because the former uses the unused space on the disk to enlarge the selected partition. In other words, there is free space on the system disk, and you can use the Extend Partition feature to extend C drive.
Let’ see how to use the feature to extend C drive.
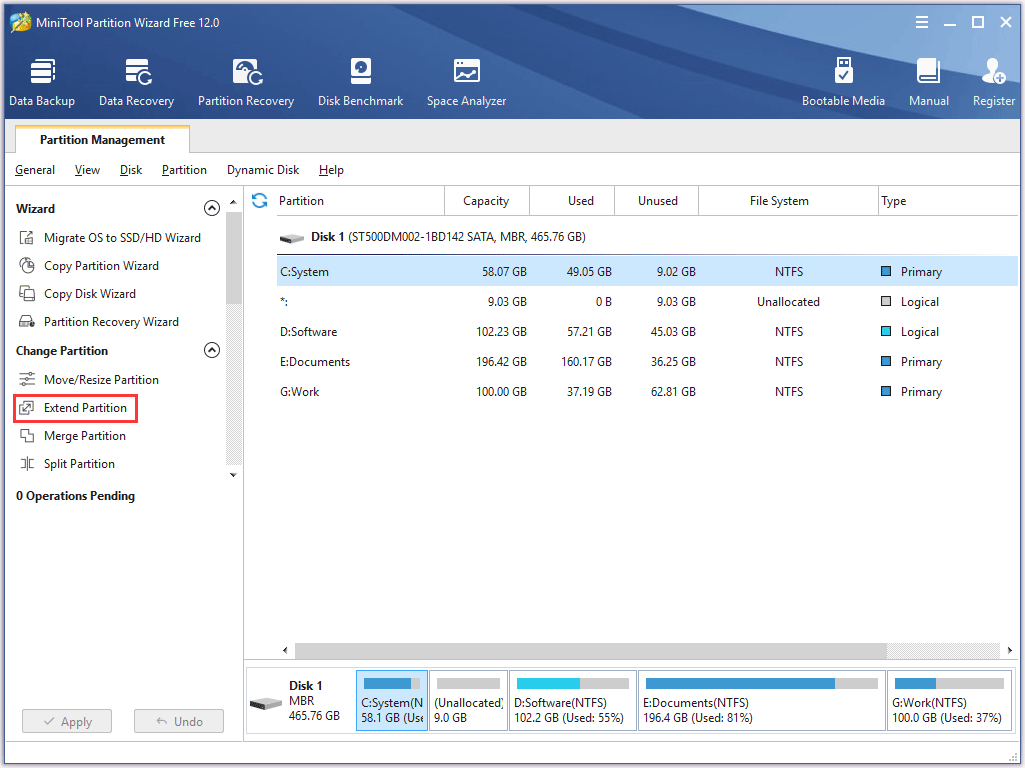
Step 1: Launch MiniTool Partition Wizard to get its main interface. Highlight C drive in the Disk Map and then click the Extend Partition feature, or right-click the partition to call out the Extend feature.
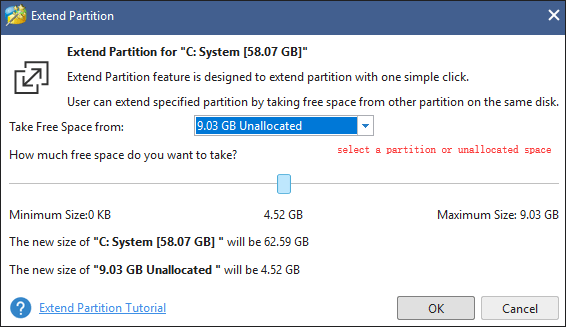
Step 2: Select one partition or the unallocated space on the system disk to take free space from it and then move the bar to the left or right side to decide how much free space you want to add in your C drive. After that, click the OK button.
Step 3: On the main interface of MiniTool Partition Wizard, hit the Apply button to execute all changes.
All the steps on extending C drive via the Extend Partition feature have been displayed.
You may find that the above two features are helpful to enlarge C drive under the condition that there is free space on your system disk. If the whole disk space is running out, the two features seem to be useless.
If you are facing that your hard disk space is running out even if you have removed files, you can pay some money for a larger HDD or SSD and upgrade to it instead of compressing your files. This way can really better your experience.
To upgrade to a larger HDD or SSD without reinstalling your Windows 10, you can also utilize MiniTool Partition Wizard. The Migrate OS to SSD/HD Wizard feature built-in this program can help you do that with ease.
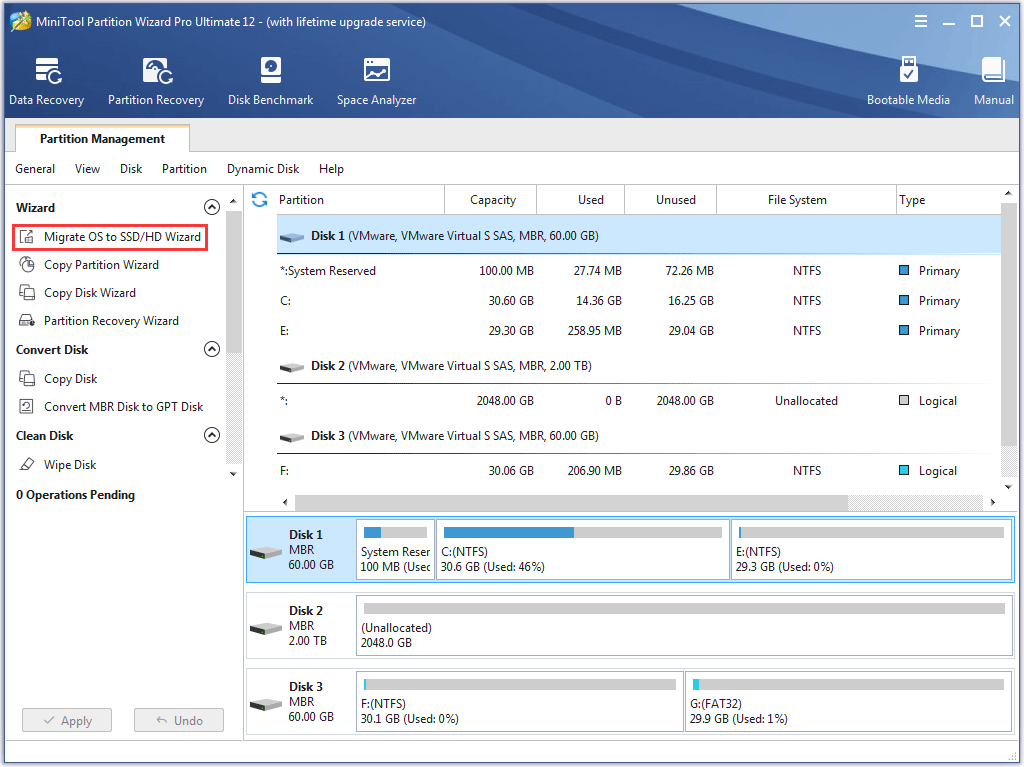
You can find the detailed tutorial on migrating Windows operating system to a large hard disk in the article below.
Bottom Line
This post comes to an end. Hope the four questions mentioned above can help you learn more about “Disk Cleanup Compress your OS drive”. To free up C drive, you can try the mentioned ways in this post.
If you still have some questions related to “Compress your OS drive”, you can leave them in the comment zone and we will answer them ASAP. Furthermore, if you have any problems with enlarging C drive by using the mentioned ways, you can contact us via [email protected].
Compress Your OS Drive FAQ
To stop your Windows from compressing files, you need to take advantage of Command Prompt.
- Type Command Prompt on the Cortana’s search bar and then select the best-matched result and right-click to select Run as administrator.
- On the Command Prompt window, type fsutil behavior set disablecompression 1 and hit Enter to run this command.
- Restart your computer when you receive the prompt ‘Note: Changes to this setting require a reboot to take effect’.
User Comments :