Nowadays, many users use UEFI boot to start up Windows as it has many significant advantages, like faster booting process and support for hard drives larger than 2 TB, more security features and so on. Although UEFI is more advanced and powerful than BIOS, It is still not widespread and not all motherboards support the new firmware. In fact, many older and less expensive motherboards still use the BIOS mode.
You may ask: What is UEFI? What is BIOS? How about UEFI vs BIOS? Just keep reading this post to get the answers.
What Is UEFI
Definition
UEFI is the abbreviation of Unified Extensible Firmware Interface, which is a firmware interface for computers and it works as a “middleman” to connect a computer’s firmware to its operating system. It is used to initialize the hardware components and start the operating system stored on the hard disk drive when the computer starts up.
UEFI possesses many new features and advantages that cannot be achieved through the traditional BIOS and it is aimed to completely replace the BIOS in the future.
UEFI stores all the information about initialization and startup in a .efi file, a file stored on a special partition called EFI System Partition (ESP). The ESP partition will also contain the boot loader programs for the operating system installed on the computer.
It is because of this partition, UEFI can directly boot the operating system and save the BIOS self-test process, which is an important reason for UEFI faster booting.
How to Access UEFI Windows 10
When you need to perform a clean install or repair Windows 10 boot issue, people always tell you that you need to go to the BIOS to change the bootup settings, giving the USB drive or CD/DVD boot sequence priority. If your computer is using UEFI firmware, how do you get into the UEFI Windows 10?
If you want to access UEFI Windows 10, you don’t need to press a key while your computer starts as computers equipped with UEFI now boot very fast and you only have very limited time to do it. So you can try the following steps to access UEFI Windows 10.
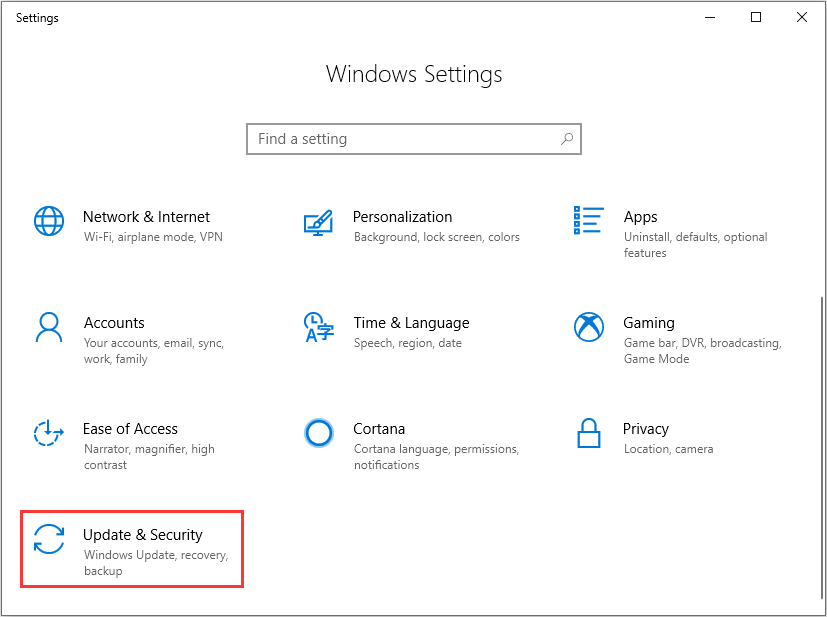
Step 1. Right-click the Windows Start menu and choose Settings. Then, choose Update and Security.
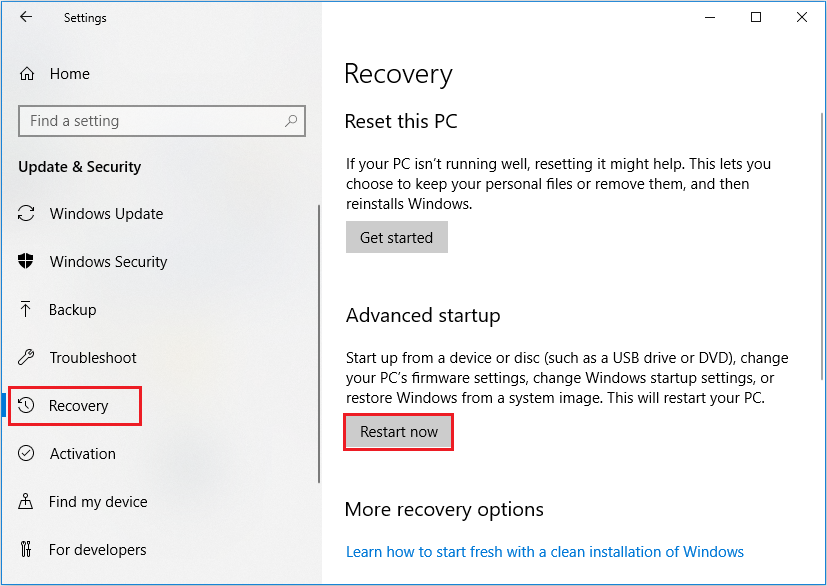
Step 2. At this interface, select Recovery. At the Advanced startup section, click Restart now. Then the system will restart.
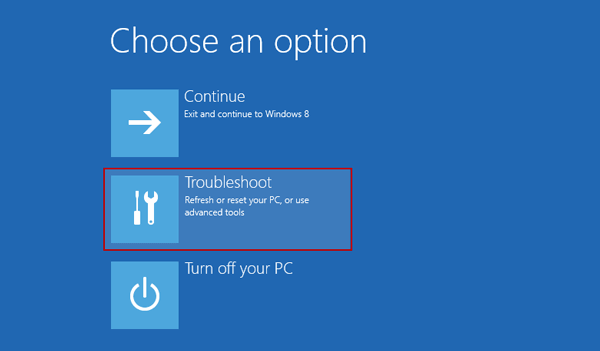
Step 3. Click Troubleshoot.
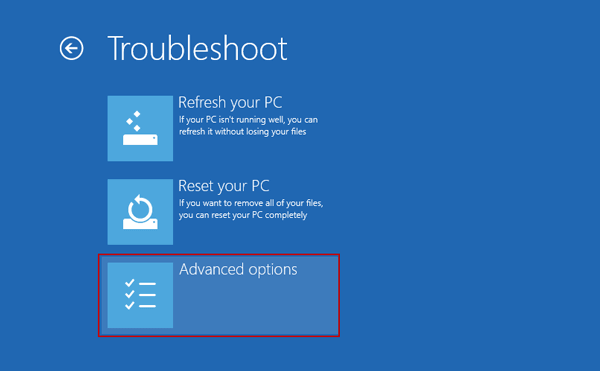
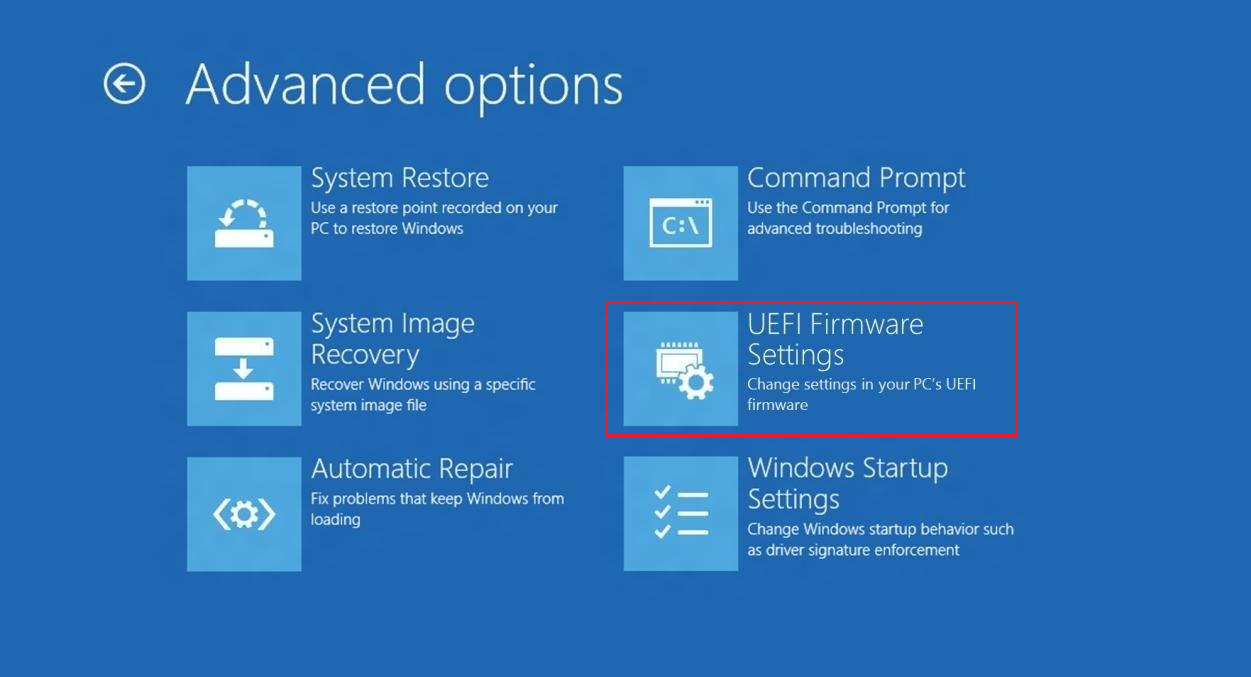
Step 4. Choose Advanced options to get into the next page.
Step 5. After that, select UEFI Firmware Settings.
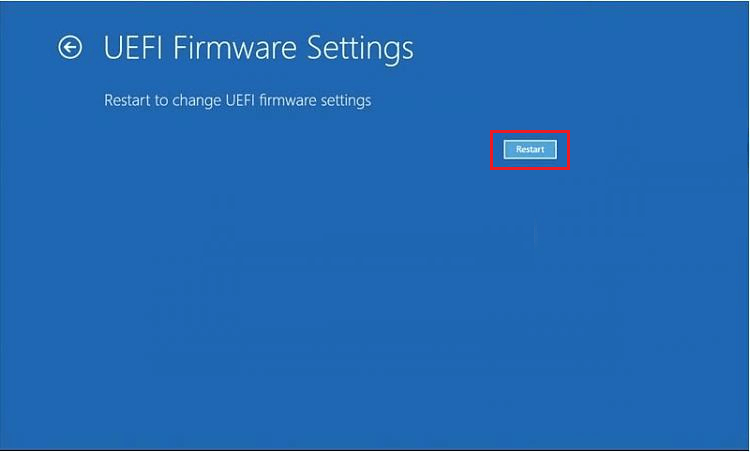
Step 5. Click Restart to restart the system and enter UEFI interface.
Different PCs with UEFI will have different interfaces and features. It’s determined by your PC manufacturer, but the basics will be the same on each PC.
What Is (Legacy) BIOS
Definition
BIOS is short for Basic Input/Output System, also known as system BIOS, ROM BIOS or PC BIOS. It is firmware embedded on the chip on the computer’s motherboard. BIOS firmware is pre-installed on the motherboard of a PC. It is a non-volatile firmware which means its settings won’t disappear or change even after power off.
It is not hard to understand how BIOS works. When your computer starts up, the BIOS loads and wakes up the computer’s hardware components, making sure they are working properly. Then it loads the boot loader to initializes Windows or any other operating system you have installed.
What you need to know is, the BIOS must run in 16-bit processor mode, and only has 1 MB of space to execute in. In this case, it has trouble initializing multiple hardware devices at once, leading to a slower boot process when it initializes all the hardware interfaces and devices on a modern PC.
Although BIOS is a little bit outdated. There are still some users using BIOS, especially for users who have used their computer for many years. Sometimes they need to go to BIOS to change boot order if they have system boot issues. Then how to access BIOS?
How to Access BIOS
The BIOS setup utility is accessed in various ways depending on your computer or motherboard. Normally, you can access BIOS by pressing a specific key while the computer boots like Delete, Esc or F2. The key to enter BIOS can be different according to different types of your computer.
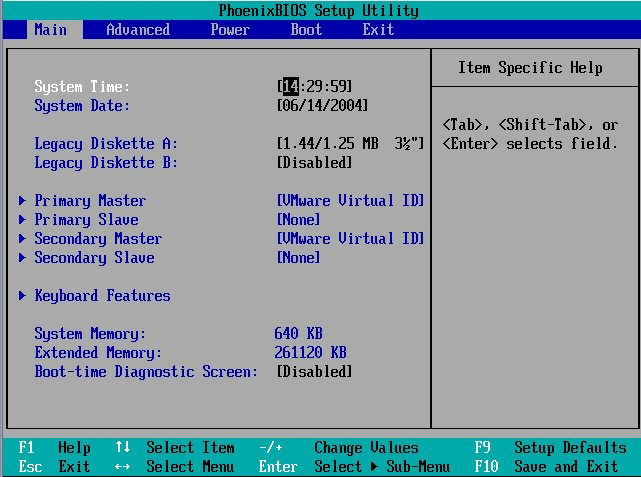
In the BIOS setup screen, you can configure various settings like the hardware configuration of the computer, system time and boot sequence, etc. The setting results will be saved to the memory on your motherboard. After this, you can start your computer, and the BIOS will configure the PC with the saved settings.
After knowing the definition of UEFI and BIOS, let’s start figuring out UEFI vs Legacy.
UEFI vs BIOS
Compared with BIOS, UEFI has the following advantages:
1. UEFI enables users to handle drives that are larger than 2 TB, while the old legacy BIOS couldn’t handle large storage drives.
2. UEFI supports more than 4 primary partitions with a GUID Partition Table.
3. Computers who use UEFI firmware have faster booting process than the BIOS. Various optimizations and enhancement in the UEFI can help your system boot more quickly than it could before.
4. UEFI supports secure startup, which means that the validity of the operating system can be checked to ensure that no malware tampers with the startup process.
5. UEFI supports networking function in the UEFI firmware itself, which helps remote troubleshooting and UEFI configuration.
6. UEFI has a simpler graphical user interface and also has much richer setup menus than legacy BIOS.
After reading the above, you may find that UEFI has many advantages over BIOS. And it is due to these advantages, UEFI is regarded as a successor to BIOS.
However, UEFI is not supported by all computers or devices. To use UEFI firmware, the hardware on your disk must support UEFI. Besides, your system disk needs to be a GPT disk. If not, you can convert MBR disk to GPT disk with a professional disk management tool. In this way, you can boot up your computer with UEFI mode successfully.
How to figure out whether your computer is using UEFI or BIOS boot mode? Actually, you can check it by yourself. Just follow the step below.
Step 1: Press Windows + R to bring up Run window.
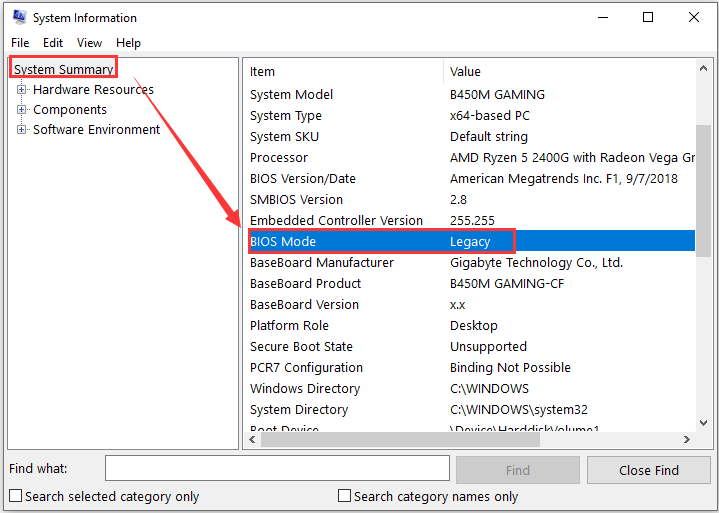
Step 2: Input msinfo32 and click OK button to open System Information.
Step 3: Click System Summary from the left list and go to the right pane to check the BIOS Mode. If it shows Legacy, it means you are using BIOS boot mode. For UEFI mode, it will display UEFI directly.
Conversion Between UEFI and BIOS Boot Modes
Nowadays, UEFI gradually replaces the traditional BIOS on most modern PCs since many major hardware companies have switched over to UEFI use. To boot from a GPT disk and enjoy the advantages of UEFI, you might want to convert the legacy BIOS to UEFI. And here are also some users who want to convert UEFI to BIOS mode.
If you are seeking for a way to perform conversion between UEFI and BIOS boot modes, you can follow the instructions below.
Move 1: Verify the Partition Style of Your Disk
Usually, MBR and BIOS (MBR + BIOS), and GPT and UEFI (GPT + UEFI) go hand in hand. If you want to convert to the BIOS mode, you have to make sure the disk is MBR, as GPT is unable to boot in BIOS mode. And to use UEFI, you had better use a GPT disk.
So, you need to check the type of your disk at first:
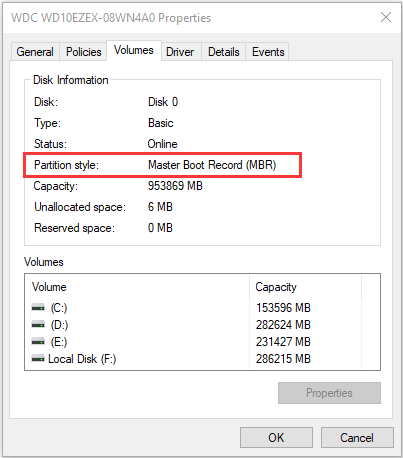
Step 1: Right-click the Start button and choose Disk Management from the pop-up menu.
Step 2: Right-click your system disk and choose Properties.
Step 3: Switch to the Volumes tab and check the Partition style under the Disk Information section. Here, you can see whether the disk is MBR or GPT style.
If the disk is of the desired type, you can jump to the Move 3 to change boot mode directly. Otherwise, you need to proceed to convert the disk to MBR or GPT as your needs.
Move 2: Convert the System Disk to MBR/GPT
If you want to use UEFI boot but the disk is MBR, or you are planning to convert to BIOS but the disk is GPT, you can make use of a third-party application to covert your disk to the desired type. To convert MBR to GPT or convert GPT to MBR without data loss, MiniTool Partition Wizard should be a nice choice.
MiniTool Partition Wizard is a professional partition manager trusted by millions of people. With its Pro Ultimate Edition, you can not only reconfigure hard disk with its basic features but also perform advanced features like recover lost partitions, convert system disk from MBR to GPT, change cluster size, convert dynamic disk to basic without data loss, convert NTFS to FAT and so on.
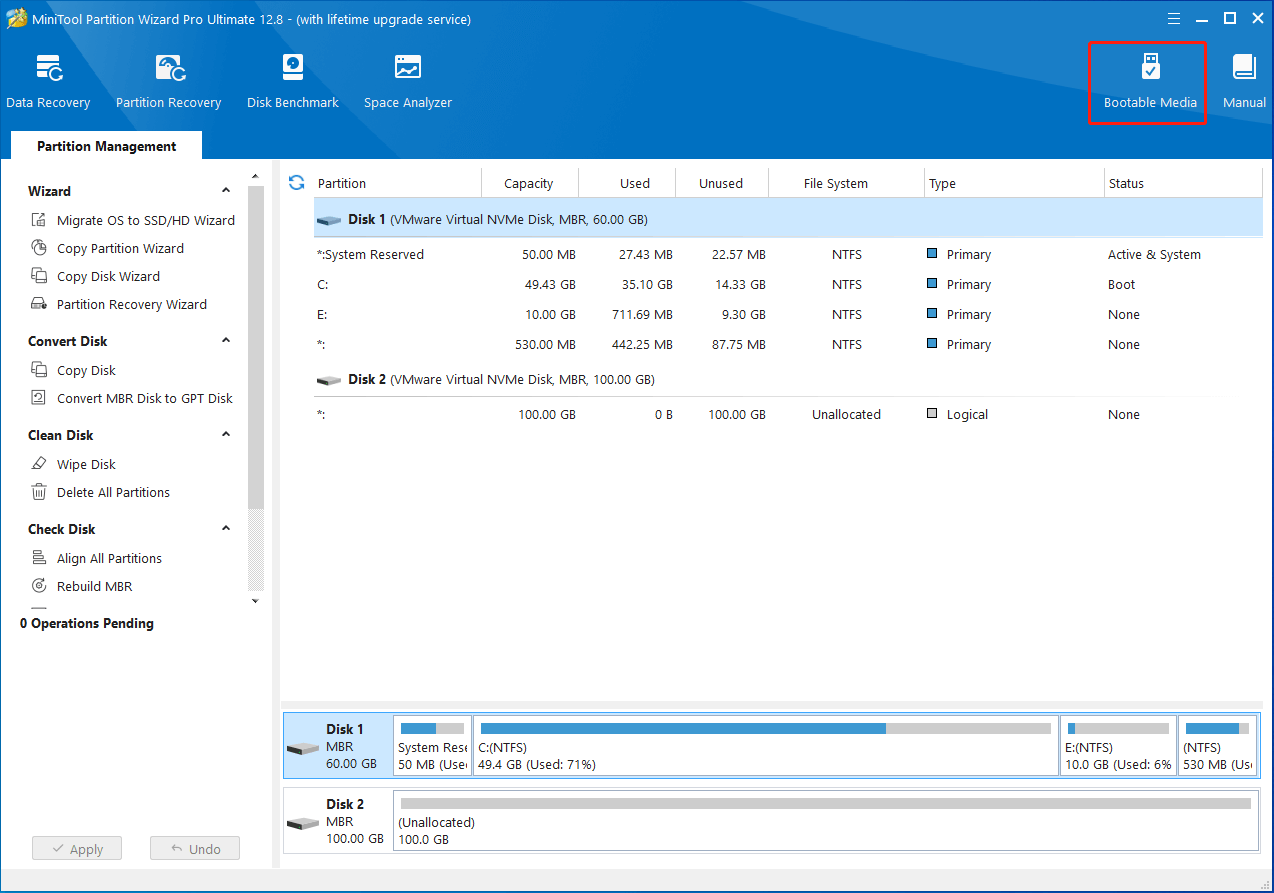
Step 1. Get the MiniTool Partition Wizard by clicking the following button. Then use the Bootable Media Builder to create a bootable edition.
MiniTool Partition Wizard DemoClick to Download100%Clean & Safe
Step 2. Click the Bootable Media and follow the prompts to create a bootable USB drive or CD/DVD disc.
Step 3. Change the BIOS boot sequence to boot from the USB drive or CD/DVD disc to launch MiniTool Partition Wizard Bootable Edition.
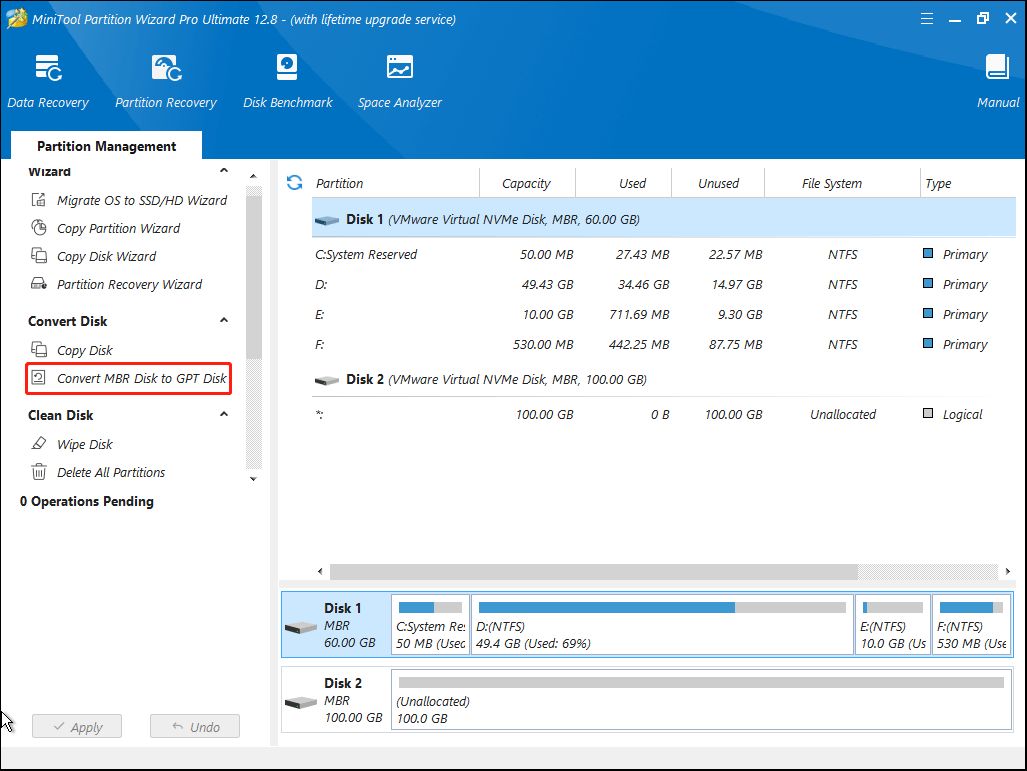
Step 4. In the bootable edition, choose system partition and select the system disk and choose Convert MBR Disk to GPT Disk from the left pane.
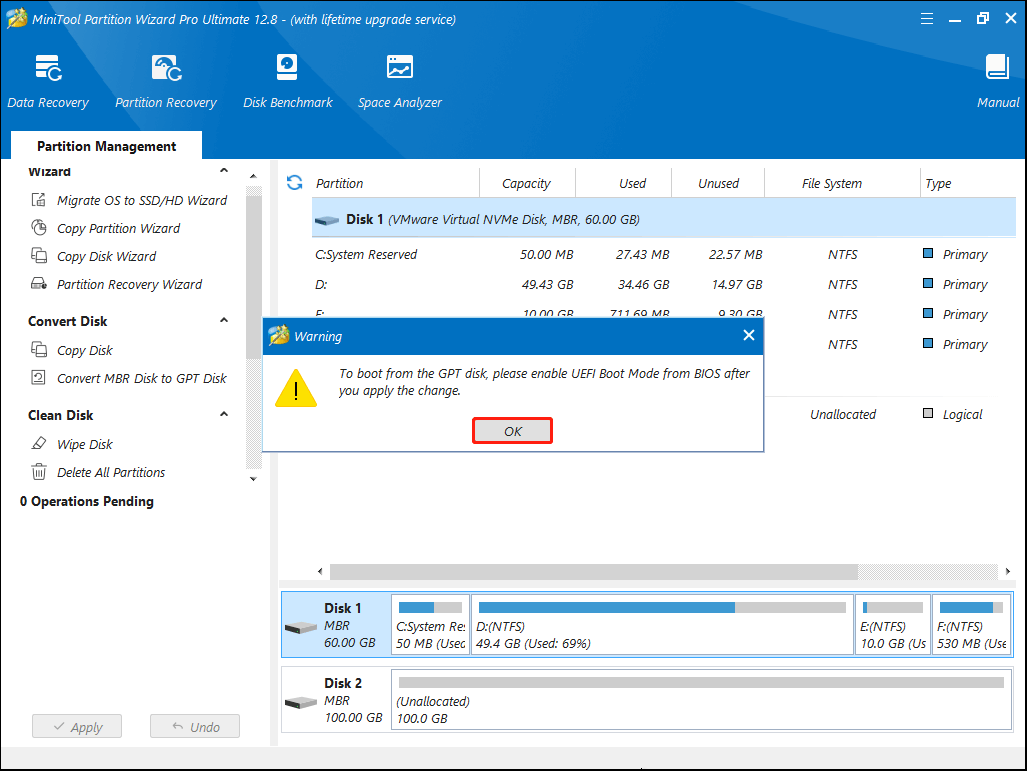
Step 5. Read the warning message and click OK.
Step 6. Click Yes to continue.
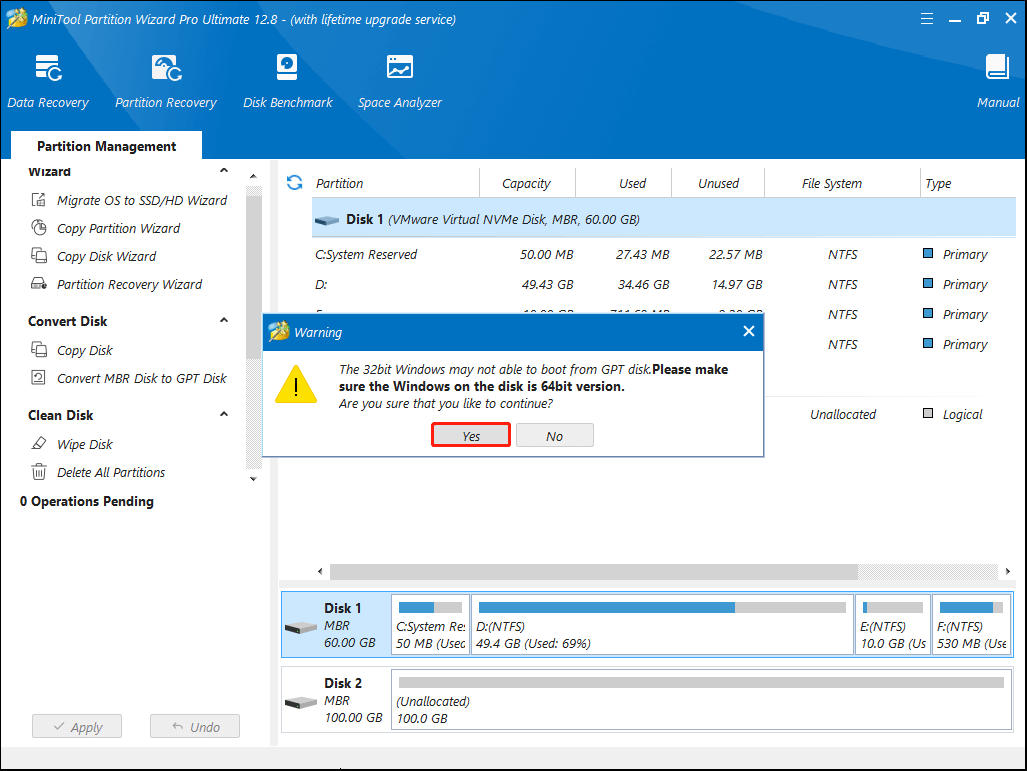
Step 7. You can see that the system disk has been converted to GPT disk, but this interface is the preview of conversion result. Click Apply on the upper left corner to allow the pending operations.

Move 3: Change UEFI/BIOS Boot Mode
After converting the disk to the right style, you need to enter the BIOS settings to switch to the boot mode you want. Here you can follow the steps as below:
Step 1. Press the F2 or other function keys (F1, F3, F10, or F12), the ESC, or Delete key continuously when you boot your computer. For different computer manufacturers, the specific key to enter BIOS may be different. You can check your PC manufacturer support website for more specific details.
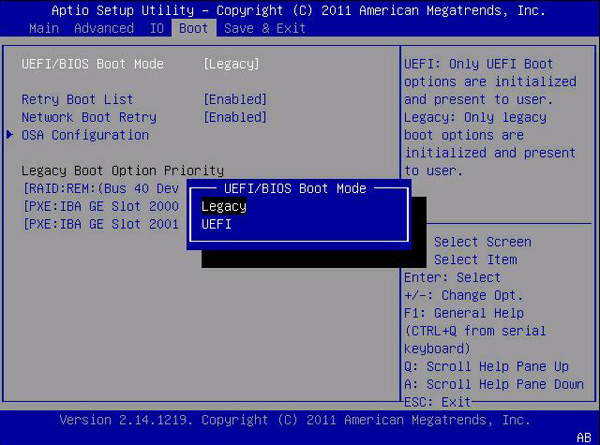
Step 2. From the BIOS Main menu screen, select Boot.
Step 3. At the Boot interface, select UEFI/BIOS Boot Mode, and press Enter.
Step 4. Then the UEFI/BIOS Boot Mode dialog box appears. Here you can use the Up and Down arrows to select UEFI for UEFI boot mode or Legacy for BIOS boot mode, and then press Enter key.
Step 5. Press F10 or a specific key depending on your BIOS to save the changes and exit the screen.
After that, your computer will boot into the specific mode you’ve set just now. By the way, if you want your PC to only boot into UEFI mode, you can remove the bootmgr file from the root of the Windows PE or Windows Setup media to prevent it from starting in BIOS mode. To prevent UEFI boot, you can remove the efi folder instead.
Final Thoughts on UEFI vs Legacy BIOS
You see, to convert system disk to MBR or GPT without data loss is very simple by using MiniTool Partition Wizard Pro Ultimate Edition. If you want to use UEFI boot mode and enjoy its fast booting speed or you want to switch UEFI back to BIOS boot mode, try using MiniTool Partition Wizard to convert your disk now!
If you have any questions about BIOS vs UEFI and how to convert a disk to MBR or GPT, or if you have other better solutions, you can leave a message on the following comment zone and we will reply as soon as possible. If you need any help when using MiniTool software, you may contact us via [email protected].
UEFI vs BIOS FAQ
The UEFI firmware scans the GPTs to find an EFI Service Partition to boot from. If the EFI bootable partition is not found, the firmware may revert to the old Legacy Boot method. If both UEFI boot and Legacy boot fail, you may receive the disk boot failure error message.
User Comments :