You are likely to suffer the Pioneer USB error 23 while plugging a USB drive into the car ratio. What does this error mean and how can you fix it? To get the answers, you can focus on this post. Here, MiniTool Partition Wizard explains the USB error 23 briefly and provides effective troubleshooting fixes for this error.
The Pioneer car stereo system always includes at least one USB port, enabling you to insert a USB drive for a better music listening experience. To be specific, you can download your favorite songs to a USB flash drive, plug the specific drive into your Pioneer car stereo, and then enjoy them while driving the car.
However, sometimes when you connect a USB flash drive with wonderful music to your Pioneer car stereo, it may not work and give you the Pioneer USB error 23.
Don’t panic when you get stuck with the error 23 Pioneer radio USB. Simply keep reading and learn what the error means and how to fix it from the following content.
About Pioneer USB Error 23
In most cases, the Pioneer USB drive error 23 occurs when you insert a USB flash drive into your Pioneer car stereo. Once the error shows up on the stereo screen, it may indicate that the file system of the USB drive is not compatible with the car stereo system.
Additionally, if the partition type of your USB flash drive is not MBR, it’s also possible for the Pioneer USB error 23 to happen.
What’s the Best File System for Pioneer USB Drive
As mentioned earlier, the incompatible file system is the main reason for the USB error 23 Pioneer. Therefore, you can try to fix the error by reformatting the incompatible USB Pioneer. Before the operation, you should know what file system is supported by the Pioneer car stereo system first.
In general, a car stereo or audio system only supports FAT16 and FAT32 file system formats. And there is no exception for the Pioneer car radio system. As for the two formats, FAT32 is the most commonly used due to its high compatibility.
To learn how FAT32 differs from other file system formats, you can refer to the following comparisons:
Solution 1: Format the USB Drive to Fix Pioneer USB Error 23
Formatting the incompatible USB Pioneer is an effective solution when you suffer from the USB error 23 Pioneer. Below this post summarizes a couple of ways to help you complete the formatting process. You can pick one according to your needs.
Via MiniTool Partition Wizard
MiniTool Partition Wizard is a professional third-party partition manager with lots of features related to partition or disk management. You can use it to create/format/resize partitions, copy/wipe disks, migrate OS to SSD/HDD, recover data from hard drive, etc.
It’s worth noting that the Format Partition feature of MiniTool Partition Wizard breaks through the 32GB limit on FAT32. That’s to say, you are able to use this free USB formatter to format a USB drive larger than 32GB to FAT32.
MiniTool Partition Wizard enables you to format USB to FAT32 to fix the error 23 Pioneer radio USB with ease. Here’s how to do this.
Step 1: Connect the Pioneer incompatible USB to your PC. Then download and install MiniTool Partition Wizard on your computer.
MiniTool Partition Wizard FreeClick to Download100%Clean & Safe
Step 2: Launch this partition manager to get into its main interface.
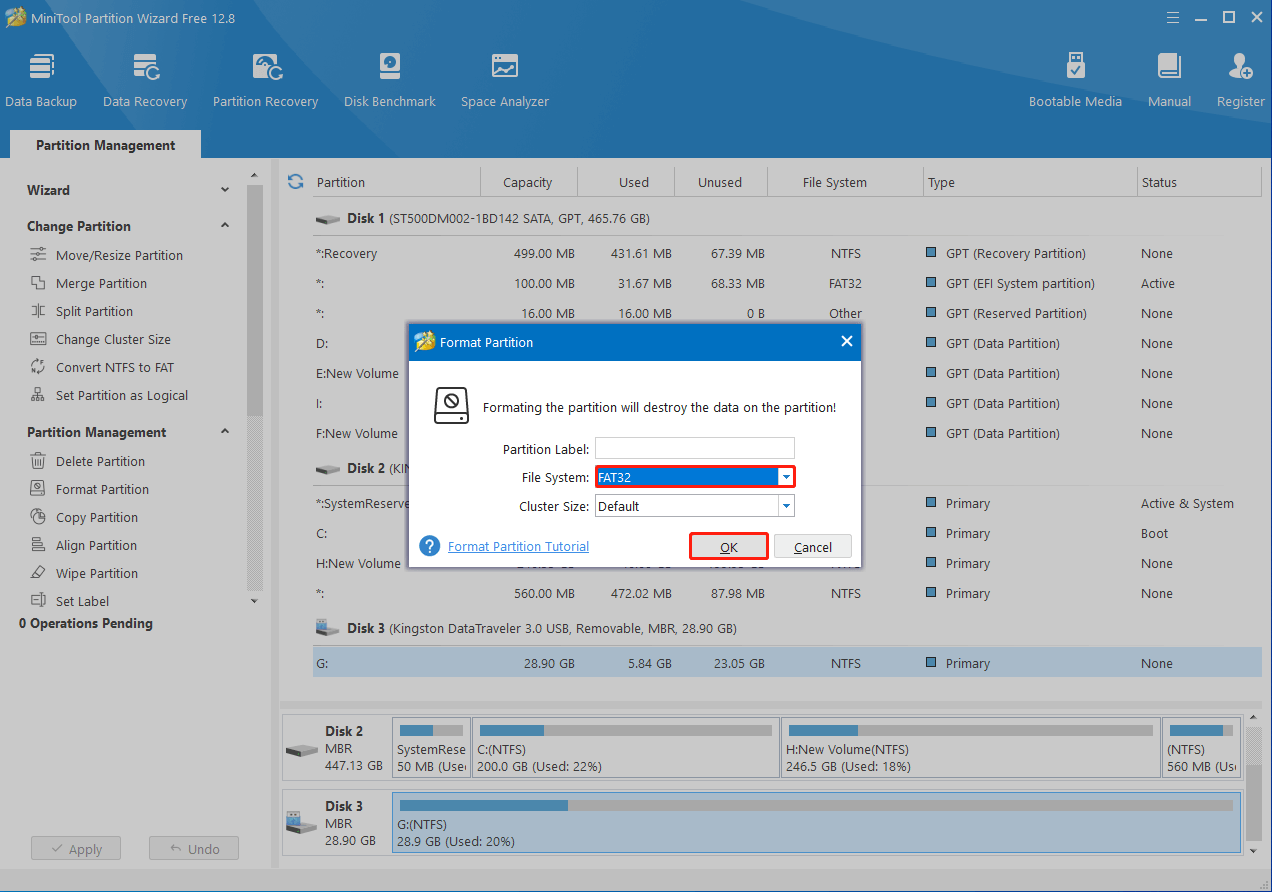
Step 3: Right-click the partition on the target USB drive and select Format. Alternatively, you can also highlight the target partition and then select Format Partition from the left action panel.

Step 4: In the pop-up window, choose FAT32 as the File System and click OK.
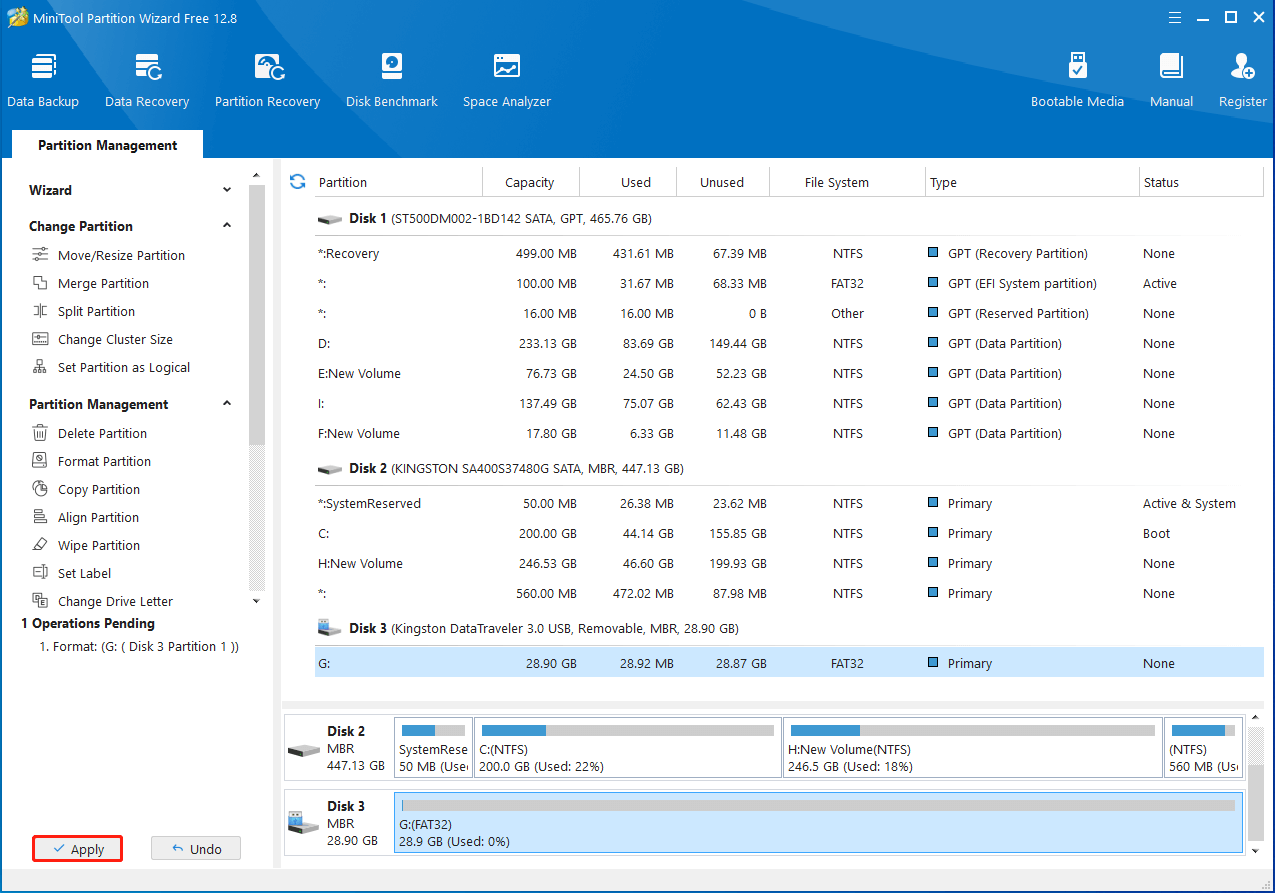
Step 5: At last, don’t forget to click Apply to save the change.
Via Disk Management
Disk Management is a Windows built-in utility that helps deal with common partition or disk tasks. If your USB drive is no larger than 32GB, you can simply use Disk Management to format it to FAT32. To do this, follow the steps below.
Step 1: Insert the Pioneer USB drive into your Windows PC.
Step 2: Right-click the Start icon and select Disk Management.
Step 3: After that, right-click the USB flash drive and select Format from the context menu.
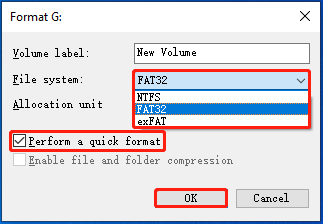
Step 4: In the prompted Format window, select FAT32 from the drop-down menu. Then check the Perform a quick format option and click OK.
Step 5: If a warning box appears, click OK to confirm the operation.
Via File Explorer
File Explorer is another useful USB formatter offered by Microsoft. You can learn how to format the incompatible USB drive by using File Explorer with the given instructions.
Step 1: Connect the Pioneer incompatible USB drive to your PC.
Step 2: Press Windows + E to open File Explorer. Then go to This PC.
Step 3: Right-click the USB drive from the right side and then select Format.
Step 4: Select FAT32 in the File system section and then tick the checkbox next to Quick Format.
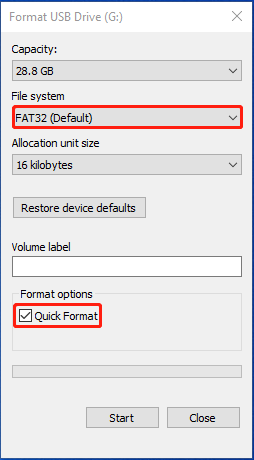
Step 5: Finally, click Start to begin the formatting process.
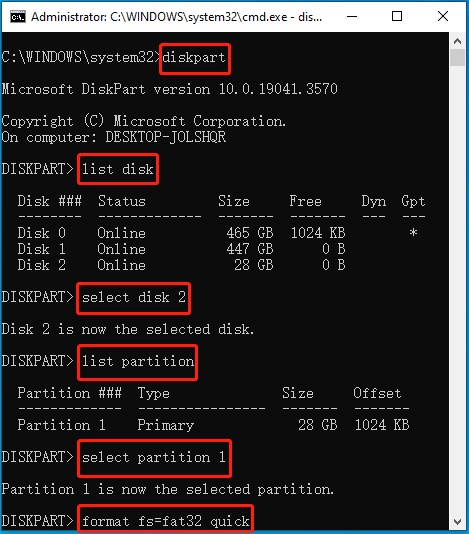
Via Diskpart
Diskpart is a disk partitioning utility that allows you to make various changes to your partitions and disks with corresponding commands. You can use it to format the Pioneer USB drive to FAT32 as well. Here’s a step-by-step guide to how to finish the format with this tool.
Step 1: Plug the target USB drive into your PC. Then press Windows + R to open the Run dialog.
Step 2: Type cmd in the text box and then press Ctrl + Shift + Enter to open Command Prompt as an administrator.
Step 3: In the elevated Command Prompt, type the following commands one by one and press Enter after each.
- diskpart
- list disk
- select disk 2 (Replace 2 with the disk number of your USB drive)
- list partition
- select partition 1 (1 represents the number of the partition on your USB drive)
- format fs=fat32 quick
Solution 2: Convert the USB Drive to MBR to Fix Pioneer USB Error 23
The Pioneer car radio system won’t recognize the USB drive if it is a GPT drive. As a result, you are likely to receive the Pioneer USB drive error 23. On this occasion, you may need to convert the USB drive from GPT to MBR to see if it works.
Both the Windows built-in tool and MiniTool Partition Wizard can help you convert the GPT USB drive to MBR. The post offers the details on the GPT to MBR conversion with different tools as follows. You can take a look.
Via Windows Built-in Tool – Diskpart
Windows Diskpart allows you to convert GPT to MBR only after you delete all the partitions on the USB drive. So, it’s important to back up your USB drive to protect the data from being lost. Once you have a backup of the USB drive, connect it to your PC and then try the following steps to finish converting GPT to MBR.
Step 1: Type diskpart in the Run dialog and click OK.
Step 2: After accessing the Diskpart window, type the following commands and press Enter after each.
- list disk
- select disk 2
- clean
- convert mbr
Step 3: Once the process ends, type create partition primary and press Enter to create a new partition.
Step 4: After that, execute the assign letter=G command to assign a letter to the newly created partition.
Step 5: To format the partition to FAT32, you should type the format fs=fat32 quick command and press Enter.
Step 6: Now, you can move the backup files to the USB drive. Then insert it into your Pioneer car stereo system to see if it can work normally.
Via MiniTool Partition Wizard
If you want to convert the USB drive to MBR without deleting partitions and losing data, then MiniTool Partition Wizard deserves your attention. The professional and reliable partition manager can keep your data safe during the GPT to MBR conversion.
You can convert the USB to MBR with a few clicks by using MiniTool Partition Wizard. Here’s the detailed guide to this conversion.
Step 1: Connect the USB drive to your PC. Then get this free disk partition software on the computer.
MiniTool Partition Wizard FreeClick to Download100%Clean & Safe
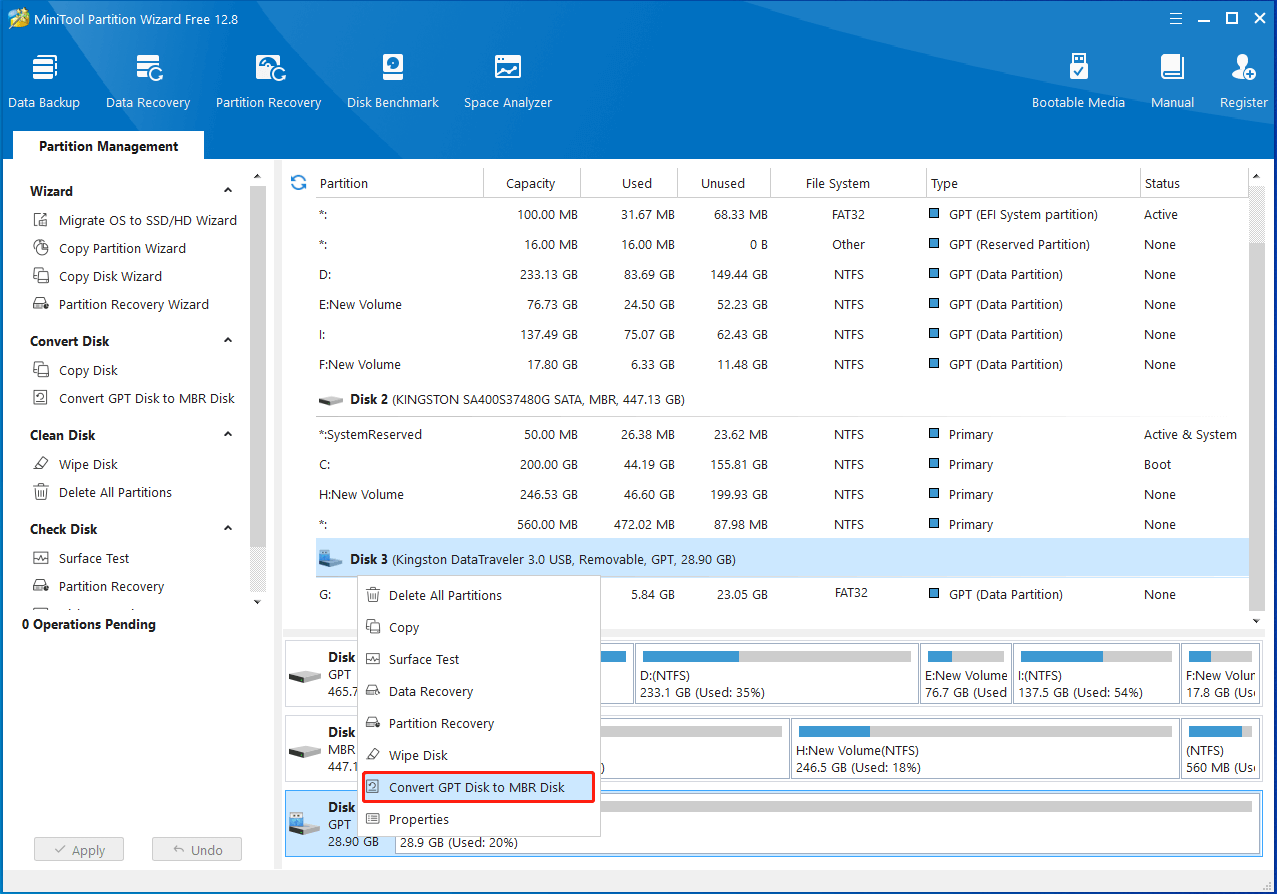
Step 2: Get into the main interface of this program. Then right-click the USB drive and select Convert GPT Disk to MBR Disk.
Step 3: Click Apply > Yes to execute the operation smoothly.
Bottom Line
When facing the Pioneer USB error 23, you can try to fix it with the solutions mentioned in this post. If you have any problems with this error, you can leave a message in our comment part below.
For any issues you experience while using MiniTool Partition Wizard, you can contact us via [email protected]. We’ll reply to you as soon as possible.
User Comments :