An Overview of Windows 11 Disk Management
Disk Management, a Microsoft Windows utility, initially brought in Windows XP as a replacement for the fdisk command. It is available on most Microsoft Windows versions including Windows 2000/XP/Vista/7/8/10/11.
This utility enables users to view and manage disk drives on the computer and partitions related to these drives. Besides, it also can manage drives including internal and external ones like optical disk drives and flash drives.
The Disk Management utility also comes along with Windows 11 system. That is to say, Windows 11 Disk Management is a Windows partition manager. In Disk Management, the layout, type, file system, status, capacity, and free space of the volume will be displayed.
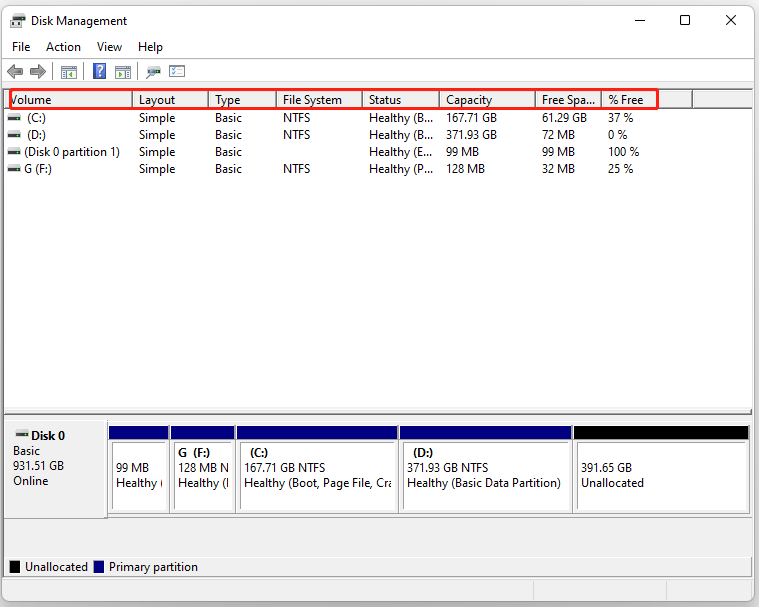
What Does Windows 11 Disk Management Do
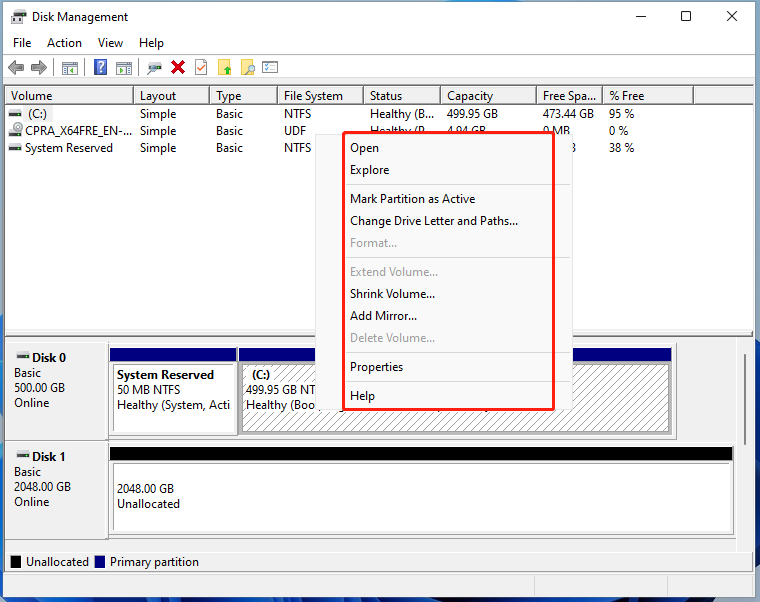
Disk Management is a system utility in Windows, which allows you o conduct advanced storage tasks. What exactly does Windows 11 Disk Management do? Here, we list the features of Disk Management as follows.
- Create volume
- Format volume
- Shrink volume
- Extend volume
- Delete volume
- Change drive letter and paths
- Mark partition as active
- Create a virtual hard drive
- Convert MBR to GPT
- Convert disk from basic to dynamic
Also read: Undelete Windows 11 Partition with Partition Recovery Software
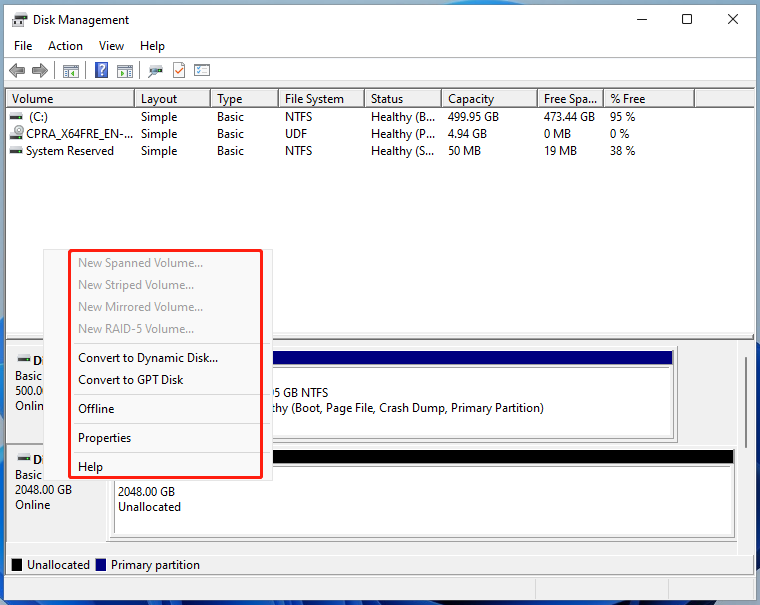
To execute the above operations in Disk Management Windows 11, you need to access this utility first. Here comes the question – how to open Disk Management. The section below would offer you 6 ways to do that.
How to Open Windows 11 Disk Management
You can open Windows 11 Disk Management via the search box, Control Panel, Start menu, Run window, and PowerShell. For that, you should refer to the respective steps below.
Way 1: Through Search Box
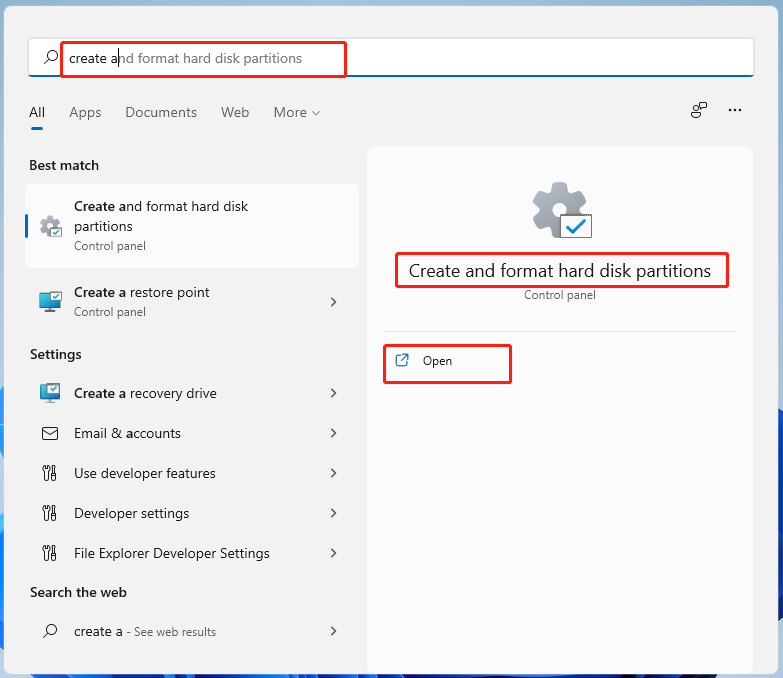
It is very easy to open Disk Management Windows 11 through the Search box. You just need 2 steps for doing that.
Step 1: Click on the Search icon on the Windows 11 desktop to open Search box.
Step 2: Type create and format hard disk partitions in the search area and then click Open under this search result. Then Disk Management opens.
Way 2: Through Control Panel
Through Control Panel, you can also access Disk Management. Here’s the tutorial for you.
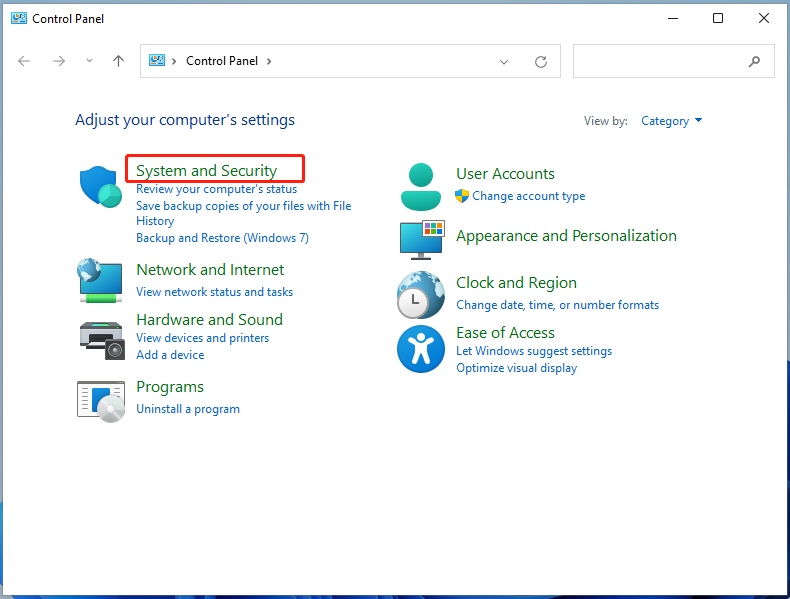
Step 1: Open the Run window by pressing Windows + R keys, and then input control and click OK. By doing so, Control Panel opens.
Step 2: In the Control Panel window, click System and Security.
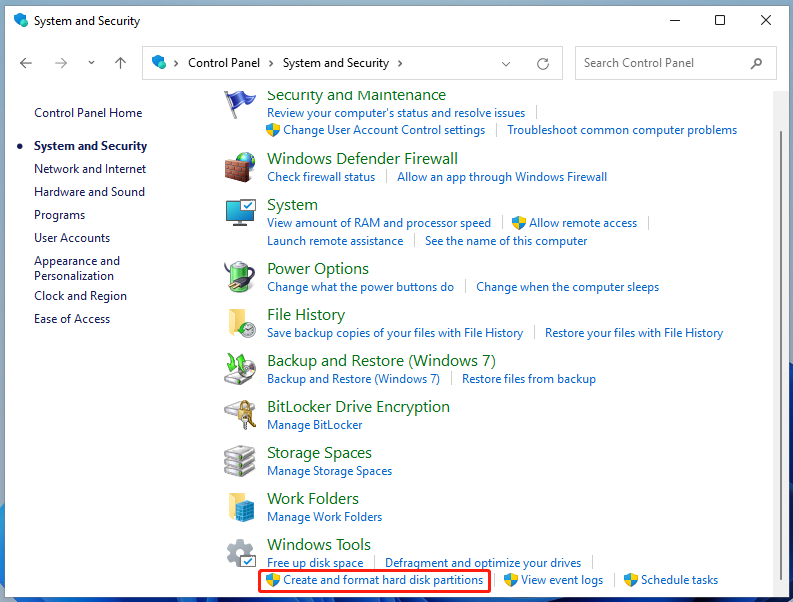
Step 3: Click the Create and format hard disk partitions option under Windows Tools.
Way 3: Through Start Menu
The Start menu allows you to open Disk Management in a flash as well.
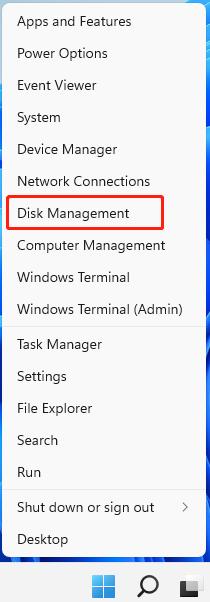
Step 1: Press Windows + S to open the Start menu. Alternatively, you can also right-click on the Windows icon to open this menu.
Step 2: In the prompted menu, click Disk Management.
Way 4: Through Run Window
The Windows built-in Run utility enables you to access Windows 11 Disk Management too. You just need to follow these simple steps.
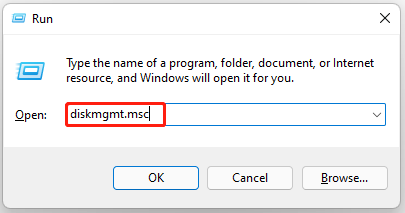
Step 1: Open the Run window by holding Windows + R keys.
Step 2: Type diskmgmt.msc in the Run window and hit Enter.
Way 5: Through PowerShell
For opening Disk Management Windows 11, PowerShell also helps.
Step 1: Tap the Search icon on the desktop to open the Search box.
Step 2: Click Windows PowerShell under the Top apps section. If it doesn’t appear in the window, type powershell in the search area and then open it.
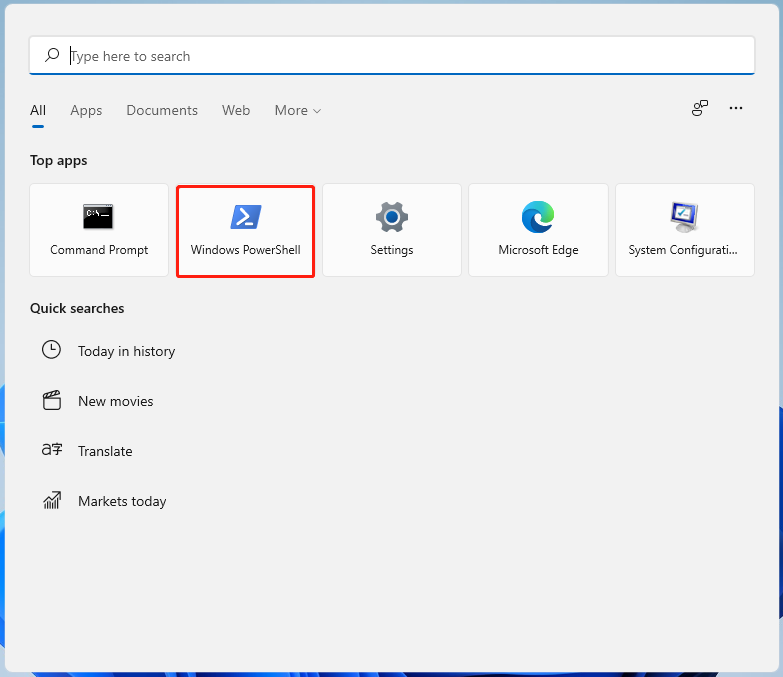
Step 3: In the elevated Windows PowerShell window, type diskmgmt and hit Enter. After that, Disk Management appears.

Way 6: Through Computer Management
You are able to access Disk Management via Computer Management. The following steps show you how to do that.
Step 1: Open the Search box by clicking the Search icon on the computer.
Step 2: Type computer management and then click the Open option under Computer Management.
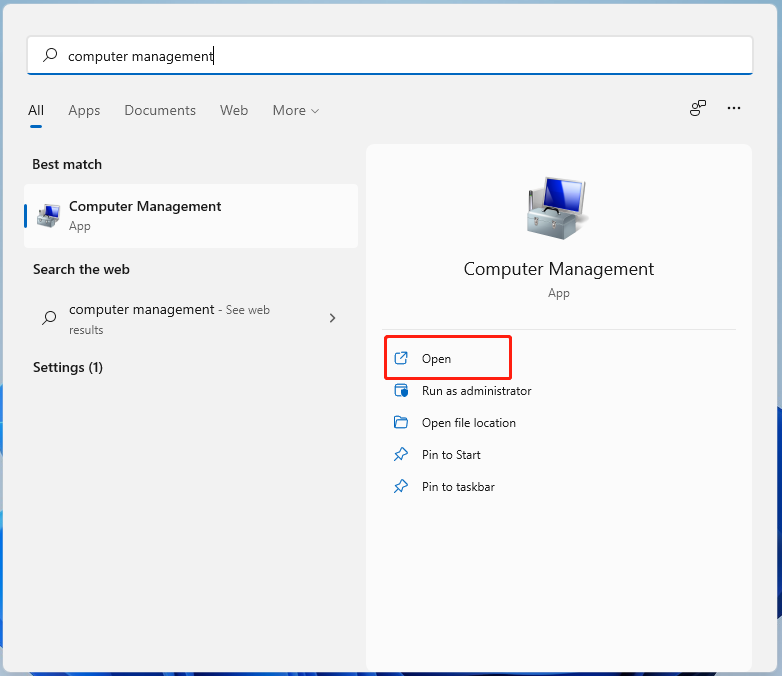
Step 3: In the Computer Management window, click Disk Management under the Storage section. Then Disk Management will appear in this window.
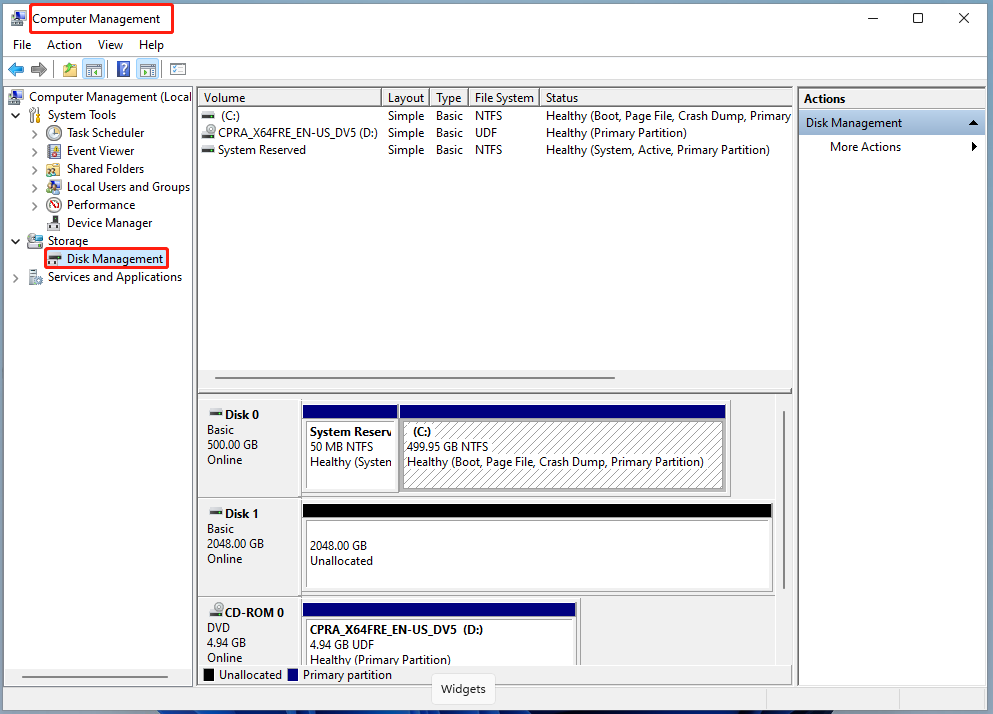
After that, you can manage drives and partitions appeared in the Disk Management window. Just right-click on the target drives or partitions, and then click a feature based on your needs and follow the on-screen instruction to finish the operation.
Issues with Disk Management Windows 11
Disk Management works well most time, but it sometimes can go wrong. For instance, you may encounter issues like Disk Management unable to connect to virtual disk service, removable disk no media, and an unexpected error has occurred, etc.
In addition, Disk Management has limits on some operations. To be specific, you can’t create a FAT32 partition larger than 32GB. What’s more, the available file systems for partition format are limited. The larger the partition is, the fewer file systems are available.
Sometimes, you will receive errors like Disk Management can’t extend boot partition, change drive letter and paths greyed out, delete volume greyed out, new simple volume greyed out, and so forth.
Under these circumstances, you may wonder if there is an alternative to Disk Management. The answer is absolutely “Yes”. MiniTool Partition Wizard is an expert on drive & partition management. You can use it as a replacement of Disk Management Windows 11.
MiniTool Partition Wizard – An Alternative to Disk Management
As a professional partition manager, MiniTool Partition Wizard owns plenty of features. Like Disk Management, it also allows you to create/format/shrink/extend partitions, convert MBR to GPT, and mark partition as active, etc.
Compared with Disk Management, MiniTool Partition Wizard offers you more file systems while formatting. They include NTFS, FAT32, exFAT, Ext2, Ext 3, Ext 4, and Linux Swap. It also allows you to create FAT32 partitions up to 2TB.
However, MiniTool Partition Wizard has some features that Disk Management doesn’t have. For instance, the former can migrate OS to SSD/HD, copy disk, analyze disk space, recover data, rebuild MBR, convert NTFS to FAT, set partition as logical, and so forth. In a word, this program is an excellent alternative to Disk Management.
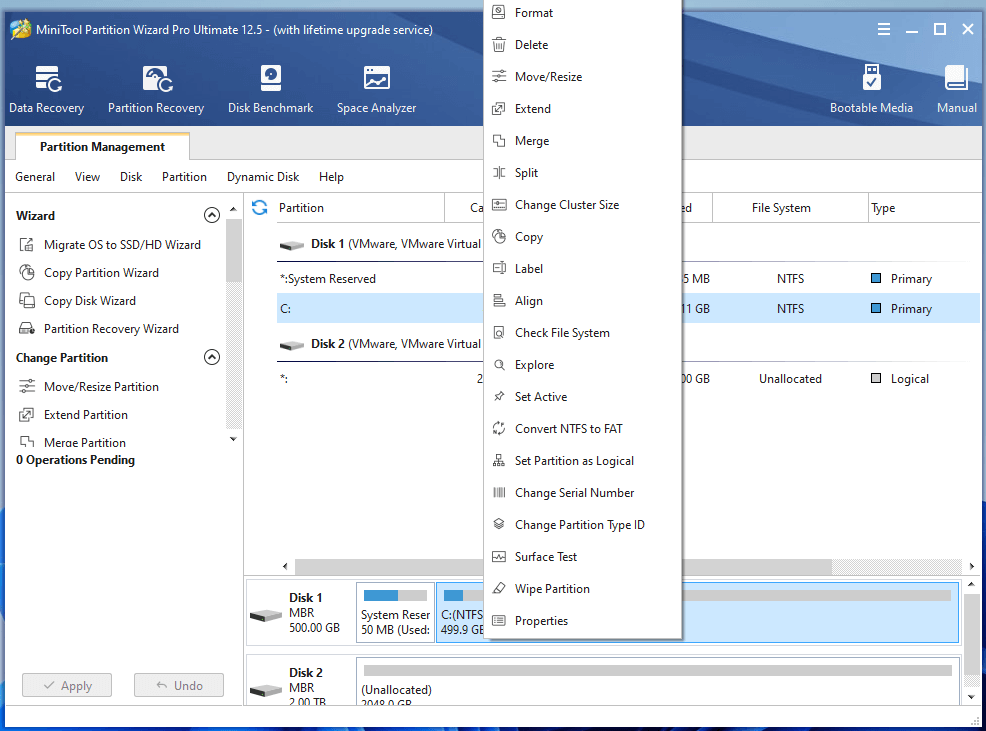
Moreover, MiniTool Partition Wizard allows you to run surface tests and check file system for hard drive errors. Importantly, it enables you to fix issues like can’t delete files from SD card, CRC failed 7Zip, Loadlibrary failed with error 87, e drive full, etc.
Here, we would show you how to manage Windows 11 drives and partitions with MiniTool Partition Wizard.
Use MiniTool Partition Wizard to Extend Partition
Space consumes quickly and easily. If you don’t have enough space, you will suffer from various errors like low disk space warning, runtime error, you can’t run this PC, and other issues. To get more space, you can free up disk space, extend partition, and upgrade to a larger hard drive.
Among these methods, extending partition is a great way to increase disk space for laptop. You don’t have to delete files nor buy another hard drive by using this method. Besides, you can enlarge your partition easily with the Extend Partition feature of MiniTool Partition Wizard. You can even extend system partition safely.
Here’s the tutorial on extending partitions via MiniTool Partition Wizard.
MiniTool Partition Wizard FreeClick to Download100%Clean & Safe
Step 1: Launch MiniTool Partition Wizard to go to its main interface.
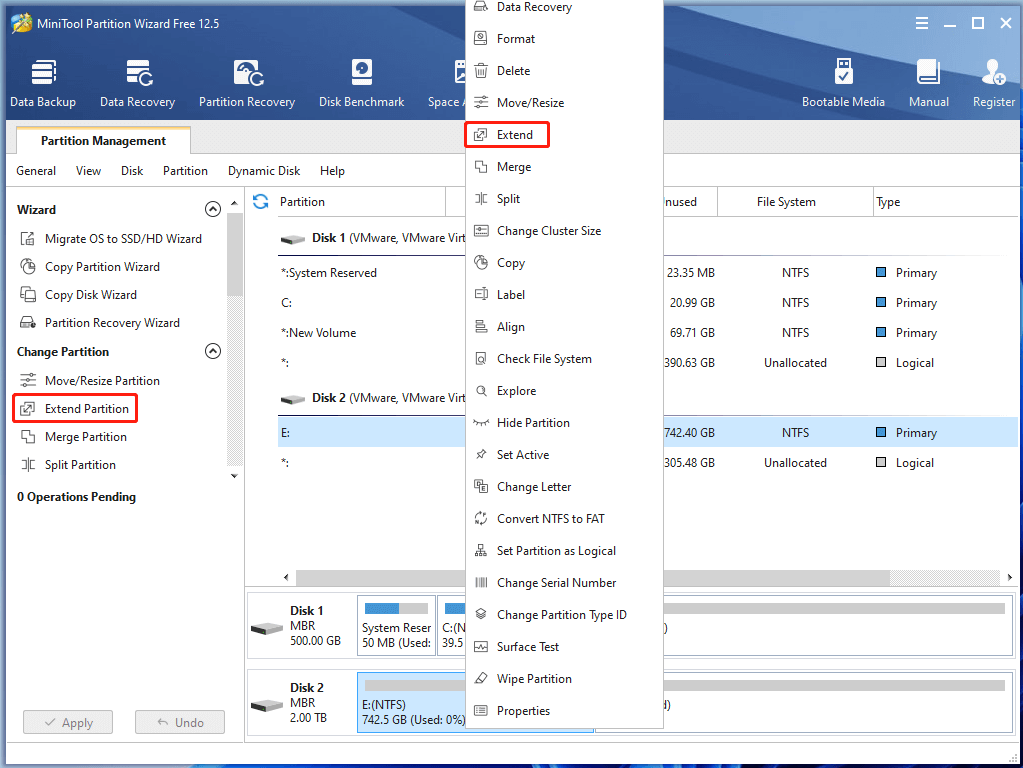
Step 2: Right-click on the partition to enlarge and click Extend. Alternatively, you can also highlight the target partition and tap Extend Partition in the left pane.
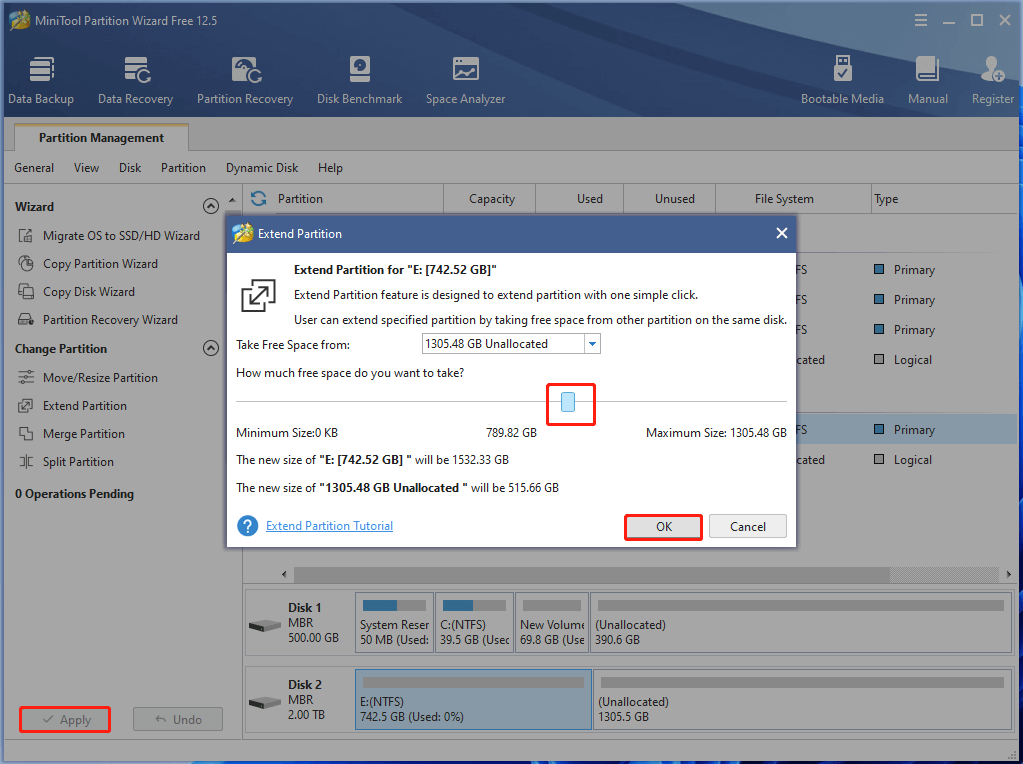
Step 3: In the Extend Partition window, choose a place where you want to take free space from and move the block to decide the space to take. After that, click OK to save the changes.
Step 4: Finally, click Apply to carry out the pending operation.
Use MiniTool Partition Wizard to Convert NTFS to FAT
If you want to convert a partition from NTFS to FAT, MiniTool Partition Wizard helps. As the free edition doesn’t support this feature, you are required to get its pro or more advanced editions to do that. To get more details, please refer to this edition comparison page.
MiniTool Partition Wizard DemoClick to Download100%Clean & Safe
After downloading and installing the correct MiniTool Partition Wizard edition, follow these steps to convert NTFS to FAT.
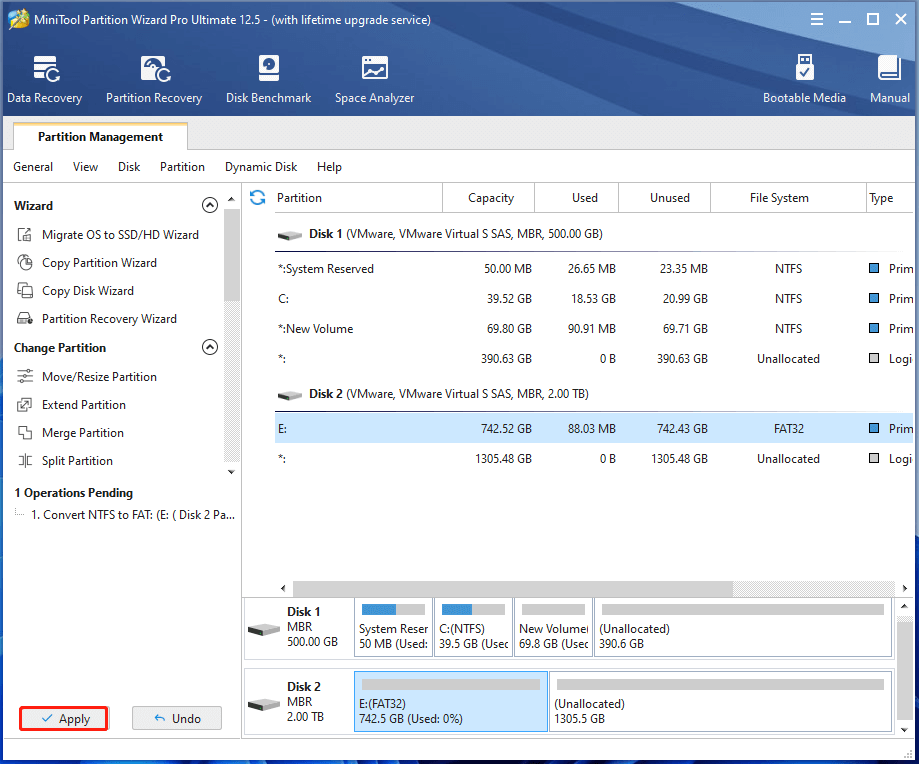
Step 1: Run this program to access its main interface.
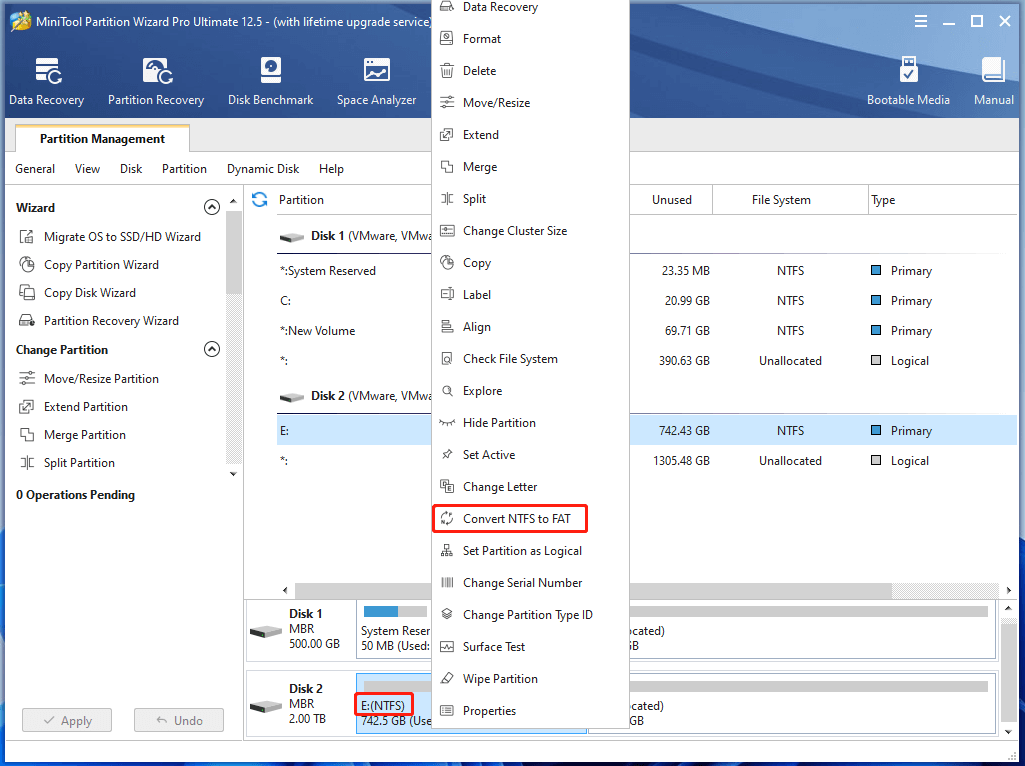
Step 2: Right-click on your NTFS partition and click the Convert NTFS to FAT option in the elevated menu.
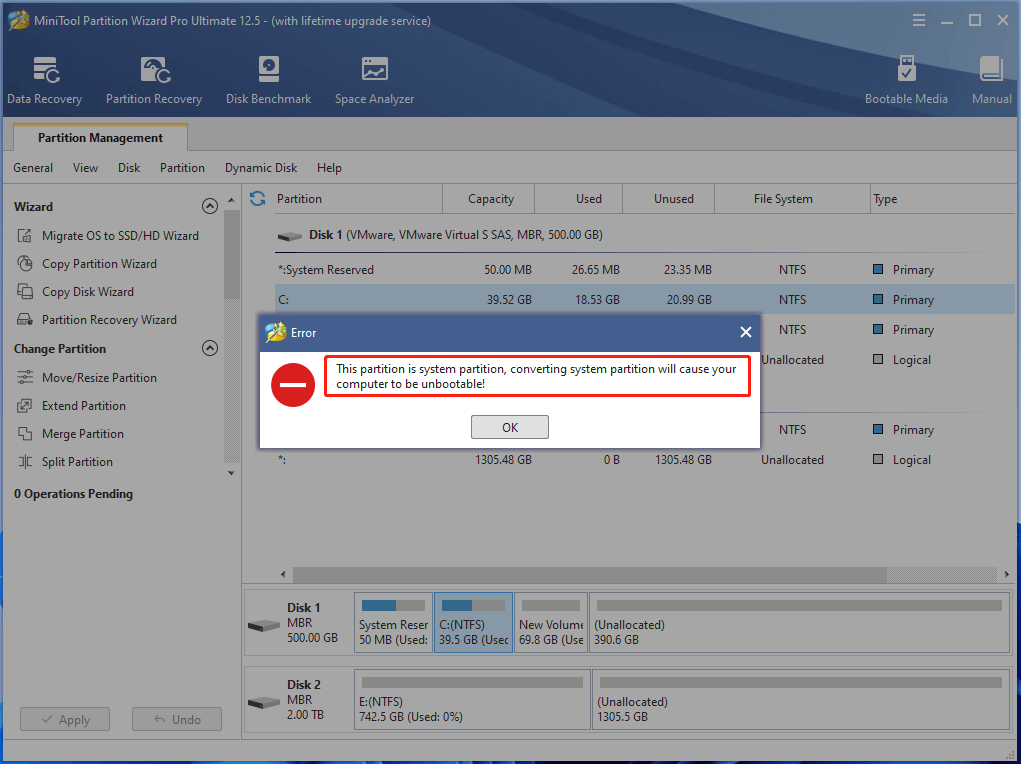
Step 3: Click Apply to execute the conversion.
To make your computer boot again, you can refer to this tutorial: Is Hiren’s Boot CD Enough? Rescue Unbootable PCs with More Fixes
Use MiniTool Partition Wizard to Check Hard Drive Errors
To check hard drive for errors, you can utilize the Surface Test and Check File System features of MiniTool Partition Wizard. Here are step-by-step guides for you.
MiniTool Partition Wizard FreeClick to Download100%Clean & Safe
Steps for Checking File System Errors
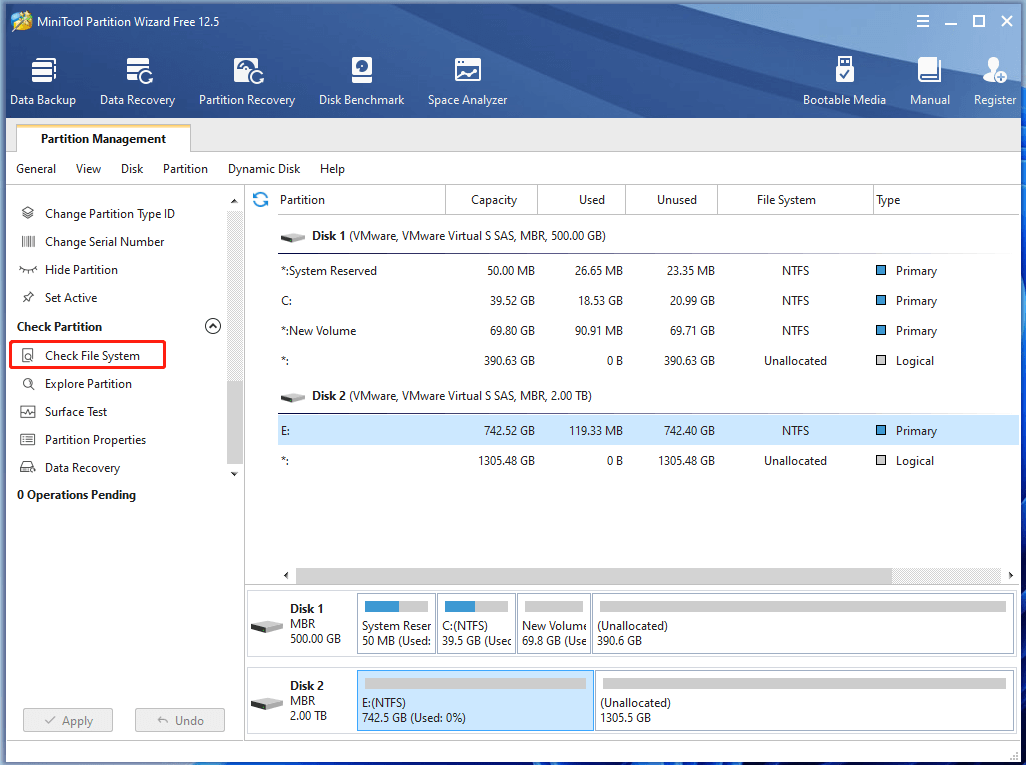
Step 1: After launching MiniTool Partition Wizard, tap the partition you want to test and click Check File System.
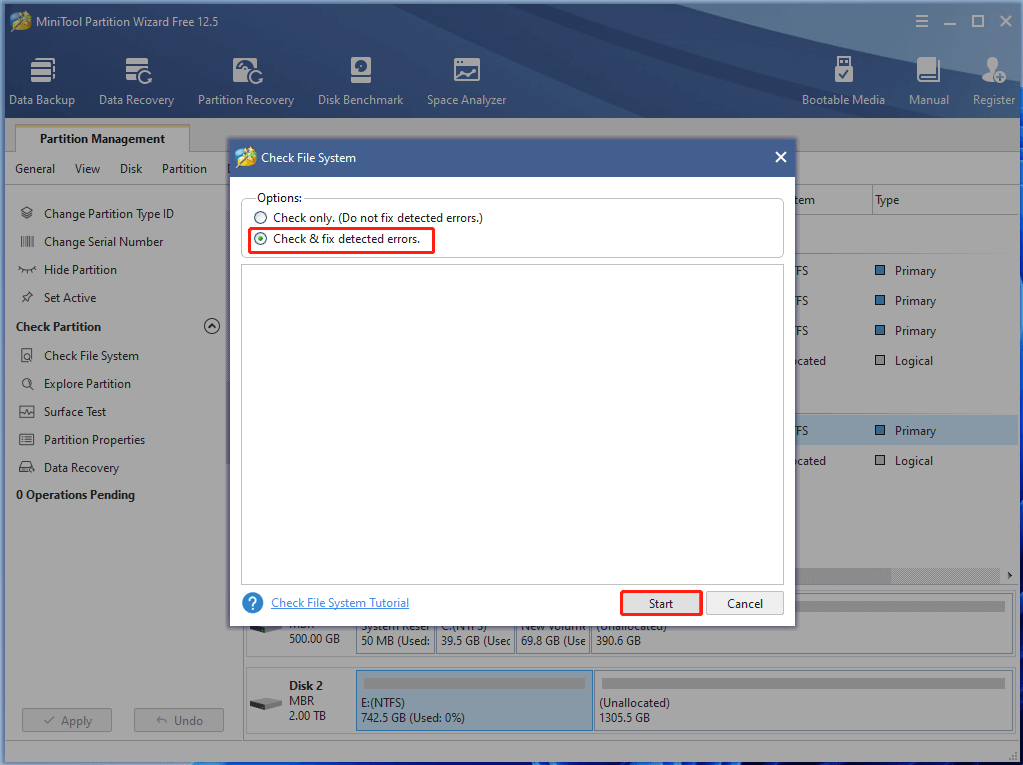
Step 2: You have two options to check file system. It is suggested that you choose the Check & fix detected errors option. Then click Start to begin the process.
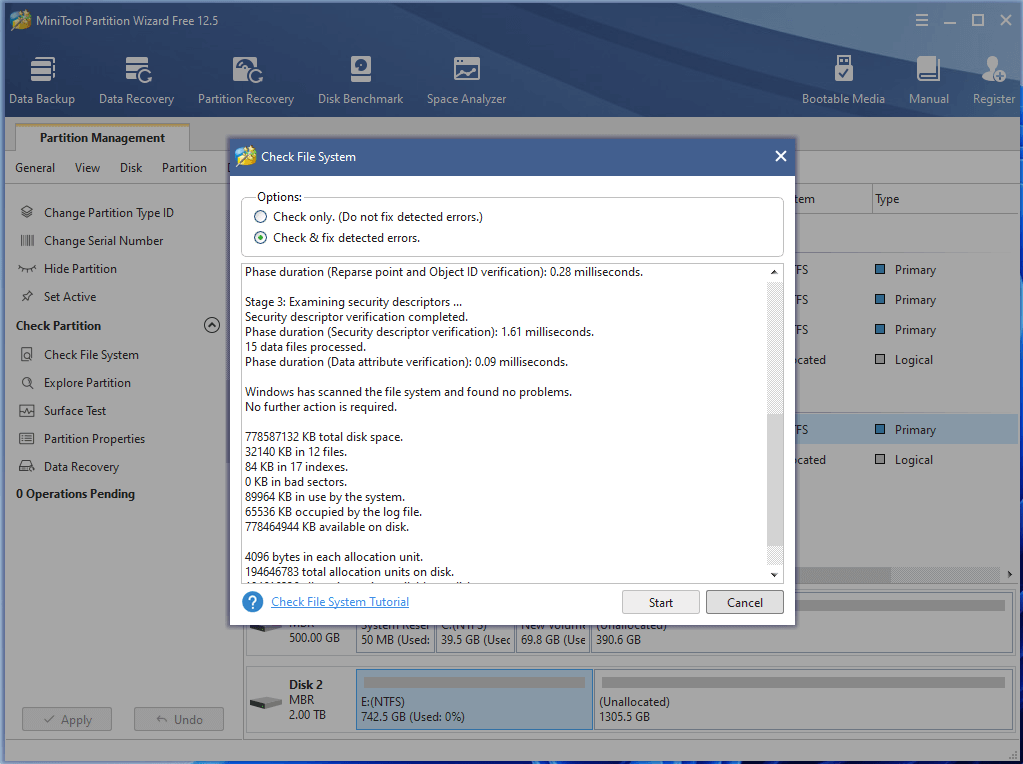
Step 3: After a while, you will receive the result. When the process ends, the detected file system errors can be fixed. Then exit the current operation.
Steps for Checking Bad Sectors
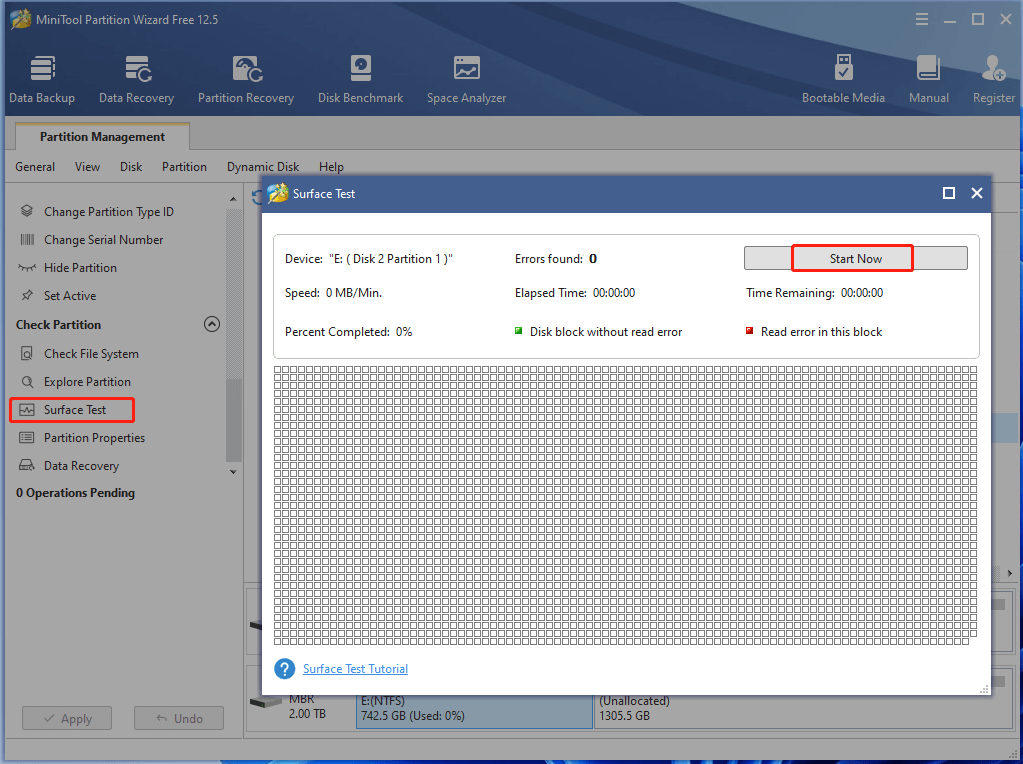
Step 1: Enter the main interface of the program, highlight the target partition, and click on Surface Test.
Step 2: In the Surface Test window, click Start Now to begin the process.
Step 3: Then MiniTool Partition Wizard will scan the selected partition for bad sectors. If there are any blocks in the scan area marked with red, it indicates that there are bad sectors on the partition. If so, you can refer to this bad sector repair guide to get rid of them. On the contrary, it means your partition doesn’t have bad sectors.
Recommended reading: 2 Easy and Effective Ways to Shrink Volume with Unmovable Files
Bottom Line
To sum up, this post provides you with a full guide on Windows 11 Disk Management ranging from its basic information, main features, opening methods, common issues, and even the alternative. Additionally, it illustrates how to manage Windows 11 disks and partitions with MiniTool Partition Wizard – the alternative to Disk Management.
If you have anything to share, please leave your words in the following comment area. For any issues while using MiniTool Partition Wizard, directly contact us via [email protected].

User Comments :