About Could Not Clean Up File History Data Element Not Found Error
File History is one of the built-in Windows 10/11 backup utilities to help users back up data and operating system files to desired locations. If your backup folder is taking up too much drive space, you can simply delete old backups.
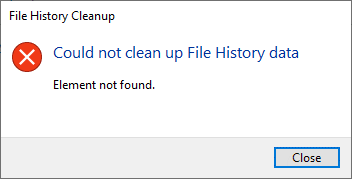
Unfortunately, sometimes the operating system may not be able to locate the backup files and clean up your file history data. And got the error message “Could not clean up File History data Element not found”. Here’s a true example from the superuse.com forum.
I have a File History backup and when I try to clean older copies, it spits out that error-Could not clean up File History data Element not found. Any idea how to solve it?https://superuser.com/questions/1603869/could-not-clean-up-file-history-data-element-not-found
What Causes Could Not Clean Up File History Data Element Not Found Error
What causes the “could not clean up File History data Element not found” error? Below are some of the most common reasons that might trigger the File History element not found on Windows 10/11.
- There is a bug: You are encountering this error due to a bug in the File History feature.
- Storage Full: If the storage drive where you created the file history backup is full then you will face this issue.
- Storage drive issues: Due to corrupted files or corrupted backups, you will also face the File History element not found error.
- Corrupted System Files: If your system files are corrupted or missing, then you will face multiple system issues, one of which is the file history element error.
- Recently installed updates: For many users, the issue was triggered after updating their PCs with the latest updates.
How to Fix Could Not Clean Up File History Data Element Not Found Error
Here we summarize the following 8 methods to fix the “could not clean up File History data Element not found” error. You can try them in order until the error gets fixed.
# 1. Disconnect USB Peripherals
USB devices, while sometimes very important for making your computer work easier, can often be a nuisance. Certain hardware peripherals (such as speakers, webcams, printers, and USB hubs) prevent certain processes from starting. As a result, people may run into the File History element not found error when cleaning.
Then you need to disconnect all external devices connected to the machine and try to perform file history clearing again.
If you’re using an external hard drive to store your backup files, turn off File History first. Go to Control Panel > System and Security > File History. Then disconnect the external drive and restart the computer. Reconnect the drive to the computer and check to see if the files can be deleted.
# 2. Increase Storage Space
As discussed above, the main reason for the error is insufficient or empty storage space. So, you should make sure enough storage space on your drive. How to free up so large disk space? You can delete unnecessary large files/folders or remove some apps/programs, but it is time-consuming and ineffective.
In this case, a more effective way is to integrate all free/unallocated space into the backup file partition using a professional partition manager. MiniTool Partition Wizard is such a tool. Its Extend Partition feature enables you to increase storage space with ease.
Method 1: Extend Partition Using MiniTool Partition Wizard
The first and simple method is to extend the game partition using the MiniTool software. For that:
MiniTool Partition Wizard FreeClick to Download100%Clean & Safe
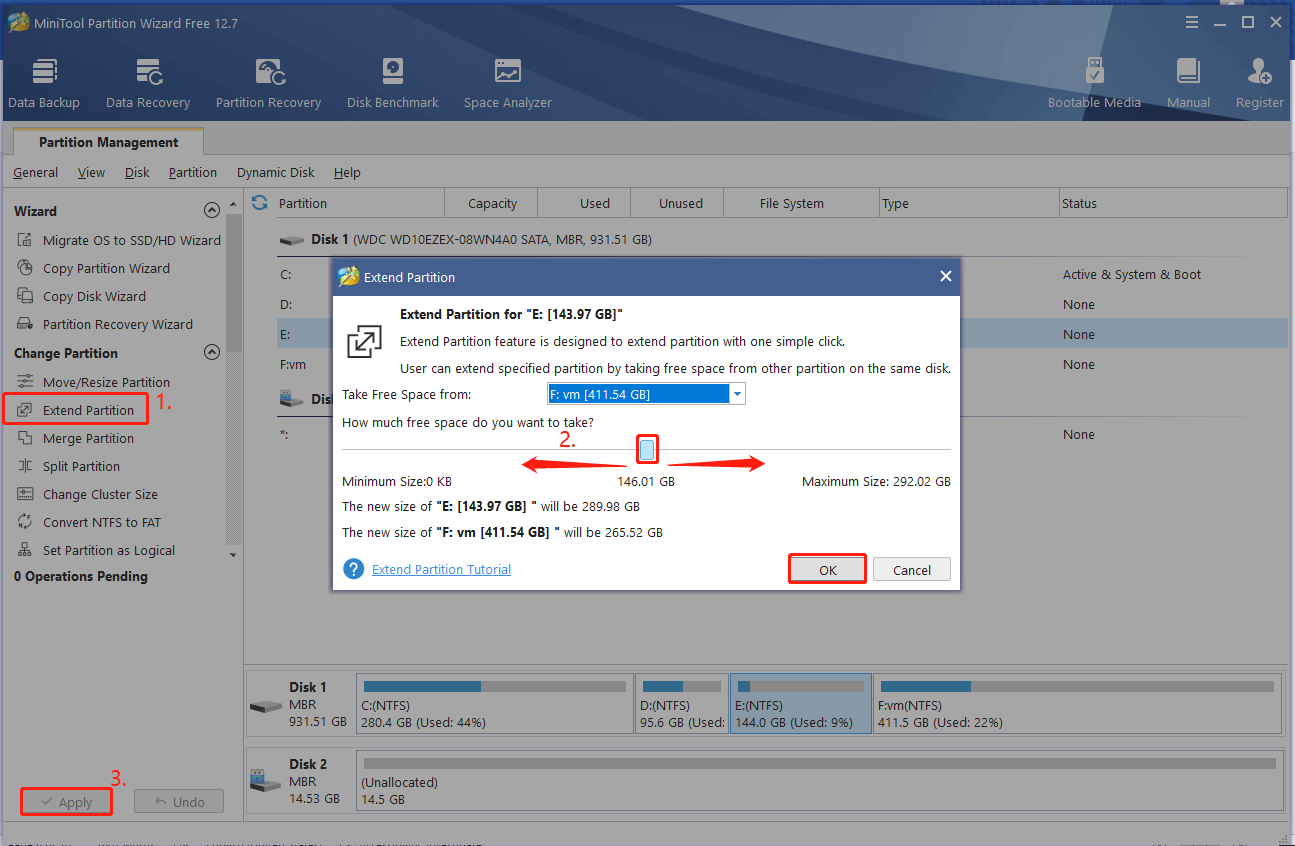
Step 1. Run MiniTool Partition Wizard to enter its main interface, select the game partition from the disk map, and click on Extend Partition from the left pane.
To extend the C drive without boot issues, we highly recommend you use the bootable MiniTool Partition Wizard Edition.
Step 2. Select the drive that you want to take free space from the drop-down menu, and then drag the sliding handle leftwards or rightwards to decide how much space to take. Then click on OK.
Step 3. Click on Apply to execute the process.
Method 2. Upgrade to Larger SSD/HHD Using MiniTool Partition Wizard
Well, if your hard disk comes with a small size capacity and you don’t want to delete any data, then upgrading to a larger HDD/SSD should be a better choice. Here the MiniTool Partition Wizard can help you upgrade the hard disk without reinstalling OS.
MiniTool Partition Wizard DemoClick to Download100%Clean & Safe
Step 1. Install the larger hard disk to your PC carefully if there are multiple disk trays.
If your computer can be installed on only one disk, you just need to migrate OS to the target disk and install it on your computer.
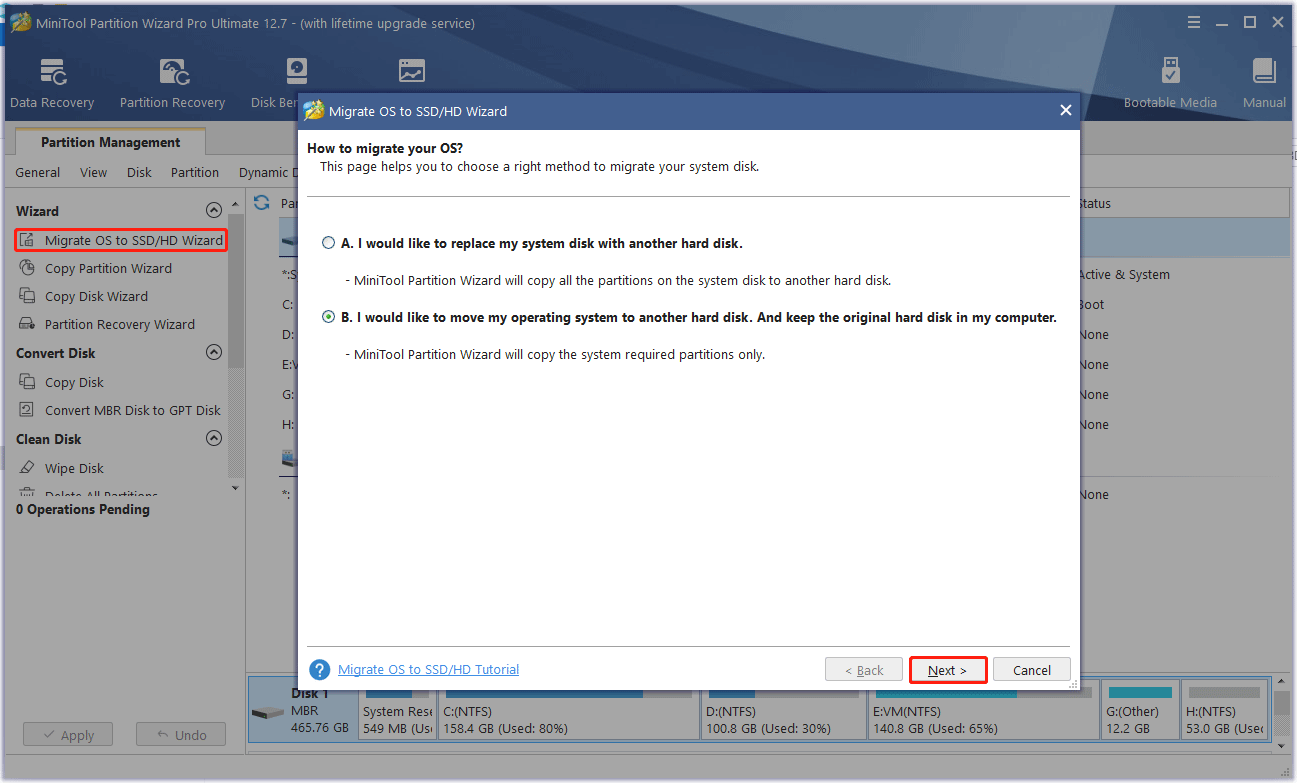
Step 2. In the main interface, select Migrate OS to SSD/HD Wizard from the left pane and select Option B to copy the system-required partitions only, and click on Next to go on. If you want to copy all partitions on the system disk to the new hard drive, you can select Option A.
Step 3. Select the target disk that you want to migrate OS to and click on Next. Then click on Yes to confirm this operation.
Step 4. Select a copy option based on your needs and click on Next.
Step 5. Click on Finish to save the changes and then click Apply to perform the operation.
Now you have enough disk space for your backup folder, and you may not encounter the “could not clean up File History data Element not found” error.
# 3. Use CMD to Clean Up File History Files
You can use CMD to clean up File History files that are older than 30 days. Here are the steps:
Step 1. Type cmd in the Search bar. Then right-click Command Prompt and select Run as administrator.
Step 2. In the Command Prompt window, type FhManagew.exe -cleanup 30 and press Enter.
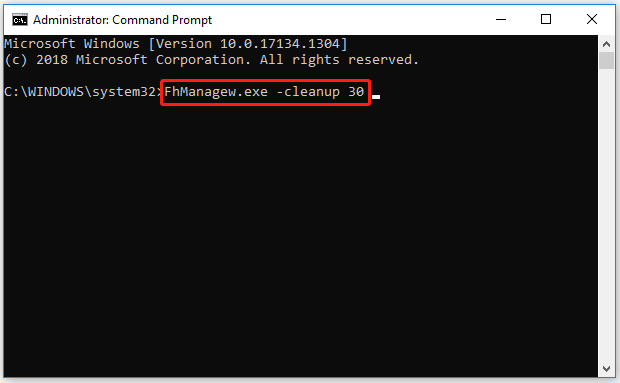
Once done, restart your computer and check if the “could not clean up File History data Element not found” error gets fixed.
# 4. Uninstall Installed Windows Updates
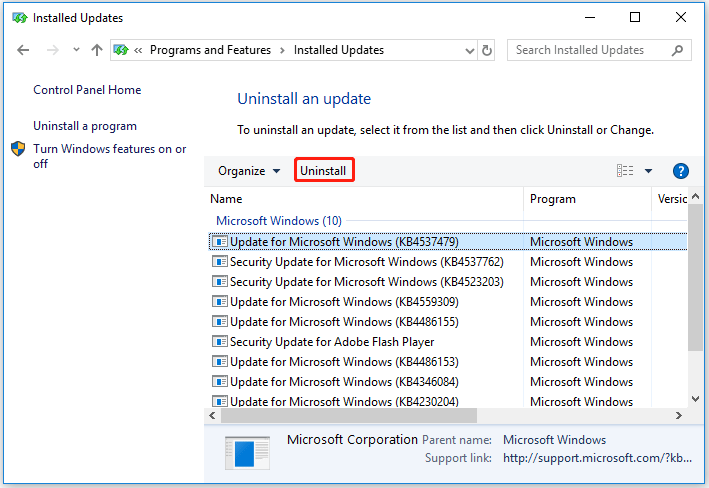
It could be that a bug was introduced after a recent update of the operating system that caused the File History element not found error. An easy fix is to remove the currently installed Windows updates and check if the problem is resolved.
Step 1. Go to Control Panel and click Uninstall a program under Programs.
Step 2. Click View installed updates to uninstall updates.
Step 3. Then find the latest update and click Uninstall to delete it.
# 5. Check the Hard Drive for Errors
Another common reason for the File History element not found error is the hard drive itself. So, it’s important to check if the hard drive gets faulty. There are 2 methods to check the hard drive for errors. For that:
Method 1. Use CHKDSK
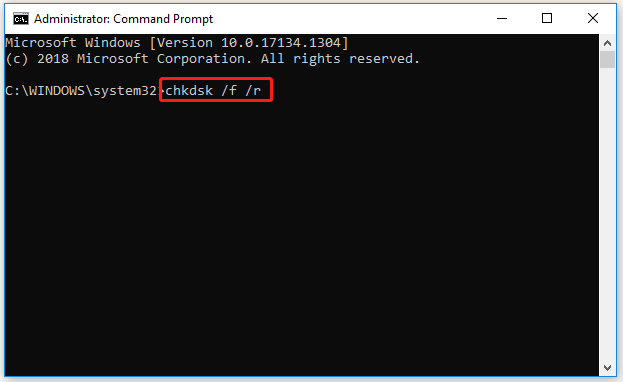
CHKDSK is a command tool that can help you check and repair hard drive errors in Command Prompt. Here you can use it to check bad sectors on the hard disk.
Step 1. Open Command Prompt as administrator.
Step 2. In the elevated window, type the following command and hit Enter. Then type Y to schedule the hard drive check next time restart. This command will check and shield the bad sectors on the hard disk.
chkdsk /f /r
Method 2. Use MiniTool Partition Wizard
Although CHKDSK can be used to check the hard drive, this tool often runs into various issues like CHKDSK write-protected, CHKDSK getting stuck, etc. So, we highly recommend you use a professional tool like MiniTool Partition Wizard. It can help you check disk errors quickly.
MiniTool Partition Wizard is a reliable partition manager that can help you do many works such as converting MBR to GPT, converting FAT to NTFS, formatting hard drives, performing disk benchmarks, migrating OS to SSD/HD, etc.
MiniTool Partition Wizard FreeClick to Download100%Clean & Safe
Step 1. Launch the MiniTool software to get its main interface, and then select the problematic hard drive and click on Surface Test from the left action pane.
Step 2. Click on the Start now button in the pop-up window. After that, this tool will scan the whole disk immediately and show you the test result.
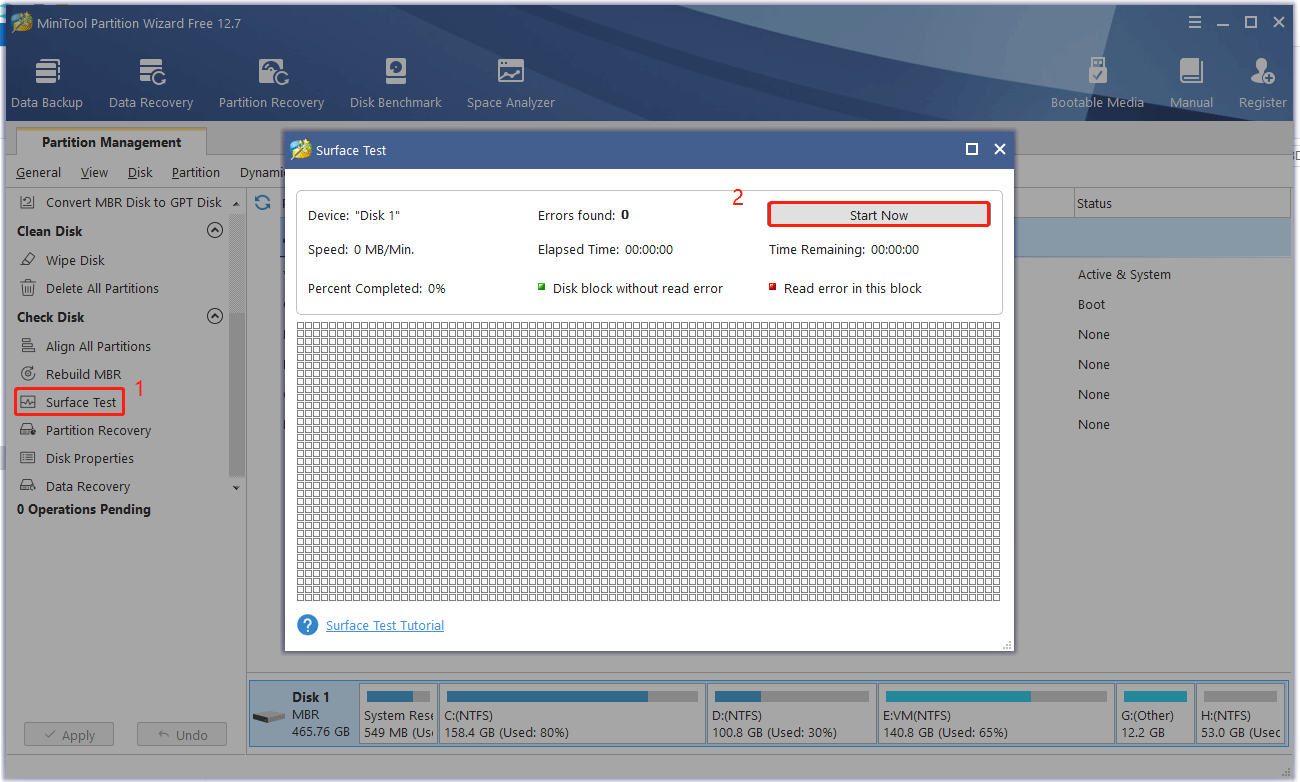
Step 3. If any blocks are marked with red color, it indicates that your hard drive is getting failing. In this case, you may consider replacing the hard drive with a new one.
# 6. Reset File History
Reset File History may help you solve the “could not clean up File History data Element not found” error. The steps are as follows:
Step 1. Go to Control Panel > System and Security > File History.
Step 2. Click the Turn off button if it says File History is on.
Step 3. Go to %UserProfile%AppDataLocalMicrosoftWindowsFileHistory in File Explorer.
Step 4. Delete all files and folders.
Step 5. Go to File History in the Control Panel again and click Turn on.
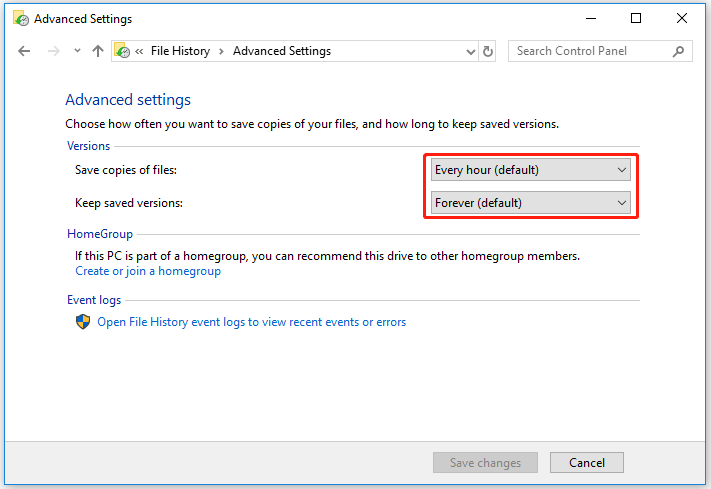
Step 6. Click Advanced settings in the left menu, and set a longer backup frequency and shorter backup retention. Then Click Save changes.
# 7. Scan Your System Files
If the File History element not found error still occurs, it may be your system file is damaged. In this case, the SFC and DISM tools can help you repair corrupted system files. Here’s how:
Step 1. Open Command Prompt as administrator.
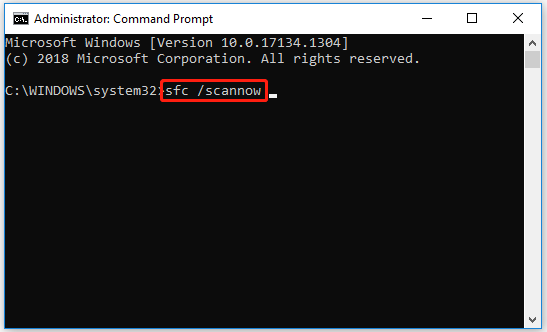
Step 2. In the elevated window, type the sfc /scannow command in the elevated command prompt and hit Enter. After that, the SFC tool will scan and try to repair the corrupted system files automatically.
Step 3. If the SFC tool fails to work, you can try using the DISM tool. Type the following commands in the elevated command prompt and hit Enter after each one.
- exe /Online /Cleanup-image /Scanhealth
- exe /Online /Cleanup-image /Restorehealth
# 8. Cloud Reset Windows
If the above methods don’t work, then the resort you can try is cloud reset Windows. There are so many ways to reset your PC but we recommend Cloud Download to fix the File History element not found error. You can refer to this article to reset PC.
Bottom Line
How to fix the File History element not found error on Windows 10/11? The top 8 solutions have been illustrated in the post. If you have any other opinions about this error, write them down in the comment zone. Of course, you can send us an email at [email protected] if you have questions or suggestions about MiniTool Partition Wizard.

User Comments :