What Does Formatting a Hard Drive Mean?
In the digital age, hard drives are important tools in our lives, storing everything from work documents and photos to games and system files.
Many users may need to format their hard drives in the following cases:
#1. Reinstall the Windows OS
Those people who are not familiar with OS installation may think the OS reinstallation requires formatting the hard drive. Then, they are eager to know how to format a hard drive before the reinstallation.
In this case, the hard drive formatting means deleting all partitions and data on the disk to prepare for the OS installation. Then, you can do that during the OS installation.
#2. Format a Partition
In most cases, when people say they format a hard drive, they actually mean formatting a partition (the D:, E:, F: drives, and so on) on the hard drive. This is especially evident with external hard drives and USB flash drives, which usually have only one partition.
#3. Erase the Drive Data Permanently
Some people may say they need to format a hard drive to erase the data permanently, which is usually needed when selling, donating, or disposing of the hard drive. To do that, a partition full format or a disk wipe is needed.
Preparation Before Formatting a Hard Drive
Before formatting a hard drive, preparation is important because the process will delete all data on the drive.
#1. Backup data
If there are important files on the drive, move or back up them to another storage device.
#2. Determine the file system
When formatting a partition, you need to choose a file system (NTFS, exFAT, or FAT32). NTFS is the default file system for Windows, used on internal hard drives.
However, exFAT and FAT32 file systems are used on external drives and USB drives, which ensures that these devices can be accessed by not only Windows PCs, but also macOS PCs, Linux PCs, and other host devices.
Note that the FAT32 file system has a file size limitation of 4GB and a partition size limitation of 32GB on Windows.
How to Format a Hard Drive?
How to format a hard drive in the above 3 cases? The steps are as follows:
Scenario 1: Format a Hard Drive for Windows OS Reinstallation
To delete all existing partitions during the OS installation, the steps are as follows:
Step 1. Create a Windows installation media.
- Insert your USB flash drive into your computer.
- Download the Windows 10 Media Creation Tool or Windows 11 Installation Assistant.
- Run the tool, accept the license terms, and select “Create installation media (USB flash drive, DVD, or ISO file) for another PC“.
- Select your language, edition, and architecture settings.
- Choose “USB flash drive” when prompted for media type, select your inserted USB drive, and follow the prompts to create the installer.
Step 2. Boot from the bootable USB drive.
- Insert the newly created bootable USB drive into the computer where you want to reinstall Windows.
- Restart the computer. As it starts up, quickly press a specific key (commonly F2, F12, Del, or Esc) to enter the BIOS/UEFI settings or Boot Menu.
- In the BIOS/UEFI screen, change the boot order to make the computer boot from the USB drive. Press F10 to save changes and exit.
- The computer will now boot from the USB and display the Windows Setup screen.
Step 3. Initiate the installation.
- Follow the initial prompts to select your language, time format, and keyboard input. Click Next, then Install now.
- If asked for a product key, select “I don’t have a product key“.
- Accept the license terms and click Next.
- Choose the Custom: Install Windows only (advanced) installation type.
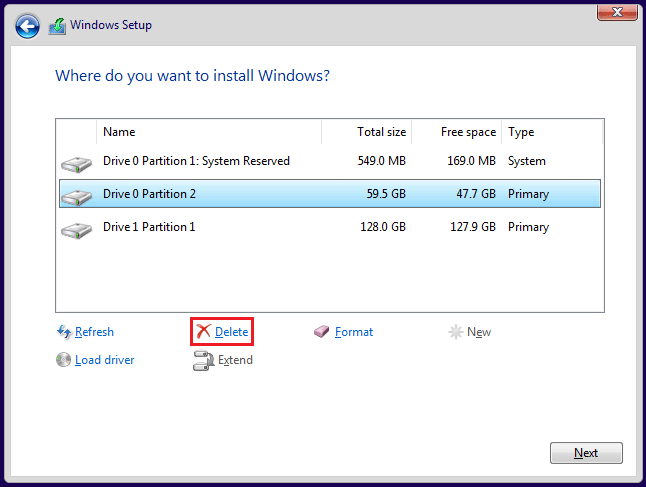
Step 4. Format the C drive.
- In the “Where do you want to install Windows?” window, you will see a list of partitions. Carefully identify the correct target drive by its size. The system drive is typically labeled “Drive 0”.
- Select a partition on Drive 0 and click Delete. Then confirm any warnings.
- Repeat this operation on other partitions of the Drive 0 until the entire drive is a single entry labeled Unallocated Space.
- Select the Unallocated Space and click Next. Windows will automatically create the necessary partitions in the NTFS format and begin the installation process.
Scenario 2: Format a Hard Drive for Normal Use
Formatting a partition will delete all data on the partition and create a new file system. Thus, some people may perform it for the following reasons.
- Delete files quickly.
- Change the file system to improve compatibility with the host devices.
- Troubleshoot issues like inaccessible drives or virus/malware infections.
To format a hard drive on Windows, here are 4 free tools.
- File Explorer
- Disk Management
- DiskPart
- MiniTool Partition Wizard
The first three are built-in Windows tools. However, they are unable to format drives larger than 32GB to FAT32. Fortunately, MiniTool Partition Wizard can break this limitation.
Moreover, this software offers other file system selections, can change the file system between FAT32 and NTFS without data loss, and features a simple user interface and powerful disk/partition management functions.
#1. File Explorer
File Explorer is the quickest way to format a non-system drive. Here are the steps:
- Open File Explorer by pressing the Win + E key.
- In the left pane, click This PC to view all drives of the PC.
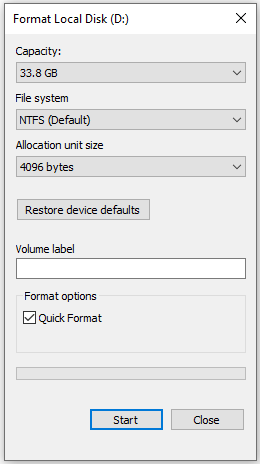
- Right-click the drive you want to format, and select Format from the menu.
- In the Format window, change the file system, allocation unit size, and volume label, or keep the options for them.
- Click Start to begin the format.
- Click OK to confirm the operation.
If you get an error like “The drive is in use,” close all programs accessing the drive and try again.
#2. Disk Management
Disk Management is a built-in Windows tool that offers more control over drives, including partitioning and formatting.
To format a hard drive using Disk Management, the steps are as follows:
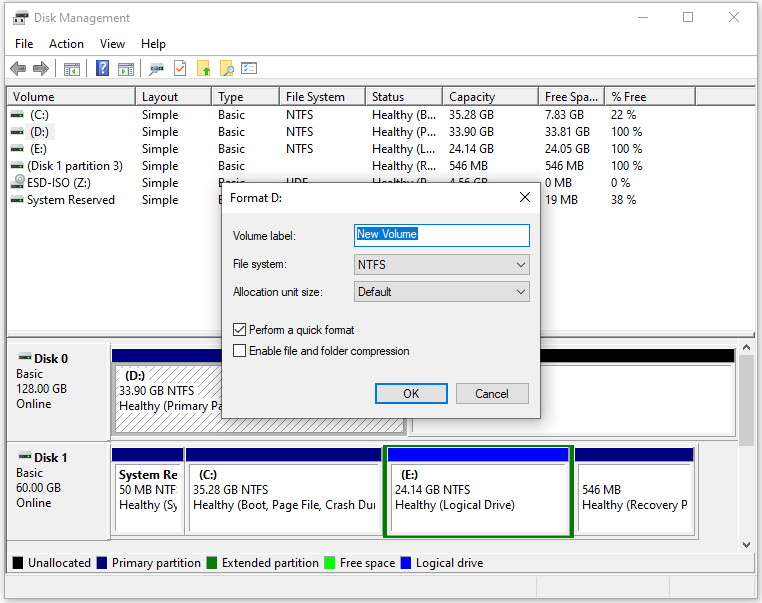
Step 1. Open Disk Management by typing disk management in the Windows Search bar and clicking Create and format hard disk partitions.
Step 2. Format the drive.
- Locate the drive you want to format.
- Right-click it and select Format.
- In the Format window, configure the settings like File system, Allocated unit size, and Volume label.
- Click OK to confirm the operation.
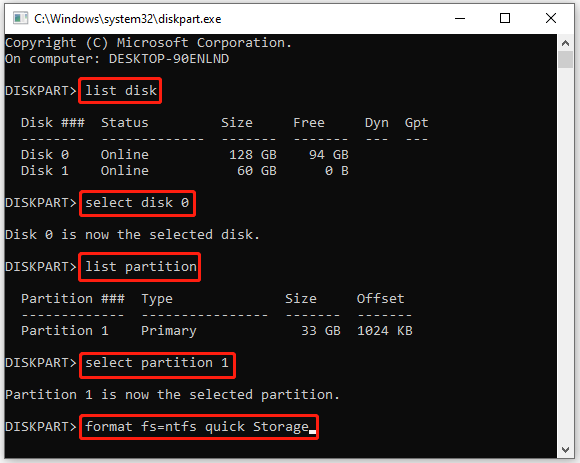
#3. DiskPart
The DiskPart command line utility offers advanced control and is used to manage partitions of hard drives. It can help you format the hard drive. Here’s a step-by-step breakdown:
Step 1. Open the DiskPart utility.
- Press the Win + R key, type diskpart, and press Enter.
- Click Yes to confirm in the User Account Control window.
Step 2: Type the following commands in order and press Enter after each one.
- list disk (This command will list all disks detected by the PC)
- select disk * (* represents the disk number)
- list partition (This command will list all partitions on the selected disk)
- select partition * (* represents the partition number of the drive)
- format fs=ntfs quick (This command will quickly format the drive to NTFS. Replace NTFS with FAT32 or exFAT if necessary. Omit “Quick” if you want to perform a full format.)
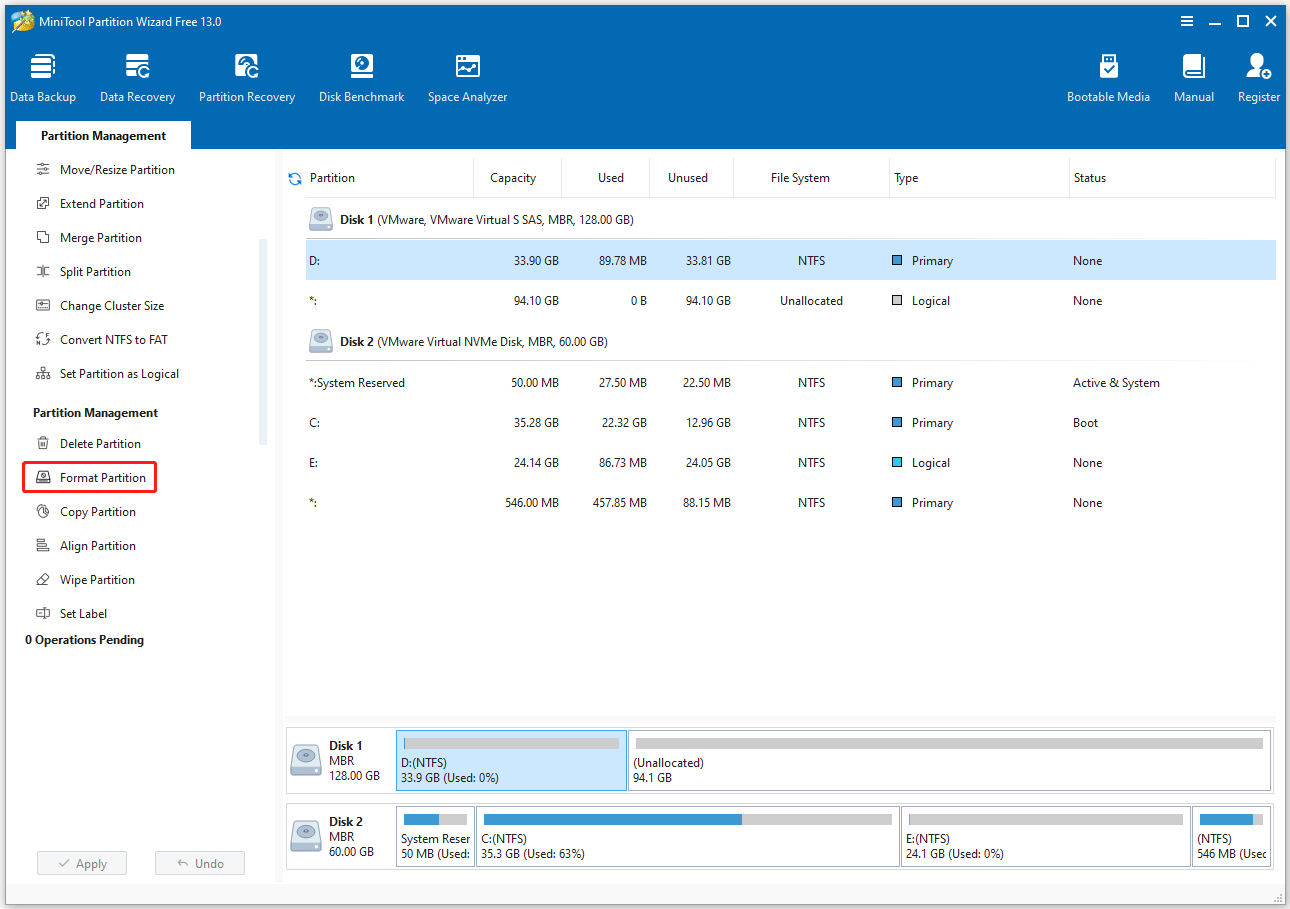
#4. MiniTool Partition Wizard
MiniTool Partition Wizard is third-party free partition manager, which can help you format a hard drive like HDDs, SSDs, SD cards, and USB flash drives on Windows.
For 64GB, 128GB, 256GB, 500GB, or other massive USB drives and SD cards, this software is an excellent FAT32 formatter.
MiniTool Partition Wizard FreeClick to Download100%Clean & Safe
Here is how to format the hard drive using MiniTool Partition Wizard.
Step 1. Choose the partition on the drive.
- Open MiniTool Partition Wizard after installation.
- Choose the partition that you want to format.
- Select the Format Partition feature from the left action panel.
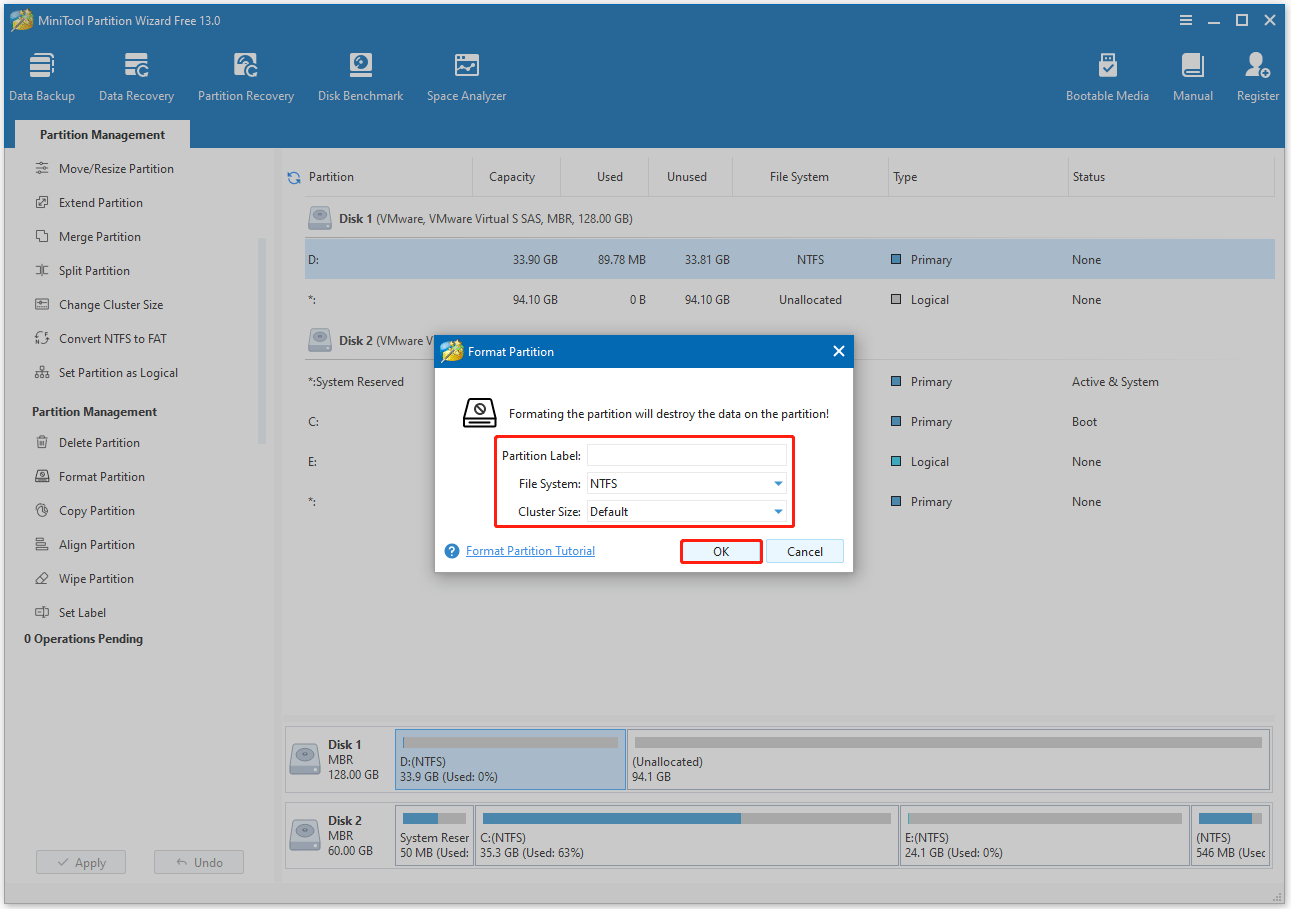
Step 2. Configure the formatting settings (file system, volume label, and cluster size) and then click OK.
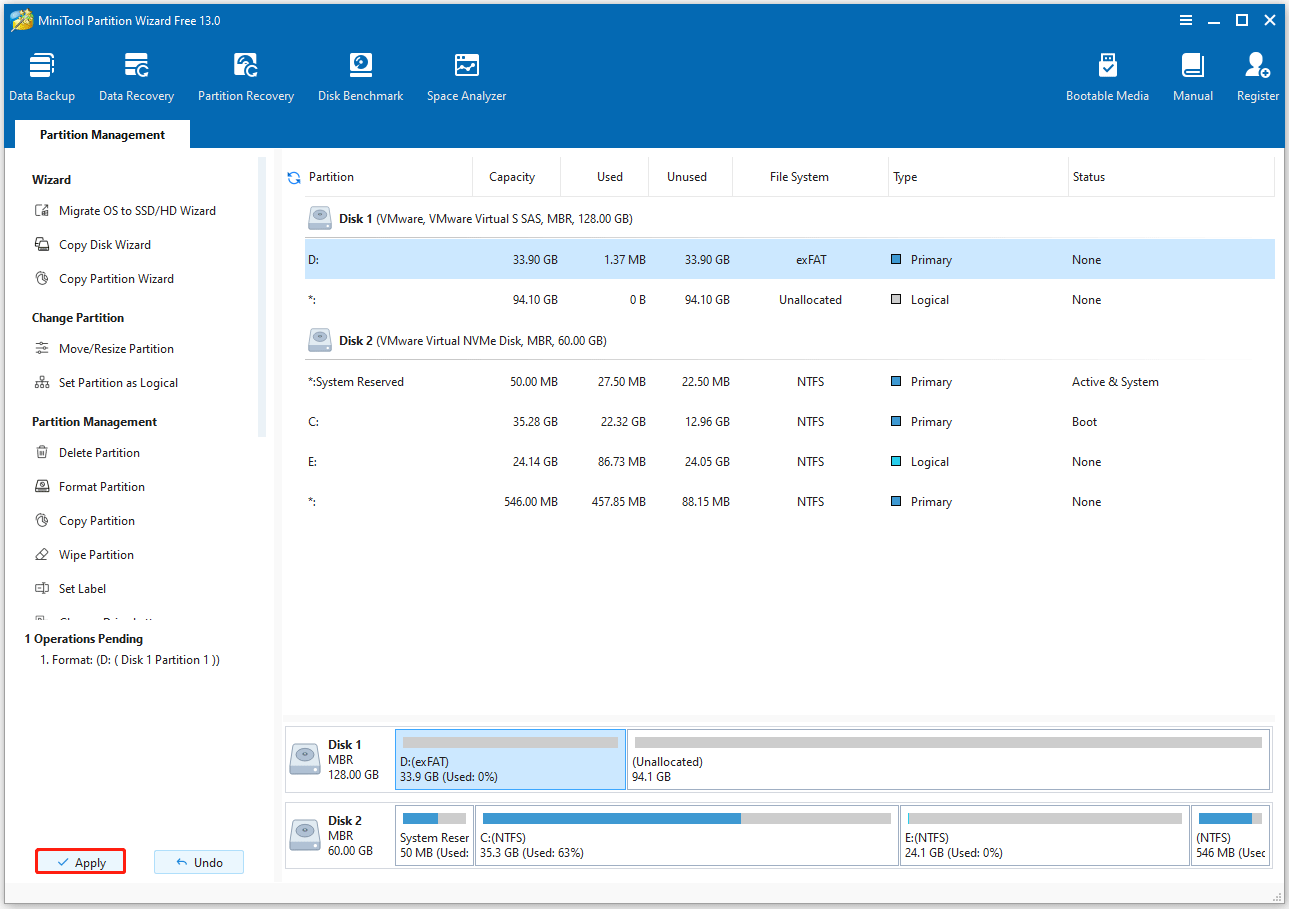
Step 3. Click Apply to start the formatting process, and then click Yes to confirm this operation.
Scenario 3: Format a Hard Drive for Data Erase
If you intend to sell or donate the hard drive, data erasure is needed.
For a traditional HDD, using the traditional wiping method can prevent the leakage of private or confidential information.
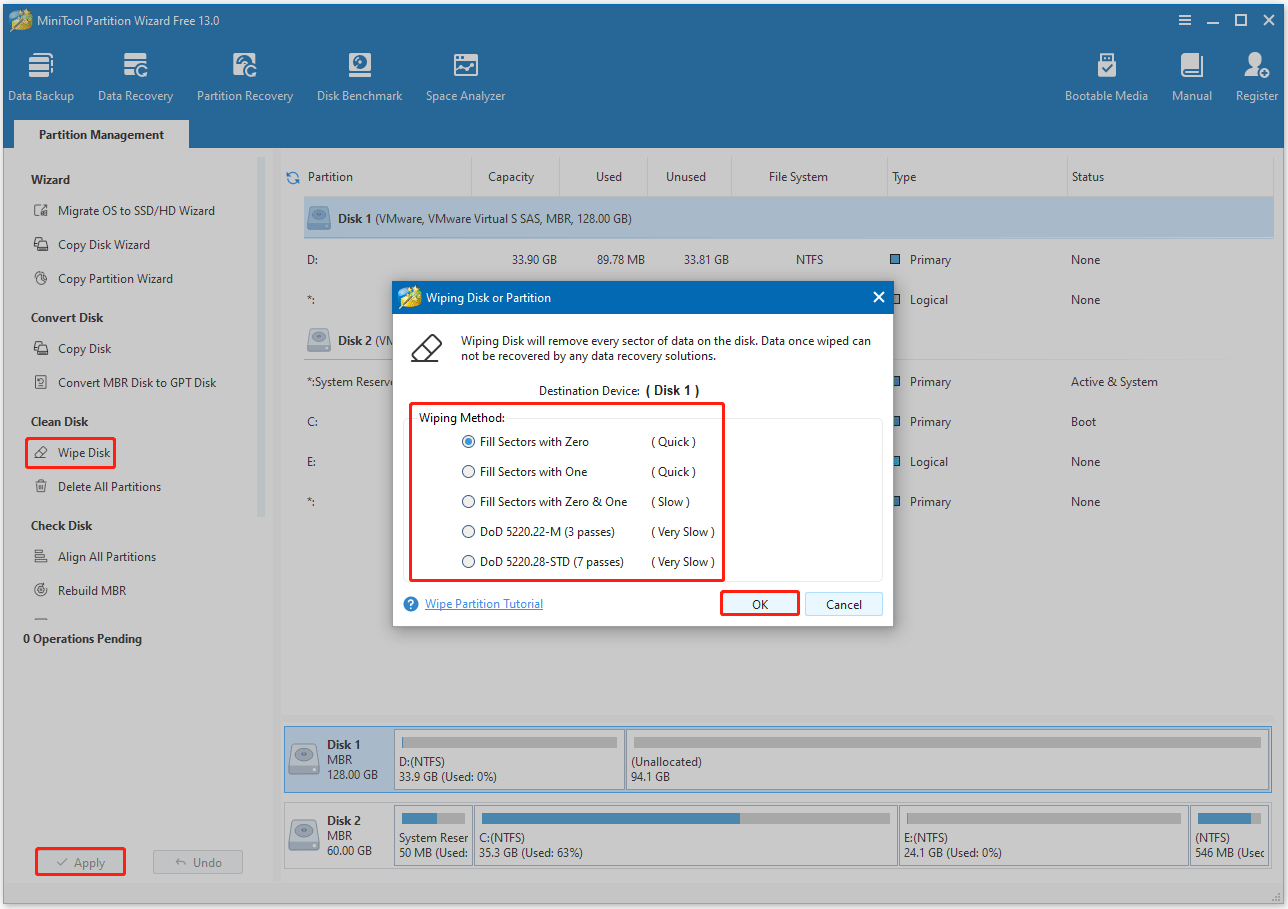
The MiniTool Partition Wizard’s Wipe Disk function can permanently erase all data on a traditional HDD, making it unrecoverable to any data recovery software.
Now, follow the steps below to wipe your hard drive with a few clicks.
- In its main interface, select the drive that needs to be wiped and choose Wipe Disk from the left action panel.
- Choose one of the five wiping methods listed on the pop-up window and click OK.
- Then you can preview that the drive will become unallocated, and then click Apply to execute the operation.
Traditional wiping methods will greatly consume SSD’s lifespan. The best method to securely erase an SSD is to utilize its built-in firmware commands, which will erase all data permanently and reset the drive to factory settings.
Here are two options:
- Use the manufacturer’s Secure Erase tool: Most major SSD manufacturers (Samsung, Crucial, WD, Intel, etc.) provide free software tools (e.g., Samsung Magician, Crucial Storage Executive) that offer a “Secure Erase” or “Sanitize” feature.
- Use the BIOS/UEFI Secure Erase feature: Many modern motherboards have a built-in “Secure Erase” option in the BIOS or UEFI settings.
Format Hard Drive FAQ
Bottom Line
By following the steps in this guide, you can safely format your hard drive to meet your needs, whether you are reinstalling Windows, preparing the hard drive for future use, or permanently erasing sensitive data.
Always back up your data and carefully check your hard drive selection before proceeding to avoid losing important data.
If you have any questions or suggestions on how to use MiniTool Partition Wizard, do not hesitate to contact us via [email protected].
About The Author

Position: Columnist
Vega enjoys helping people with computer problems, including disk management, data recovery, data backup, and more. She is constantly expanding her knowledge in related fields. And she will continue to bring more easy-to-understand professional articles to help people solve various problems on the PC.
User Comments :