Blue Screen of Death (BSOD) is a common system crash error that often causes a sudden shutdown or restart. When the blue screen problem occurs, you may receive the SESSION1 INITIALIZATION FAILED, MUP_FILE_SYSTEM, and the one discussed BSOD error in this post.
To fix the ntkrnlpa.exe BSOD Windows, you need to check common causes of BSOD such as RAM issues or faulty drivers. Besides, some other factors like a faulty hard drive or corrupted system files are also responsible for the ntkrnlpa.exe BSOD error.
Way 1. Use Driver Verifier
Faulty drivers can cause the Windows system to randomly crash and generate various errors, like the ntkrnlpa.exe BSOD error. So, you’d better use Driver Verifier to find faulty drivers and fix them.
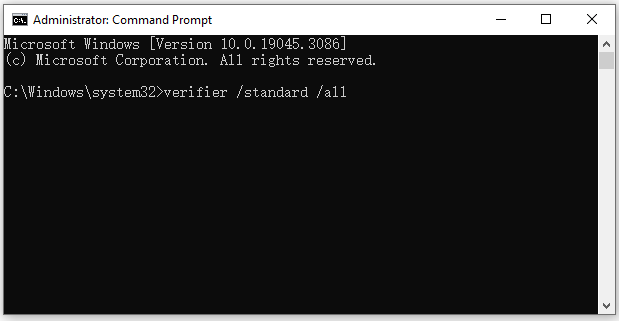
Step 1: Type cmd in the Search box, right-click on Command Prompt to choose Run as administrator.
Step 2: In the Command Prompt window, type verifier /standard /all.
Step 3: Reboot your system and keep it running until it got crashes.
Step 4: Make a listing of faulty drivers, then download and install the latest version of these all.
Step 5: Just after installing new drivers, boot your computer into Safe Mode. Turned off your computer, press the Power button on and immediately tap the F8 key. You will receive Advanced Boot Options.
Step 6: Navigate to Safe Mode in Advanced Boot Options, and press Enter. This will boot your computer into the Elevated Command Prompt.
Step 7: Disable the Driver Verifier, by typing verifier /reset in Command Prompt.
Step 8: Type Exit in Command Prompt, and then reinstate your device, and you will not get Blue Screen Error on your computer.

Way 2. Run an SFC and DISM Scan
Sometimes, the corrupted system files may cause the ntkrnlpa.exe BSOD error. So, you can try repairing the system file via System File Checker or DISM. Here’s how:
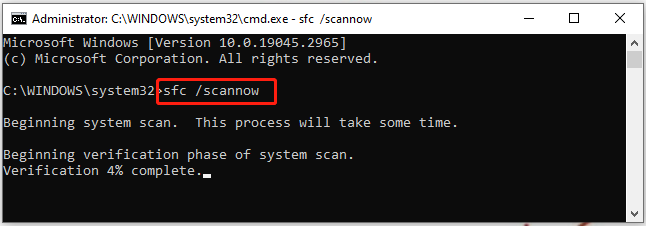
Step 1: Open Command Prompt as administrator again.
Step 2: Type the sfc /scannow command in the elevated command prompt and hit Enter. Then wait for the SFC scan to complete.
Step 3: If no corrupted system files were found, you can try running the commands below to go on the repair. After that, reboot your computer and see if the ntkrnlpa.exe BSOD error is gone.
- DISM.exe /Online /Cleanup-image /Scanhealth
- DISM.exe /Online /Cleanup-image /Restorehealth
Way 3. Check Hard Disk for Errors
The ntkrnlpa.exe BSOD error may be caused by bad sectors on your hard drive. Although CHKDSK can be used to check hard drives for errors, sometimes it may not run properly due to various errors like CHKDSK Write Protected, CHKDSK gets stuck, etc. In this case, you can run a surface test via a powerful disk manager – MiniTool Partition Wizard to check bad sectors easily and quickly.
MiniTool Partition Wizard FreeClick to Download100%Clean & Safe
Step 1: Download and install this software on your PC. Then launch it to get its main interface, and then select the target drive and click on Surface Test from the left pane.
Step 2:Click on the Start Now button in the pop-up window. After that, this tool will scan the whole drive immediately and show you the test result.
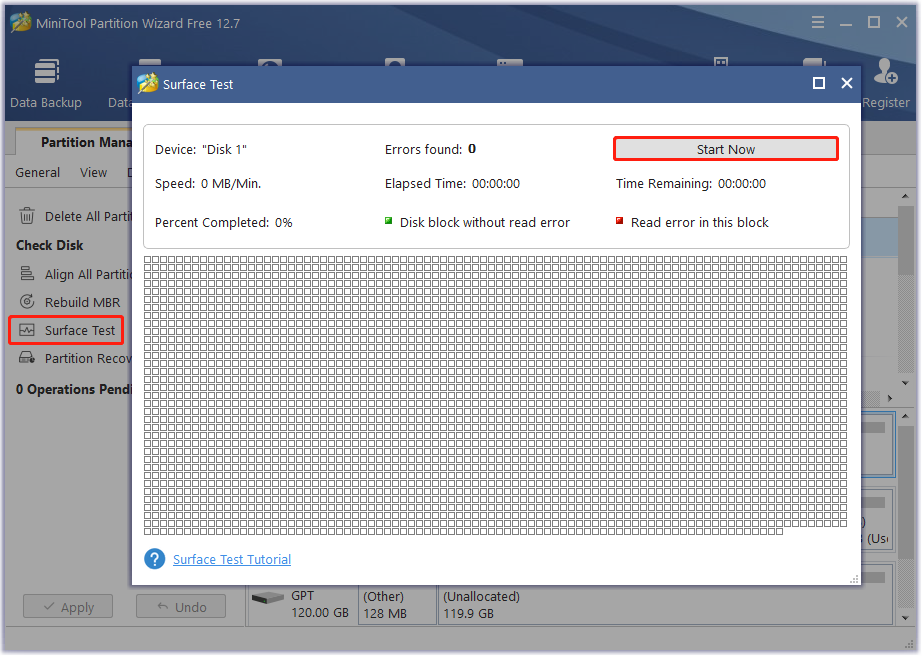
Step 3: When the hard drive error test process is completed, the bad sectors on the hard drive will be marked with red color. In this case, you can either use this bad sector repair guide or consider replacing it with a new one.
![The IO Operation Failed Due to a Hardware Error? [Solved]](https://images.minitool.com/partitionwizard.com/images/uploads/2023/07/io-operation-at-logical-block-address-failed-hardware-error-thumbnail.png)
Way 4. Run a Malware and Virus Scan
Perform a malware, virus scan while keeping the computer in safe mode. This is the best time to run these applications, as any viruses that try to disable them will usually disable themselves in this mode.

Way 5. Run System Restore
System Restore may be a useful tool to repair Session5_Initialization_Failed BSOD. The method is as follows:
Step 1: Press Windows + R key to open Run and type rstrui. Then press Enter.
Step 2: When the System Restore window opens, click on the Next option to generate a restore of the device.
Step 3: Select the latest and click Next to continue. Finally, click Finish to let start this process.

About The Author

Position: Columnist
Vega enjoys helping people with computer problems, including disk management, data recovery, data backup, and more. She is constantly expanding her knowledge in related fields. And she will continue to bring more easy-to-understand professional articles to help people solve various problems on the PC.
User Comments :