Here is a true example from the Microsoft forum.
Hello everyone, currently getting a Session1_Initialization_Failed blue screen when booting my PC. When the computer restarts, it goes directly into Automatic Repair which fails. Let me know if you need any more information, thanks for any help that can be provided!https://answers.microsoft.com/en-us/windows/forum/all/session-1-initialization-failed/
What is the SESSION1 INITIALIZATION FAILED error? How to fix this error? Keep reading to know the answers.
What Is SESSION1 INITIALIZATION FAILED Error
What is the SESSION1 INITIALIZATION FAILED error? Actually, it is a BSOD error message. That’s accompanied by the value of 0x0000006D. It indicates that the initialization of the Microsoft Windows operating system failed.
Generally speaking, Windows SESSION1 INITIALIZATION FAILED is caused by incompatible drivers, system incompatibility, memory conflicts, corrupted system files, bad sectors on the hard drive, etc. As for how to fix the error, the common methods are shown below.
Because the computer cannot boot successfully, in this case, you should boot the computer into Safe Mode and then perform these actions. For how to start a PC with a blue screen in safe mode, the steps are:
- Press Win + X and then click Shut down or sign out. Then press Shift and click Restart to enter Windows Recovery Environment (WinRE).
- When you are in WinRE, navigate to Troubleshoot > Advanced options > Startup Settings > Restart.
- After the computer restarts, there is a list of options. Press the F5 key to choose the Enable Safe Mode with Networking
How to Fix the SESSION1 INITIALIZATION FAILED Error
Now try the following solutions one by one to get rid of the Windows 10 SESSION1 INITIALIZATION FAILED error.
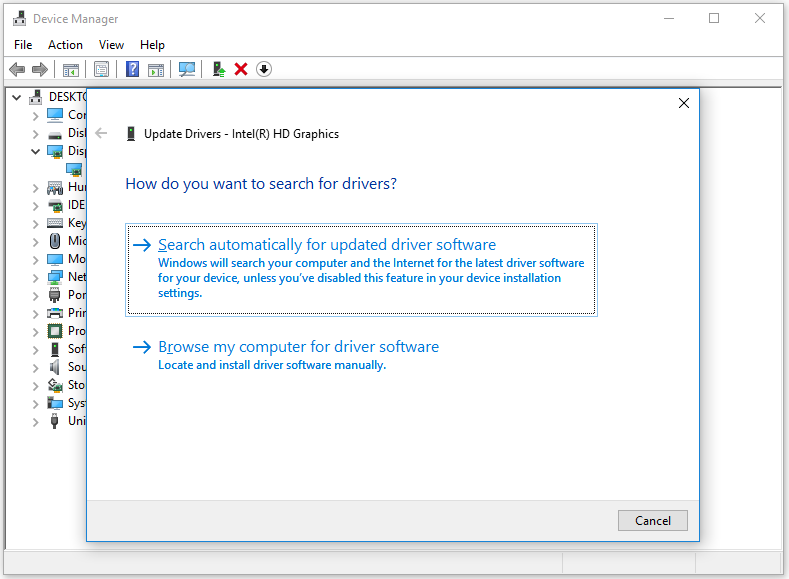
Way 1: Update Outdated Drivers
Drivers are an essential part of every operating system. If you encounter the SESSION1 INITIALIZATION FAILED error, it is possible that the driver is not compatible with your Windows operating system. So, you should try to update them.
Step 1: Press the Win + S key and type Device Manager in the Search box. Then press Enter.
Step 2: Expand the directory and right-click a driver to select Update Driver.
Step 3: In a pop-up window, select Search automatically for updated driver software. Then your Windows will check, download and install the latest and appropriate driver.
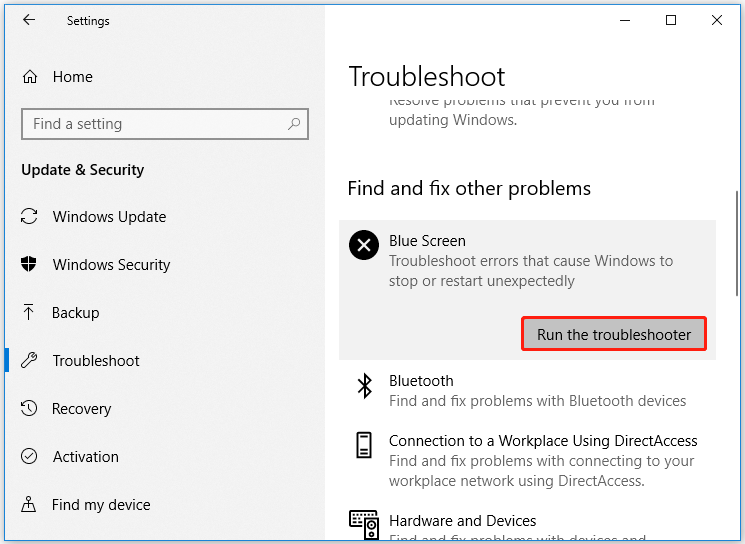
Way 2: Run the Blue Screen Troubleshooter
If the SESSION1 INITIALIZATION FAILED error still appears, it’s time to run the Blue Screen Troubleshooter. It is a Windows tool designed to assist a user in fixing blue screen errors.
For how to run the Blue Screen Troubleshooter, you need to go to the path: Settings > Update & Security > Troubleshoot > Blue Screen > Run the troubleshooter.
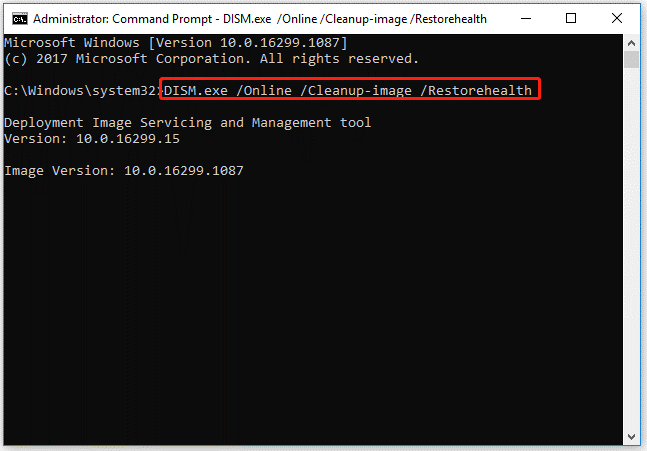
Way 3: Run DISM and SFC Tools
Windows 10 SESSION1 INITIALIZATION FAILED error may be caused by corrupted system files. You can repair them by running DISM and SFC tools. These two tools should be used in Windows PowerShell or Command Prompt. So, launch PowerShell or Command Prompt first. Here shows how to use DISM and SFC in Command Prompt.
Step 1: Type cmd in the Windows search bar. Then right-click on Command Prompt and select Run as administrator.
Step 2: In the Command Prompt window, type DISM.exe /Online /Cleanup-image /Restorehealth and press Enter.
Step 3: When the DISM tool completes its task, type sfc /scannow and press Enter.
Step 4: Wait patiently until the process is 100% complete.
Way 4: Check Hard Disk Errors
The blue screen with SESSION1 INITIALIZATION FAILED may be caused by file system errors or bad sectors on your hard disk. So, it’s important to check if the hard drive gets faulty. There are 2 methods to check the hard disk for errors. For that:
Method 1: Use CHKDSK
CHKDSK is a disk error checking and repair utility built into Windows. It scans hard drive partitions for internal errors and repairs them at the same time. To use CHKDSK to repair a corrupted hard drive partition, follow these steps:
Step 1: Type cmd in the Search box. Then right-click on Command Prompt and select the Run as administrator option to open Command Prompt as administrator. Then click Yes to get Admin access.
Step 2: In the Command Prompt window, type the chkdsk G: /f command and press Enter.
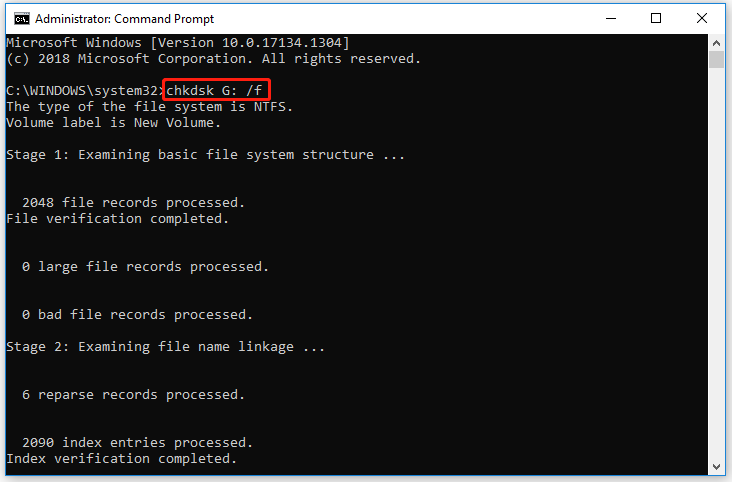
“G” represents the hard drive partition letter.
Method 2: Use MiniTool Partition Wizard
Although CHKDSK can be used to check the hard drive for errors, this tool often runs into various issues like CHKDSK being write-protected, CHKDSK getting stuck, etc. So, it’s highly recommended you use a powerful disk manager – MiniTool Partition Wizard. It can help you check bad sectors but also repair file system errors easily and quickly.
MiniTool Partition Wizard FreeClick to Download100%Clean & Safe
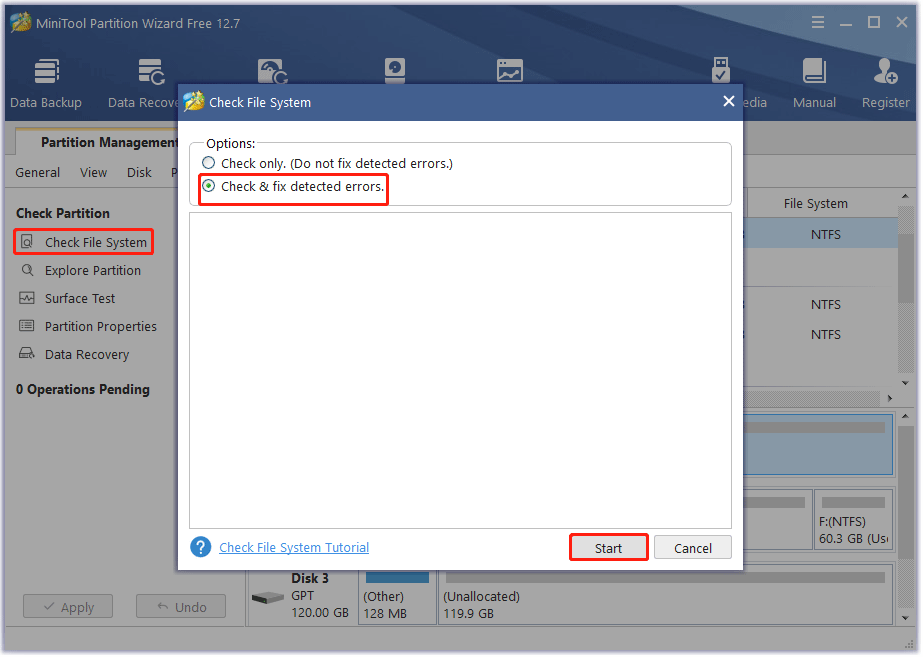
Step 1: Launch the MiniTool software to get its main interface, and then select the target drive and click on Check File System from the left action panel.
Step 2: Select Check & fix detected errors and click on the Start button. This tool will check and repair file system errors immediately.
Step 3: In the main interface, select the drive again and click on Surface Test from the left pane.
Step 4: Click on the Start Now button in the pop-up window. After that, this tool will scan the whole external drive immediately and show you the test result.
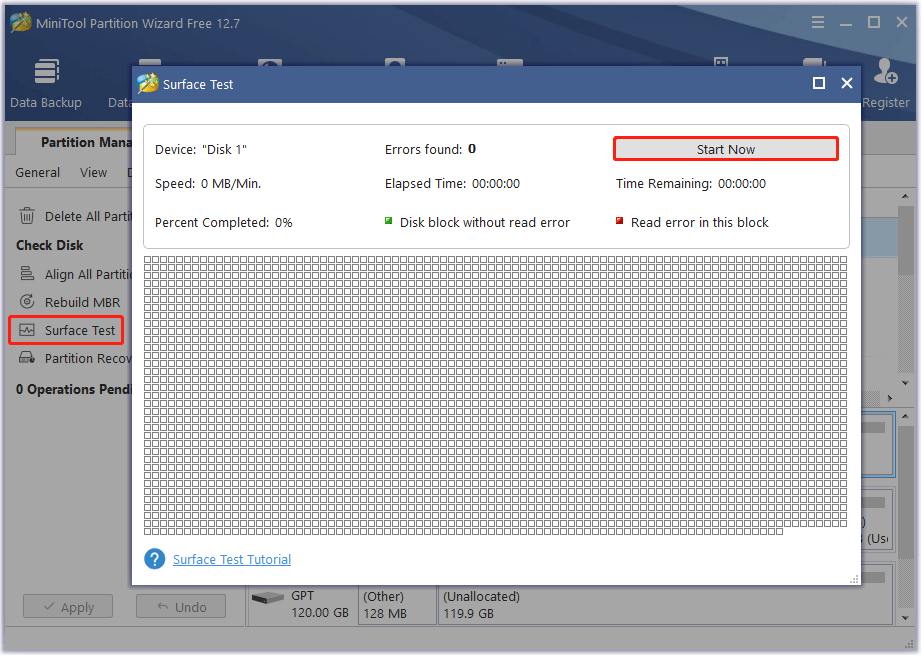
Step 5: When the hard drive error test process is completed, the bad sectors on the hard drive will be marked with red color. In this case, you can either use this bad sector repair guide or consider replacing it with a new one.
Way 5: Use the Mode of Compatibility with an Old Version of Windows
Windows 10 SESSION1 INITIALIZATION FAILED error may be caused by outdated software. If this error occurs after launching a program, then using Windows compatibility mode can help you get rid of the problem. To do that, follow the steps below:
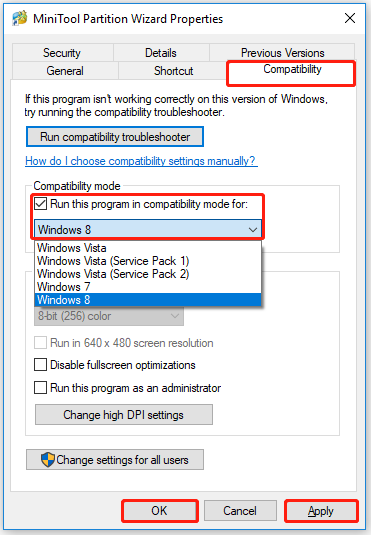
Step 1: Right-click on the program on the desktop, and then select Properties.
Step 2: Go to the Compatibility tab, check the Run this program in compatibility mode for box and then select Windows 8 or older Windows version from the drop-down menu.
Step 3: Click on the Apply and OK buttons to execute the changes.
Way 6: Disable the Unnecessary Programs at the Startup
Software that causes SESSION1 INITIALIZATION FAILED 0x0000006D may be written to the Windows startup list, so the error occurs immediately after system startup without any user activity. You can remove programs from startup using Task Manager.
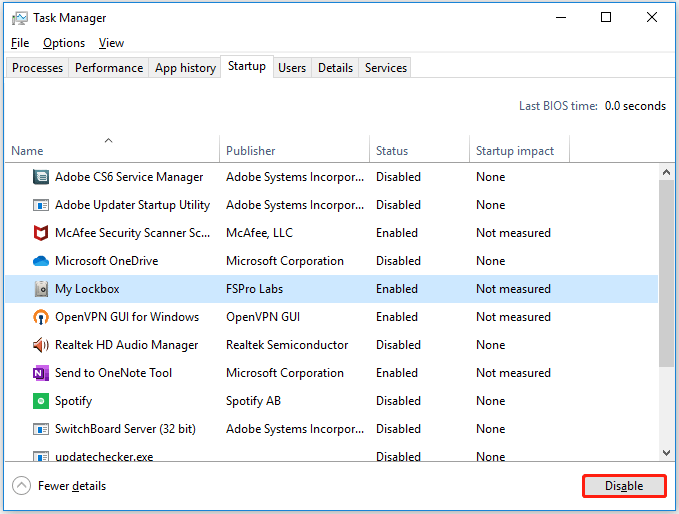
Step 1: Right-click on Task Bar and then select Task Manager.
Step 2: Switch to the Startup tab.
Step 3: Select the unnecessary program and then click on the Disable button in the right lower corner of the window.
Way 7: Run Windows Memory Diagnostic
Go on to check if the Memory is the cause of the SESSION1 INITIALIZATION FAILED 0x0000006D error. Here is how to do that:
Step 1: Type memory into the Windows search bar.
Step 2: Click on Windows Memory Diagnostic under Best match.
Step 3: Once the memory test tool opens, click on the Restart now and check for problems (recommended) option.
Step 4: Wait until the computer finish memory diagnosis. This process will usually take a few minutes.
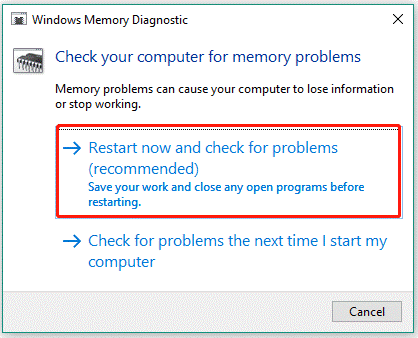
Step 5: Finally, check the result in Event Viewer.
- Right-click the Windows icon on the taskbar and then choose the Event Viewer
- When Event Viewer opens, expand the Windows Logs entry on the left pane.
- Select the System option in the list and then click the Find option in the right pane.
- Type MemoryDiagnostics-Results in the search box on the pop-up window, and click the Find Next
- Close the Find dialog box.
- On Event Viewer, double-click the MemoryDiagnostics-Results source and view the test result.
If it reads “Windows Memory Diagnostic tested the computer’s memory and detected no errors”, it means the memory is innocent, and you can try the next solution.
If it shows one or more errors, you can run the memory test again and recheck the result. If it still shows at least one error, you RAM modules might have problems, and it may need to be replaced.
Way 8: Reinstall OS
If the above methods can’t solve the Windows 10 SESSION1 INITIALIZATION FAILED error, you can try to clean reinstallation of the OS to solve it. Some users report that they have solved the SESSION1 INITIALIZATION FAILED error through this method.
If you perform a clean reinstallation of the OS, you should use MiniTool Partition Wizard to back up or recover data in advance. Follow the tutorial to complete the reinstallation.
Recover Data from the SESSION1 INITIALIZATION FAILED Error
When the SESSION1 INITIALIZATION FAILED error happens and you can’t boot your computer into Windows, you can use MiniTool Partition Wizard to recover your data. Surely, if your computer can boot into Windows but you find your data is lost, you can also try it to recover data.
MiniTool Partition Wizard DemoClick to Download100%Clean & Safe
Here is a tutorial on how to recover data when the computer can’t boot.
Step 1: Plug the prepared USB into the working computer or insert the prepared CD/DVD into its CD/DVD burner.
Step 2: Download the software and then launch it to access its main interface. Click Bootable Media in the upper right corner and follow the on-screen instructions to create a bootable USB, CD, or DVD.
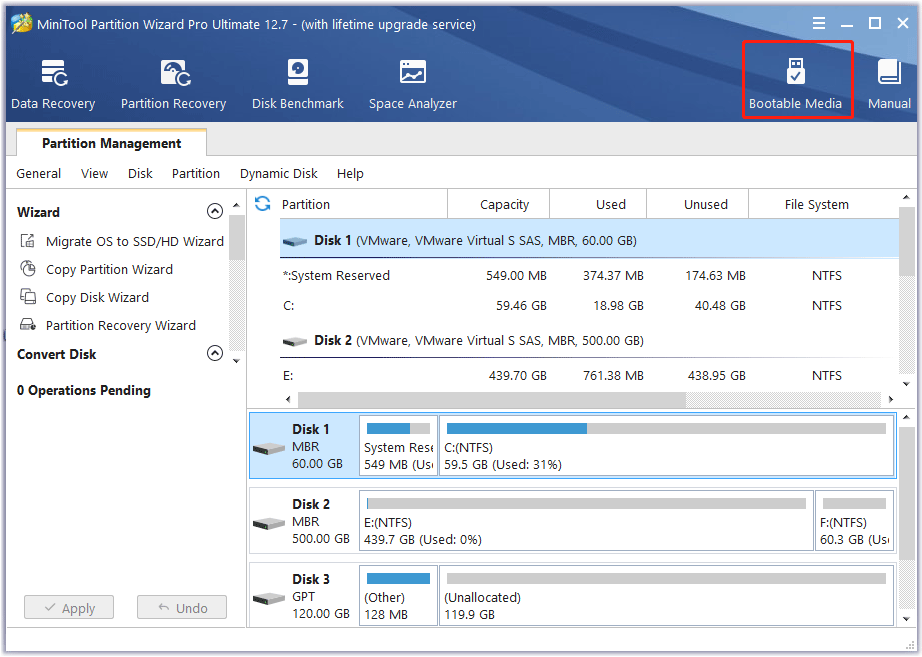
Step 3: Plug the bootable USB into the original computer which the operating system cannot boot or put the bootable CD or DVD into it.
Step 4: Restart the computer and press F2 or another key to enter BIOS menu. Change boot settings to make your computer boot from the USB or CD/DVD flash drive.
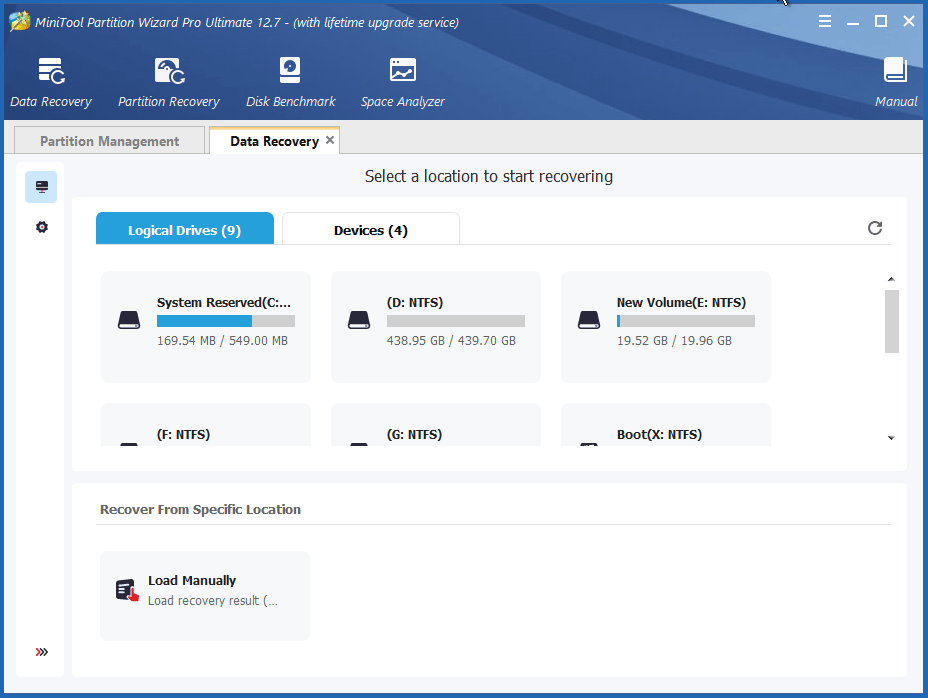
Step 5: In the main interface of MiniTool Partition Wizard, click on Data Recovery from the top toolbar.
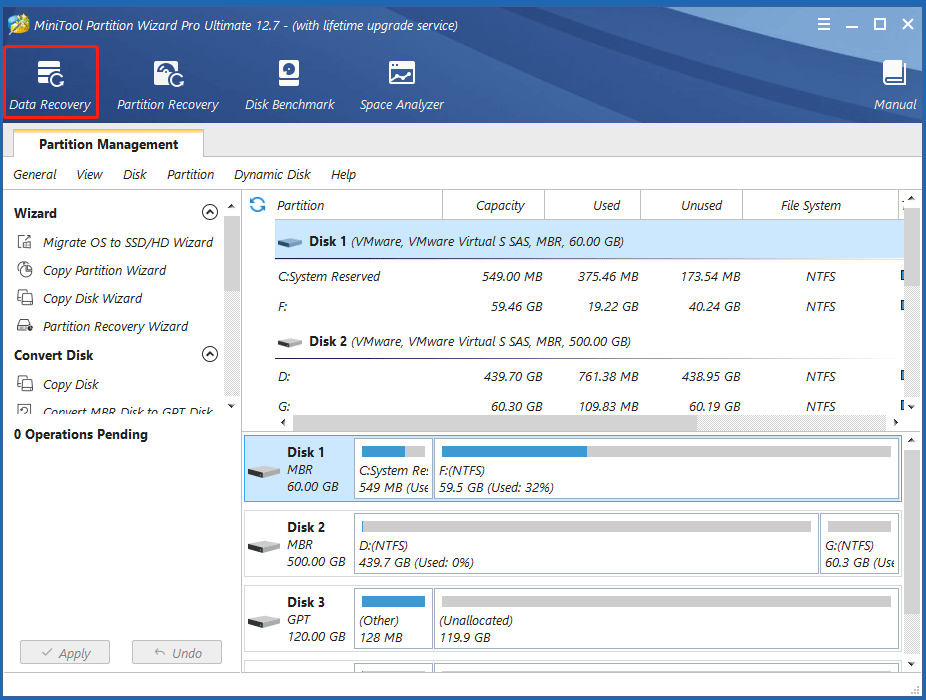
Step 6: Click on the Scan button under the partition you need to recover the data.
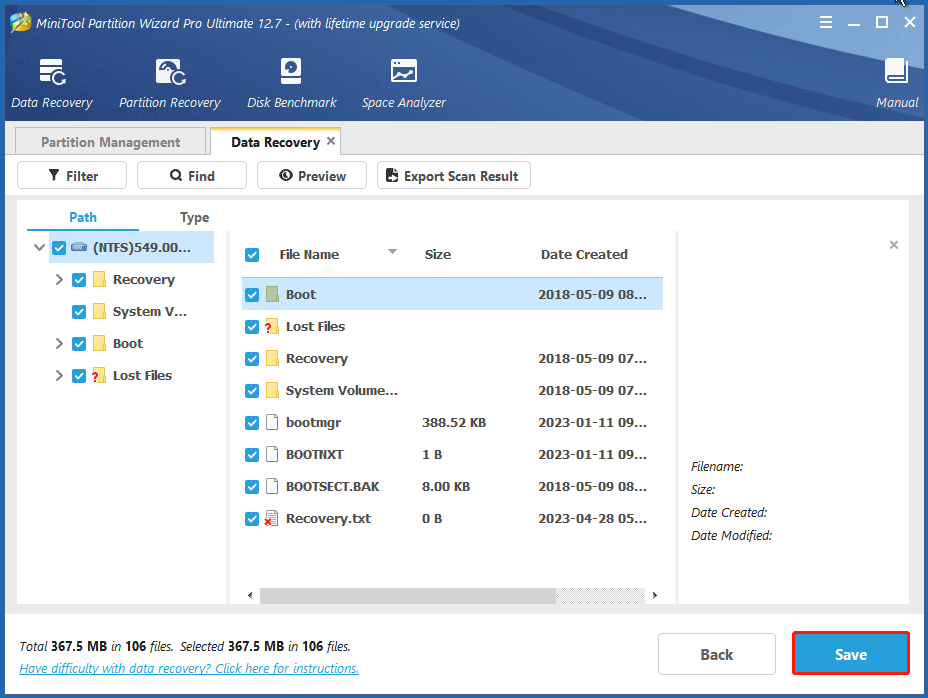
Step 7: Then wait for the scan to complete. Once the scan is complete, check all items that you need to recover and click on Save.
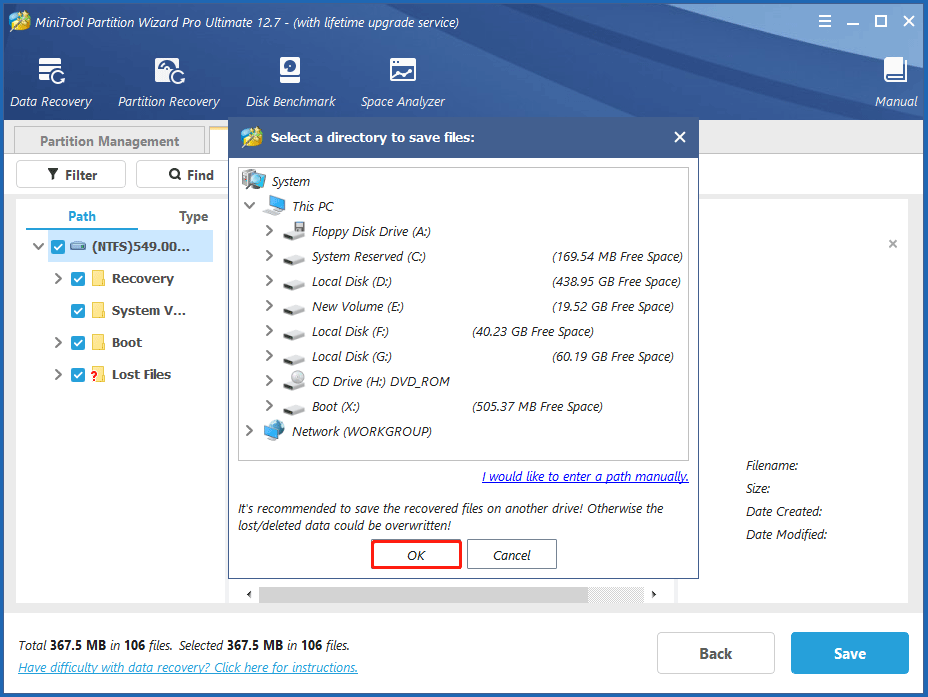
Step 8: In the pop-up window, select a directory to save the selected files and click on OK.
You’d better save the recovered files to another drive. Otherwise, the lost/deleted data could be overwritten.
If your computer can boot into Windows and you want to recover data, just launch MiniTool Partition Wizard and normally activate the Data Recovery feature.
Bottom Line
The SESSION1 INITIALIZATION FAILED error is annoying, but there is always a way to tackle it. 8 solutions to the BSOD error are displayed above and you can try them one by one. If you run into some problems during the fixing process, you can leave them in the following comment zone.
Certainly, if you have any questions about or suggestions for MiniTool Partition Wizard, please do not hesitate to contact us via [email protected].
About The Author

Position: Columnist
Vega enjoys helping people with computer problems, including disk management, data recovery, data backup, and more. She is constantly expanding her knowledge in related fields. And she will continue to bring more easy-to-understand professional articles to help people solve various problems on the PC.
User Comments :