Different from other operating systems, Windows 11 requires TPM 2.0 and Secure Boot before it gets installed. Here, MiniTool Partition Wizard tells you how to activate TPM 2.0 and Secure Boot after you find that the status of TPM 2.0 and Secure Boot is disabled.
You are required to activate TPM 2.0 and Secure Boot to install Windows 11 or do other things. Otherwise, you may fail to install Windows 11 or receive errors like “This Build of Vanguard Requires TPM Version 2.0”. Fortunately, you can install Nexus LiteOS 11, Rectify11, or Ghost Spectre Windows 11 Superlite without TPM and Secure Boot.
Besides, there’s still a chance to install Windows 11 on computers that don’t meet the system requirements. You can refer to the guides below.
- How to Enable/Bypass Secure Boot to Install Windows 11
- How to Install Windows 11 on Unsupported PC/Hardware? (4 Ways)
How to Check If TPM and Secure Boot Are Enabled
Before you activate TPM 2.0 and Secure Boot for Windows 11, you should check their status by using the following steps.
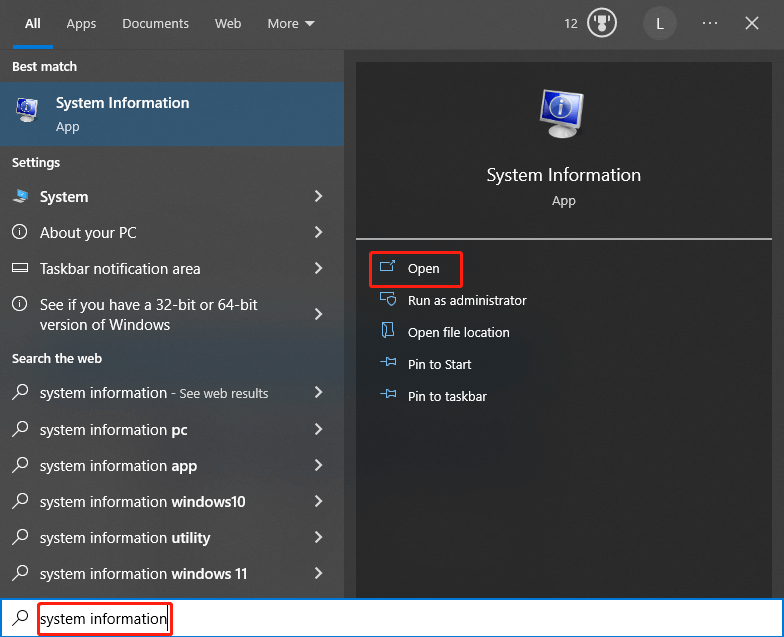
Step 1: Press Windows and S keys to call out the Search box. Then type system information in the box and click the Open option under the prompted System Information app in the right panel.
Step 2: Click System Summary in the left panel and then find and check the status of Secure Boot State in the right side of the window. If Secure Boot State is off, you need to enable it manually.

Further reading:
It is very likely that your system is installed on an MBR disk if Secure Boot is unsupported and the BIOS mode is Legacy. In this case, you need to convert MBR to GPT via MBR2GPT tools. MiniTool Partition Wizard is one of the such programs, which can help you convert the disk from MBR to GPT without losing data.
Download and install this partition manager by clicking the button below and following the on-screen instructions. Then finish the conversion step by step.
MiniTool Partition Wizard DemoClick to Download100%Clean & Safe
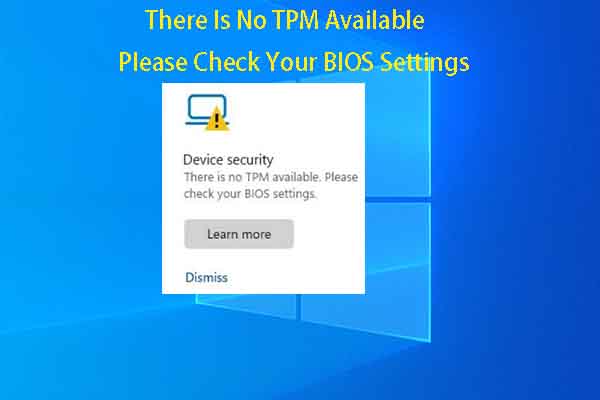
To see the status of the TPM 2.0, follow these steps.
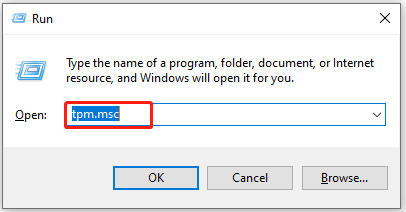
Step 1: Open the Run window, type tpm.msc, and then click OK.
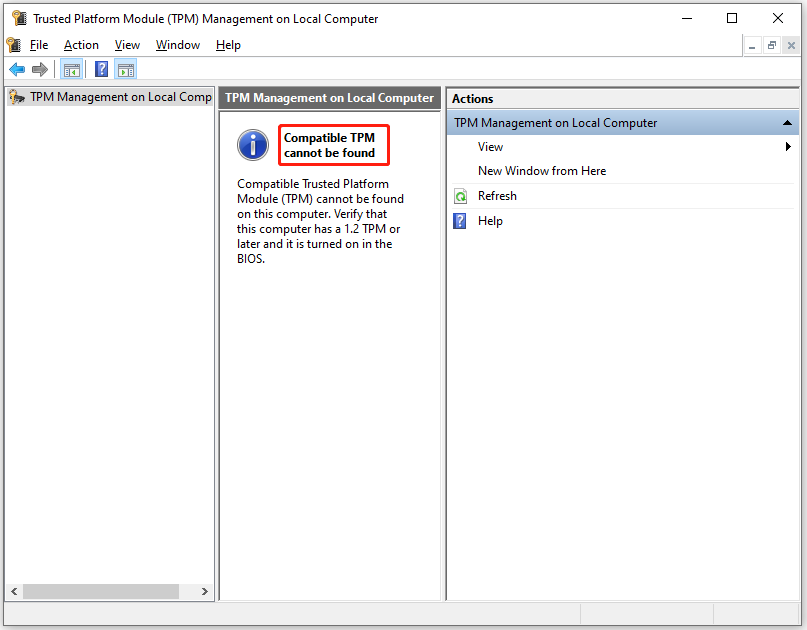
Step 2: If you receive the message as the picture below shows, it means that you don’t have a TPM 2.0 module on your motherboard. You will see the status and manufacturer information if you have a TPM 2.0 on your computer.
If TPM 2.0 is not supported on your computer, there’s no way to activate TPM 2.0. You need to buy a new computer with TPM 2.0 supported.
How to Activate TPM 2.0 and Secure Boot
Now, it’s time to enable TPM 2.0 and Secure Boot in BIOS with the steps below.
Step 1: Turn off your computer and then restart it. During the startup process, keep pressing the BIOS or UEFI key to enter the BIOS or UEFI setup screen.
Step 2: If you are using the advanced mode, click the Boot option from the top menu.
Step 3: Navigate to the Settings bar and then double-click Miscellaneous tab. Then you will see the Intel Platform Trust Technology (PTT) option inside Miscellaneous.
Step 4: Click on that option and choose Enable from the drop-down menu.
Step 5: Then locate the Secure Boot tab and click on it.
Step 6: Click the Secure boot option and switch to the Enabled option.
Step 7: Press F10 > Enter keys to save the changes and exit the screen. Then your computer will restart with the modified settings.
Alternatively, you can also activate TPM 2.0 with these steps. Right-click the Windows icon and click Settings > Update & Security > Recovery > Restart now > Troubleshoot > Advanced options > UEFI Firmware Settings > Restart. Then find and click the option to enable the TPM, which could be labeled Security Device, Security Device Support, TPM State, AMD fTPM switch, AMD PSP fTPM, Intel PTT, or Intel Platform Trust Technology.
How to activate TPM 2.0 and Secure Boot for Windows 11? This post has shown the answer to you. Simply follow the given methods to enable TPM 2.0 and Secure Boot.
User Comments :