Windows 11 and Secure Boot
Windows 11 is the latest major release of Microsoft’s Windows NT operating system, released in October 2021. It is a free upgrade to its predecessor Windows 10 (2015). You can install Windows 11 on your PC as long as it meets the minimum Windows 11 system requirements.
According to the Windows 11 system requirements, your device needs to have Secure Boot enabled to install Windows 11.
What Is Secure Boot?
Secure Boot is a security feature available on most motherboards with UEFI firmware enabled. When this feature is enabled, any operating system or hardware driver loads on this motherboard must pass the authentication of keys set by the Original Equipment Manufacturer (OEM).
If the software fails to pass the authentication, the motherboard will refuse to load it. In other words, Secure Boot allows the computer to boot only with trusted software from the OEM. This can prevent malicious software from intruding and infecting the boot sector.
Secure Boot is a feature jointly promoted by Microsoft and many OEMs. Windows 8 and higher versions can easily pass the Secure Boot authentication. However, Windows 7 and earlier versions, and other operating systems like Linux OS will be blocked.
How to Check the Secure Boot State on Your PC
If the Secure Boot is not enabled, you will get the “This PC must support Secure Boot” message when upgrading to Windows 11 or using the PC Health Check app offered by Microsoft to check Windows 11 compatibility. This issue will make your Windows 11 upgrade fail.
So, before installing Windows 11, you need to check the Secure Boot Sate. Here is the guide:
- Press the “Windows + R” keys to open the Run box.
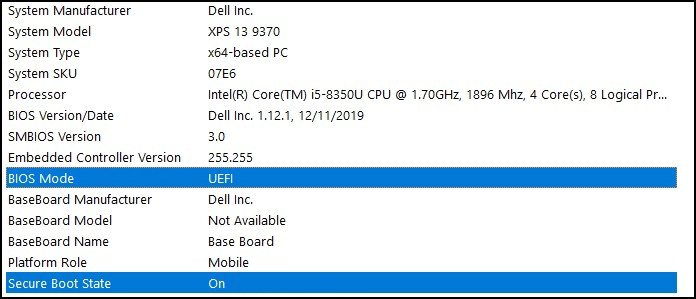
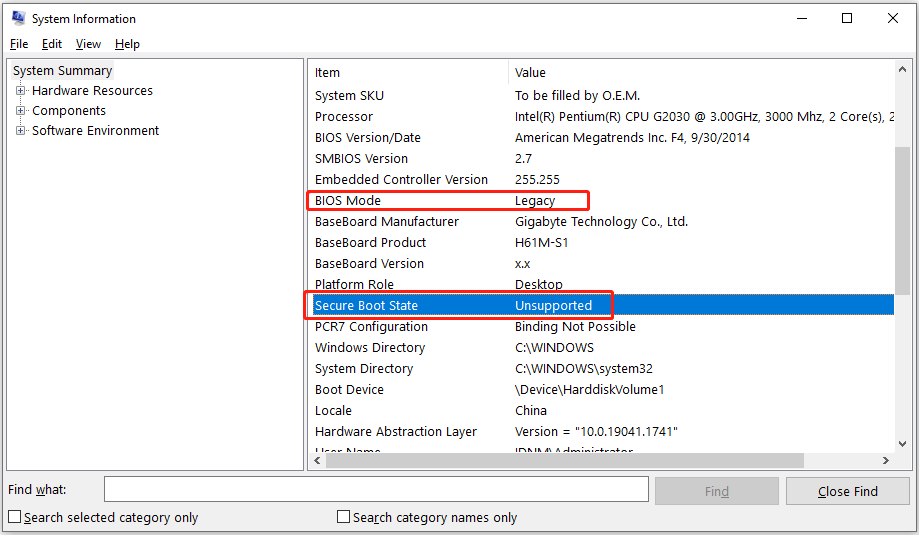
- In the Run box, type “msinfo32” and press Enter to open the System Information window.
- On the right panel, scroll down to locate BIOS Mode and Secure Boot State. If the BIOS Mode is UEFI and the Secure Boot State is On, it means that the Secure Boot on your PC has been enabled.
Sometimes, the Secure Boot State of your PC is not On. It may be Off or Unsupported. In the two cases, you need to enable Secure Boot Windows 11. How to enable Secure Boot for Windows 11? Just keep reading to get solutions.
Case 1. Secure Boot State Is Off
If your Secure Boot is Off, the BIOS Mode should still be UEFI. In this case, you just need to enable Secure Boot for Windows 11 in the firmware. Here is the guide:
Step 1: Uninstall software that is incompatible with Secure Boot, including Linux OS or other operating systems.
Step 2: Enter UEFI firmware.
- From your Windows, go to Start > Settings > Update & Security > Recovery.
- Under Advanced startup, click the Restart now button.
- After the PC restarts, go to Troubleshoot > Advanced options > UEFI Firmware Settings.
- Click Restart and then the PC will boot into the firmware.
Step 3: Enable Secure Boot in the firmware.
- Open the boot or security settings page.
- Find the Secure Boot item and make sure the Enabled option is selected for it.
- Save changes and exit the firmware.
Then, you can upgrade your PC to Windows 11 and you won’t get the message “this PC must support Secure Boot.”
This PC Can’t Run Windows 11: What Should You Do to Fix It?
Case 2. Secure Boot Is Unsupported
Sometimes, you may find the Secure Boot State is Unsupported and the BIOS Mode is Legacy. This is because your system is installed on an MBR disk.
In general, if your system disk is MBR style, you should use the Legacy (also named BIOS) mode to boot it. If your system disk is GPT style, you should use the UEFI mode to boot it. If you want to know more information about MBR/GPT and Legacy/UEFI, please read the following posts:
- MBR VS GPT (Focus on Difference and How to Convert Safely)
- UEFI vs BIOS – What’s the Differences and Which One Is Better
However, the Legacy boot mode doesn’t support the Secure Boot feature, so the Secure Boot State is “Unsupported.” To solve this problem, you need to convert the system disk from MBR to GPT and then enable the UEFI boot mode and Secure Boot feature for it.
Here are 3 ways for you and you can choose one according to your condition.
Way 1. Use MBR2GPT
MBR2GPT is a tool offered by Windows and it is usually stored in WindowsSystem32. In addition, this tool is only available on 64-bit Windows 10 version 1703 or later. Here is the guide on how to convert the system disk from MBR to GPT using MBR2GPT:
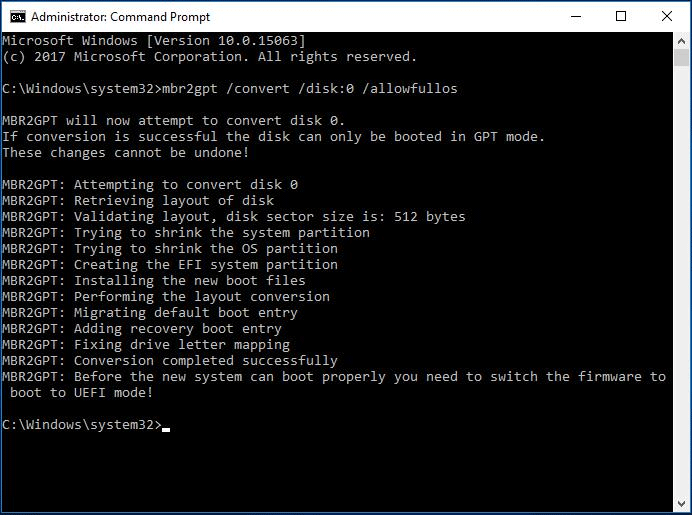
- Type “cmd” in the Windows search bar and the Command Prompt app will appear.
- Right-click the app and choose Run as administrator.
- On the Command Prompt window, type “mbr2gpt /convert /disk: 0 /allowfullOS” and press Enter. Disk 0 is usually the system disk.
After the conversion is complete, you need to switch the PC boot mode from Legacy to UEFI. Here is the guide:
- Shut down your PC.
- Power on the PC and press the BIOS key immediately when the PC brand logo appears to enter the firmware. The BIOS key may vary according to the PC model, but you can try pressing Del, Esc, or F2.
- In the firmware, go to the Boot tab and change the boot mode from Legacy to UEFI.
- Save changes and exit the firmware. The PC will boot up automatically. Then, you can perform the Windows upgrade or installation process.
Way 2. Use Windows 11 Installation Media
This way will delete all files on the system disk, so you should back up data first.
Step 1: Go to the Windows 11 download page and click the Download Now button under the Create Windows 11 Installation Media section. You will get the MediaCreationToolW11 tool.
Step 2: Use the MediaCreationToolW11 tool to create a Windows 11 installation USB drive.
- Insert a USB drive into your computer.
- Launch the MediaCreationToolW11 tool and accept the license terms.
- Choose the Create installation media (USB flash drive, DVD, or ISO file) for another PC option and click Next.
- Select language, edition, and architecture, and then click Next.
- Choose USB flash drive and click Next.
- Select the connected USB drive and click Next. Then, you just wait for the process to finish.
Step 3: Boot your PC from the Windows 11 installation USB drive.
- Use the BIOS key to enter the firmware.
- In the firmware, go to the Boot tab and set the USB drive as the first boot device.
- Save changes and exit the firmware. The PC will boot from the Windows 11 installation USB drive automatically.
Step 4: Convert the system disk from MBR to GPT.
- On the Windows setup wizard, click Next.
- On the next interface, click Repair your computer button at the bottom left corner of the Windows setup window.
- Go to Troubleshoot > Command Prompt.
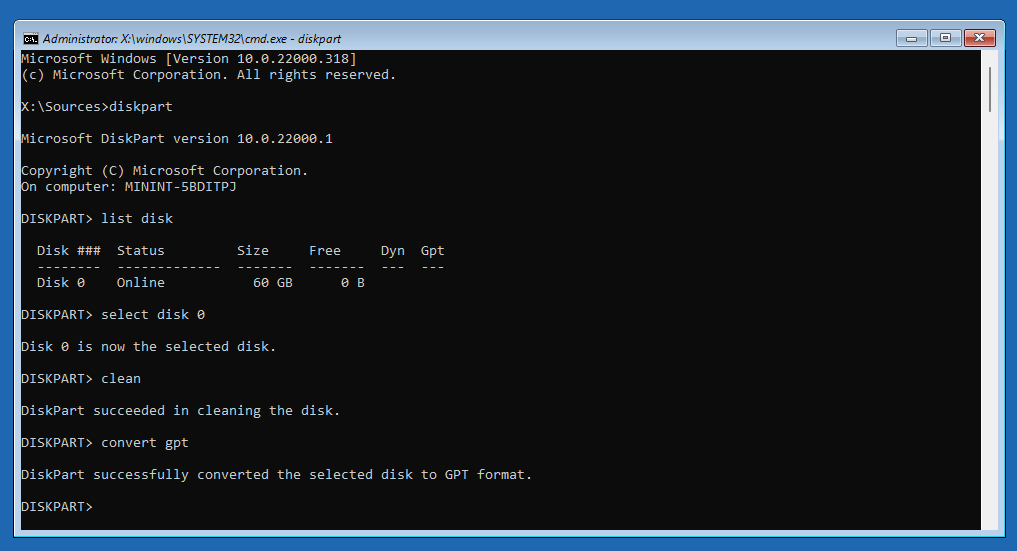
- Type “diskpart” and press Enter.
- Type “list disk” and press Enter. This will list all disks on your computer.
- Type “select disk 0” and press Enter.
- Type “clean” to delete all data on the disk and press Enter.
- Type “convert gpt” and press Enter.
Then, turn off the PC and boot it into the firmware again to switch the boot mode to UEFI. Then, boot the PC from the Windows 11 installation USB drive to complete the Windows 11 installation process.
Way 3. Use MiniTool Partition Wizard
Similar to MBR2GPT, MiniTool Partition Wizard can also help you convert the system disk from MBR to GPT without losing data. In addition, MiniTool Partition Wizard has wider applicability. It can run on Windows Vista/7/8/10/11 All Editions.
Here is the guide on how to convert MBR to GPT using MiniTool Partition Wizard.
MiniTool Partition Wizard DemoClick to Download100%Clean & Safe
Step 1: Launch MiniTool Partition Wizard. Right-click the system disk and choose the Convert MBR Disk to GPT Disk option from the context menu. Read the warning information and click OK.
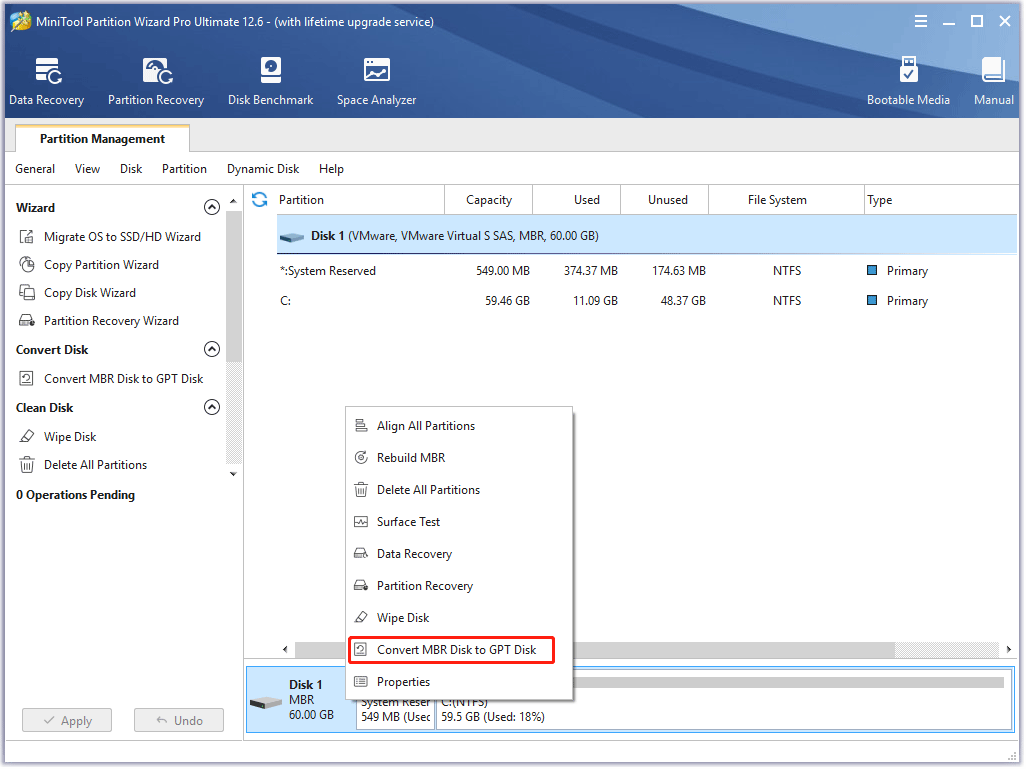
Step 2: Click the Apply button to execute the pending operations.
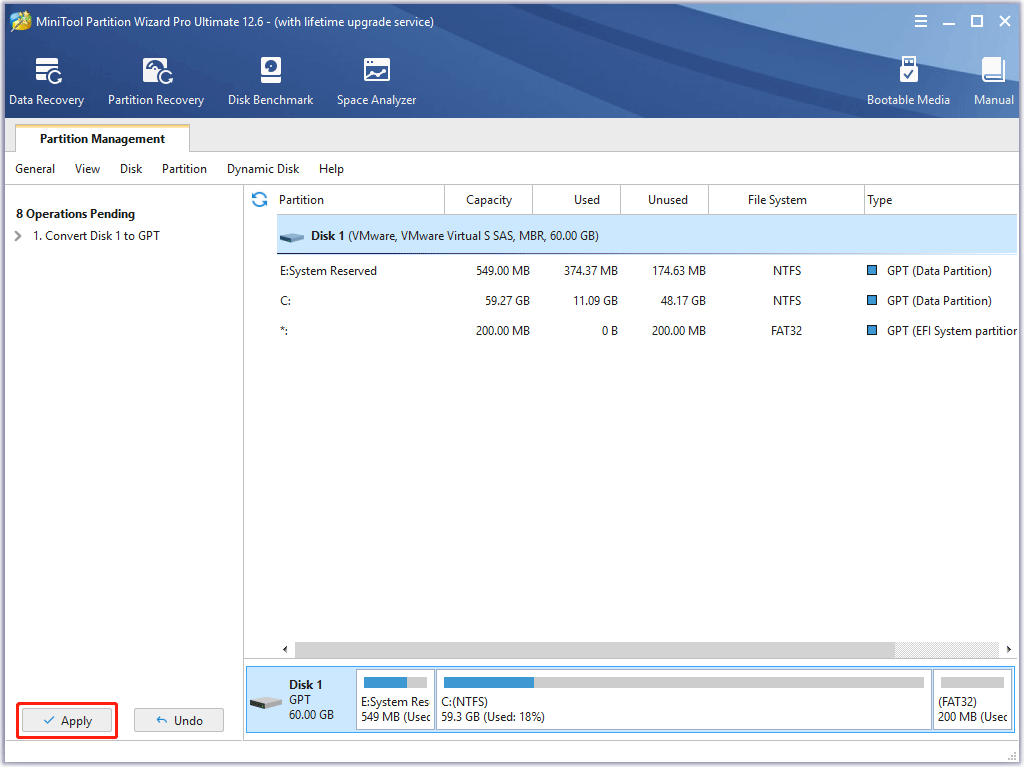
After the conversion is complete, switch the PC boot mode to UEFI. Then, the PC will boot into Windows again. You can perform the Windows 11 upgrade or installation.
How to Bypass Secure Boot When You Install Windows 11
If you don’t like the Windows 11 Secure Boot requirement, you can also bypass it when installing Windows 11. Here is the guide:
If you plan to upgrade to Windows 11 using the Windows 11 Installation Assistant:
- Press “Win + R” keys to open the Run box.
- In the Run box, type “regedit” and press Enter to open Registry Editor.
- Go to ComputerHKEY_LOCAL_MACHINESYSTEMSetup.
- Right-click the Setupkey and select New > Key.
- Name the key LabConfig.
- Right-click on the LabConfigkey and select New > DWORD (32-bit) Value.
- Name the value BypassSecureBootCheck.
- Double-click on BypassSecureBootCheck, change the Value data to 1, and press OK.
If you install Windows 11 using a USB drive:
- Once the Windows setup wizard launches, press Shift+F10 on your keyboard to open the Command Prompt.
- Type command “regedit” and press Enter to open Registry Editor.
- Then, use this tool to bypass the Secure Boot check (the steps are the same). After that, you can continue to install Windows 11.
How to Bypass Windows 11 Requirements – 2 Latest Ways
Can You Disable Secure Boot on Windows 11?
After installing Windows 11, you can disable Secure Boot Windows 11. The disabling process is the same as Windows 10. However, if you disable Windows 11 Secure Boot, some features may be affected, for example:
- Windows Hello won’t work. You should disable Windows Hello before disabling Secure Boot Windows 11. Otherwise, you are unable to enter Windows.
- Your PC may be incompatible with some games like Valorant.
- BitLocker will require you to decrypt manually using the key every time the PC boots up if you have enabled BitLocker before disabling Windows 11 Secure Boot.
- Your PC can’t run WSL because WSL requires Secure Boot.
Bottom Line
Is this post useful to you? Do you have other ideas about Secure Boot Windows 11? Please leave comments in the following zone for sharing. In addition, if you encounter problems when using MiniTool Partition Wizard, please feel free to contact us via [email protected]. We will get back to you as soon as possible.
About The Author

Position: Columnist
Linda has been an editor at MiniTool for seven years. She continuously learns about computers and puts her knowledge into practice. Moreover, she is particularly knowledgeable in disk management, data recovery, system installation, and PDF editing. Her articles typically reference multiple examples or are based on her own experience, providing users with the most suitable solutions.
User Comments :