Due to multiple reasons, you may experience D drive data loss. What can you do to recover the lost data? In this post, MiniTool Partition Wizard lists some available methods to perform D drive data recovery. Pick one method to recover deleted data from D drive now!
Like C drive, D drive is also a local drive on the computer. It can be a secondary storage device or a partition created in the same internal hard disk that can store any type of file. If it is used as a local drive, it saves local files and folders, files associated with software installation, and system files used to run the device.
However, the D drive varies from computer to computer as some manufacturers may use it as a built-in recovery disk. When your computer experiences issues like hardware failure, you can use the recovery drive (D drive) to reinstall Windows.
You might receive various errors while using the D drive such as D drive not showing up, D drive is not accessible, HP recovery drive full, D drive data loss, etc. In this post, the focus comes to data loss on the D drive. It tells you how to recover data from D drive.
To recover deleted data from D drive successfully, you should know the possible causes for the data loss. After that, take the corresponding measures to recover data. The section below lists some probable reasons for the D drive data loss. You can take them as a reference while looking for the reasons.
Reasons for D Drive Data Loss
You may lose D drive data due to various reasons. For instance, if the D drive is deleted accidentally or gets corrupted, data on the drive will disappear. After you delete files or format the D drive without backup, your D drive data will be lost.
Besides, a virus or malware attack can also result in D drive data loss. Sometimes, the data will get lost after the system update or other operations. For instance, you will lose data if you get a blue screen after installing drivers or encounter the D drive not showing up or missing issue.
How to recover data from D drive? This post offers you 5 available methods. Get a quick preview of them now and then pick a preferred way to recover D drive data.
- Perform D Drive Data Recovery with MiniTool Partition Wizard
- Perform D Drive Data Recovery in the Recycle Bin
- Perform D Drive Data Recovery by Rescanning Disks
- Perform D Drive Data Recovery via a System Restore
- Perform D Drive Data Recovery via Windows File Recovery
MiniTool Partition Wizard DemoClick to Download100%Clean & Safe
#1: Recover Data from D Drive via MiniTool Partition Wizard
How to recover data from D drive? Well, an effective and reliable way to perform D drive data recovery is to use a piece of professional data recovery software. MiniTool Partition Wizard is such a tool that allows you to conduct hard drive data recovery, USB data recovery, SD card recovery, external hard drive recovery, SSD file recovery, etc.
In addition to recovering data, MiniTool Partition Wizard also enables you to recover lost or deleted partitions. For instance, it is capable of recovering hard disk partitions, undeleting NTFS partitions, recovering FAT32 partitions, and so on.
Download and install MiniTool Partition Wizard on your PC, and then use it to recover D drive data with the steps below.
MiniTool Partition Wizard DemoClick to Download100%Clean & Safe
Step 1: Launch this partition software to access its main interface.
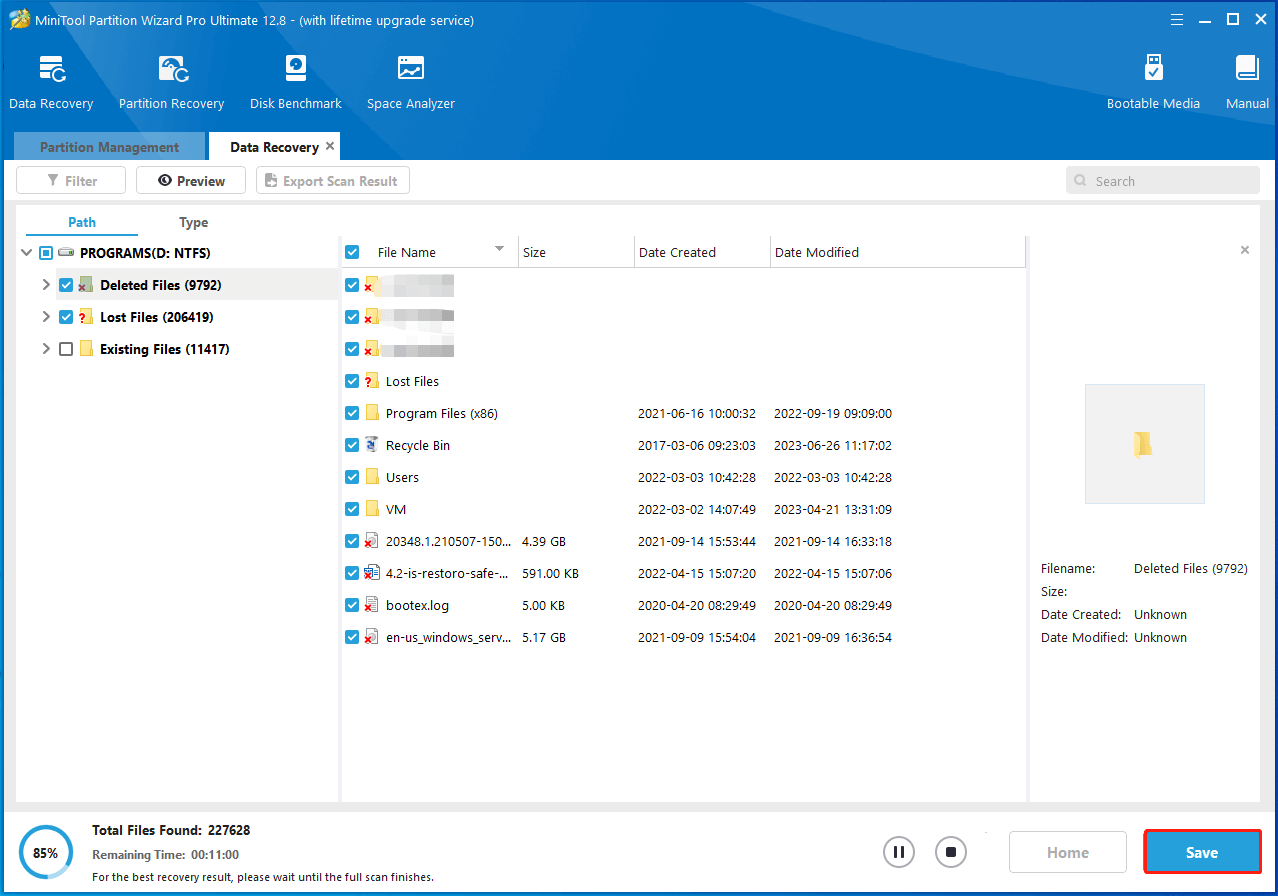
Step 2: Click on Data Recovery at the top toolbar.
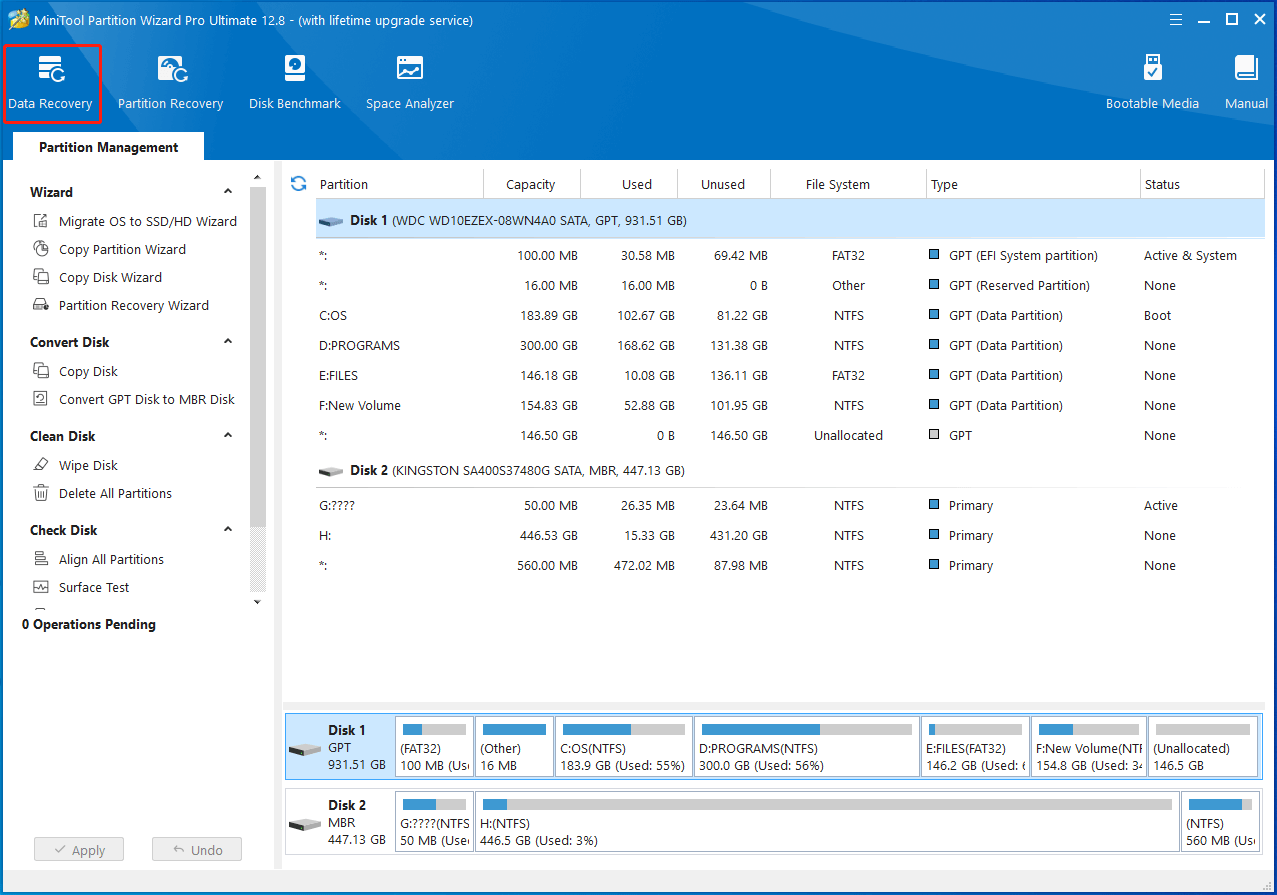
Step 3: Under the Logical Drives section, find and tap on the D drive. Then click on the prompted Scan button to start the scanning process.

Step 4: Find and check the needed D drive data, and then click the Save button.
Step 5: In the elevated window, choose a directory to save the recovered files and then click OK. You can select a directory from the given options or manually enter a path.

#2: Recover Data from D Drive via Recycle Bin
If you deleted D drive data by accident, simply recover data from D drive via Recycle Bin. Generally speaking, files would be recycled to the Recycle Bin after you delete them. When you experience data loss, perform D drive data recovery through Recycle Bin by using the steps below.
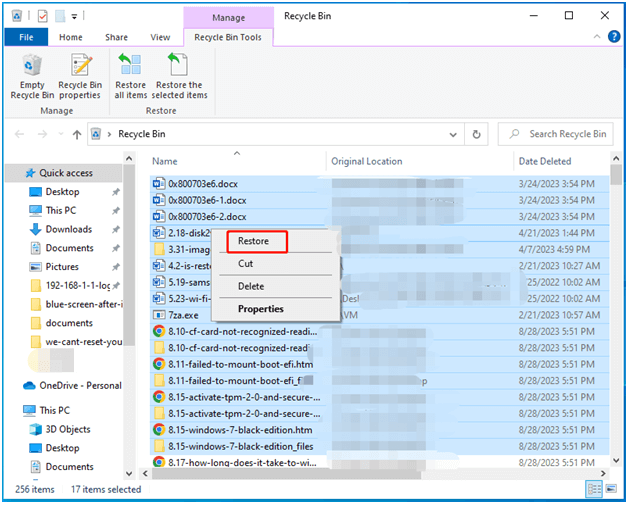
Step 1: Find and double-click Recycle Bin on your computer to open it.
Step 2: Locate files that you have deleted from the D drive.
Step 3: Right-click on these files and scroll down the mouse button to select all the D drive data. Then release the mouse, right-click on one of these files, and then click the Restore option. After that, the selected files would be restored.
What can I do if I delete files from Recycle Bin? Don’t panic! You are able to get the deleted files back with the help of this Recycle Bin recovery guide.
#3: Recover Data from D Drive by Rescanning Disks
How to restore D drive? The Rescan Disks option in the Disk Management enables you to restore D drive with ease. The following steps show you how to use this option.
Step 1: Right-click on the Windows icon and then click Disk Management from the pop-up menu.
Step 2: Tap on the Action tab and click Rescan Disks in the drop-down menu.
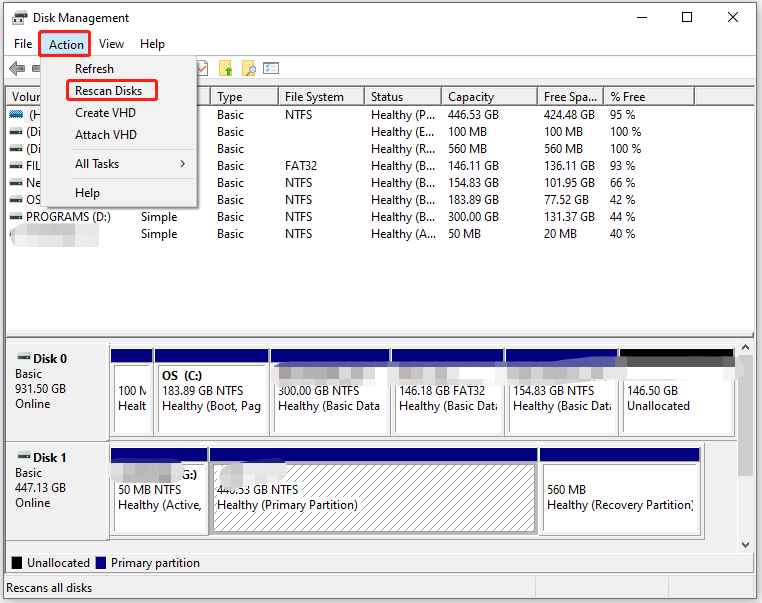
Step 3: Then Disk Management will automatically re-identify all the connected storage devices on the computer.
Step 4: After the scan process ends, check if the D drive and its data appear.
![External Hard Drive Not Showing up Windows 11 [Solved]](https://images.minitool.com/partitionwizard.com/images/uploads/2023/08/external-hard-drive-not-showing-up-windows-11-thumbnail.jpg)
#4: Recover Data from D Drive by Performing a System Restore
If you have created a restore point before D drive data loss occurs, things would be easier because you can perform D drive data recovery by restoring system to an early state. If you are in this scenario, recover deleted data from D drive with a system restore.
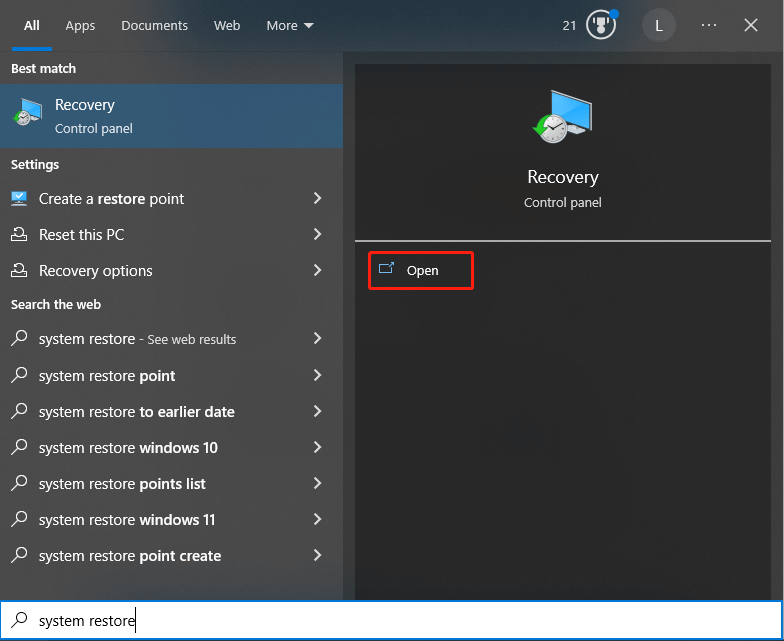
Step 1: Type system restore in the search box.
Step 2: Click the Open option under the Recovery app.
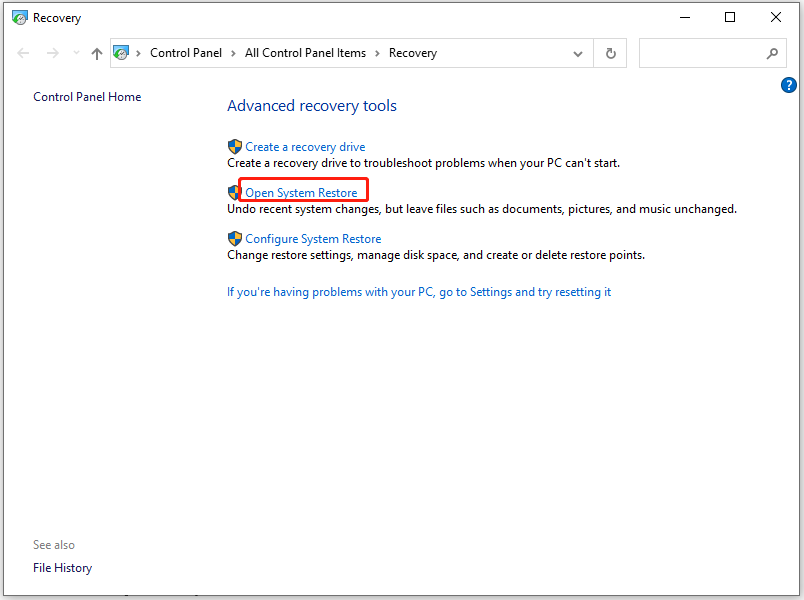
Step 3: In the Recovery window, click Open System Restore.
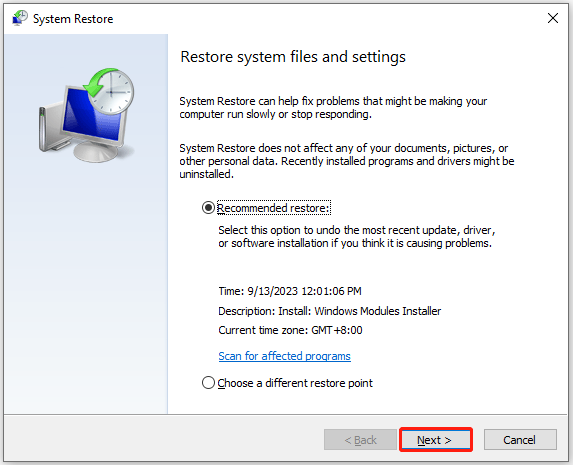
Step 4: Based on your demands, pick a restore point and click Next. If you don’t remember the specific restore point, use the Recommended restore.
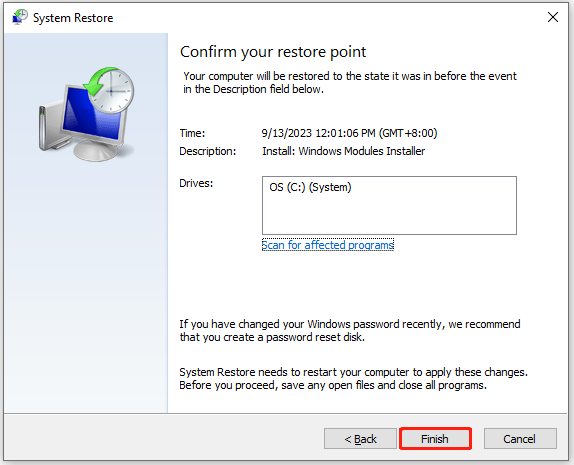
Step 5: In the next window, confirm your restore point and click the Finish button to save the changes. After a while, your system will be restored to the selected point. Then check if your D drive data is recovered.
#5: Recover Data from D Drive via Windows File Recovery
Windows File Recovery is a command-line utility that comes with Windows 10/11. It enables you to recover deleted data from D drive.
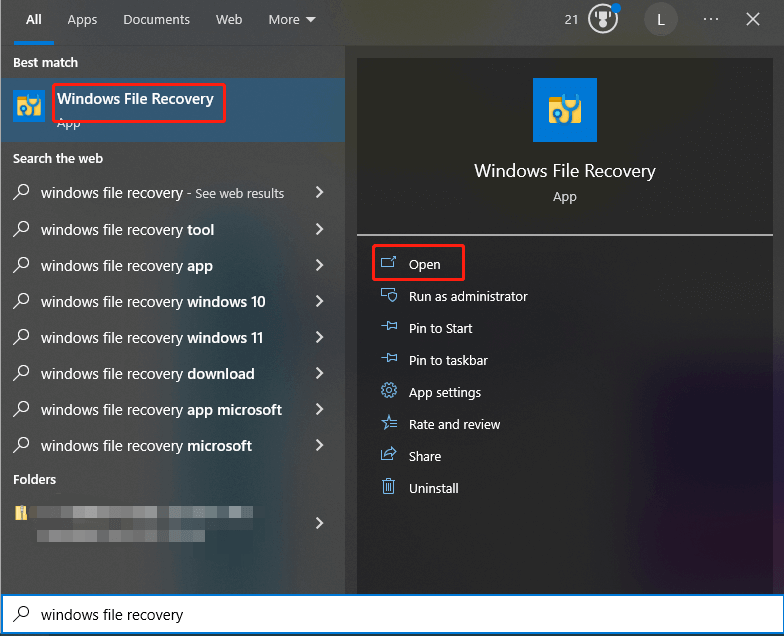
Step 1: Type windows file recovery in the search box. Then open the program by clicking the Open option under the target app or clicking Windows File Recovery under Best match.
Step 2: In the elevated Command Prompt window, specify the source drive, search for the deleted files, choose the destination drive for the recovered files, and choose switches based on the following basic command line. You need to replace these parameters with the actual ones. After typing the command, press the Enter key to execute the operation.
winfr source-drive: destination-drive: [/mode] [/switches]
Step 3: Wait for the finish of the process.
Also read: Windows File Recovery Stuck at 99%? Here’re 5 Fixes
Bonus tip: To avoid data loss, make a backup for your hard drive regularly. Besides, make sure that there’s no important data before deleting/formatting/wiping the partitions or hard drives. It’s also recommended to turn on real-time protection in Windows Security to keep your PC safe.
Bottom Line
This post summarizes possible reasons for D drive data loss and offers you ways to recover data from D drive. If you are wondering about how to recover data from D drive, pay attention to this post now! It provides you with several ways to recover D drive data.
If you encounter other problems related to data recovery, share your experiences with us in the following comment area. We will try our best to help you solve them. For any questions that occur when you use MiniTool Partition Wizard, please feel free to contact us by sending an email to [email protected].
User Comments :