Sometimes, you may be stuck in a loop of BitLocker asking for your recovery key whenever you turn on the computer. You can bypass BitLocker recovery screen by turning off auto-unlock, updating the BIOS, formatting the drive, and reinstalling Windows using MiniTool Partition Wizard.
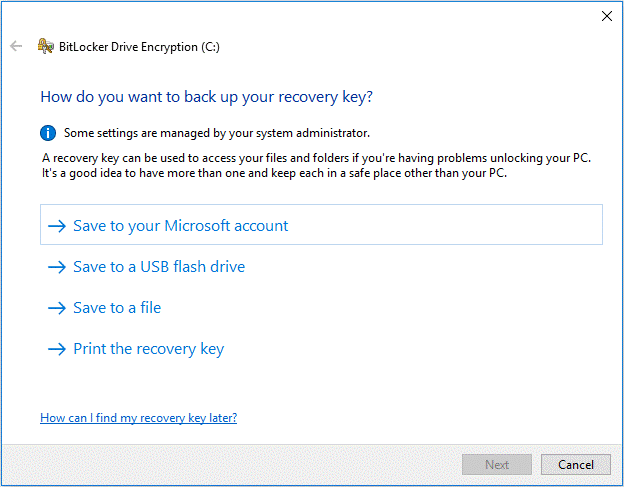
BitLocker recovery key is very important when you need it to unlock the BitLocker-protected drive. It is automatically generated from the process of encrypting the specific drive using the BitLocker encryption technology. This key can be stored in different places including your Microsoft account, USB flash drive, a TXT file, or paper document.
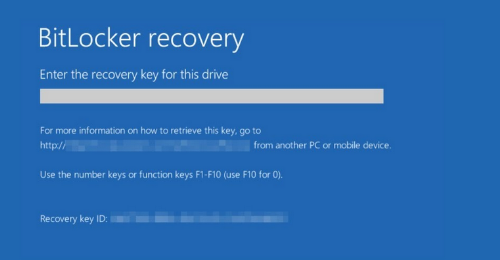
However, many people are stuck on the BitLocker recovery screen asking for the recovery key on Startup. Sometimes, the BitLocker recovery screen persists even if they enter the correct recovery key multiple times.
It is so frustrating that you can boot into your system but can’t bypass BitLocker recovery key, like the user from the community.spiceworks.com
Hi all. Is there another way to bypass BitLocker I wasn’t using my computer for more than 2 years and now it’s telling me to input the BitLocker key when I turn it on? I entered the correct BitLocker recovery key multiple times, and am still unable to continue past the initial recovery screen. If you guys have any tools or notions, please share them with me. Thank you.https://community.spiceworks.com/topic/2343015-how-to-remove-or-bypass-bitlocker-without-recovery-key
There are various reasons for the BitLocker recovery screen to appear. Here is a table to show the causes and the corresponding methods:
Causes | Methods |
Wrong BitLocker password | Find the BitLocker recovery key |
New boot menu issues | Switch to Legacy boot |
Auto-unlock option | Turn off auto-unlock |
Outdated BIOS | Update the BIOS |
Secure boot issues | Enable or disable |
The recovery key is lost | Format the drive and reinstall Windows |
Now, follow the methods below to bypass the BitLocker recovery screen.
![BitLocker Recovery Key Not Working on Windows 10/11? [Full Fix]](https://images.minitool.com/partitionwizard.com/images/uploads/2023/06/bitlocker-recovery-key-not-working-thumbnail.jpg)
Method 1. Find the BitLocker Recovery Key
Of course, the first thing you should do is to try resuming the BitLocker recovery key. When creating a BitLocker encrypted drive, you can save the recovery key to your Microsoft account, USB flash drive, a paper document, and a TXT file. So, try your best to find the key from these places.
If you still can’t find the BitLocker recovery key, move down to the following fixes.
Method 2. Temporarily Turn Off BitLocker Protection in Command Prompt
If your computer keeps asking for your BitLocker recovery key in a repeating loop, you can follow these steps to stop the loop and start Windows normally.
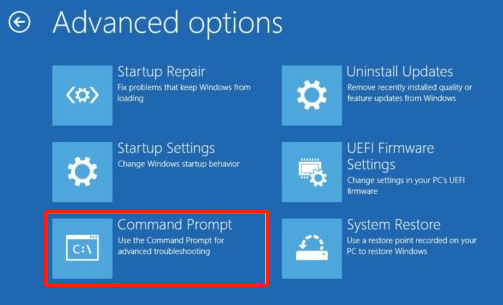
- On the screen asking for your recovery key, select Skip this drive > Troubleshoot > Advanced options > Command Prompt.
- Type manage-bde -unlock *: -rp <your-48-digit recovery-key> and press Enter. Replace * with your encrypted drive letter.
- Type manage-bde -protectors -disable *: and press Enter to temporarily suspend protection. Replace * with your encrypted drive letter.
- Wait for the message that says Protection is suspended or Key protectors are disabled for the volume *.
- Exit the program and restart your computer.
Once Windows starts, you need to turn BitLocker protection back on:
- Type BitLocker in the search box.
- Select Manage BitLocker from the results.
- Find your drive in the BitLocker window.
- Select Resume protection next to your drive.
- Wait for the message that says protection is active again.
- Your computer is now fully protected and should work normally.
MiniTool Partition Wizard FreeClick to Download100%Clean & Safe
Method 3. Enable or Disable the Secure Boot
Some users reported that they managed to bypass BitLocker recovery by enabling or disabling the Secure Boot option. Let’s try.
Step 1. Follow Step 1 to Step 2 in # 2 to open the Advanced options screen and select UEFI Firmware Settings > Restart.
Step 2. Your computer should be restarted to UEFI, go to the Security category.
Step 3. Set the Secure Boot to Enabled or Disabled and press F10 to save the change.
This procedure may vary from different motherboards. If you can’t find the secure boot option, search for the manual tutorial according to the manufacturer of your motherboard.
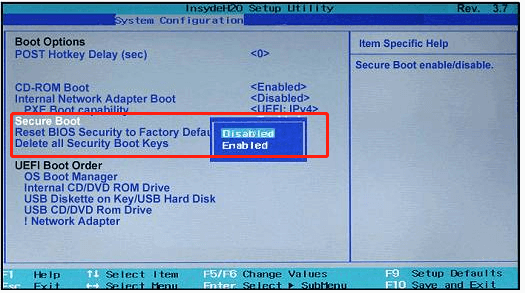
Step 4. Exit the BIOS and restart your PC to see if you can bypass BitLocker smoothly.
Method 4. Update Your BIOS
Sometimes an outdated BIOS version can trigger various issues like the BitLocker recovery key bypass issue. If you haven’t the latest BIOS version installed, you can read this post to update it. Also, you can check your motherboard’s manual to update BIOS.
Method 5. Switch to the Legacy Boot
As it’s well known, Windows 10 uses a fully new graphical boot menu, and sometimes it can trigger the BitLocker bypass problem too. In this case, you can try switching to the legacy boot menu.
If you can’t boot into the computer normally, follow Step 1 to Step 2 in # 2 to open the Advanced options screen and select Command Prompt.
Step 1. Type cmd in the Search box, and then right-click the Command Prompt app and select Run as administrator. Click on Yes when you’re prompted with the User Account Control window.
Step 2. In the elevated Command Prompt window, type the following command and hit Enter.
“bcdedit /set {default} bootmenupolicy legacy”
Once done, restart your computer and check if you can bypass BitLocker recovery successfully.
Method 6. Turn Off Auto-unlock
Your Windows operating system has an automatic unlock function enabled by default, which may cause the BitLocker recovery screen to reappear. Therefore, you can disable the automatic unlock function to resolve the issue.
Follow these steps to disable the auto-unlock function:
- Type Control Panel in the Search bar to open it.
- Go to System and Security, and then select BitLocker Drive Encryption.
- Click Turn off auto-unlock.
Method 7. Uninstall the Newly Installed Hardware
As discussed above, some hardware changes can trigger the BitLocker screen bypass failed issue too. If you currently installed some new hardware, disconnect them from your computer when booting.
Alternatively, you can revert your system to an earlier date where the BitLocker recovery screen works properly. Here’s how:
Step 1. Follow Step 1 to Step 2 in # 2 to open the Advanced options screen and select System Restore.
Step 2. The system restores window will pop up immediately, select the Recommended option click Next to continue. If the recommended one is not the system restore point where your computer works fine, select the Choose a different restore point option and select the proper one.
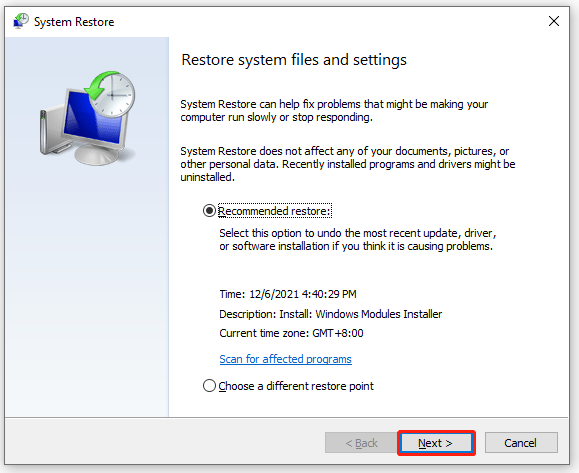
Step 3. Then confirm your restore point by clicking the Finish button. Wait for the process to complete and restart your PC to see if the issue gets solved.
![How to Fix BitLocker Fatal Error on Windows 10/11? [5 Ways]](https://images.minitool.com/partitionwizard.com/images/uploads/2023/06/bitlocker-fatal-error-thumbnail.jpg)
Method 8. Clean Install Your OS
If you cannot find the recovery key and do not need the data on the drive, you can format the drive and perform a clean install of Windows.
There are 2 options to help you clean reinstall OS. The first is to use Command Prompt, while another effective way is to use MiniTool Partition Wizard.
Format C Drive with CMD:
Step 1. Follow Step 1 to Step 2 in # 2 to open the Advanced options screen and select Command Prompt.
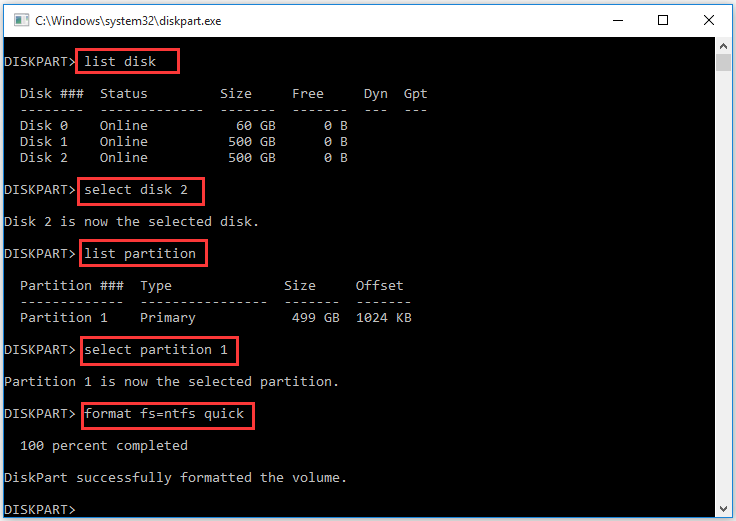
Step 2. In the elevated Command Prompt window, type the following commands in order and hit Enter after each one.
- diskpart
- list disk
- select disk * (replace * with the disk number that contains the BitLocker drive)
- list partition
- select partition * (replace * with the drive number of your OS drive)
- format fs=ntfs quick
Step 3. Now, you can read this post to reinstall Windows from a USB drive or CD/DVD.
Sometimes, however, the formatting process is not always smooth with CMD. You may encounter some errors like “Windows was unable to complete the format”, “the format did not complete successfully”, etc. Under these circumstances, MiniTool Partition Wizard is a good choice.
Format C Drive with MiniTool Partition Wizard:
MiniTool Partition Wizard DemoClick to Download100%Clean & Safe
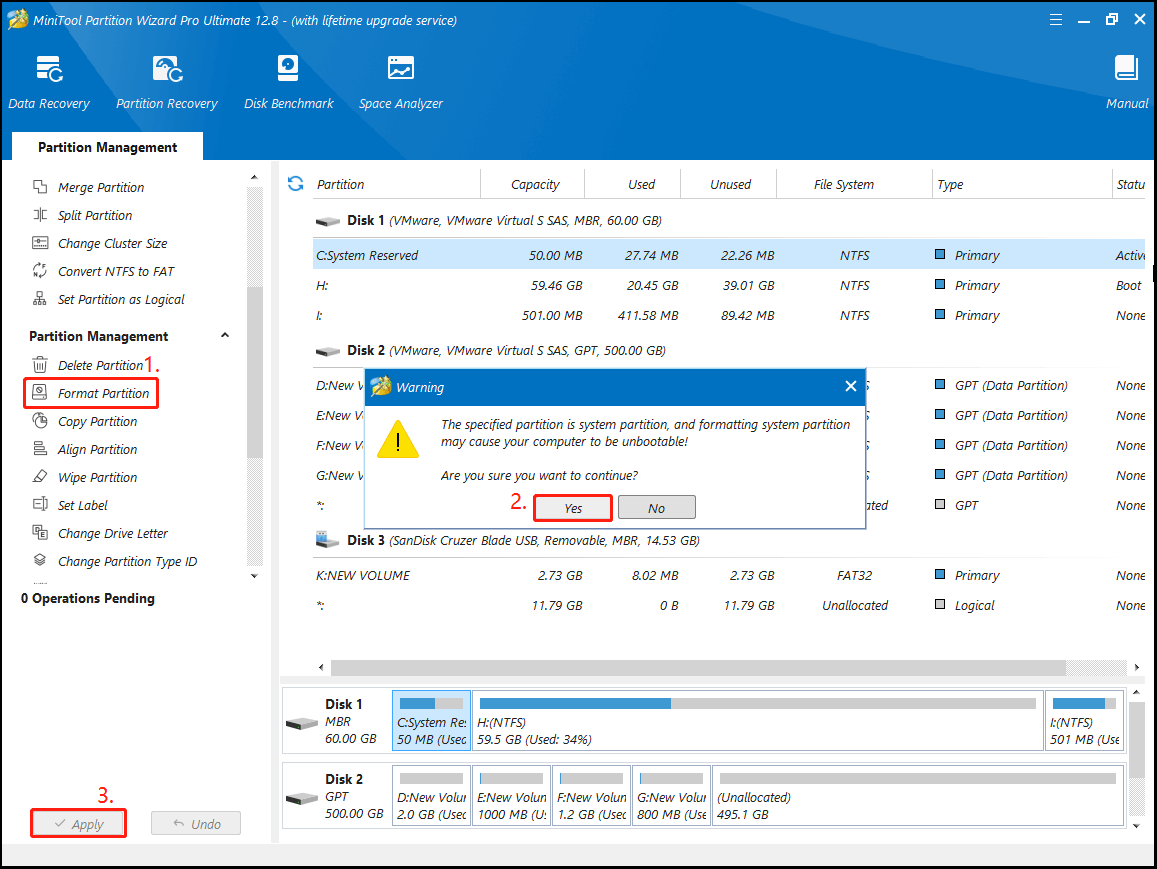
Step 1. Use the bootable MiniTool Partition Wizard drive to start your computable as we explain above.
Step 2. In the main interface, select the OS drive that you need to format and click on Format Partition from the left panel. Then you will receive a warning message, click on Yes if you have backed up all important data and confirm this.
Step 3. Click on Apply to execute the operation. Once done, you can reinstall OS.
Bottom Line
How to bypass BitLocker recovery screen? This post offers 8 effective methods for you.
Of course, you can send us an email via [email protected] when you have difficulty using the MiniTool software.
About The Author

Position: Columnist
Vega enjoys helping people with computer problems, including disk management, data recovery, data backup, and more. She is constantly expanding her knowledge in related fields. And she will continue to bring more easy-to-understand professional articles to help people solve various problems on the PC.
User Comments :