
Quick Answer: The “The format did not complete successfully” error means Windows Disk Management could not finish formatting the selected partition.
Check whether the drive is write-protected or shown as RAW, then try checking for bad sectors, formatting with DiskPart or MiniTool Partition Wizard, or recreating the partition. If the drive contains important files, recover them before formatting.
Why Does “The Format Did Not Complete Successfully” Happen
Windows’ built-in Disk Management tool can sometimes fail at basic tasks — including formatting a drive outright.
This “format disk error” is a frequent topic on forums like Reddit, and it usually shows up when you try to format a RAW partition on a micro SD card, memory card, USB flash drive, pen drive, SSD, or external hard drive (occasionally also on an exFAT partition).
In Disk Management, the message typically reads “Virtual Disk Manager: The format did not complete successfully.”
This error is usually caused by one of the following:
- Virus or malware infection
- Corrupted system files or a damaged file system
- Bad sectors (physical or logical) on the drive
- Write protection on the SD card or USB drive
- Outdated BIOS or missing Windows updates/drivers
Once you know which cause applies to you, jump to the matching fix below.
How to Fix “The Format Did Not Complete Successfully” Error
If your disk has become RAW and fails to be formatted, but it contains important data, recover the data first. Formatting, wiping, or recreating a partition may make existing files harder to recover.
Step 0: Recover Your Data First (Recommended)
If your disk becomes RAW and contains important files, recover the data before trying to format, wipe, or recreate the partition. These operations may make existing data harder to recover.
MiniTool Partition Wizard can help recover files and folders from a RAW volume with its Data Recovery feature. Its Pro Ultimate Edition or an advanced edition can be used for file recovery. It can also recover data from unallocated space.
Step 1: Launch MiniTool Partition Wizard to its main interface and then right click on your target USB drive, SD card, pen drive or any removable drive to choose Data Recovery from the context menu.
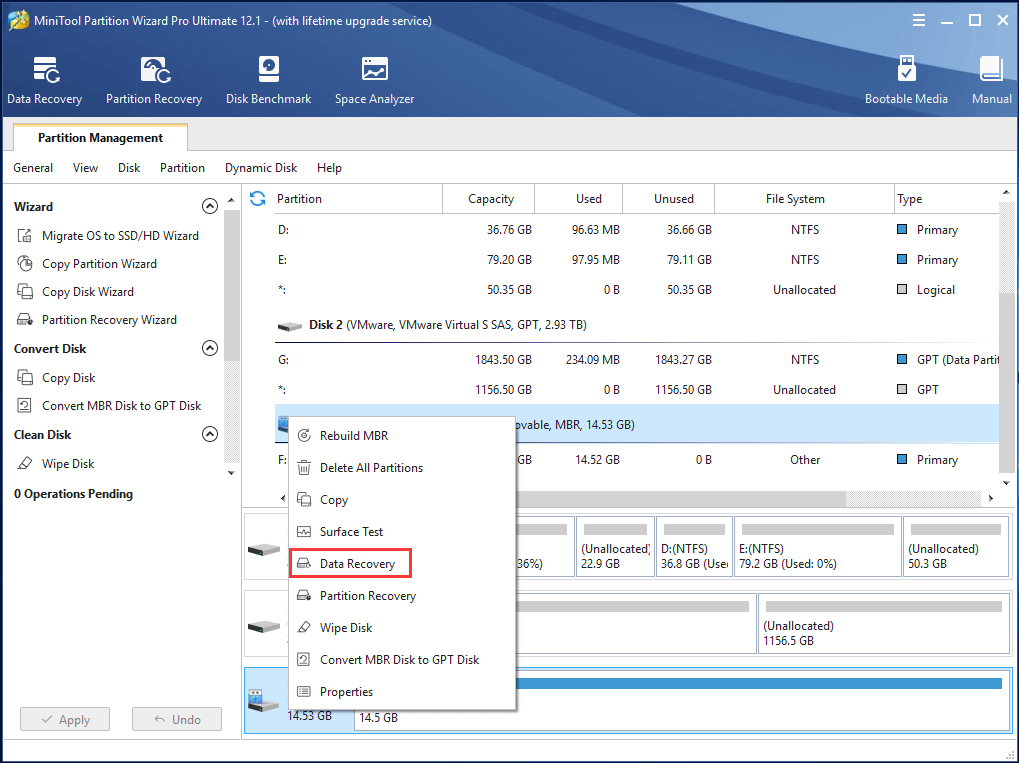
Step 2: Then this tool will start to scan your removable drive. Please wait patiently.
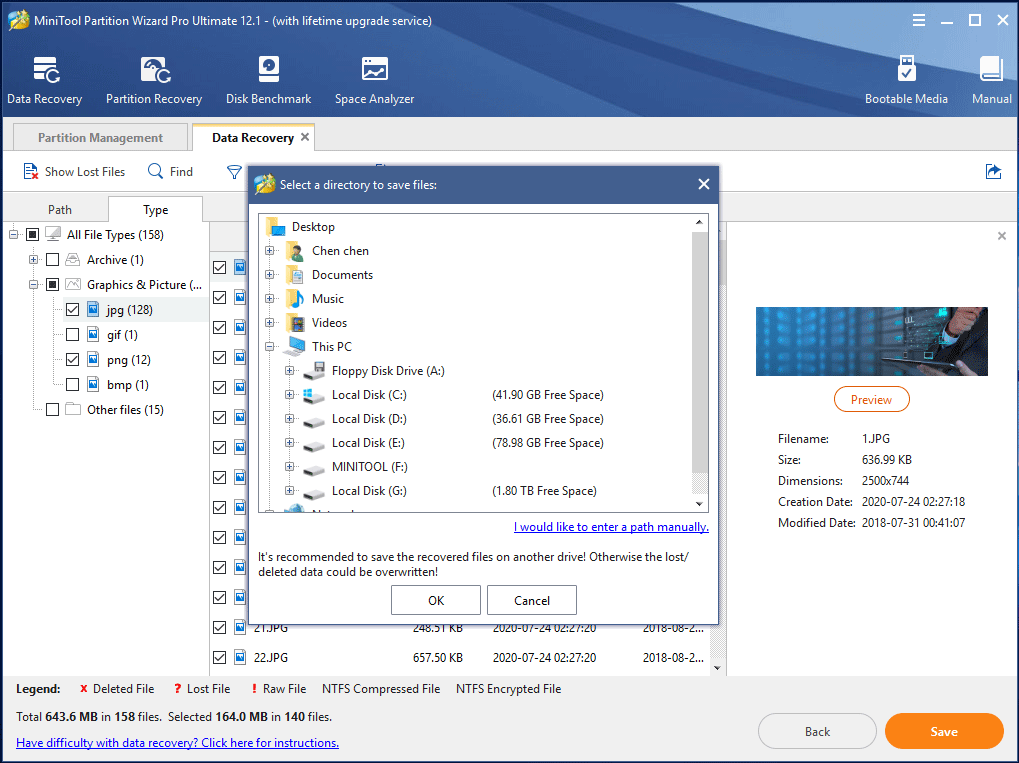
Step 3: Find your needed files or folders and select all the items, and then click the Save button to recover them to the specified path or free space.
Related article: How To Recover Data From RAW File System, RAW Partition & RAW Drive
Solution 1: Check and Remove Write Protection
If your SD card, micro SD card, or USB drive is write-protected, Windows may not be able to format it. First, check whether the SD card or its adapter has a physical lock switch and make sure it is in the unlocked position.
You can also check whether the disk is marked as read-only with DiskPart.
Step 1: Open Command Prompt as administrator.
Step 2: Run the following commands one by one to check the disk attributes:
- diskpart
- list disk (view the connected disks)
- select disk X (replace X with the number of the target disk)
- attributes disk
Step 3: If the disk is marked as read-only, type attributes disk clear readonly and press Enter.
After clearing the read-only attribute, try formatting the drive again.
If you suspect malware is preventing the drive from being modified, you can also run a Windows Security scan before trying to format it.
Solution 2: Check Bad Sectors
If removing write protection does not solve the problem, check the drive for bad sectors. Bad sectors or other disk errors can prevent Windows from completing a formatting operation.
For an SD card or memory card, connect it to your computer with a reliable card reader before checking the disk.
MiniTool Partition Wizard provides a Surface Test feature that can scan a disk for read errors. Its Free Edition can be used for this purpose.
Step 1. Download and install this software on your computer. Then, launch it to its main interface.
MiniTool Partition Wizard FreeClick to Download100%Clean & Safe
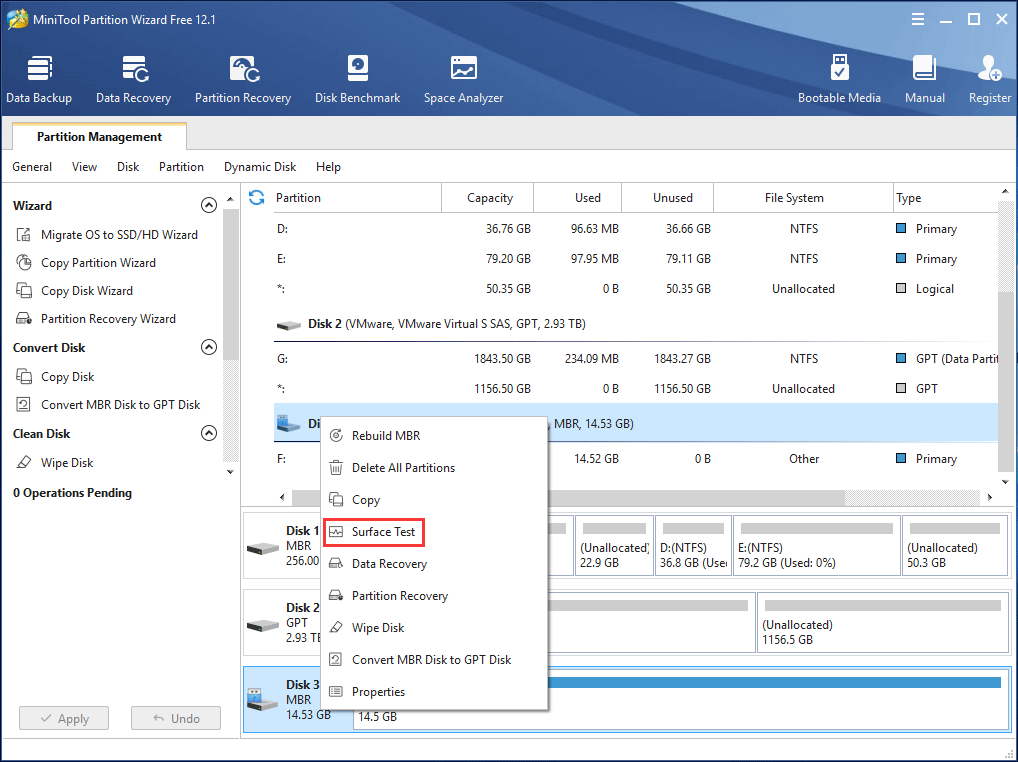
Step 2: Next select the micro SD card, memory stick or any removable device you want to identify, and click Surface Test from Check Disk menu. Or choose this feature from the context menu.
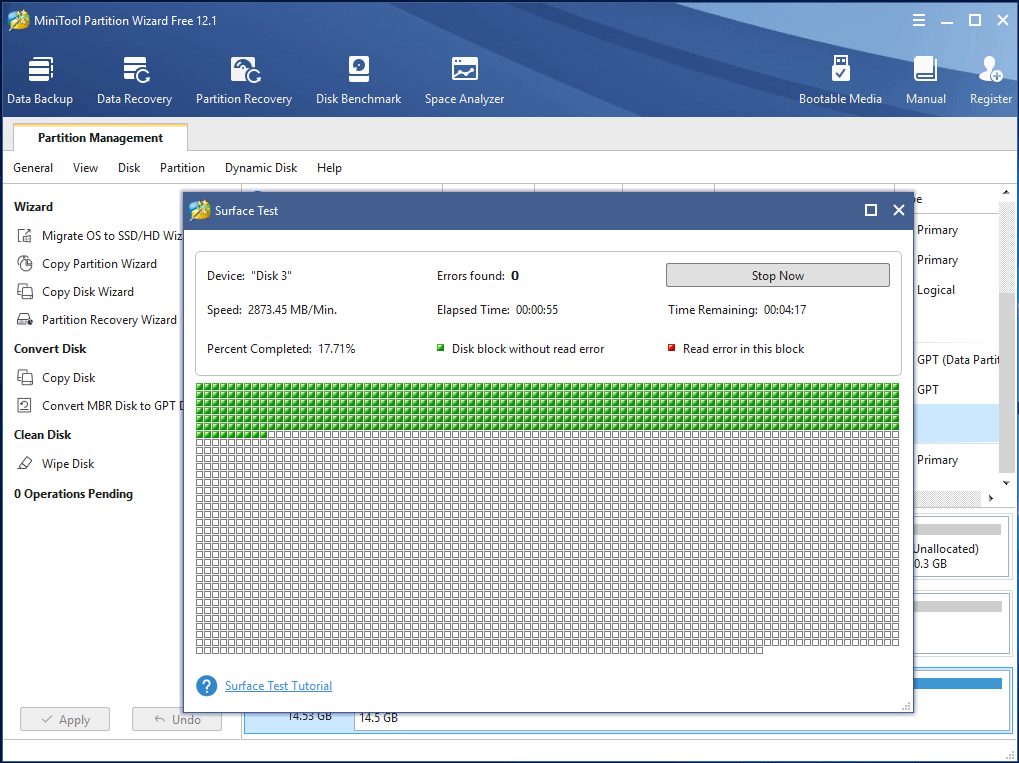
Step 3: Then click Start Now to begin this process. After a few minutes, all sectors of the target disk will be checked. From the figure, as follows, you know MiniTool Partition Wizard will mark Disk block without read error green and mark Read error in this block red.
If no bad sectors are found, skip to Solution 3. If bad sectors are found, you’ll need to shield them to avoid running into “the format did not complete successfully RAW SD card” again.
Once bad blocks are shielded, try formatting your removable drive again — “the format did not complete successfully SD card” issue should no longer occur.
Solution 3: Use Command Prompt to Complete Formatting
If Windows Disk Management cannot format the drive, you can try formatting it from Command Prompt.
- Open Command Prompt as administrator.
- Finally, type FORMAT X: /FS:FAT32 /Q /V:PenDrive (X refers to the drive letter of your drive.). And wait for the formatting process to be finished.
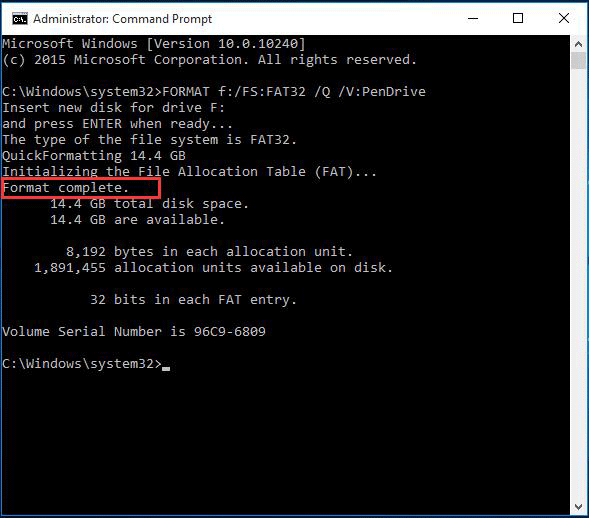
This way comes from a Microsoft forum, check it to learn much.
Solution 4: Use MiniTool Partition Wizard to Format
If you fail to format your USB key or SD card with last method, “the format did not complete successfully RAW USB” issue is still not solved. Now try to use a professional formatting tool. Here MiniTool Partition Wizard Free Edition is also useful for disk formatting.
MiniTool Partition Wizard FreeClick to Download100%Clean & Safe
How to perform the formatting operation with this free partition manager? Look at the step-by-step guidance as follows:
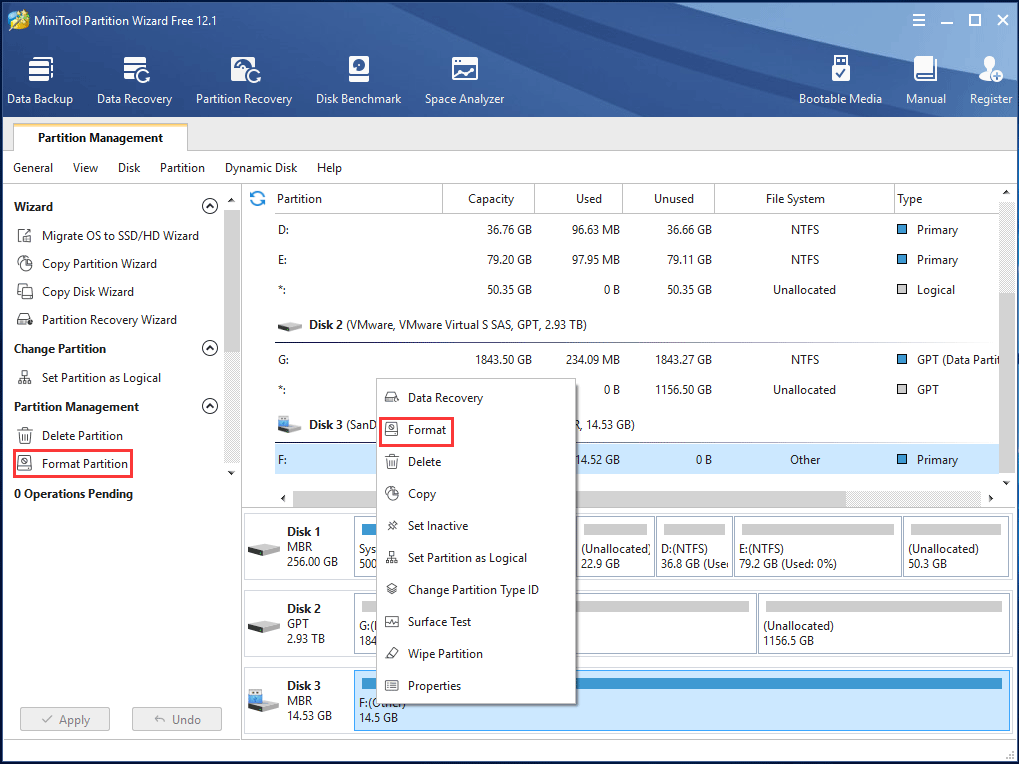
Step 1: Launch MiniTool Partition Wizard Free Edition. Then select the partition of your SD card, USB key, external hard drive, SSD or memory stick in the main interface, and click Format Partition from Partition Management menu in the left pane. Or right click on the target drive to select the Format feature.
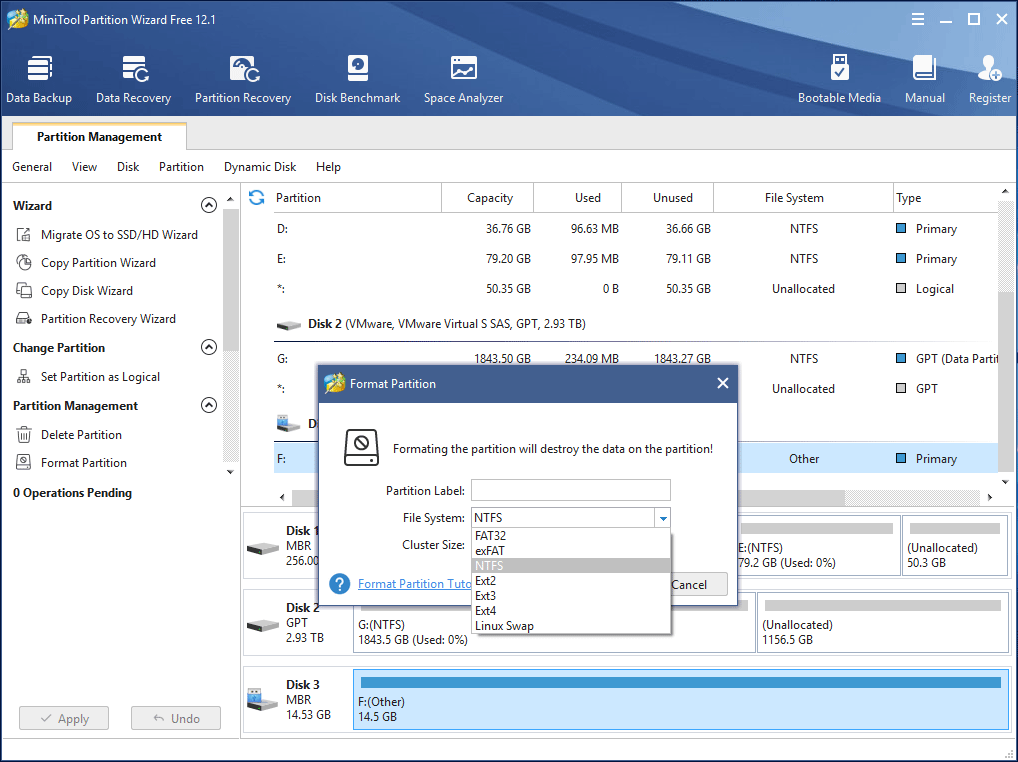
Step 2: Then in the pop-up window, select FAT32 as the file system of your target partition or set the cluster size by yourself. Click OK to return to the main interface.
Step 3: Finally, click Apply to make this change effective.
If there is more than one partition on your removable drive, external hard drive or SSD, please repeat the above steps to format the entire disk. With this tool, “the format did not complete successfully micro SD card” error can be fixed.
Solution 5: Wipe the Entire Disk
If Windows DM tool is unable to format your micro SD card or any removable drive, in addition to using the third-party software to format it, there is another option for you to choose, that is to wipe the entire disk.
Step 1: After entering MiniTool Partition Wizard main interface, right click on the target disk and select Wipe Disk.
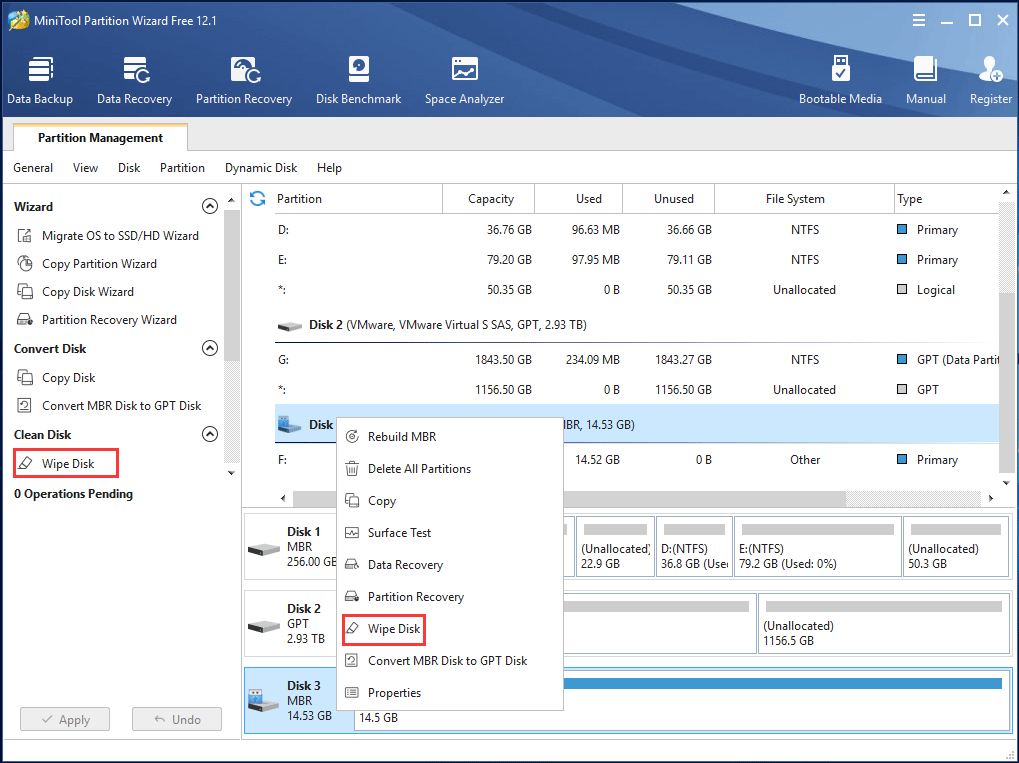
Step 2: Then you can see there are five wiping choices, and here we recommend you to choose the first or second method with fast speed. Next hit the OK button.
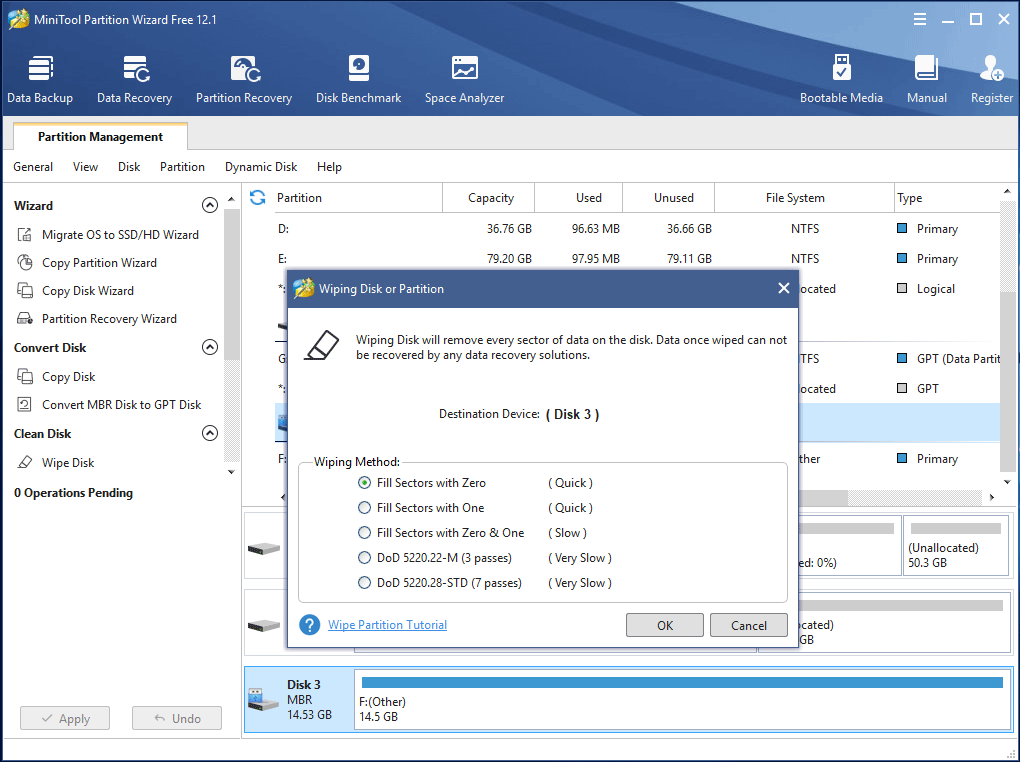
Step 3: At last, execute this wiping operation by hitting Apply.
Solution 6: Recreate Partition
In addition to the above ways to fix “virtual disk manager the format did not complete successfully SD card” issue, you can also delete the target partition and create a new partition by Windows DM.
If you have “the format did not complete successfully external hard drive” issue and decide to delete the partition on an SSD or external hard drive, you can use Delete Volume to delete the RAW volume. And then use New Simple Volume to create a new partition. During the process of recreating the partition, formatting will be done.
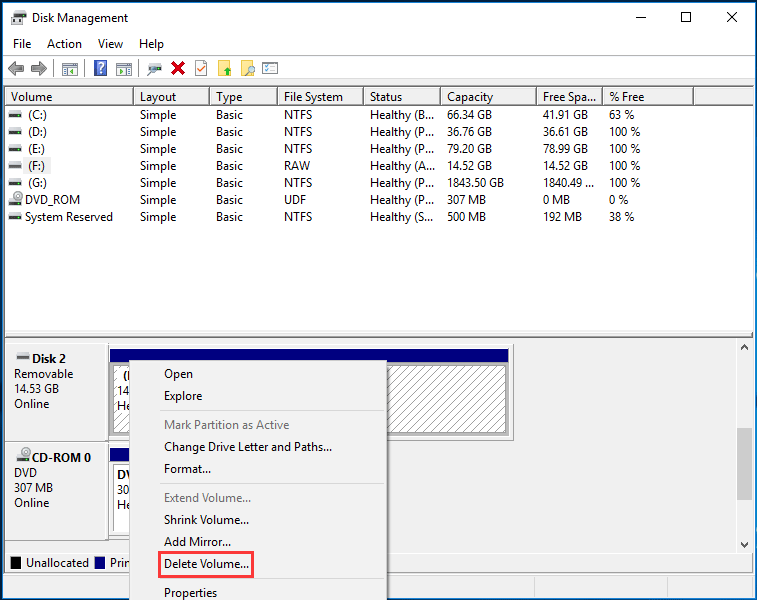
Sometimes, when deleting the RAW volume of the removable disk, for example, a micro SD card, memory stick or USB key, Windows DM tool may not work with the gray Delete Volume feature.
In this case, what should you do to fix “the format did not complete successfully RAW SD card/RAW USB” issue? Fortunately, you can also use MiniTool Partition Wizard to do this work.
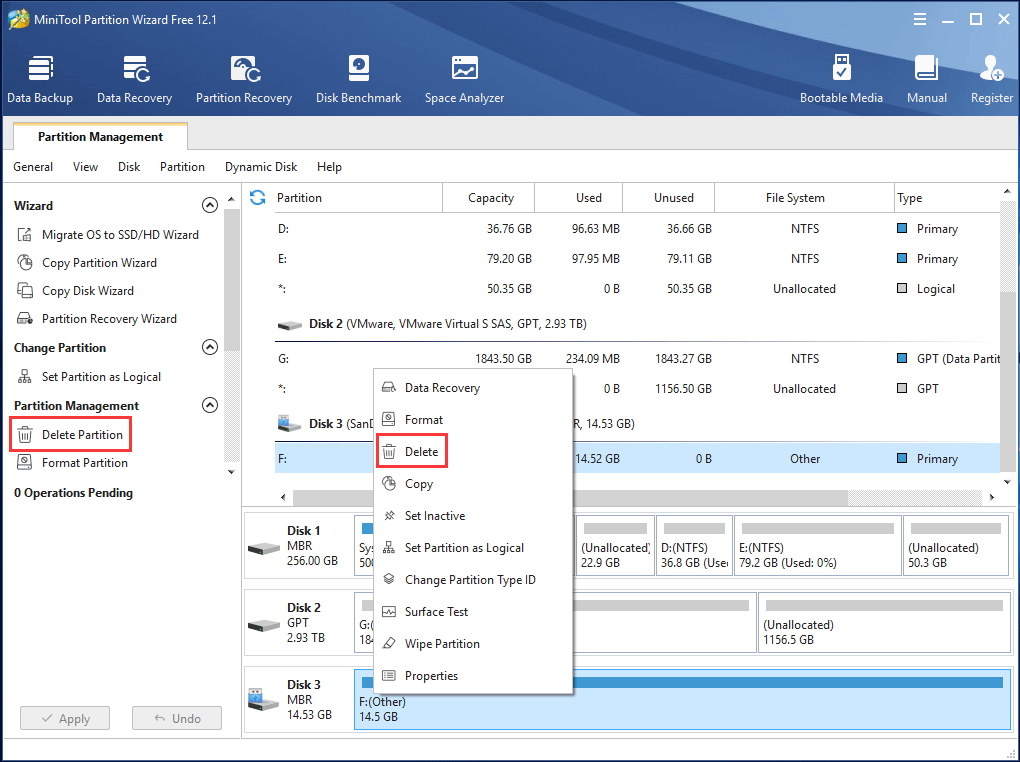
Step 1: Open MiniTool Partition Wizard Free Edition, and then select the partition you want to delete and click Delete Partition in the left pane.
Step 2: Then select Create Partition from Partition Management menu. Here set the file system of the target partition as FAT32. (USB drives use it by default.)
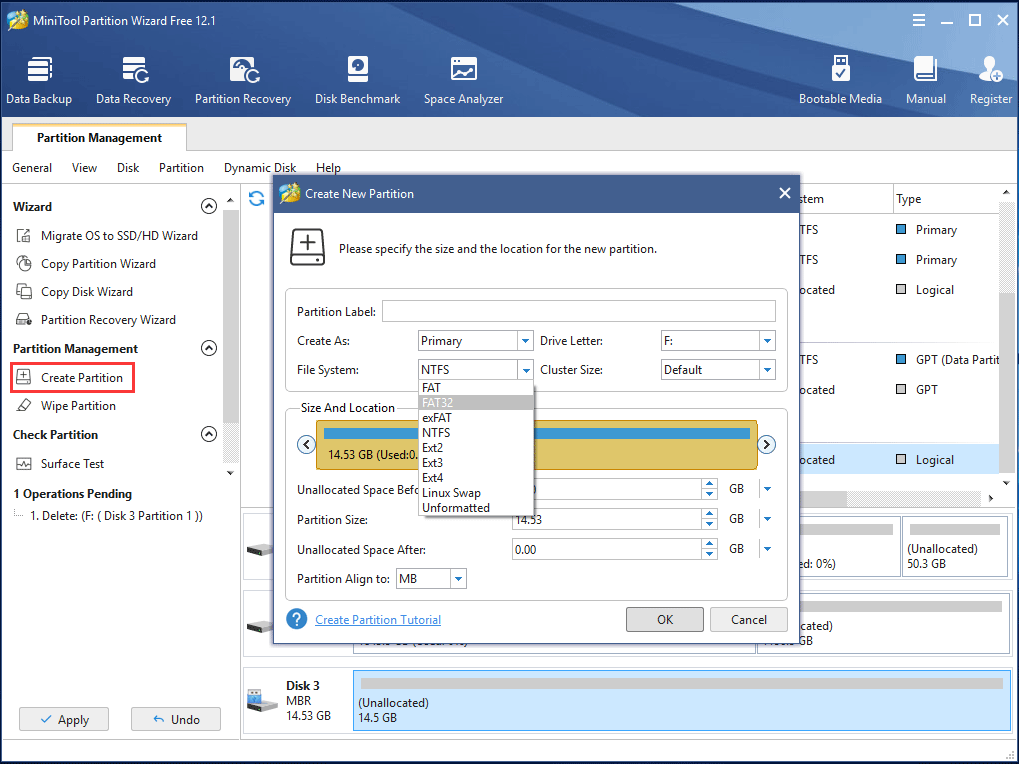
Step 3: Then let all changes effectual by hitting Apply. By recreating the partition, it is useful to fix this formatting error.
How to Fix “The Format Did Not Complete Successfully” ErrorClick to Tweet
Bottom Line
In this post, we show you what the error “format did not complete successfully in Disk Management” is, the specific situations about this issue on an SSD, external hard drive, USB drive, micro SD card or memory stick and how to fix Windows 10/8/7 Disk Management the format did not complete successfully error, especially MiniTool Partition Wizard helps a lot.
MiniTool Partition Wizard FreeClick to Download100%Clean & Safe
On the other hand, we welcome any question or suggestion for this post or our software from you. Please leave one comment in the following text box or send us an email via [email protected]. Much appreciated!
The Format Did Not Complete Successfully FAQ
- Remove virus
- Check bad sectors
- Use Diskpart to complete formatting
- Use MiniTool Partition Wizard to format
- Wipe the entire removable disk
- Recreate the partition
About The Author

Position: Columnist
Charlotte is a technology columnist with a strong focus on the Windows operating system, specializing in disk management, backup, and data recovery. She is passionate about analyzing computer errors, identifying root causes, and delivering practical solutions. In her free time, she stays updated on the latest developments in computer systems and hardware while continuously learning new technologies to broaden her expertise. Her writing style is clear and easy to understand, making complex technical topics accessible even to users with limited computer knowledge.
User Comments :