A Windows reinstall is installing Windows on a computer that has Windows set up already. It is usually performed for the following reasons.
- The PC has crashes, freezes, driver issues, or severe Windows Update errors that other fixes can’t resolve. Reinstalling Windows can be the last resort.
- The PC is infected with viruses, while the antivirus software takes no effect. Then, reinstall Windows to wipe everything, removing persistent viruses, rootkits, and unwanted bloatware.
- The PC accumulates junk that slows it down. A Windows reinstall can clear out accumulated junk, unnecessary background programs, and registry clutter that slow down your computer.
- The in-place upgrade failed. Then, back up data and reinstall Windows thoroughly can avoid issues that causes the in-place upgrade failure.
- The computer has been used for many years, and you want to start fresh. Reinstalling Windows will offer a system free from years of installed apps, settings, and leftover files for better stability and speed.
How to reinstall Windows 10/11? Try the following 3 methods. However, before reinstalling Windows, back up your data to an external drive or cloud services because a Windows reinstall may erase data.
Reinstall Your Current Version of Windows 11
On Windows 11 (the 2022 annual update or later versions), there is a feature named Fix problems using Windows Update. It will reinstall the same version of Windows already on your PC, repair system files and components, while preserving your apps, files, and settings.
This feature is usually used to fix PC problems, especially issues related to Windows Update. In addition, if an update fails to install because of problems related to system files or components, the PC will also prompt you to “Reinstall your current version of Windows to repair system files and components.”
How to reinstall your version of Windows? Here is the guide:
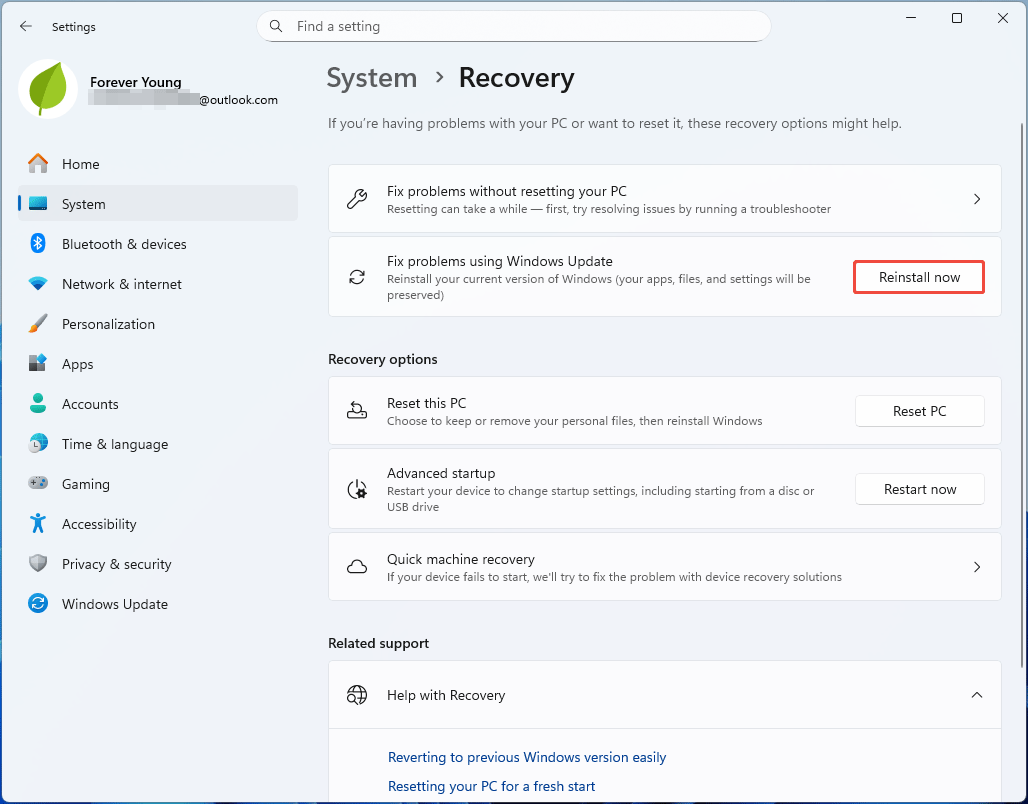
Step 1: Enable the Fix problems using Windows Update feature.
- Press the Windows logo key + I to open Settings.
- Go to System > Recovery.
- Find the Fix problems using Windows Update feature and click Reinstall now.
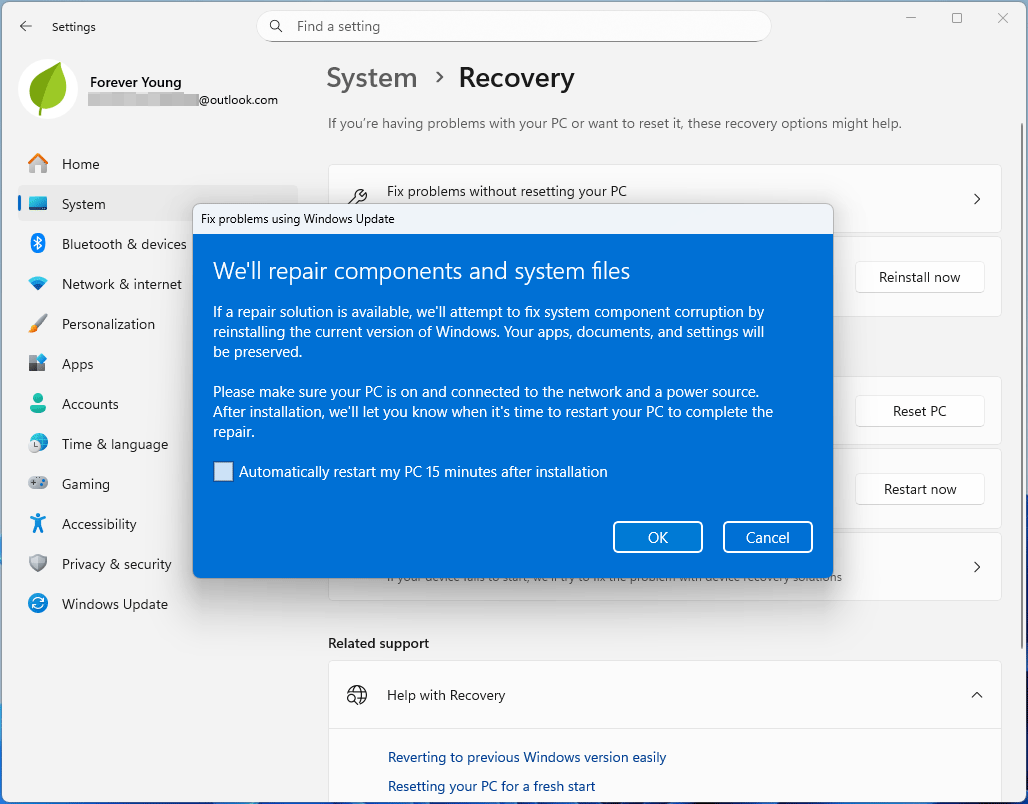
Step 2: In the pop-up window, read the message. Then, choose if you want to allow the PC to automatically restart 15 minutes after the installation completes. If you are ready to start the reinstallation, click OK.
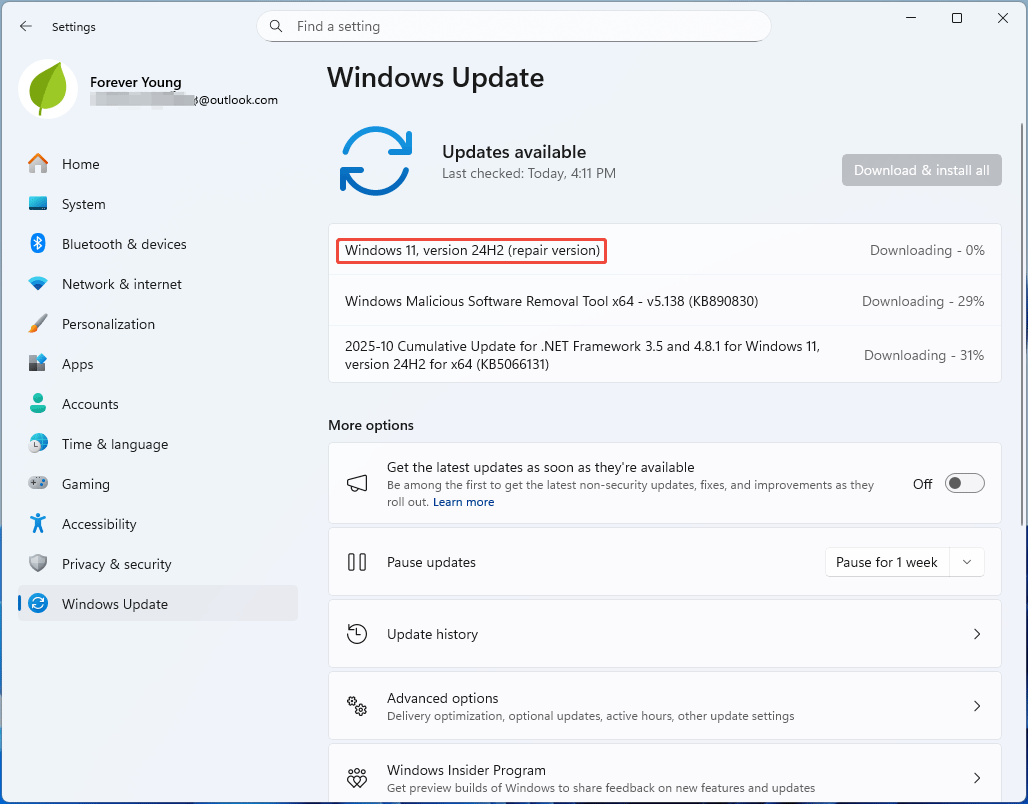
Step 3: The reinstall process will take you to the Windows Update page, and start downloading and installing a repair version of the last operating system update that was successfully installed on your PC. Once the reinstall is complete, restart your PC immediately or wait for the restart to perform automatically.
Reinstall Windows via PC Reset
PC reset also reinstalls Windows, giving you options to either keep personal files while removing apps and settings, or remove everything for a complete factory fresh start. Follow the guides below to reset Windows 10/11.
Reset the PC from Windows
If you can enter Windows, the PC reset will be much simpler.
Step 1: Enable the Reset this PC feature.
- Windows 11: Open Settings and go to System > Recovery. Find Reset this PC and click the Reset PC button.
- Windows 10: Open Settings and go to Update & Security > Recovery. Under Reset this PC, click Get started.
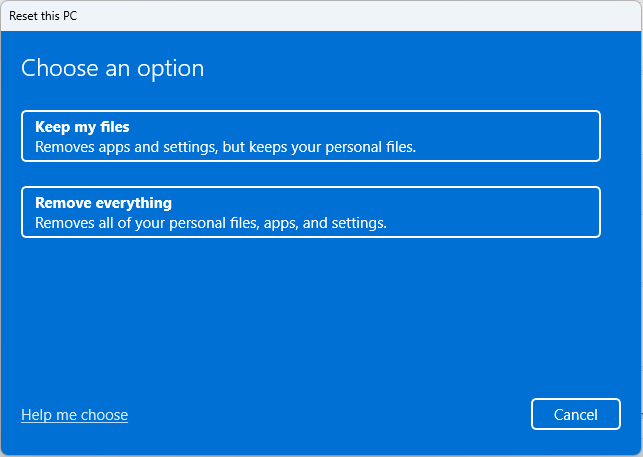
Step 2: Choose Keep my files or Remove everything.
- Keep my files: When reinstalling Windows, it will remove apps and settings, but keep your personal files (documents and photos).
- Remove everything: It will delete all things on the computer and then reinstall Windows. This option is similar to a clean install.
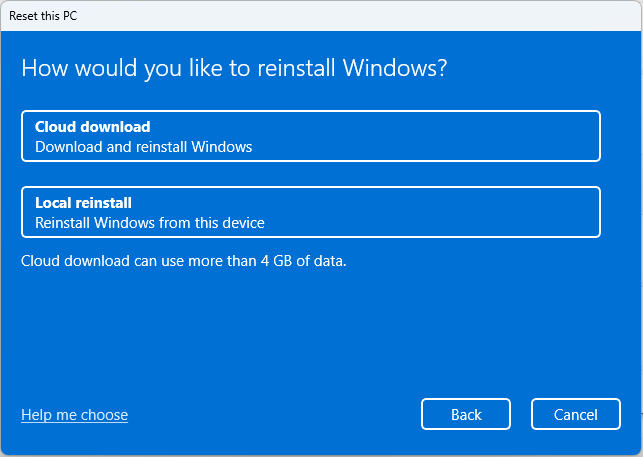
Step 3: Choose Cloud download or Local reinstall.
- Cloud download: It will download the latest Windows version from Microsoft to reinstall Windows.
- Local reinstall: It reinstalls Windows using the local recovery image (winre.wim), which is stored in the Windows Recovery partition and maintained by major Windows updates. Therefore, it will not install the version of Windows that came with the computer, but the currently used Windows version.
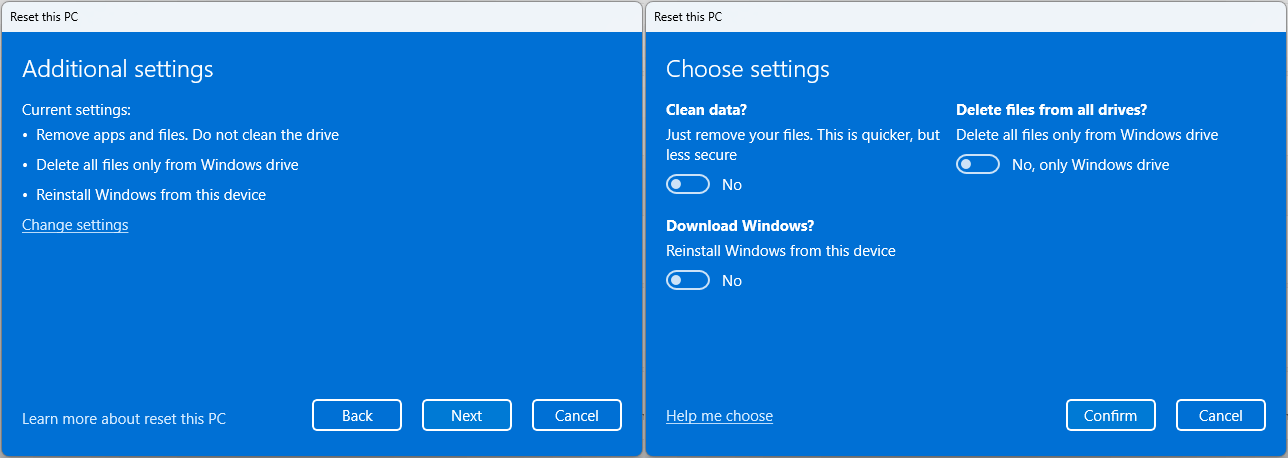
Step 4: Review Additional settings. If you want to change some of them, click Change settings, choose the settings you want, and then click Confirm to get back to Additional settings. Then, click Next.
- Download Windows: It allows you to change between Cloud download and Local reinstall.
- Clean data: This option only appears after you choose Remove everything in Step 2. It lets you choose whether to just remove files via quick format or fully clean the drive via full format. The former is fast, leaving data recoverable. The latter takes hours to overwrite the drive with zeros, making data unrecoverable.
- Delete files from all drives: This option also appears only after you choose Remove everything. It determines whether to clean data from the Windows drive (the C: drive) or all drives.
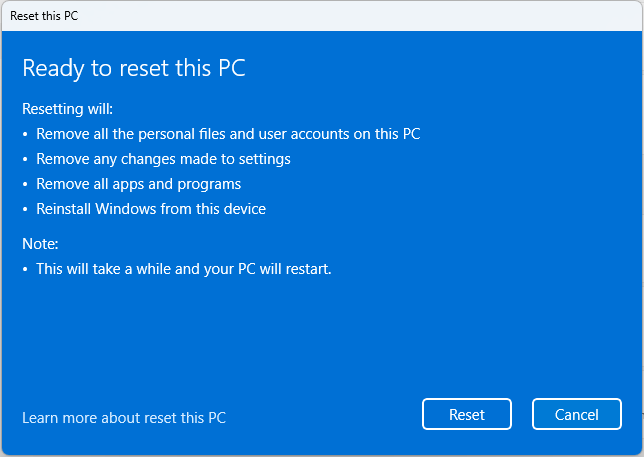
Step 5: Click Reset to start resetting this PC. Wait until the reset process is complete.
![How to Wipe a Computer Windows 10 [4 Ways]](https://images.minitool.com/partitionwizard.com/images/uploads/2021/09/how-to-wipe-a-computer-win10-thumbnail.png)
Reset the PC from WinRE
If the PC won’t boot, you can reset it from WinRE (Windows Recovery Environment). Here is the guide.
Step 1: Interrupt the booting process 3 times to enter WinRE. The process should be as follows: power on the PC, once the PC logo appears, power down the PC, and then repeat this process 2 more times.
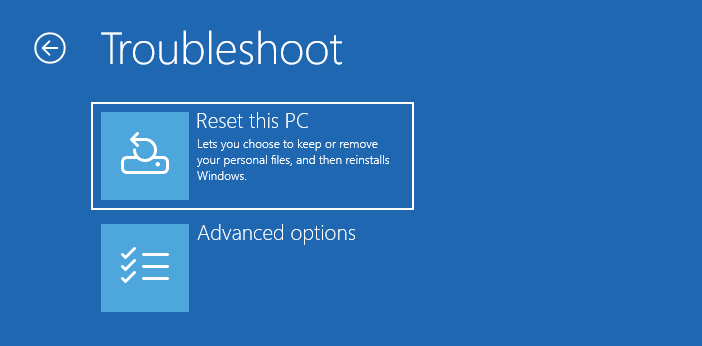
Step 2: Once in WinRE, go to Troubleshoot > Reset this PC.
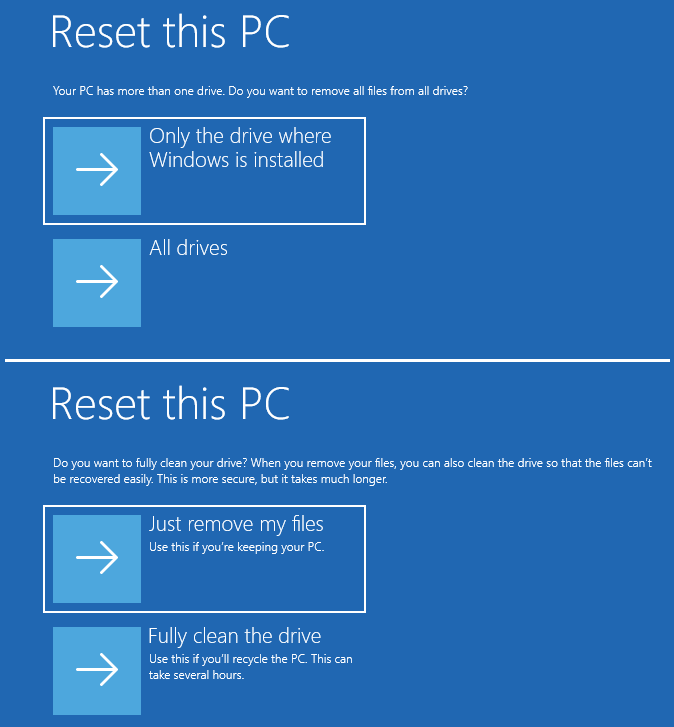
Step 3: Choose Keep my files or Remove everything. Then, choose Cloud download or Local reinstall.
Step 4 (Only for the Remove everything option): Choose Only the drive where Windows is installed or All drives. Then, choose Just remove my files or Fully clean the drive.
Step 5: Click Reset to start resetting the PC.
Reinstall Windows with USB
This method is usually used when the PC won’t boot, and it works even if the computer can’t enter WinRE. In addition, it can be used to install a different Windows edition.
Reinstall Windows 11 with USB
Here is how to reinstall Windows 11 using a USB drive.
Step 1: Create a Windows 11 installation USB drive.
- On a well-running PC, go to Microsoft’s Download Windows 11 webpage.
- Under Create Windows 11 Installation Media, click Download Now to get MediaCreationTool.
- Connect a USB drive to the computer and run MediaCreationTool.
- Accept license terms.
- Select Language and Edition.
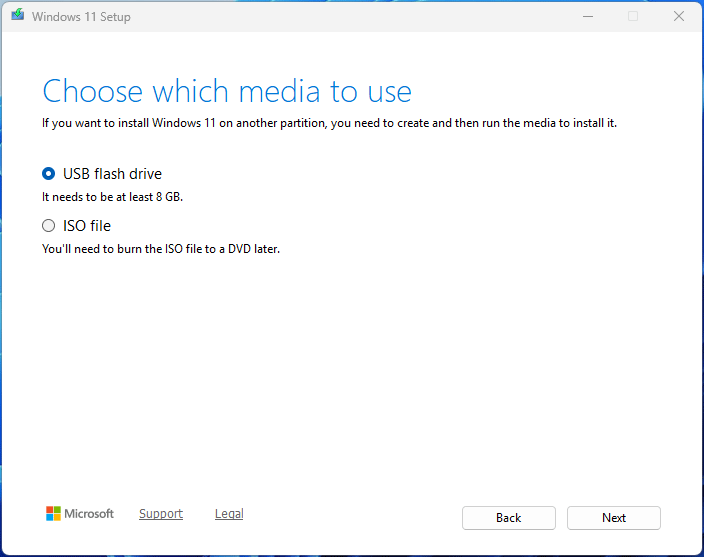
- It will ask you to choose which media to use. Choose the USB flash drive option.
- Select the drive letter of the USB drive to start creating the Windows 11 installation USB drive.
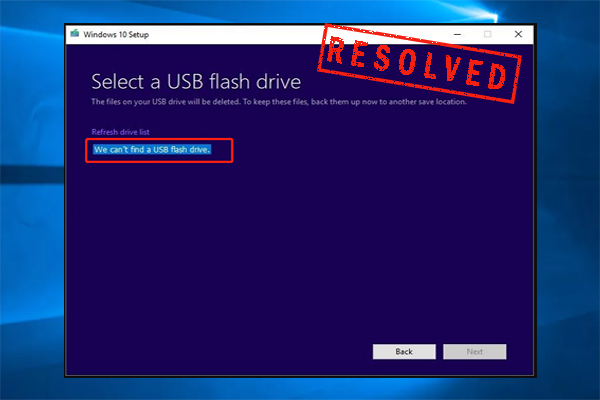
Step 2: Use the USB drive to boot the PC that needs to reinstall Windows.
- Power down the computer that needs to reinstall Windows.
- Connect the Windows 11 installation USB drive to it.
- Power on the computer and press the boot menu key (F12, F2, Esc, F10, Del, etc.).
- On the Boot Menu, select the USB drive and press Enter to boot the PC from the USB drive.
Step 3: Go through the Windows 11 installation process.
- Once the computer boots up, you will see the Windows 11 Setup interface.
- Set the language to install, Time and currency format, and Keyboard or input method.
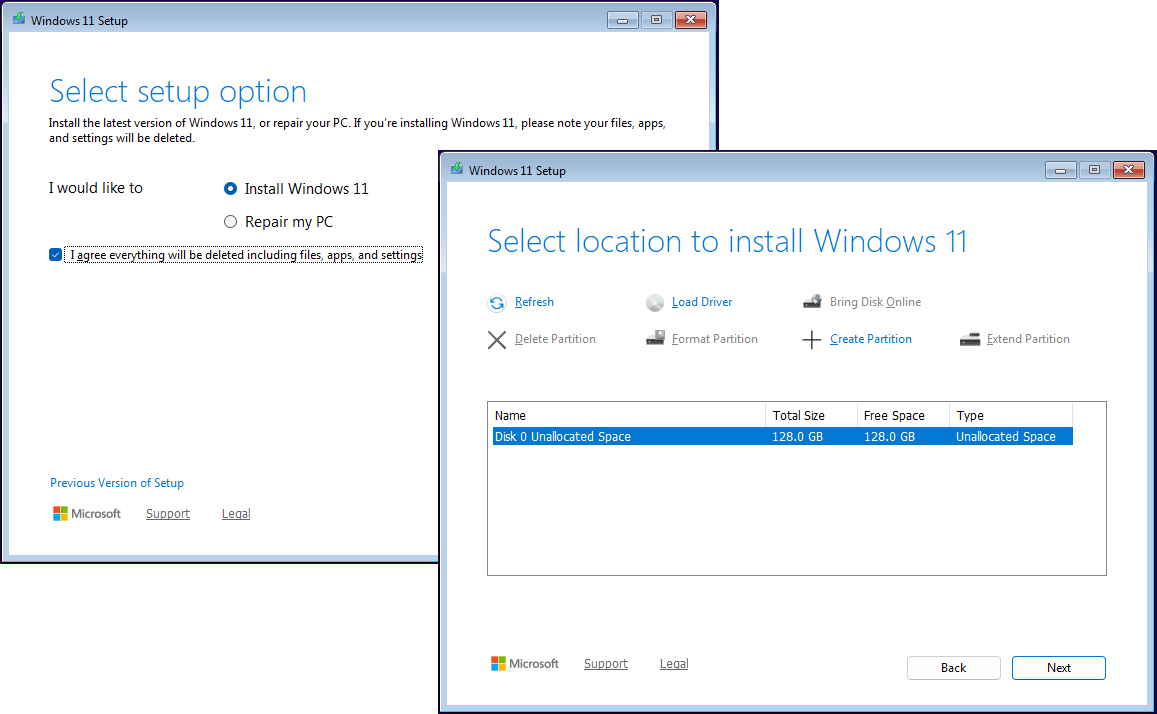
- Select the Install Windows 11 option and check the box before I agree everything will be deleted including files, apps, and settings.
- Click I don’t have a product key in the bottom left corner.
- Select a Windows 11 edition to install. It’s recommended to choose the one for which you have the product key.
- Accept the license terms.
- You need to select the location to install Windows 11. Select the C drive directly, which will just clean data on the Windows drive. Or, use the Delete Partition feature to delete these partitions one by one and choose the unallocated space to install Windows 11.
- If you are Ready to install, click Install to start the Windows 11 reinstallation.
- Wait until the reinstallation is complete.
Reinstall Windows 10 with USB
Reinstalling Windows 10 with a USB is similar to reinstalling Windows 11, but there is a little difference. Here is the guide.
Step 1: Create a Windows 10 installation USB drive.
- Go to Microsoft’s Download Windows 10 webpage.
- Click Download Now to get MediaCreationTool_22H2.
- Connect a USB drive and run this tool.
- Accept license terms.
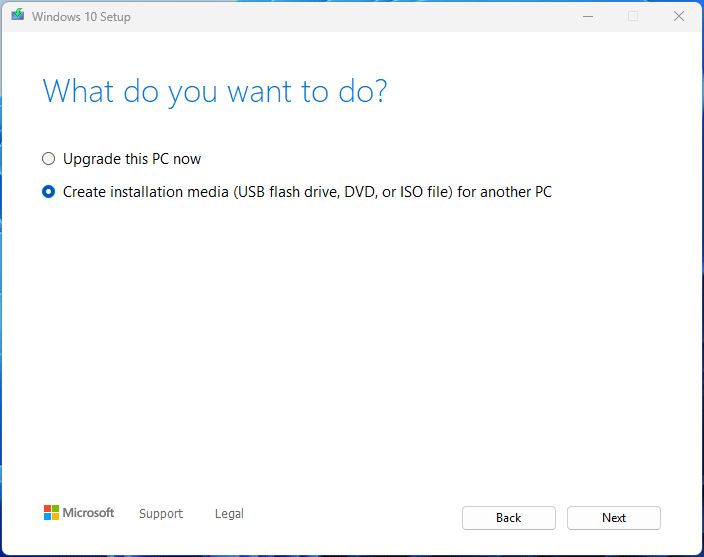
- When it asks you what you want to do, choose the Create installation media (USB flash drive, DVD, or ISO file) for another PC option.
- Select Language, Edition, and Architecture.
- Choose which media to use. The USB flash drive option is recommended.
- Select the drive letter of the USB drive to start the creation.
Step 2: Use the method described above to boot the PC to be reinstalled from the USB drive. Then, go through the installation process.
- Once the Windows Setup opens, review the Language to install, Time and currency format, and Keyboard or input method. Then, click Next.
- Click Install now.
- Select I don’t have a product key at the bottom.
- Choose a Windows 10 edition.
- Accept the license terms.
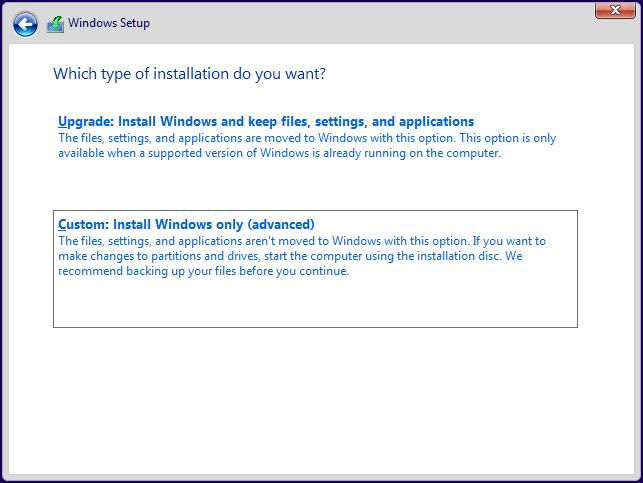
- Choose Custom: Install Windows only (advanced).
- Where do you want to install Windows? Select the Windows drive, or delete all drives and select the unallocated space.
- The installation process will start and wait until it finishes.
Clone Your System Disk for Data Protection
Computers can malfunction for various reasons. To protect the computer, cloning the computer system disk is one of the measures.
MiniTool Partition Wizard is capable of this job. Its Copy Disk feature can clone the system and data to an external hard drive. Once the computer goes wrong, you can clone the system and data from the external drive back to the computer.
Here is how to clone the system disk to an external hard drive.
MiniTool Partition Wizard DemoClick to Download100%Clean & Safe
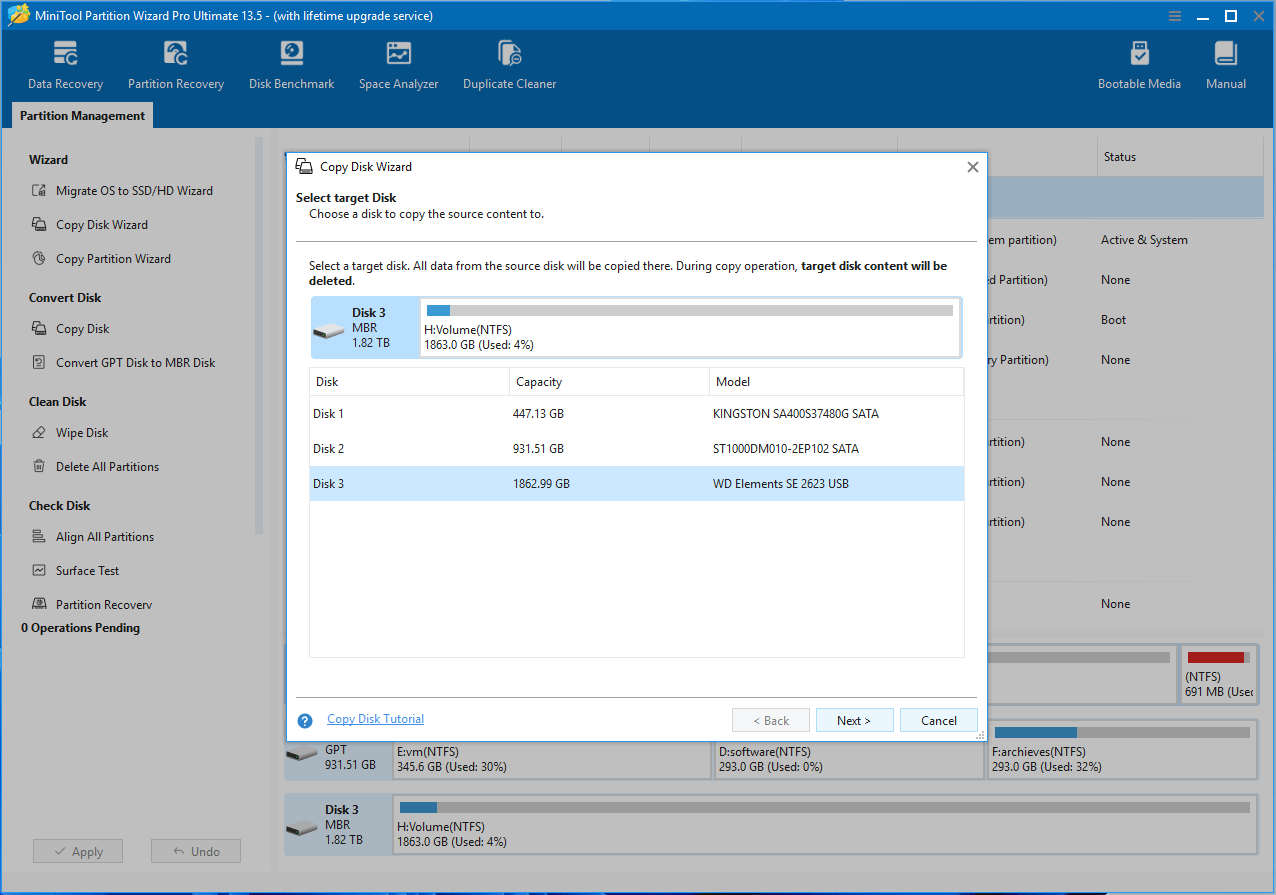
Step 1: Connect an external hard drive to your computer. Launch MiniTool Partition Wizard. Right-click the system disk and choose Copy.
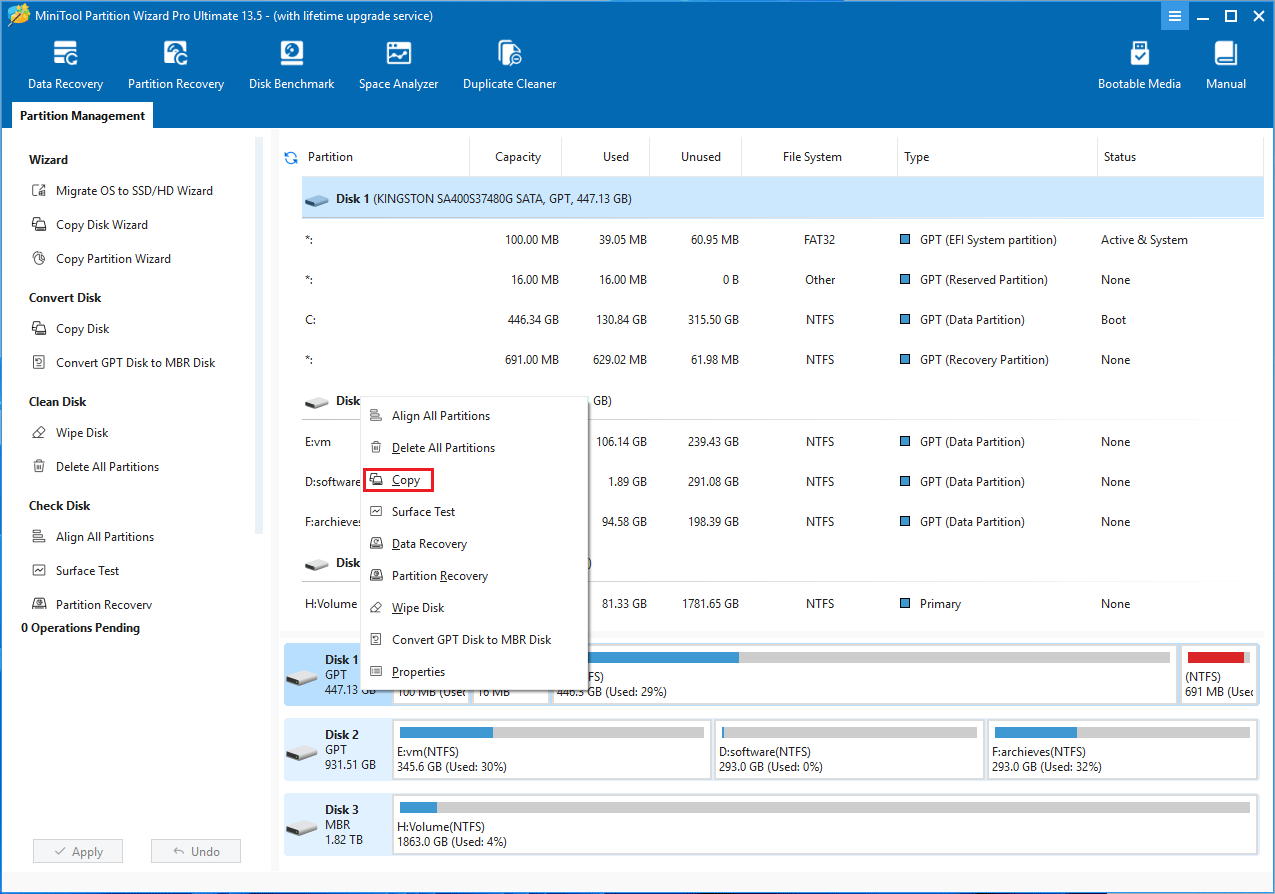
Step 2: Select the connected external hard drive as the target disk, and then click Next. Read the warning information and click Yes to confirm that all data on the disk will be destroyed.
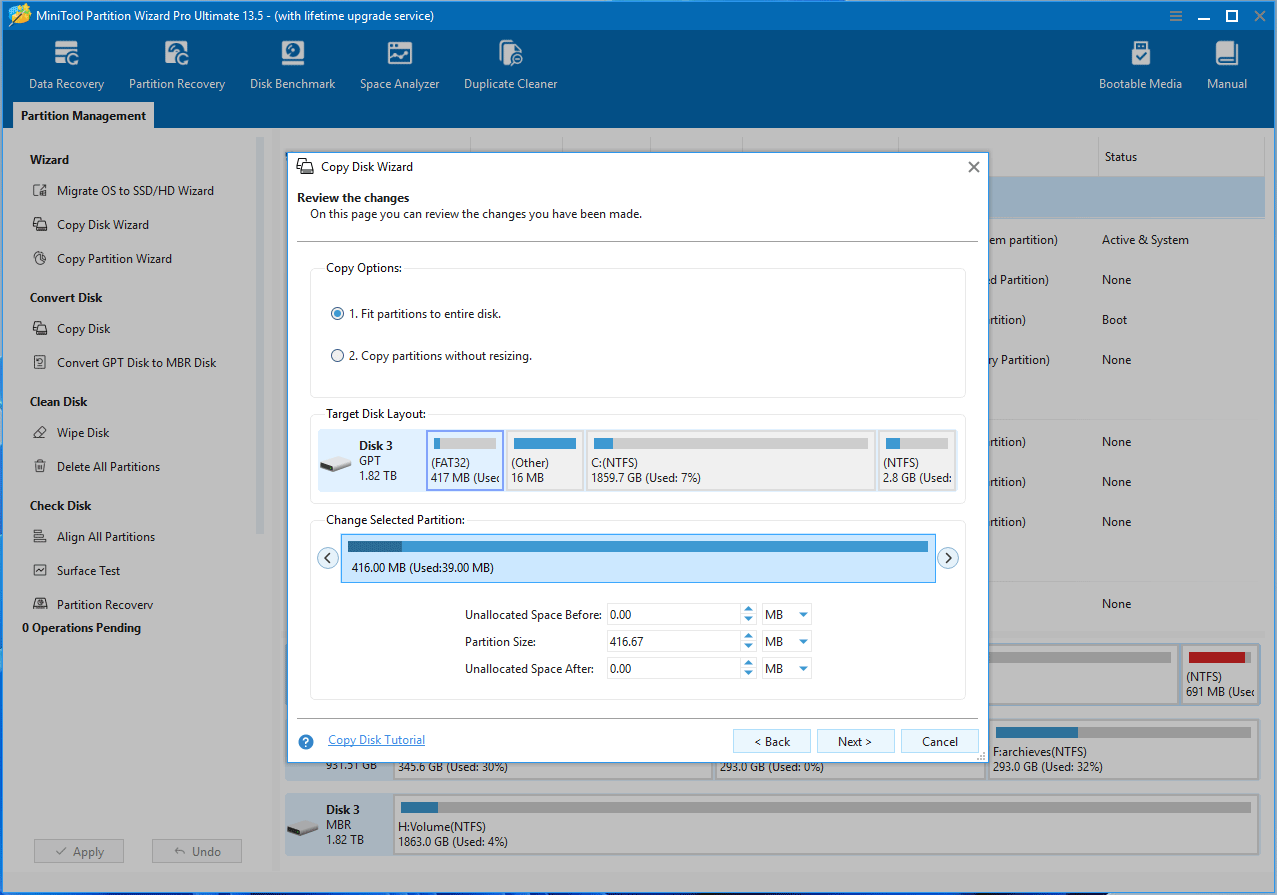
Step 3: Review the copy options and target disk layout. Then, click Next. Read the notice and click OK.
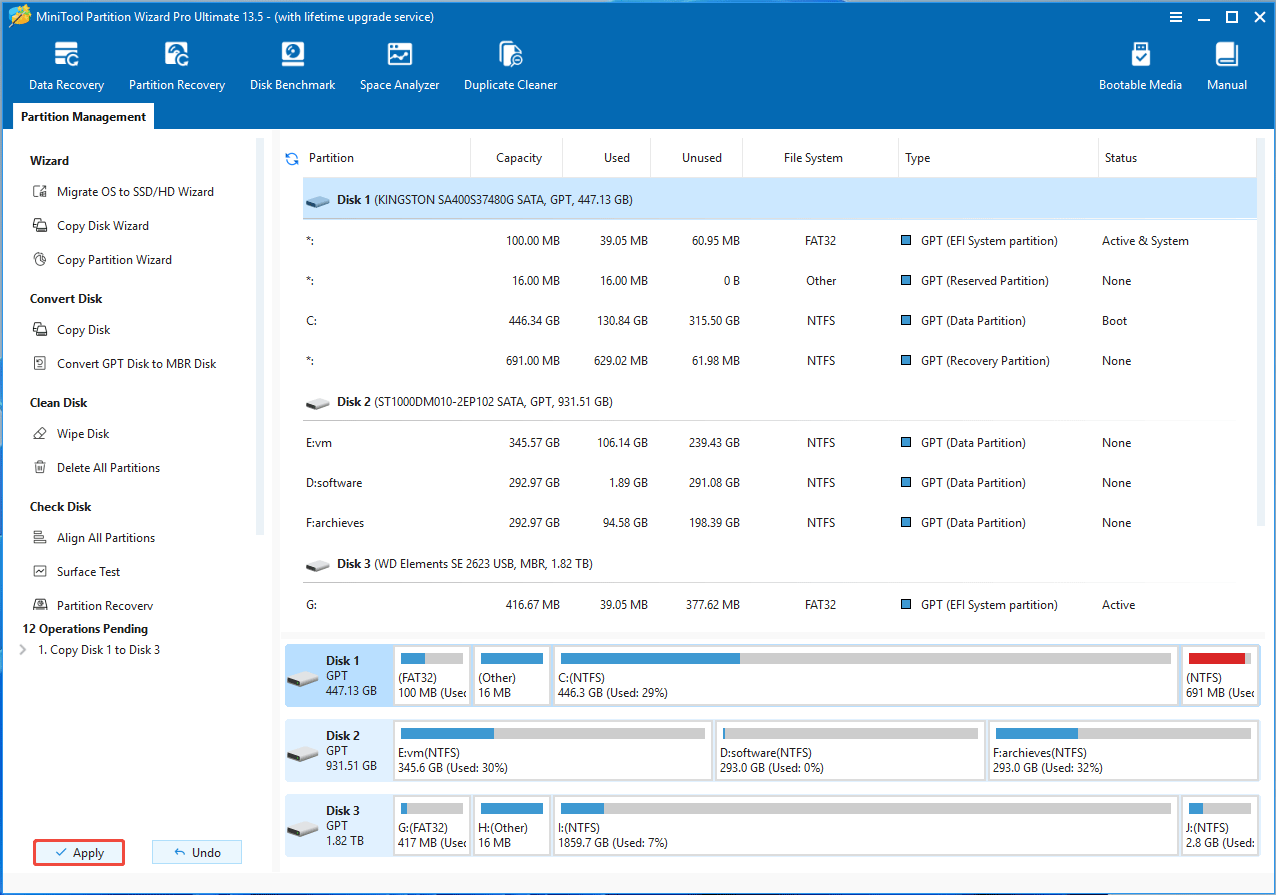
Step 4: Read the note information and click Finish. Click Apply to execute the disk copy task.
How to Reinstall Windows FAQ
1. Documents, Photos, Videos, Music, desktop files, downloaded files, etc.
2. Browser data, especially bookmarks and saved passwords.
3. Other important files, like program license keys, important email data, and any crucial game saves.
Choose a reset for convenience to keep files, but opt for a clean install for maximum thoroughness, especially for persistent problems or upgrades.
Bottom Line
This post shows you how to reinstall your version of Windows 11, reinstall Windows 11/10 via PC reset, and reinstall Windows 11/10 with a USB. It also offers a guide to computer cloning with MiniTool Partition Wizard. If you encounter issues when copying a disk with this software, contact our support team via [email protected] for help.
About The Author

Position: Columnist
Linda has been an editor at MiniTool for seven years. She continuously learns about computers and puts her knowledge into practice. Moreover, she is particularly knowledgeable in disk management, data recovery, system installation, and PDF editing. Her articles typically reference multiple examples or are based on her own experience, providing users with the most suitable solutions.
User Comments :