Can Raspberry Pi run Windows? What do you need to prepare for the installation? How to install Windows 10 Raspberry Pi 4? If you are trying to figure them out, this post of MiniTool is what you need.
Can You Run Windows 10 on Raspberry Pi 4
Raspberry Pi is a series of small single-board computers developed by the Raspberry Pi Foundation, while Windows 10 is a personal computer operating system created by Microsoft as a part of the Windows NT family. It is a type of bare computer without an operating system and you have to install the official Raspberry Pi OS on an SD card to boot the computer.
Here comes a new question: can Raspberry Pi run Windows 10? According to Microsoft, the only operating system for Raspberry Pi is an old version of Windows 10 IoT Core, which allows you to execute Visual Studio code on the computer, but it can’t work as a personal OS with a GUI. That is to say, there is still no way to directly install Windows on Raspberry Pi.
Fortunately, many developers have made it possible to run Raspberry Pi Windows 10 by using some tools like the WoR project. Well, how to install Windows 10 on Raspberry Pi? Don’t worry. We will guide you through the entire installation process.
![How to Set up Raspberry Pi Minecraft Server [Complete Guide]](https://images.minitool.com/partitionwizard.com/images/uploads/2021/06/raspberry-pi-minecraft-server-thumbnail.jpg)
What You Need to Install Windows 10 on Raspberry Pi 4
The installation is a relatively complex and time-consuming process. To complete the installation smoothly, you need to prepare some important hardware and software. Here we list them as follows:
Hardware requirements:
- A Raspberry Pi 4 computer (Windows 10 is a fairly heavy system. So, it’s highly recommended you use a Raspberry Pi 4 with 8GB RAM if possible.)
- A Windows 10 computer
- A 16GB or larger microSD card
- A keyboard, mouse, HDMI, and power cable for the Raspberry Pi 4
- USB to Ethernet or Wi-Fi dongle
- Bluetooth dongle (if you want to use Bluetooth)
Software requirements:
- The WoR (Windows on Raspberry Pi) tool
- The UUP file for Windows 10 RAM (It will help you download the cmd file used to build the Windows 10 Raspberry Pi ISO file)
Once you have already these tools and files, you can proceed with the following tutorial.
How to Install Windows 10 on Raspberry Pi 4
There are 6 main parts on how to Windows 10 on Raspberry Pi 4. Since the process is relatively long, please follow the steps below patiently and carefully.
Part 1. Update Your Raspberry Pi Firmware
Before installing Windows 10 on the Raspberry Pi, you need to ensure that your Raspberry Pi 4 firmware is up to date. If not, you can follow the simple guide below to check and update its firmware:
Step 1. Start your Raspberry Pi computer and click on the Terminal icon at the top menu bar to access the Command Line. Also, you can select Menu > Accessories > Terminal or press Ctrl + Alt + F1 keys to open the Command Line.
Step 2. In the pop-up command prompt window, run the following commands in order:
- sudo apt update
- sudo apt full-upgrade
Once done, you can turn off your Raspberry Pi computer temporarily and switch to the Windows 10 computer.
Part 2. Download the Necessary Tool and File
The second part is to install the necessary tool and file on your Windows 10 computer. There are 2 important things to download: the WoR tool and UUP file. WoR is a practical tool developed to flash an ARM image of Windows 10 Raspberry Pi to a microSD card. The UUP file can be used to build the Windows 10 Raspberry Pi ISO file on your computer.
Step 1. Click here to download the WoR tool, and then extract the zip file and install the tool from the executable file.
Step 2. Click here to download the UUP file. On the download page, select the Type, Version, Language, Edition, and type download from the drop-down menu based on your needs.
Step 3. Select the “Download ISO compiler in One click!” option from the type download section and click on the first link on the right side to download the cmd file.

After you have downloaded the WoR program and UUP file, you can proceed to build the Raspberry Pi Windows 10 ISO file.
Part 3. Create the Windows 10 Raspberry Pi ISO File
Now, it’s time to build the Raspberry Pi Windows 10 ISO file on your computer. Since the cmd file may be blocked by your Windows Firewall from running, you can turn off Windows Defender Firewall temporarily.
Step 1. Double click the cmd file on your computer and click on Yes in the User Account Control window.
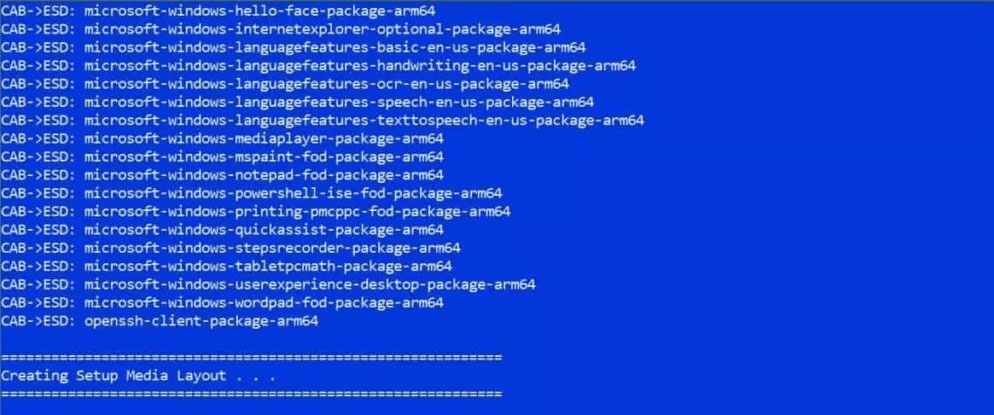
Step 2. Now, a terminal window pops up and it will begin downloading many important files. This process will take you a while because it will download several gigabytes from the Microsoft servers. So, make sure that your computer is connected to a stable internet connection during the process.

Step 3. Once downloaded, the tool will start creating the Windows 10 Raspberry Pi ISO file. It may take a few hours to complete depending on your computer performance.
Part 4. Format Your SD Card to FAT32
After you create the ISO file successfully, you can flash the file into your SD card using the WoR tool. Here you need to use a 16GB or larger SD card and make sure it is formatted to FAT32. If not, you need to format it first.
How to format SD card to FAT32? You can use Windows built-in tools like Disk Management and Diskpart, but both 2 tools have limitations in formatting an SD card larger than 32GB to FAT32. In addition, you may encounter some issues like formatting takes forever. So, we highly recommend you use MiniTool Partition Wizard. It is a multifunctional partition manager that can format SD cards, convert NFTS to FAT32, migrate OS, convert MBR to GPT, etc.
MiniTool Partition Wizard FreeClick to Download100%Clean & Safe
Step 1. Connect your SD card to the Windows 10 computer.
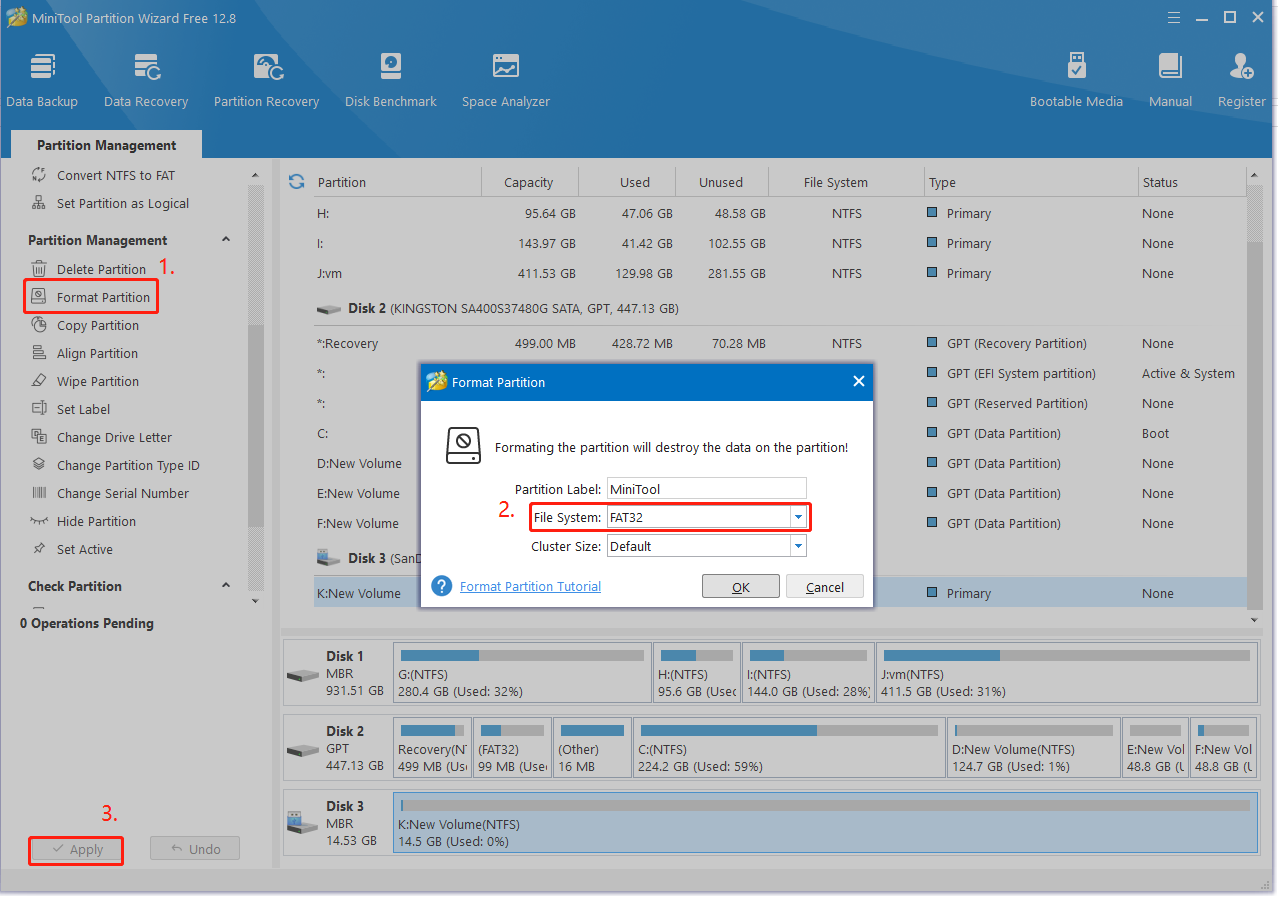
Step 2. Launch MiniTool Partition Wizard to get its main interface, and then select the SD card from the disk map and click on Format Partition from the left pane.
Step 3. In the pop-up window, select FAT32 from the File System drop-down menu and click on OK to save changes. Besides, you can set its Partition Label and Cluster Size based on your needs.
Step 4. Click on the Apply button to execute this formatting.
Now, the SD card should be formatted to FAT32 and you can proceed with the following part to flash the Windows 10 Raspberry Pi ISO file to the card.
Part 5. Flash the ISO File to SD Card
This part will show you how to flash the ISO file to your SD card. For that:
Step 1. Make sure your SD card is connected to the computer.
Step 2. Open the WoR installation folder and double click the WoR.exe file in it, and then click on Yes to run it.
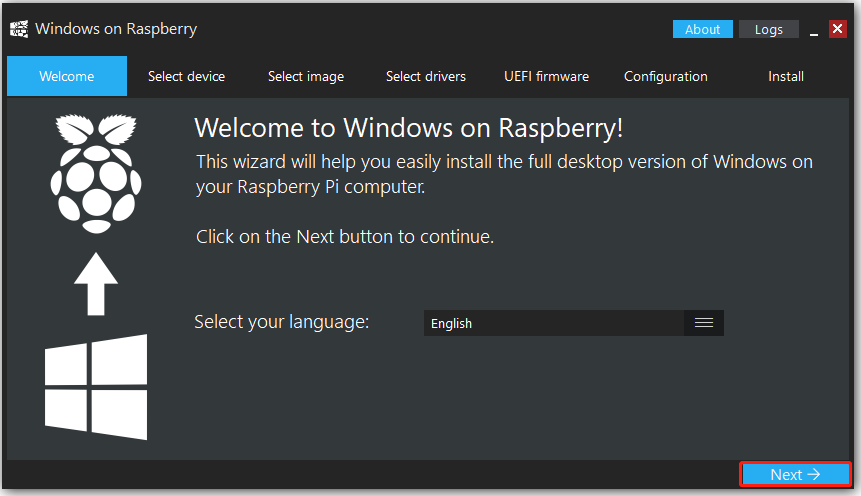
Step 3. A pop-up window like this shows up. Click on Next to continue.
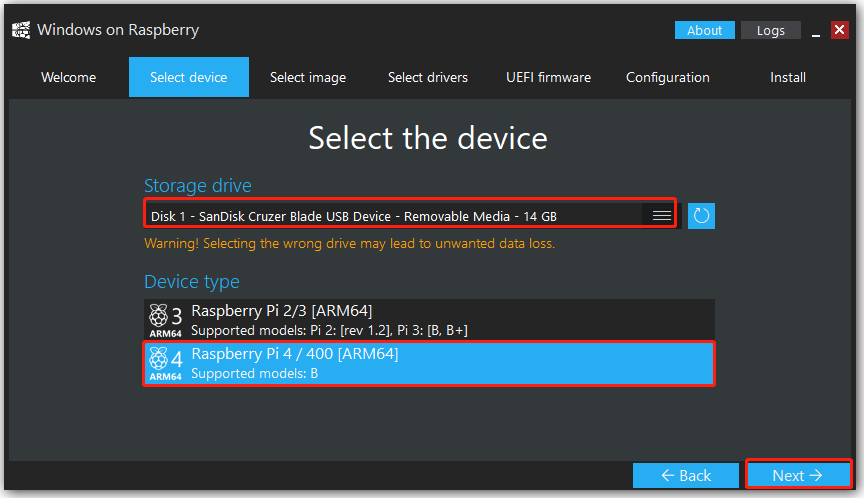
Step 4. Select your SD card from the Storge drive drop-menu and select Raspberry Pi 4 from the Device type section, then click on Next to continue.
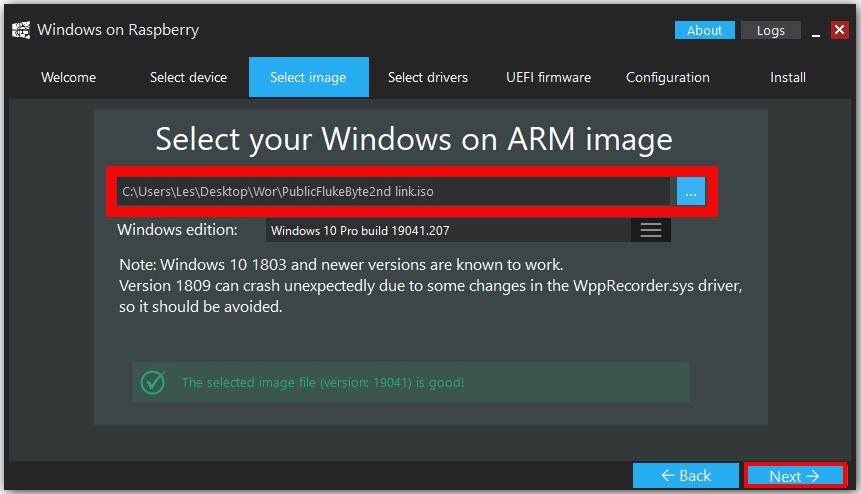
Step 5. In the Select image tab, click on the three-dot icon to select the ISO file you just created and select the Windows edition from the drop-down menu, and then click on Next.
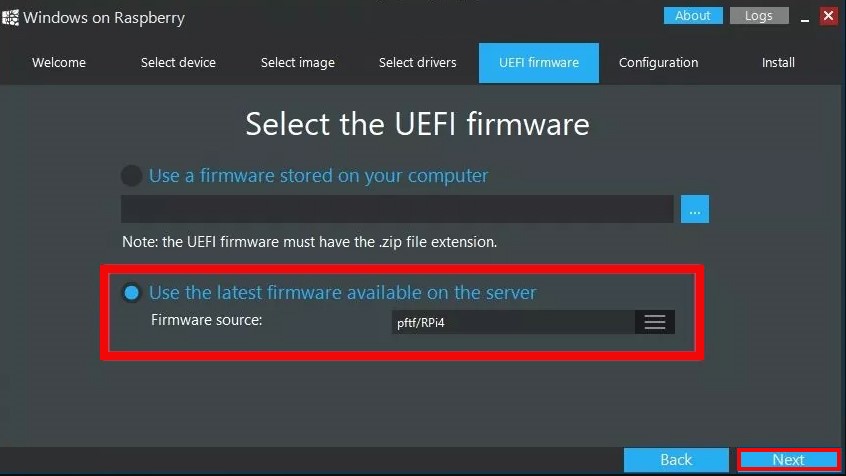
Step 6. Select the Use the latest package available on the server option and click on Next.
Step 7. In the Configuration tab, you can set up the Partition scheme, Boot options, and Install image based on your demands. Click on the Advanced button, you can change the Memory limit.Then click on Next to go on.

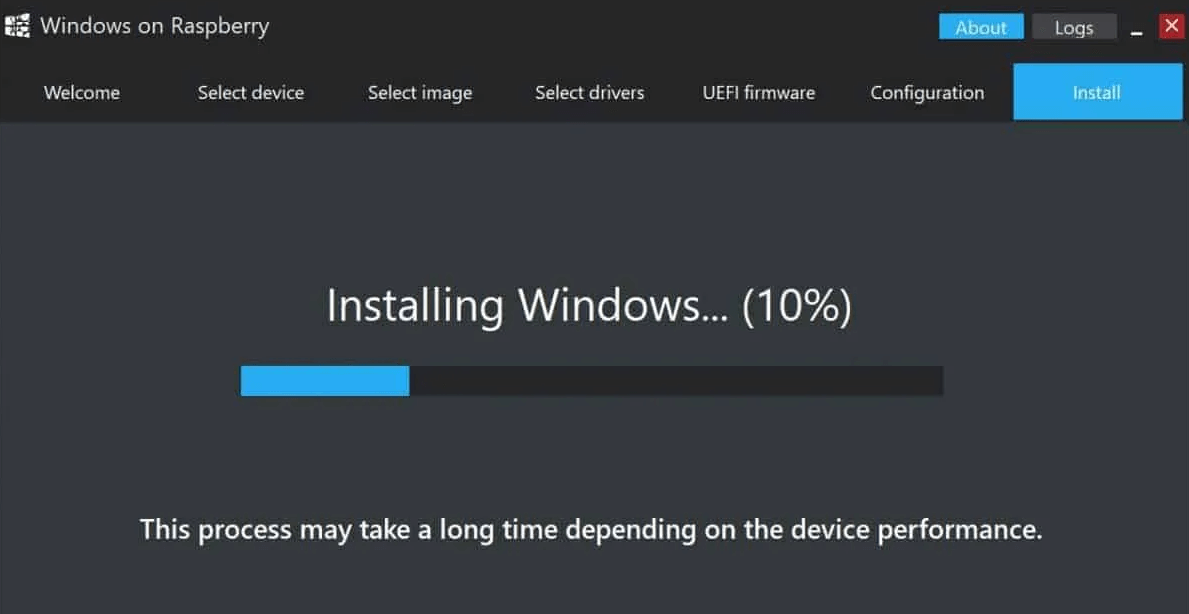
Step 8. Go to the Install tab and click on Install after you double-check everything for the Windows 10 Raspberry Pi 4 installation. This installation process will take you a few hours to complete depending on the speed of your SD card.
Once done, you can safely eject the SD card from your Windows 10 PC and continue with the last part.
Part 6. Install Windows 10 on Raspberry Pi 4
Now, you can switch to your Raspberry Pi 4 computer and start installing Windows 10 on Raspberry Pi 4.
Step 1. Insert the microSD card you just flashed into the Raspberry Pi4 computer.
Step 2. Connect the keyboard, mouse, HDMI, and power cable to your Raspberry Pi 4.
Step 3. Restart your Raspberry Pi computer and select the SD card as the boot drive.
Step 4. Then you can complete the standard Windows 10 installation process by following the on-screen prompts.
Step 5. Open the Command Prompt as administrator and run the following command to enable 3GB of RAM.
bcdedit /deletevalue {default} truncatememory
Step 6. Restart your Raspberry Pi computer for the changes to take effect.
Step 7. Connect to the network via a USB to Ethernet or a compatible WiFi dongle.
Step 8. Now, you can install Microsoft Edge by double-clicking the Edge icon on your desktop or install other programs you need just like installing in Windows 10.
Have a Try Now
How to install Windows 10 on Raspberry Pi 4? The entire installation procedure has been illustrated. Now, it’s your turn to have a try. If you have any other ideas on this project, you can leave them in the comment zone. You can send us an email to [email protected] for any difficulties in using MiniTool Partition Wizard.
User Comments :