How to set up Minecraft server on Raspberry Pi? A large number of people are searching for its guide. Now, you come to the right place. This post of MiniTool will share you with a step-by-step guide to create a Raspberry Pi Minecraft server.
What You Need to Prepare
Minecraft is a widely popular video game where you can create a world for an adventure of limitless possibilities. A lot of users want to create a Raspberry Pi Minecraft server. To build up a Minecraft server on Raspberry Pi, you need to make some preparations:
Hardware:
- A Raspberry Pi 3 or later version
- Power cable
- Ethernet cable
- A 16GB or larger microSD card
Software:
- A copy of Minecraft on your computer
- Raspbian image
- Nukkit server software
How to Set up a Raspberry Pi Minecraft Server
There are 4 main parts on building a Minecraft Raspberry Pi server. Let’s follow the steps below carefully.
Part 1. Install Raspbian and Configure Its Environment
To install the latest Raspberry Pi OS image version, you can click here to download it. If you prefer to use your existing copy of Raspbian, you can also update to the latest version by running the sudo apt update command.
After you installed the Rasbien on the computer, you need to configure it environment to run the Minecraft server on Raspberry Pi.
Step 1. Open the Raspberry Pi configuration tool in the Preferences menu of your desktop.
Step 2. Navigate to the Advanced Options tab, and then select Memory Split and change its setting to 16MB. Then more memory resources will be freed for the server.
Step 3. Navigate to the Boot Options tab and select Desktop/CLI > Console. (No need to do this in Raspbian Lite)
Step 4. Come back to the Advanced Options tab and Enable SSH.
Step 5. Navigate to Advanced > Expand Filesystem. Once you have made these changes, navigate to Finish and start your Raspbian.
Step 6. Log in to your Raspbian again and run the sudo hostname –I or ifconfig command to find the IP address of the device. Then note down the IP address.
Part 2. Install Minecraft Server on Raspberry Pi
To install the Minecraft server on Raspberry Pi, you need to use the Nukkit server software. It is developed for Minecraft Pocket Edition. Here’s how to use the server software to install the Minecraft server.
Step 1. Make sure you installed Java on your computer.
Step 2. Run the sudo apt install oracle-java8-jdk command.
Step 3. Create a new directory and name it nukkit. Then run the mkdir nukkit and cd nukkit command to open it.
Step 4. Once done, you can download the Nukkit software. Make sure you copy and paste the following command into an SSH session.
wget -O nukkit.jar http://ci.mengcraft.com:8080/job/nukkit/lastSuccessfulBuild/artifact/target/nukkit-1.0-SNAPSHOT.jar
Step 5. Run the server software with the sudo java -jar nukkit.jar command. Then choose your language when you are prompted to set up the Minecraft server.
Part 3. Configure Your Minecraft Server
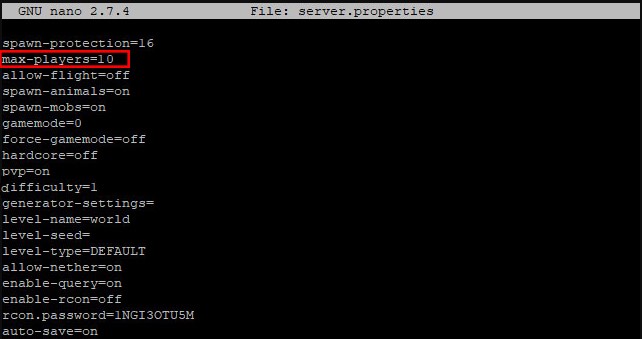
Now, it’s time to configure the Raspberry Pi 3 Minecraft server. There are 2 configuration files including Nukkit: nukkit.yml and server.properties.
Step 1. Open the Configure files with your preferred text editor and then run the sudo nano nukkit.yml or sudo nano server.properties command on Raspbian.
Step 2. In the Configuration file, Change the max-players to 10 if you are on Raspberry Pi 3. If you are running on an older Raspberry Pi, you can set it lower than 10. Also, you can make various changes based on your needs from here, such as pvp=on, difficulty=1, etc.
Step 3. Once done, press Ctrl + X keys to save changes and exit, then run sudo java -jar nukkit.jar to restart the Minecraft server software.
Part 4. Connect to Your Raspberry Pi Minecraft Server
Now, your Minecraft server should be online on your local network. You can check this by using a ping command and the IP address you noted down before (like “ping 192.168.1.1”). If the ping command response from your Raspberry Pi, you can continue with the steps below:
Step 1. Launch Minecraft on your computer, and then go to Play > Servers.
Step 2. Add Server by inputting the new server details and giving the server a name, and adding the IP address.
Step 3. Now, your Minecraft server should be listed as an option here and you can run Minecraft server on Raspberry Pi to start playing.
How to create a Minecraft Raspberry Pi server? All detailed steps have been elaborated. Have a try now!
User Comments :