Since Raspberry Pi is a bare computer without an operating system, you have to install Raspbian manually. How to install Raspbian? Now, this post of MiniTool Partition Wizard will walk you through the Raspbian installation.
About Raspberry Pi
Raspberry Pi, also known as RPi, is a series of small single-board computers developed by the Raspberry Pi Foundation. This type of computer was designed to boost the development of basic computer science in schools and developing countries.
It is a single-chip computer that mainly uses SD cards or TF cards as storage media. Since its release, Raspberry Pi has attracted a large number of users due to its credit-card size and low cost. It can also be connected to a computer monitor or TV, and support a standard keyboard and mouse like most ordinary computers.
However, Raspberry Pi is a type of bare computer without an operating system. That is to say, users have to install the official Raspberry Pi OS (formerly called Raspbian) on an SD card to boot the computer.
![How to Speed Up SD Card Transfer in Windows 10/11 [5 Proven Ways]](https://images.minitool.com/partitionwizard.com/images/uploads/2023/06/speed-up-sd-card-transfer-thumbnail.jpg)
How to install Raspbian on SD card Windows? Let’s keep reading.
What You Need to Prepare for Installing Raspbian
Installing Raspbian is a relatively complex and time-consuming process. To install Raspbian on SD card Windows smoothly, you need to prepare some important things. Here we summarize them as follows:
Hardware requirements:
- A Raspberry Pi 3 or later version computer
- A Windows computer
- A Power cable
- An Ethernet cable
- A microSD card with at least 16GB capacity
Software requirements:
- Raspbian image
- Win32DiskImager
- Unzip software
If you have already prepared these things, you can proceed with the following section.
How to Install Raspbain
There are 4 main parts on how to install Raspbian. Let’s follow the steps below in order.
# 1. Download Raspbian
The first step is to download and unzip Raspbian on your computer. Here is a simple guide for you:
Step 1. Open your Windows computer, and then navigate to the Raspberry Pi foundation website.
Step 2. Select the correct Raspberry Pi OS from the website and click on Download. Well, you can click on the Download torrent link if you want to save time.
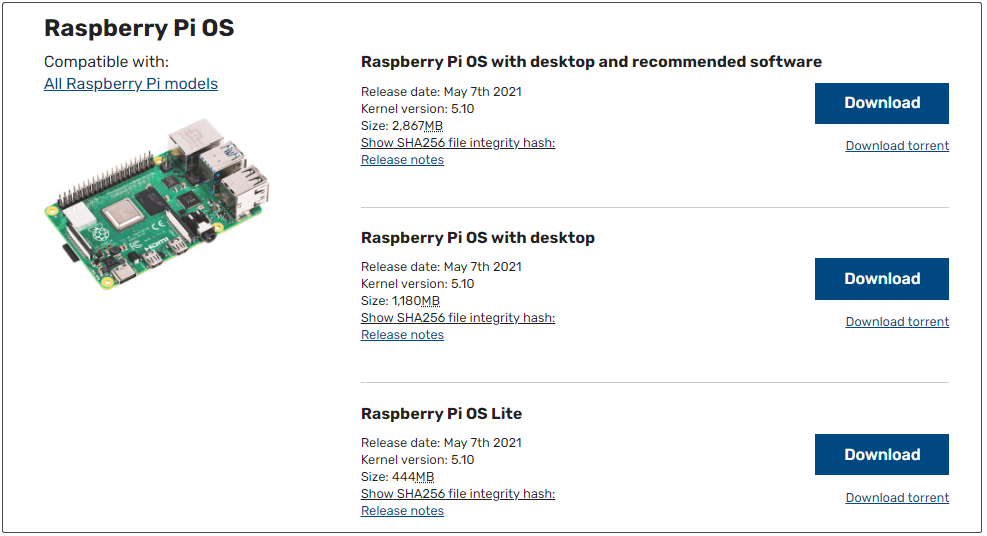
Step 3. Find the Raspbian disc image on your computer and unzip the file with a professional tool like 7-zip.
# 2. Format the SD Card
Once you have downloaded the Raspbian image on the Windows computer, you need to format the SD card to FAT32. On Windows, you can use built-in tools like Disk Management, Diskpart, and File Explorer to format an SD card within 32GB.
In addition, you may encounter some issues like formatting takes forever and Windows was unable to format the removable disk when using the Windows built-in tools. To format an SD card quickly and easily, you can use MiniTool Partition Wizard. It is a multifunctional partition manager that can format SD cards, convert NFTS to FAT32, migrate OS, convert MBR to GPT, and so on.
Here we will show you how to format an SD card using these formatters:
Using Windows Built-in Tool:
Here we take Disk Management for example.
Step 1. Connect your SD card to the computer via a card reader.
Step 2. Press Win +R keys to open the Run dialog box, and then input diskmgmt.msc in the box and hit Enter to access Disk Management.
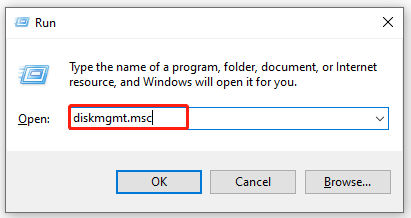
Step 2. Right-click the SD card from the disk map and select Format from the pop-up menu.
Step 3. Select FAT32 from the File system drop-down menu and click on OK.
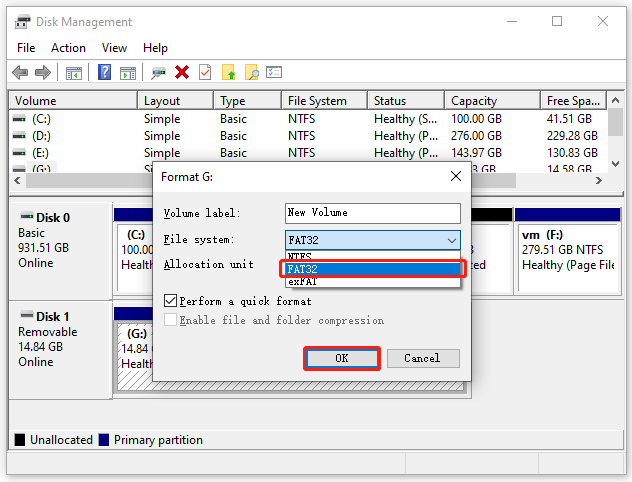
Step 4. Click on OK to confirm this formatting.
Using MiniTool Partition Wizard:
If you have an SD card larger than 32GB or encounter some issues when using the Windows built-in tools, we recommend you can use MiniTool Partition Wizard. Let’s see how to use it:
MiniTool Partition Wizard FreeClick to Download100%Clean & Safe
Step 1. Connect your SD card to the Windows computer.
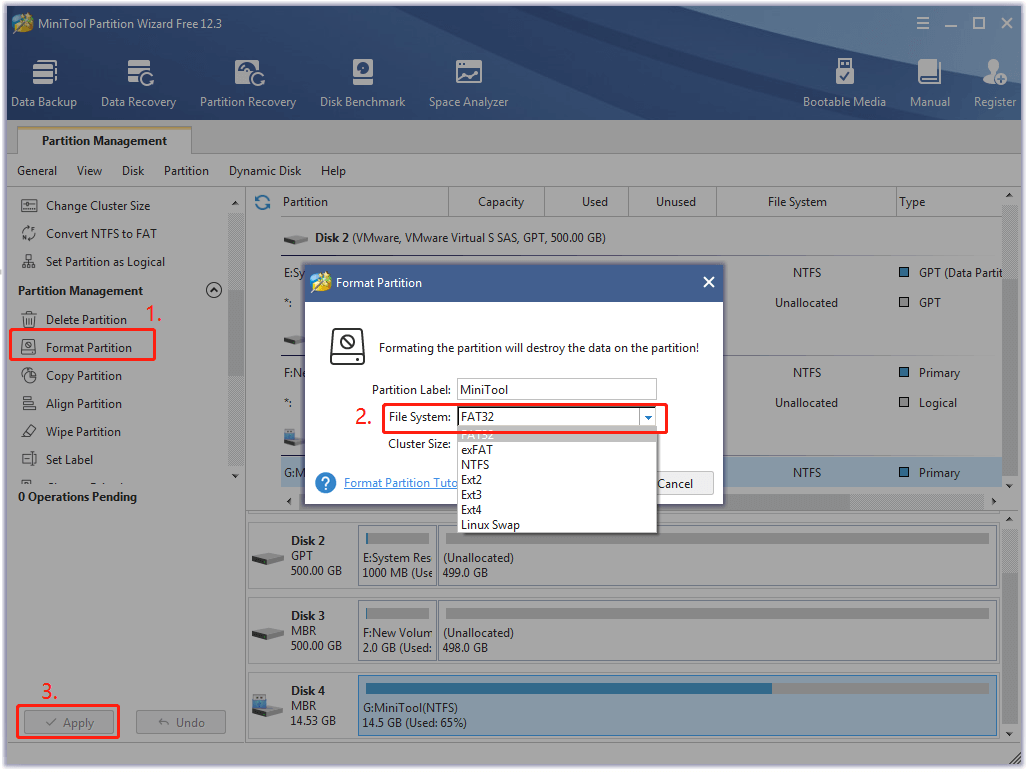
Step 2. Launch MiniTool Partition Wizard to get its main interface, and then select the SD card from the disk map and click on Format Partition from the left pane.
Step 3. In the pop-up window, select FAT32 from the File System drop-down menu and click on OK to save the changes. Here you can also set its Partition Label and Cluster Size based on your needs.
Step 4. Click on the Apply button to execute this formatting.
Now, your SD card should be formatted to FAT32, you can proceed with the following section to install Raspbian on SD card Windows.
![How to Fix Nikon Camera Not Recognizing SD Card? [4 Proven Ways]](https://images.minitool.com/partitionwizard.com/images/uploads/2023/06/nikon-camera-not-recognizing-sd-card-thumbnail.jpg)
# 3. Install Raspbian on SD Card Windows
To install Raspbian on SD card Windows successfully, you need to use a disc image tool. Here you can use Win32DiskImager. It is a practical Windows tool for writing images to a USB drive or SD/TF cards. Download the image from the Win32DiskImager official website and install it on your Windows computer. Once done, follow the tutorial on installing Raspbian on an SD card.
Step 1. Connect your SD card to the computer via a card reader and note down the drive letter you assigned to the SD card.
Step 2. Run Win32DiskImager to enter its main interface, and then select the drive letter of your SD card under the Device menu.
Step 3. Click on the Blue folder icon next to Image File and select the Raspbian image file you saved on your PC. Then click on the Write button.
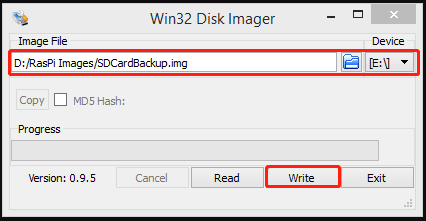
Step 4. Wait for the writing process to complete. Then you can exit the imager and eject the SD card.
After the Raspbian image is installed on the SD card, you can go to the following section to boot your Raspberry Pi computer.
Top recommendation: How to Make Raspberry Pi Boot from USB Drives and SSD
# 4. Boot Raspberry Pi Using the SD Card
Now, you can navigate to the Raspberry Pi computer and use the SD card to boot it. If you don’t know how to do that, don’t worry. Here we walk you through detailed steps.
Step 1. Get everything connected to your Raspberry Pi computer correctly.
- Insert the SD card you installed Raspbian image into the MicroSD card slot at the underside of your Raspberry Pi. (Note: Many SD cards come with a large adapter. In this case, you can slider the smaller card out using the lip at the bottom.)
- Connect your mouse and keyboard to the USB ports on Raspberry Pi.
- Connect your screen to the first HDMI port Raspberry Pi.
- Connect your Raspberry Pi to the internet via Ethernet.
Step 2. Set up your Raspberry Pi.
- Since Raspberry Pi doesn’t have a power switch, you need to turn it on by plugging the power cable into a socket. When the Raspberry Pi is connected to power, you will see a red LED light.
- Once the Raspberry Pi OS desktop appears, you can make an initial setup. Here you need to set your Country, Language, and Timezone, then click on Next.
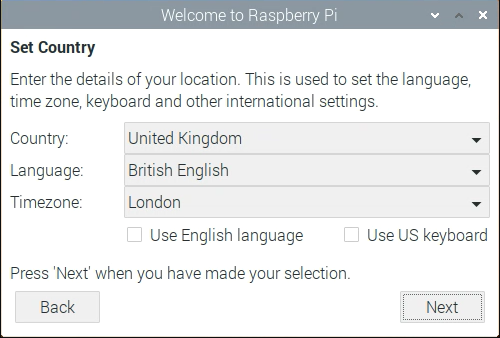
- Enter a new password for the Raspberry Pi and click on Next.
- Click on Restart to finish the setup. Then you can continue with the step 3 below to set up the SD card as the boot drive.
Step 3. Boot Raspberry Pi using the SD card.
- Keep the SD card connected to your Raspberry Pi.
- Launch the built-in utility SD Card Copier on Raspberry Pi from the Accessories
- Select the Copy From Device option and click on Start to copy the Raspbian image file into Raspberry Pi.
- Once the copying process is completed, shut down the Raspberry Pi and disconnect the SD card.
- Power up your Raspberry Pi. At this time, it will boot from the SD card.
Have a Try Now
How to install Raspbian? This post focuses on 4 main parts: download Raspbian image, format your SD card to FAT32, install Raspbian on SD card Windows, and boot your Raspberry Pi from the SD card. Make sure you follow the steps in order until the Raspbian is installed successfully.
If you encounter any difficulties in using MiniTool Partition Wizard, you can send an email to us via [email protected]. Also, you can share your opinions or ideas on this subject in the comment area.
How to Install Raspbian FAQ
Here we summarize 6 simple steps on installing Raspberry Pi on Windows.
- Download Raspberry Pi OS image on your Windows PC.
- Format your USB drive to FAT32.
- Create a USB drive installer by using a professional imager.
- Boot your computer from the USB drive.
- Install the Raspberry Pi OS on your computer.
- Set up the Raspberry Pi desktop on Windows.
NOOBS is an operating system installation manager that provides an easy way to install Raspbian as well as some other operating systems. Here’s how to use it:
- Download NOOBS from the official website.
- Format an SD card to FAT32.
- Extract NOOBS from the .zip archive.
- Insert the SD card into Raspberry Pi and copying the NOOBS to the SD card.
- Launch the NOOBS installer and follow the on-screen instructions to install Raspbian.
User Comments :