A clean install of Windows 11 erases the current system, installed programs, and personal data. MiniTool Partition Wizard introduces when to clean install, what to prepare, how to do a fresh install of Windows 11, and how to run the OOBE (Out-of-Box Experience) setup.
Understanding of Windows 11 Clean Install
What Is a Clean Install
A clean install resets your system by removing installed apps, personal data, and settings, allowing you to start Windows 11 from scratch.
The process is a complete system refresh, widely used to remove manufacturer bloatware and fix system errors to get a faster and more stable system.
The most common method to perform a fresh install of Windows 11 is to create a bootable USB drive, boot the PC from it, and follow the Windows setup.
Do I Need to Clean Install Windows 11
Upgrading from Windows 10 does not generally require a clean install of Windows 11. This is because the standard update methods keep files, system settings, and apps.
However, a clean install is recommended in certain scenarios, as follows:
- Persistent performance issues: The computer may be encountering continuous performance issues, for example, system slowdowns, frequent stutters, or high memory/CPU usage. The problems persist despite cleaning up files and background apps.
- Malware/virus infection: Malicious software or viruses may invade the system. To get a secure and completely clean Windows copy, it is recommended to clean install Windows 11.
- Major hardware changes: After replacing a motherboard, it is necessary to reinstall Windows and activate it (the license is tied to the motherboard). This helps avoid driver conflicts, poor system performance, or system instability. Moreover, when installing a new disk as the primary drive, you may consider a clean install.
- Constant system errors or crashes: BSOD issues, app crashes, or Windows errors cannot be repaired. A clean install can be considered as a last resort.
- Bloatware and old junk removal: Your computer may be bogged down by preinstalled software, stubborn apps, or numerous leftover files, but manual cleanup is difficult. Consider a fresh install to remove the bloatware and junk files.
To install a fresh copy of Windows 11, some users recommended performing an in-place upgrade or resetting this PC, as they also offer the option to remove everything.
We make a deep analysis and offer details to help you identify them.
In-Place Upgrade vs Clean Install
An in-place upgrade reinstalls Windows while preserving personal files, installed applications, and system settings. It is primarily intended to repair system corruption or to upgrade from Windows 10 to Windows 11.
To perform an upgrade:
Step 1: Download a Windows ISO file from Microsoft.
Step 2: Double-click the ISO to mount it to a virtual drive.
Step 3: Locate the setup.exe file and run it to open Windows Setup.
Step 4: Accept license terms.
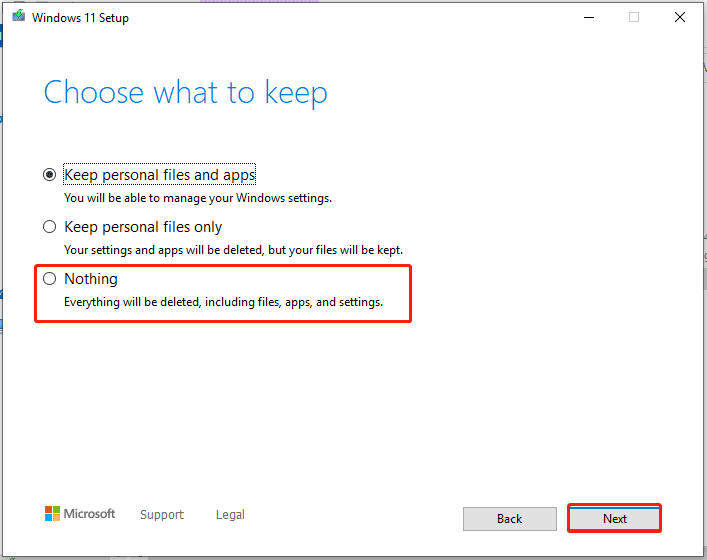
Step 5: To remove all personal files, apps, and settings, click Change what to keep and select Nothing. To retain your files and apps, choose Keep personal files and apps.
Step 6: Follow the on-screen instructions to proceed.
To learn key differences between an in-place upgrade and a clean install, check the following table.
| Features | In-Place Upgrade | Clean Install |
| Data preservation | 3 options are offered: – Keeps files and apps; – Only keeps files; – Removes files, apps, and settings. | Erases everything, including files, apps, and settings. |
| System state | Existing system issues and errors may be retained. | Installs a fresh copy of Windows 11. |
| Time & Effort | Fast, minimal effort. | Time-consuming (requiring app reinstallation). |
| Method | Upgrade Assistant or ISO. | Bootable USB drive. |
| Best for | Performs routine upgrades. | Fixes performance issues and Windows errors, remove viruses, and uninstalls bloatware. |
For details, refer to the Windows 11 upgrade vs clean install guide.
Reset This PC vs Clean Install
PC resetting refers to using the built-in Windows feature to reinstall the operating system to repair some issues. It allows you to keep personal files or remove everything (full factory reset).
To reset Windows 11:
Step 1: Go to Settings > System > Recovery.
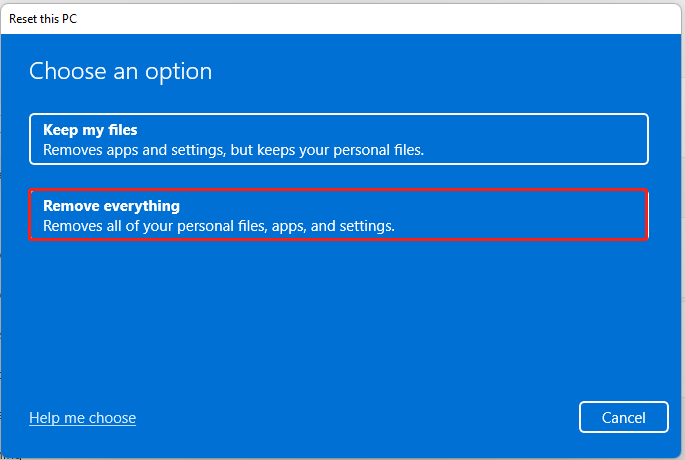
Step 2: Click Reset PC under Recovery options.
Step 3: Choose Remove everything for a factory-fresh installation.
Step 4: Select Local reinstall and follow the on-screen instructions to finish the resetting process.
To find the differences between PC resetting and a clean install, view the following table.
| Features | Reset this PC | Clean Install |
| Data retention | Keeps personal files or remove all data. | Completely wipes all data on the system drive. |
| Time | Generally faster, as applications do not need to be reinstalled. | More time-consuming, requires reinstallation of applications. |
| Method | Performed via the built-in Windows feature. | Performed using bootable media such as a USB drive or CD/DVD. |
| Best for | Addressing minor system issues or slow performance. | Resolving severe, unfixable errors, malware infections, or removing pre-installed bloatware. |
| Reliability | Moderate. Can fail if system files are corrupted. | High. Eliminates all legacy issues and clutter. |
Can I Clean Install Windows 11 for Free
Making a clean install is free if you use a legitimately activated Windows 10 or 11.
The Windows license is usually linked to the motherboard. Microsoft generates a digital license and stores it in the activation servers after Windows is activated.
Upon reinstallation, Windows can automatically activate. During the setup process, if asked for a product key, choose I don’t have a product key to proceed.
Is a Clean Install Risky
It is generally safe when performed correctly, but there are risks such as data loss and driver-related issues. On the other hand, it is highly beneficial, as it is a secure method to remove malware, eliminate system junk files, and improve system performance.
The main risk is losing all personal files, apps, and settings if you don’t back up.
Additionally, it is time-consuming to reinstall all software and reconfigure user preferences.
Moreover, the system may fail to connect to the internet if not installing essential drivers during the setup.
How Long Does a Clean Install Take
Typically, the installation process takes 20 to 60 minutes. The total time depends on various factors, such as the storage type (SSD or HDD), USB speed, and internet connection.
If the installation stays on the same screen for over 3 hours without any progress, it gets stuck due to drive issues, hardware incompatibility, or corrupted installation media.
In this case, try removing your USB drive, unplugging all unnecessary peripherals, recreating the bootable USB drive, and checking the boot order in BIOS. For details, refer to this related Windows 11 24H2 not starting a clean install guide.
Preparations Before a Clean Install of Windows 11
Before proceeding, it is essential to prepare the system for a clean install.
Key preparations before performing a clean install include:
#1. Verify Hardware Compatibility
Windows 11 has strict system requirements. To ensure a smooth installation process and system stability, perform a thorough check of the hardware compatibility.
How to Verify
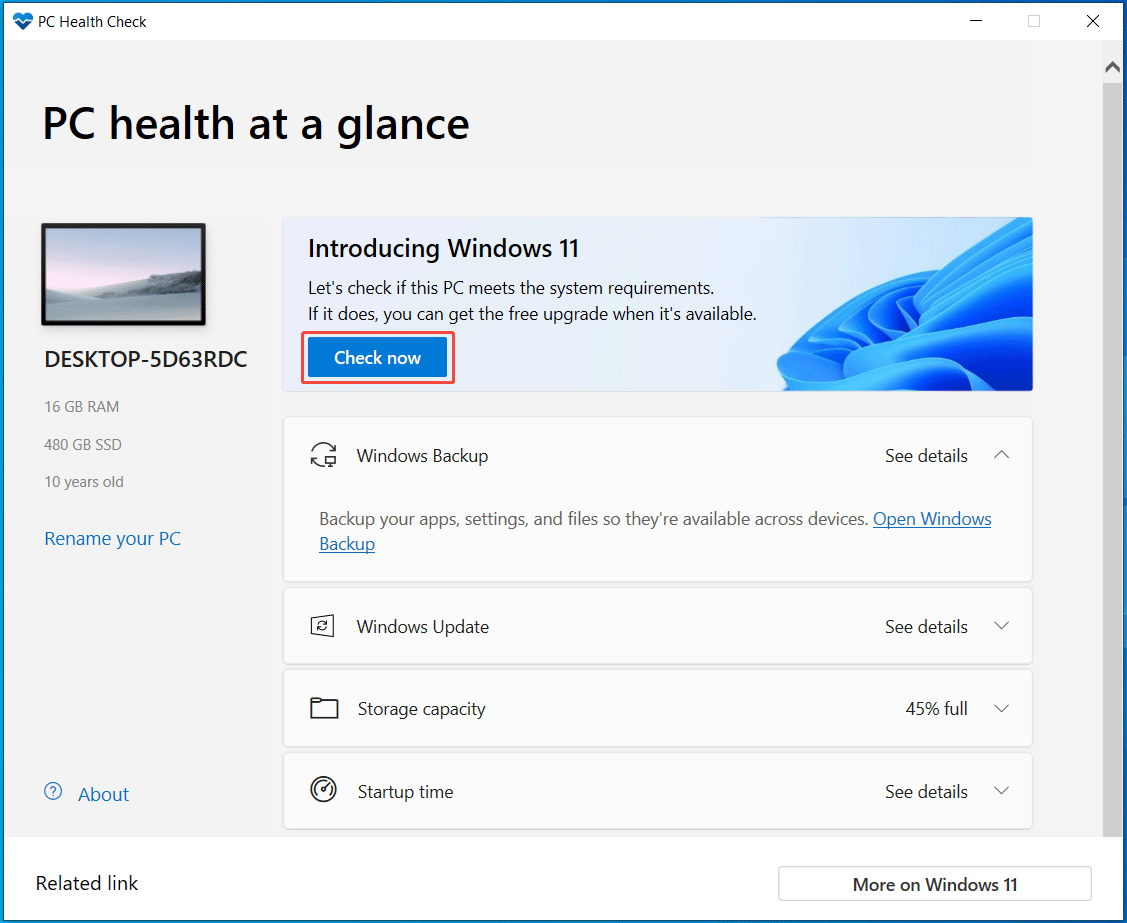
Step 1: Download and install the official application, PC Health Check.
Step 2: Launch this utility and click the Check now button. Then, the check results will be listed.
If the computer supports TPM 2.0 and Secure Boot, enable them in the BIOS/UEFI menu.
Prepare BIOS/UEFI Settings
Step 1: Restart the system and press F2, Del, Esc, or another key specified by the manufacturer on startup to enter the BIOS/UEFI menu.
Step 2: Go to the Advanced, Security, or Trusted Computing tab. Then, look for Intel Platform Trust Technology, TPM, Intel PPT, AMD fTPM switch, TPM State, or a similar option, and enable the TPM.
Step 3: In the Security or Boot tab, locate Secure Boot and set it to Enabled.
Step 4: Find Boot Mode or CSM and change the setting from Legacy or CSM to UEFI. If possible, disable CSM.
Step 5: Press F10 to save the changes and exit the BIOS/UEFI menu.
After preparing the hardware, back up data for security and implement software operations.
#2. Data Backup
Files on your drive will be deleted when you clean install Windows 11. Hence, backup is a critical step. Learn which files to back up and how to create a backup.
What Files to Prioritize
Over time, gigabytes of unnecessary files may be accumulated on the computer. There is no point in moving these junk files to the new Windows installation.
Only back up essential files, including:
– User Profile Data
Navigate to C:\Users\Yourusename, and back up the user folders to an external hard drive or the cloud.
- Documents: Work documents, text files, spreadsheets, and other files you have created.
- Downloads: Default storage location for most files downloaded from the internet, including installers, documents, compressed files, and media files.
- Desktop: Files, folders, and application shortcuts you have placed on the desktop.
- Pictures and Videos: Family photos, recorded videos, screenshots, and image files.
– Application Data
- Game saves: Digital files that record a player’s progress, inventory, and character statistics.
- License keys: Your purchased software licenses.
– Browser data
If you don’t sync your browser, like Chrome, manually back up bookmarks and saved passwords.
- Bookmarks: Export bookmarks from the browser menu. In Chrome, click three dots, select Bookmarks and lists > Bookmark manager, click three dots in the top right corner, and choose Export bookmarks. Then, save the .html file to a location.
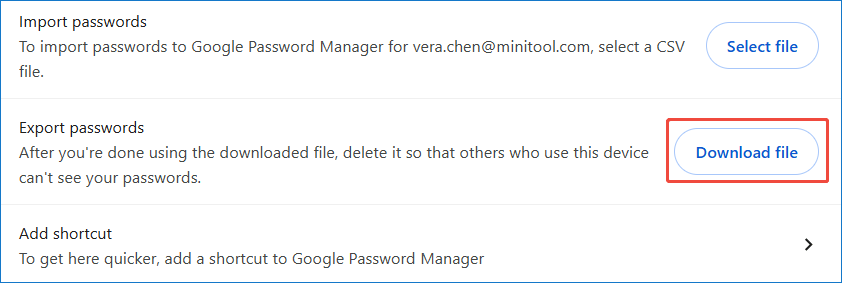
- Saved passwords: Export passwords to a CSV file. In Chrome, click three dots, go to Settings > Autofill and passwords > Google Password Manager > Settings. Under Export passwords, click Download file and save the Chrome Passwords.csv file.
Option 1: Copy & Paste
The simplest backup method is copying and pasting the files or folders to an external hard drive or a large USB flash drive. This can make data easily accessible on the fresh Windows.
For large volumes of data, manual copy-and-paste can be time-consuming. Consider using a dedicated backup software, such as MiniTool ShadowMaker, which provides a more efficient and reliable method.
Option 2: Use MiniTool ShadowMaker
This utility provides comprehensive backup solutions, supporting various backup types such as full, incremental, and differential backups.
It can create a full system image, allowing you to restore the PC to a previous state if something goes wrong during the installation process.
Additionally, MiniTool ShadowMaker supports disk/partition/folder/file backup and automatic backups. During the backup, files will be compressed, saving much storage space.
Follow these steps:
Step 1: Connect a USB or external drive to the computer.
Step 2: Download MiniTool ShadowMaker, run the .exe file to install, and then launch it to enter the main interface.
MiniTool ShadowMaker TrialClick to Download100%Clean & Safe
Step 3: In the Backup page, system drives are selected by default. To create a system image before a clean install, only need to choose a USB or external drive in DESTINATION.
To back up files, click SOURCE > Folders and Files > Computer, choose what to back up, and click OK. Then, select a target location under DESTINATION.
Step 4: Click Back Up Now to execute the backup task immediately.
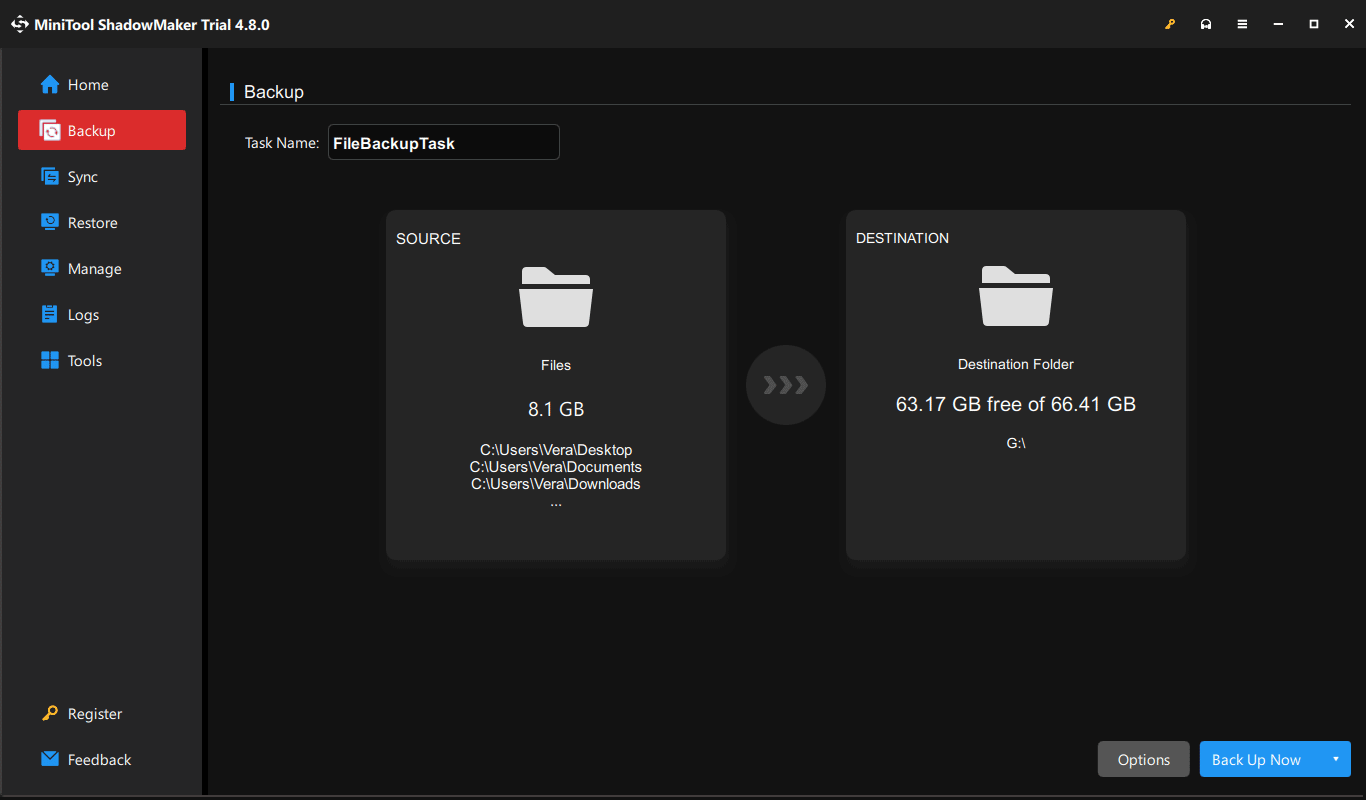
Step 5: To check the backup result, head to Manage.
Option 3: Run the Windows Backup App
This program helps sync the folders, including Documents, Desktop, Pictures, Videos, and Music, to OneDrive.
Moreover, the Windows Backup app can remember installed apps and pinned app preferences, Windows settings and preferences, Wi-Fi networks, accounts, and other passwords. This allows for a seamless transition to a new PC
Follow these instructions:
Step 1: Launch Windows Backup on your old PC.
Step 2: Configure the folders, apps, settings, or credentials, and click Back up.
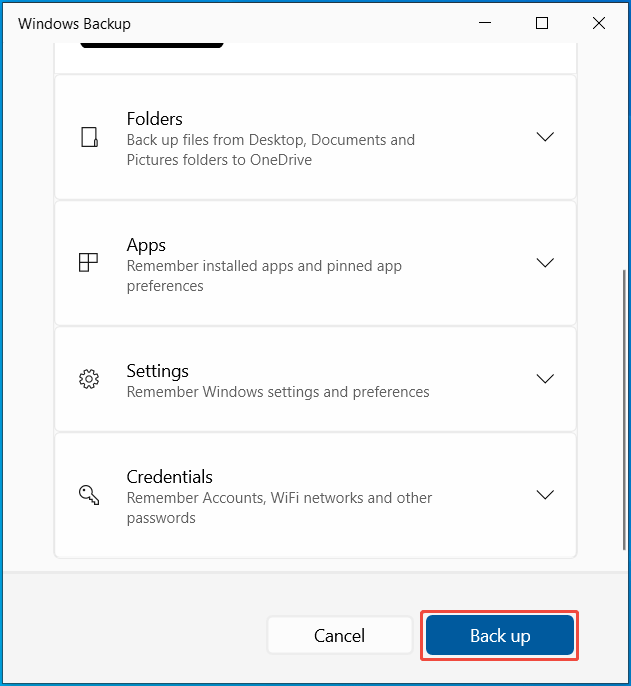
After a clean install of Windows 11, all backed-up data can be restored when logging in with the same Microsoft account.
#3. Download Essential Drivers
It is necessary to download network drivers and chipset drivers from the manufacturer’s website in advance. Windows may not install them automatically during a clean install.
Then, save the downloaded driver files to a separate USB drive, not the same one used for the installation.
Without a network driver (Wi-Fi/Ethernet), there may be no internet after installation, leaving you unable to browse the web. Moreover, the chipset driver can ensure proper communication between the processor and motherboard.
#4. Unplug Extra Drives
If you use multiple drives in the PC, unplug the extra ones. This can eliminate the risk of accidentally selecting and erasing the wrong drive during an installation, preventing data deletion.
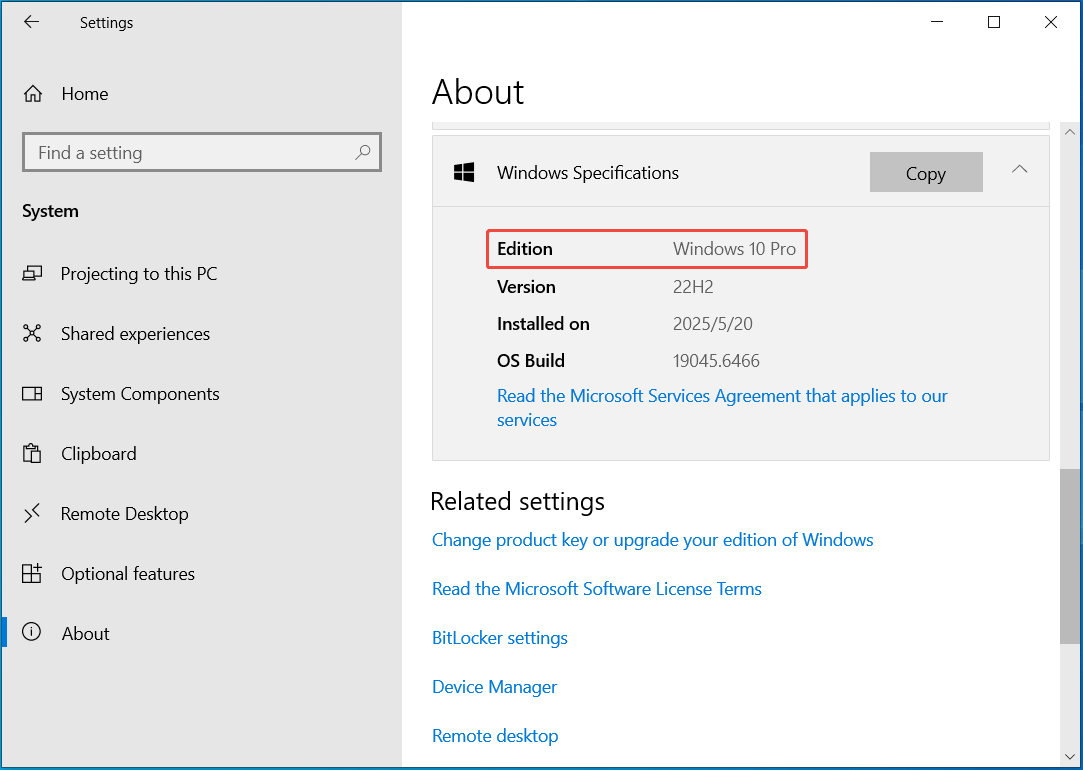
#5. Record Current Edition
Before a clean install, it is crucial to record your current Windows edition. This ensures the computer automatically activates after installing the correct version, without requiring a new license key.
To check the Windows edition:
Step 1: Go to Settings > System > About.
Step 2: Expand the Windows Specifications section to view the Edition item, for example, Windows 10 Pro.
#6. Note Key Information
Software Licenses
On your PC, there may be some installed non-subscription software that requires activation. Ensure you gather the product keys so that you can manually reactivate them after a fresh install of Windows 11.
The following are some examples of the software:
- Microsoft Office
- Adobe Photoshop
- CorelDRAW
- Autodesk AutoCAD
- Third-party antivirus software
Document the Installed Applications
Creating a list of all installed applications is necessary. After installing the system, you know which app you need to reinstall, without missing critical programs.
To make an application list, follow these steps:
Step 1: Type powershell to the Search box and click Run as administrator.
Step 2: Execute the command: Get-Package | Select-Object Name, Version > C:\Applist.txt.
Step 3: Wait for the command to finish. Then, go to C:\ and find the Applist.txt file.
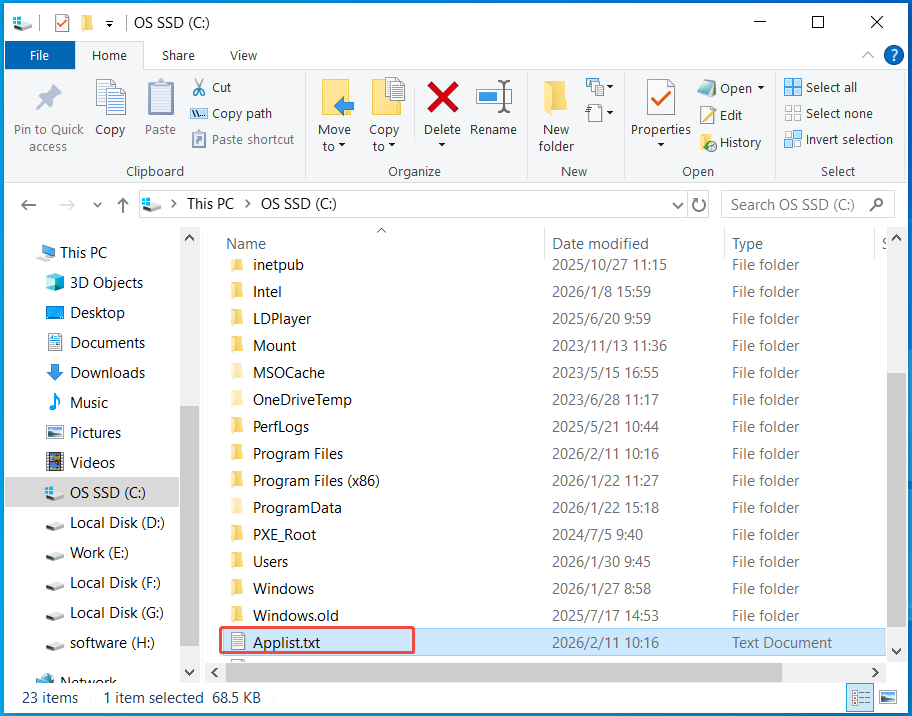
Step 4: Copy this file to an external drive or USB drive.
Drive Encryption Recovery Keys
On supported devices, Windows 11 24H2 and the latter version may automatically enable device encryption after a clean install. If you use a local account, the feature won’t be enabled.
Typically, the recovery key is backed up to the Microsoft account. However, if you don’t note the key for some reason, Windows will lock you out of the data. The only option is to reset the PC.
To find the recovery key:
Step 1: Go to https://account.microsoft.com/devices/recoverykey.
Step 2: All created BitLocker recovery keys are in a list. Find the latest one and save it to a USB or external drive.
How to Clean Install Windows 11 from USB
This process involves creating a bootable USB drive, booting Windows from it, and deleting existing system drives during the fresh install.
#1. Create a Bootable USB Drive
In terms of bootable media, a CD/DVD and a USB flash drive are common physical storage options. However, a USB drive is preferred and widely used because of its widespread compatibility, faster speeds, reusability, and high durability.
Ensure the USB drive is blank and has at least 8GB of capacity.
To make a bootable USB drive, use Media Creation Tool or Rufus.
Option 1: Use Media Creation Tool
Media Creation Tool is a free and official Microsoft utility that allows for downloading the latest ISO file that can be burned to a DVD or used for virtual machines.
Additionally, it helps you directly create a bootable USB drive for reinstalling the system or repairing unbootable systems.
Here are the steps:
Step 1: In a browser, access the Windows 11 Download page.
Step 2: In the Create Windows 11 Installation Media section, click Download Now to download Media Creation Tool.
Step 3: Double-click on the MediaCreationTool.exe file to run this tool.
Step 4: Accept the notices and license terms.
Step 5: Manually choose a language and edition. It is advisable to select Use the recommended options for this PC.
Step 6: Choose a USB flash drive and click Next to proceed.
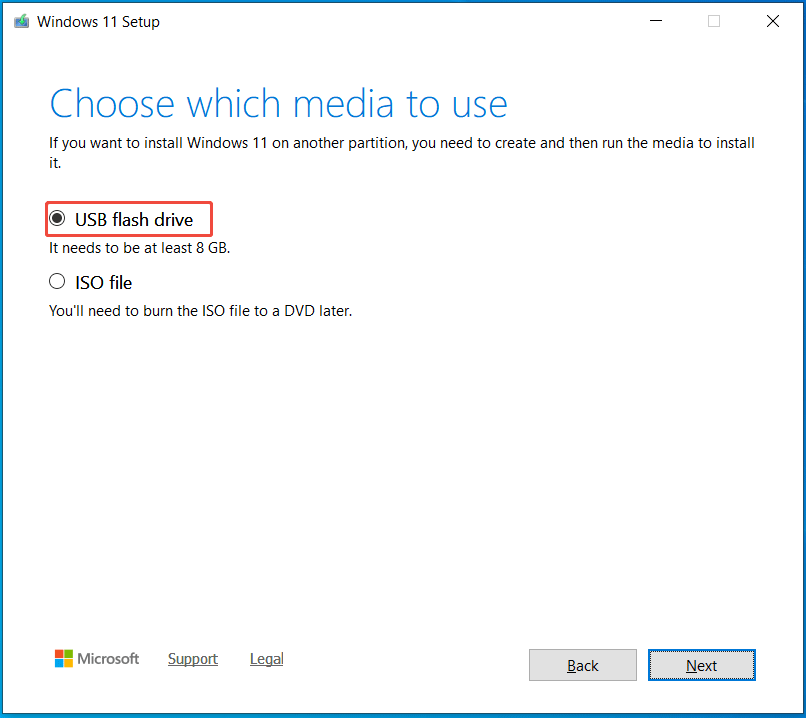
Step 7: Connect your USB flash drive to the computer and refresh the window.
Step 8: Choose this drive, and the utility begins downloading necessary Windows 11 files and creates the bootable drive.
Step 9: Once the process is complete, click Finish.
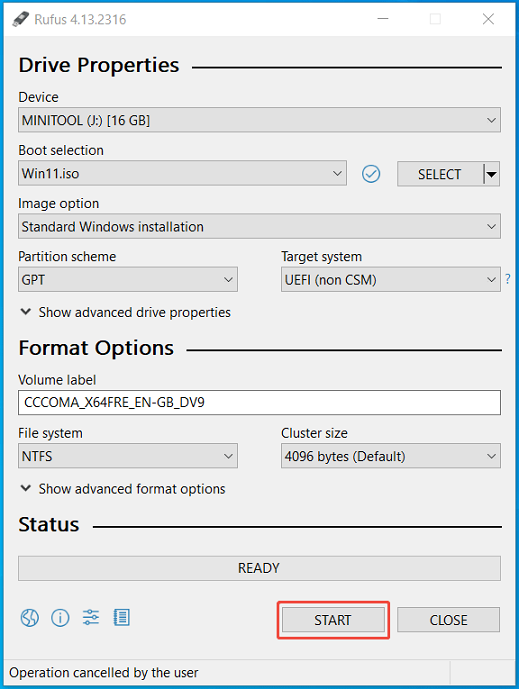
Option 2: Use Rufus to Create a Bootable USB Drive
If you don’t want to use Media Creation Tool, there is an alternative method: using Rufus.
Rufus is a popular free, open-source utility designed to create a bootable USB drive from ISOs.
It supports bypassing the Windows 11 Secure Boot, CPU, TPM 2.0, and RAM checks. Therefore, it is considered the most effective tool to install Windows 11 on unsupported hardware.
Follow these steps to make a bootable drive with Rufus:
Step 1: On Microsoft’s official download page, scroll down to the Download Windows 11 Disk Image (ISO) for x64 devices section.
Step 2: Select Windows 11 (multi-edition ISO for x64 devices) and confirm it.
Step 3: Choose a language and click Confirm > 64-bit Download to begin downloading.
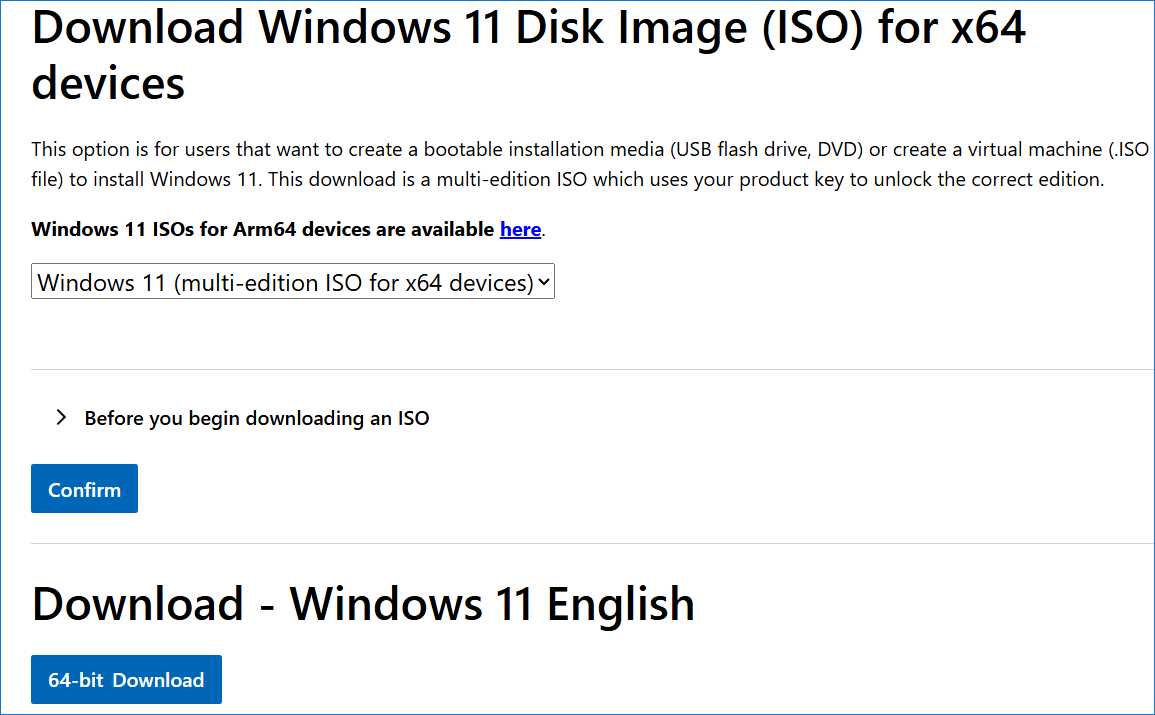
Step 4: Connect a USB drive to the computer, download Rufus online, and launch it.
Step 5: Select the downloaded ISO image, configure the partition scheme to GPT, and click START > OK to write necessary files to the drive.
#2. Boot from USB
After preparing the USB drive, boot Windows from it to evoke the setup interface.
Step 1: Insert the bootable USB stick into the computer that needs to clean install Windows 11.
Step 2: Restart the PC and immediately press the boot key to access the BIOS/UEFI menu, such as F2, F10, F12, Del, Esc, or another one specified by the manufacturer.
Step 3: In the Boot tab or a similar one, choose the USB drive as the boot device. If needed, use arrows to move the USB drive to the first position.
Step 4: Save the changes to restart the computer with the new settings.
#3. Perform the Clean Installation Process
Everything is ready. Now, start the system setup with the following steps.
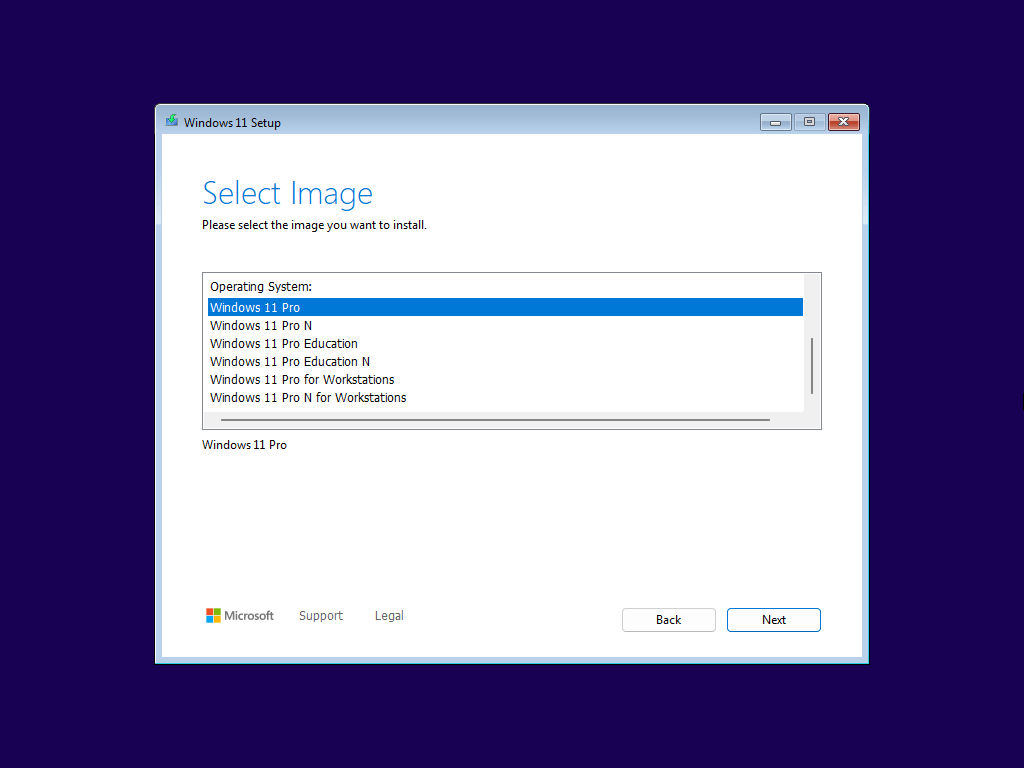
Step 1: On the Windows 11 Setup screen, choose a language and time format.
Step 2: Select a keyboard or input method.
Step 3: Choose the setup option: Install Windows. Ensure you select the option of I agree everything will be deleted including files, apps, and settings.
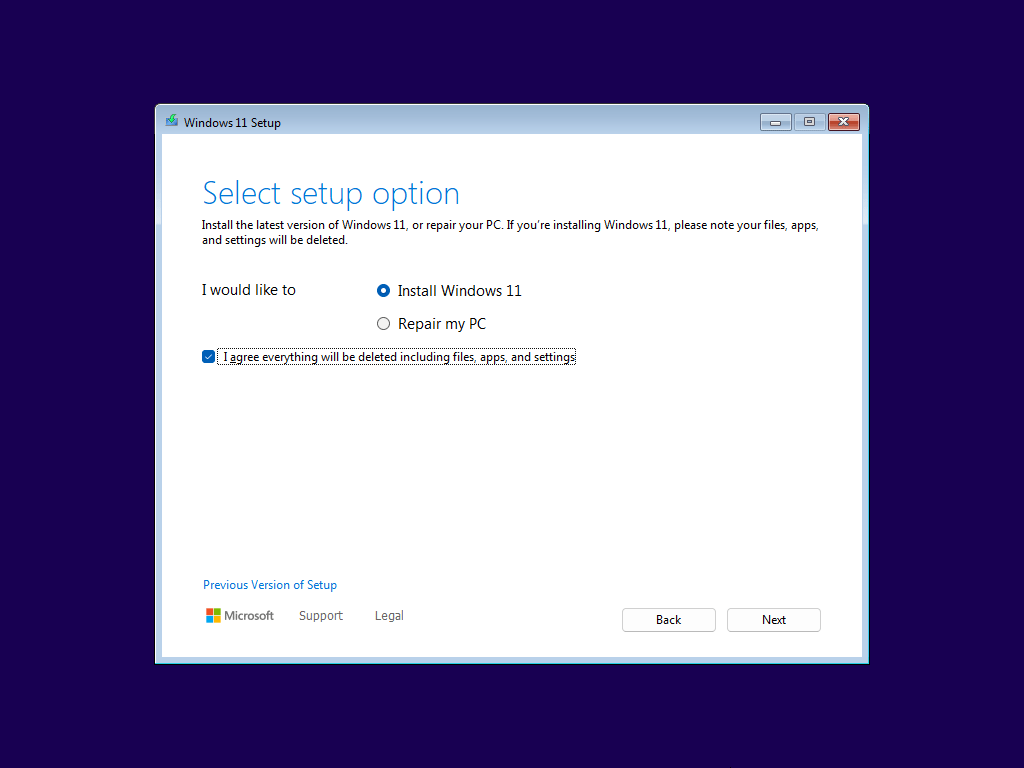
Step 4: Click I don’t have a product key to proceed.
Step 5: Select a Windows edition, such as Windows 11 Pro.
The new system should match the old Windows edition. Or, a new product key is required after the installation.
Step 6: Select the existing partitions and click Delete Partition. Then, choose unallocated space and click Next.
Step 7: On the Ready to install screen, click the Install button to install a fresh copy of Windows 11.
Wait until the process finishes.
Complete Post-Installation Steps
#1. Windows 11 Out-of-Box Experience Setup
After completing the clean install, the Out-of-Box Experience (OOBE) interface occurs immediately. It allows you to perform the initial setup process for the new Windows system before reaching the desktop.
The fundamental settings cover language, region, keyboard, internet, and account.
Follow the steps to complete the OOBE setup:
Step 1: Choose a country or region.
Step 2: Select the preferred keyboard layout and decide whether to add a second keyboard layout or skip.
Step 3: Connect to your network. If Windows prompts you to install a network adapter, click Install driver, locate the downloaded driver file, and install it.
Step 4: Name your device or click Skip for now.
Step 5: Add a Microsoft account and sign in to unlock your Microsoft experience.
Step 6: Click Create PIN and enter, and then re-enter a PIN.
Step 7: Choose privacy settings for the device.
Step 8: Decide how you would like to set up the PC: Restore from a PC or Set up as a new PC.
Step 8: Customize your experience or skip this.
Step 9: Use a mobile device, set up Microsoft 365, or configure other Microsoft services as per your preferences.
Once the OOBE setup is complete, Windows 11 boots to the desktop.
#2. System Settings
Run Windows Update
The ISO file used for a clean installation may lack some security patches, bug fixes, and performance improvements. This makes the system vulnerable and unstable.
To ensure system security and stability, installing Windows updates is crucial.
Step 1: Click the Windows icon and choose Settings.
Step 2: In the Windows Update tab, click Check for updates.
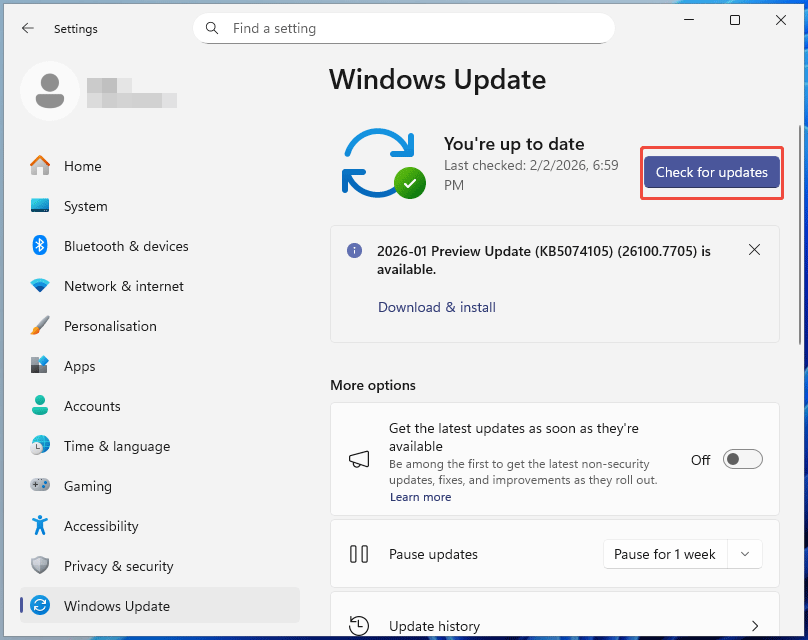
Step 3: Download and install available updates. If prompted, restart the computer to apply the changes.
Install Hardware Drivers
It is crucial to install drivers, allowing Windows to correctly communicate with hardware components for peak performance.
Step 1: In Windows Update, choose Advanced options > Optional updates.
Step 2: Under the Driver updates section, choose the driver update listed, and click Download & install.
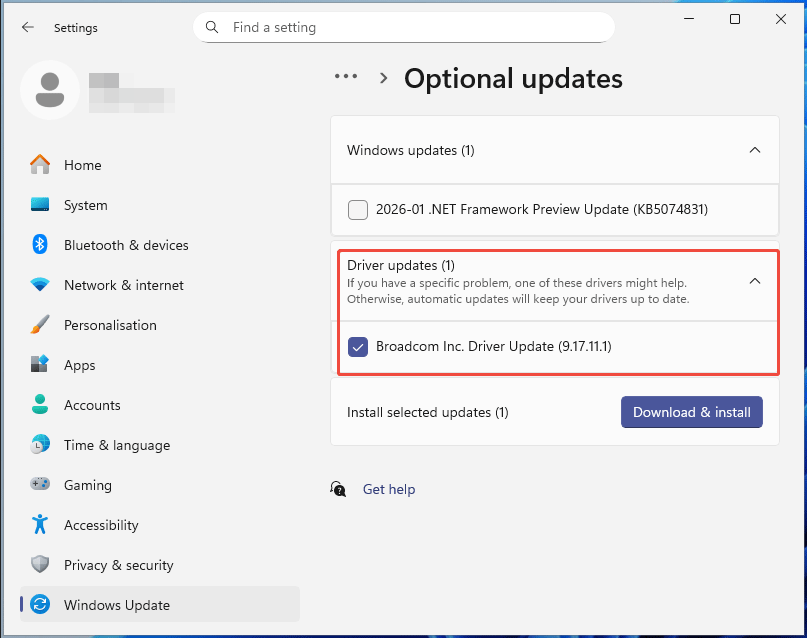
Step 3: Follow the instructions to finish the update.
Verify Activation
A clean install of Windows 11 may not detect the digital license stored on the motherboard or linked to your Microsoft Account. As a result, the system is not activated.
To verify this: go to Settings > System > Activation and check the activation state.
#3. Security and Privacy Configuration
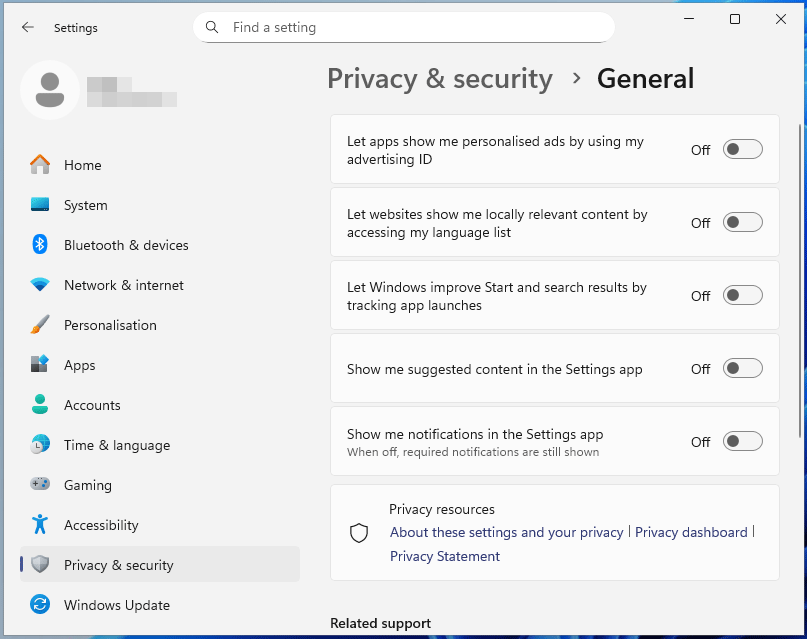
Adjust Privacy Settings
A Windows 11 clean installation can enable features to gather data, run targeted ads, and track user activity.
To minimize unnecessary data sharing with Microsoft to enhance privacy, adjust these settings.
Step 1: Navigate to Settings > Privacy & security.
Step 2: Choose General and turn off all toggles, involving advertising ID, local relevant content, app launches, suggested content, and notifications.
Step 3: Go to the Diagnostics & feedback tab, disable Send optional diagnostic data.
Step 4: Under Speech, turn off Online speech recognition.
Step 5: Click Inking & typing personalization and disable this option.
Step 6: In the App permissions section, disable location, camera, and microphone, and app access to them.
Step 7: Disable the Find my device feature.
Enable Security Features
To keep Windows 11 secure, ensure that Windows Security is always running to offer real-time protection against various threats.
Step 1: Head to Settings > Privacy & security > Windows Security > Open Windows Security.
Step 2: Click Virus & threat protection > Manage settings.
Step 3: Enable Real-time protection.
Additionally, click Device security in Windows Security, choose Core isolation details, and turn on Memory integrity.
What’s more, enable Device encryption under Privacy & security.
#4. Personalization Configuration
Remove Bloatware
Many pre-installed apps are unnecessary, which can consume valuable disk space, CPU, and RAM resources.
To reclaim the space and improve system performance, remove the bloatware.
Step 1: Navigate to Settings > Apps > Installed apps.
Step 2: Click the three dots next to an app and choose Uninstall.

Step 3: Click Uninstall to confirm.
Install Essential Software
A Windows 11 clean install can delete all installed programs. After the installation, it is necessary to reinstall the apps.
Step 1: Check the app list that was created previously.
Step 2: Download them one by one from the official websites.
Step 3: Follow the instructions to install on the new system.
Set Default Apps
To enhance work efficiency, one effective method is to set the default apps in Windows 11. This includes setting a default for a file type and setting defaults for apps.
Step 1: Head to Settings > Apps > Default apps.
Step 2: Adjust some settings as per your preferences.
For detailed information, refer to the changing default apps guide.
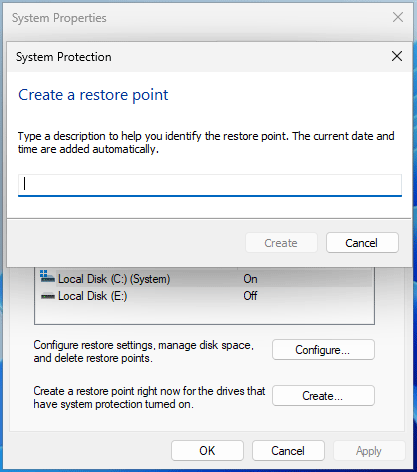
#5. Restore Point Creation
Creating a restore point immediately after a clean install can be considered as a safety net to revert the system to a clean, stable state in case of system issues.
Step 1: Type create a restore point and press Enter.
Step 2: Choose the system drive, click Configure, and enable system protection.
Step 3: Click Create, type a description, and begin creating a restore point manually.
Common Clean Install Problems and Solutions
Some issues may occur during or after a clean install of Windows 11.
The following are common problems and solutions.
#1. Installation Fails with Error 0x8007025D
The installation may be canceled, displaying the following error message on the screen:
“Windows cannot install required files. Make sure all files required for installation are available, and restart the installation. Error code: 0x8007025D.”
This commonly indicates corrupted installation files, faulty RAM, or a damaged USB drive/port.
Solutions:
- Re-create a bootable USB drive and clean install Windows 11 again.
- Switch to a USB 2.0 port instead of a USB 3.0 port.
- Run Windows Memory Diagnostic to check RAM for errors. If necessary, replace the memory stick.
#2. Drive Not Detected During Setup
Modern NVMe SSDs, especially on Intel 11th Gen or newer systems, often require specific storage drivers during a clean install. By default, the Windows installer doesn’t include these drivers, resulting in the drive not recognized.
Solutions:
To fix the issue, download Intel Rapid Storage Technology (RST) drivers and load them during the installation using the Load driver option.
Additionally, there are some other solutions:
- Change SATA/NVMe Mode in BIOS
- Disable Intel VMD Technology
- Re-create Bootable USB
- Reseat the drive
- Try different ports
For details, refer to the hard disk not detected during Windows installation guide.
#3. The Selected Disk Has an MBR Partition Table
On the Select location to install Windows 11 screen, an error warning may pop up, as follows:
“The selected disk has an MBR partition table. On EFI systems, the operating system can only be installed to GPT disks.”
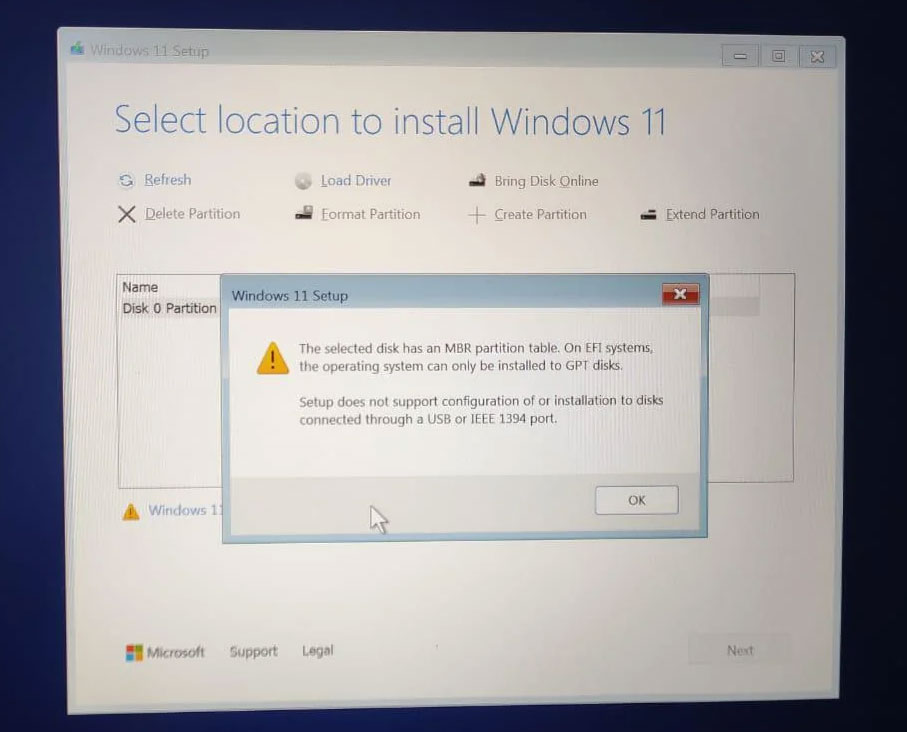
(Image from Reddit)
When attempting to install Windows on a modern UEFI-based system that requires a GPT partition table, but your disk is using MBR, the error occurs.
Solutions:
One straightforward solution is to delete all existing partitions until the drive shows as unallocated space. To do this, choose a partition and click Delete Partition. Then, select the unallocated space and click Next. Windows will reformat the drive and begin the installation.
However, this action can result in data loss if you don’t create a backup for important data beforehand.
Alternatively, run MiniTool Partition Wizard to convert the MBR disk to GPT, without losing files. To perform this task, exit the installation task to access the desktop, launch this partition manager, right-click the MBR disk, and select Convert MBR Disk to GPT Disk.
MiniTool Partition Wizard FreeClick to Download100%Clean & Safe
#4. Mouse/Keyboard Not Working During Setup
The keyboard or mouse may work well in BIOS, but stop responding immediately after the Windows 11 Setup screen appears. This issue is primarily caused by a lack of necessary USB 3.0 drivers and disabled legacy support.
Solutions:
- Switch to a USB 2.0 port.
- Use a wired USB keyboard and mouse for the installation process.
- Enable legacy USB support or USB controller in BIOS.
For detailed information, refer to the keyboard or mouse not working guide.
Conclusion
A fresh install helps format the drive and create a clean copy of Windows 11. It can be an effective method to resolve persistent performance issues, constant system errors, remove bloatware, and virus infections.
To clean install Windows 11, follow the instructions to prepare the PC, create a bootable USB drive, boot Windows from it, and begin the installation. Then, complete the OOBE setup and configure security, privacy, and personalization for a better user experience.
In terms of issues with MiniTool software, contact us at [email protected].
Clean Install Windows 11 FAQ
Try a clean installation for optimal performance and a stable system, as it removes bugs, registry clutter, bloatware, and viruses, and addresses system issues.
Regardless of the method used to install Windows 11, it is necessary to back up your important files to prevent data loss.
For details, refer to the wiping a computer guide.
About The Author

Position: Columnist
Vera has been working at the MiniTool Team for over 10 years as a technical editor and content writer. She mainly focuses on disk and partition management, data recovery, Windows backup and restore, and PC troubleshooting. Through in-depth software testing and hands-on experience, she has helped users solve a wide range of computer problems and better protect their data on Windows devices.
User Comments :