Brief Introduction of Tesla Dashcam
Tesla is known for breaking the industry innovation throughout the last decade and has two cool features. One is the Sentry mode that can record a 10-minute clip when it detects a person moving nearby. The other is Tesla Dashcam that records video while driving using 4 cameras (front, both side repeaters, and rear).
The vehicles that are equipped with Tesla Dashcam include the Model S and Model X with HW2.5 (made after July 31, 2017), and all Model 3/Y vehicles. Although Tesla Dashcam might not be so good as third-party dashcams, most users are satisfied as it is a built-in feature and doesn’t require any special installation.
About Tesla Dashcam Not Working Issue
Unfortunately, some Tesla Dashcam users have experienced various problems while using this driving recorder and Tesla Dashcam not working is one of them. Actually, apart from physical issues of Dashcam itself, the TeslaCam USB might be responsible for this problem in most cases.
There are 2 commonly-discussed cases about Tesla Dashcam not working on the forum.
My Dashcam icon has an X icon next to it. Worked fine on 39.5 and 39.6 and when I got into my car today after installing 39.7 last night, it seemed to work fine with red record icon on. Got out of the car to grab something from the house come back in and got ready to leave when I noticed the dash cam icon has X icon on it. Anyone else have this issue and have been able to fix? — posted by SoCalGuy in teslamotorsclub
As this user complains, an X icon might appear on your Tesla Dashcam icon when it stops working. In this case, probably the disk gets corrupted during the 39.7 update process, or the disk has been full.
Yesterday, out of the blue, TeslaCam stopped working. It was displaying a gray icon. Now it is not showing the dashcam icon at all. I have two USB sticks both formatted with FAT32 as per instructions, and they were both working with both sentry mode and dashcam footage until yesterday. Both have plenty of space. The strange thing is that the sentry mode icon is active, although it does not record any sentry mode video.— posted by etrc in teslamotorsclub
Sometimes, your Tesla Dashcam runs into problem and doesn’t record video, even if the TeslaCam USB is health and of right file system. If you have the same problem, perhaps you need reformat your USB with a third-party program.
Of course, there are more problems you might encounter if your Tesla Dashcam stops working. But you don’t need to worry about that, the possible solutions to Tesla Dashcam not working are collected and listed below.
Without further ado, let’s start with the first simple solution.
Fix 1: Check Your USB Type
If Tesla Dashcam not working error appears, you should check your USB driver type at first. Note that the USB problem does not occur to Tesla only, but also general driving recorders that need additional USB to store data.
Generally, USB 2.0 works fine, but USB 3.0/3.1/3.2 are recommended in Tesla as the 3.x types will often speed up operations such as viewing and formatting.
Besides, the basic consumer drivers do not support the workloads generated by driving recorders like TeslaCam. Because it continuously stores 2 GB or more data per hour while driving and thus quickly makes the poor driver wear out and fail.
Therefore, if your current USB memory stick doesn’t meet the above requirements, replace it with another one which can meet the data needs generated by TeslaCam and Sentry Mode.
Fix 2: Split TeslaCam USB to Two Partitions
Are you using one USB to store music and Dashcam data? You should know that separate USB drives are required for music and your Tesla V9 Dashcam.
This might be kind of annoying. If you use a USB drive only for music, your dashcam cannot work. But if you use both USB ports for them at the same time, you will have no USB port for phone charging.
Most users choose to partition the USB into two partitions to be free from this dilemma. So, if your Tesla Dashcam doesn’t work when you have just a USB for music, you’d better check whether you have a partition for Dashcam.
Here is how to partition Tesla Dashcam USB with the built-in Windows tool.
Stage 1: Delete the Original Partition on USB
If the USB is a NTFS drive, you can shrink it directly and create a new partition. But Windows doesn’t support to shrink FAT32 drive, so you have to firstly delete the original music partition which occupies the whole drive to create 2 new partitions with the built-in Windows tool.
Step 1: Remove the USB from your car and connect it to your computer.
Step 2: Press Windows + R to open Run window, and type diskmgmt.msc and click OK to launch Disk Management.
Step 3: Just right-click the partition and choose Delete Volume. Then, click OK in the confirmation window. (In the previous version of Windows system, perhaps you cannot delete volume on USB flash drive as it is regarded as a removable device by windows.)
Stage 2: Create Two Partitions On USB
Step 4: Now, right-click the unallocated space and choose New Simple Volume.
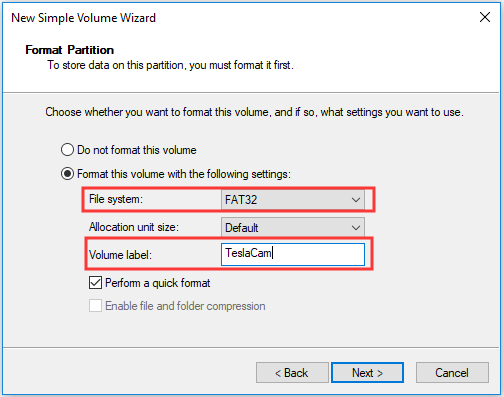
Step 5: In the following pages, set the size and drive letter for the new partition, and select FAT32 file system and give a volume label of TESLACAM. Don’t forget check Perform a quick format option.
Step 6: Do the same operations to create another partition and give it a label of Music.
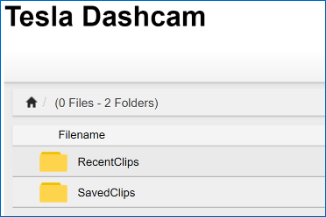
Step 7: Open TESLACAM partition and create a folder TeslaCam without which your Tesla Dashcam won’t write data to your USB. Then, you can copy the music files to the Music partition.
See also: How to Free Create FAT32 Partition on External Hard Drive
Fix 3: Free up Space of Dashcam USB
#1. Delete Files from Dashcam USB
Sometimes, deleting certain files from your Dashcam memory stick is an effective method to fix Tesla Dashcam not working. Once the USB gets full, Tesla Dashcam will continue recording but save nothing. So, you need take actions to free up the space.
Delete Recording Files from Time to Time
It’s necessary to delete the recoding files from time to time, because the old files won’t be deleted automatically.
Just remove Dashcam USB from the recorder and connect it to your computer. Open the Dashcam folder and choose some files to delete. Commonly, you are recommended to delete the files under SavedClips folder which saves the recording of more previous data.
Delete FSCK Files
When the USB drive is removed or the car is shut down, the last file that Tesla Dashcam is actively recording is always corrupted and unusable.
When the USB drive is started on the next power-up, the file system check (FSCK) will run and find the corrupted sectors of the final file. Then, the recovered files will be saved on the root of the USB drive, rather than inside the TeslaCam folder, with characters FSCK in their names.
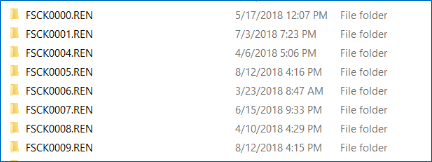
You need to delete these files periodically. If you don’t do it for long time, the number of FSCK files will increase and they will eat up your TeslaCam USB.
#2. Enlarge the Partition of TeslaCam
If you have 2 partitions on you Dashcam USB and deleting Dashcam files doesn’t free up much space, you can try enlarging the partition of TeslaCam while shrinking the Music Partition.
As I have said before, Disk Management doesn’t support shrink FAT32 drive, so you can choose to employ a third-party program. Here, MiniTool Partition Wizard is recommended for you.
MiniTool Partition Wizard is a professional partition manager, which can help you manage your hard drive easier. For example, with this program, you can backup partition quickly, check and fix the partition error, and even migrate your Windows to SSD without reinstalling operation system.
It also provides a feature of Extend Partition that can help you enlarge FAT32 partition easily.
MiniTool Partition Wizard FreeClick to Download100%Clean & Safe
Step 1: Connect TeslaCam USB to your computer. Install MiniTool Partition Wizard and launch it to get the main interface.
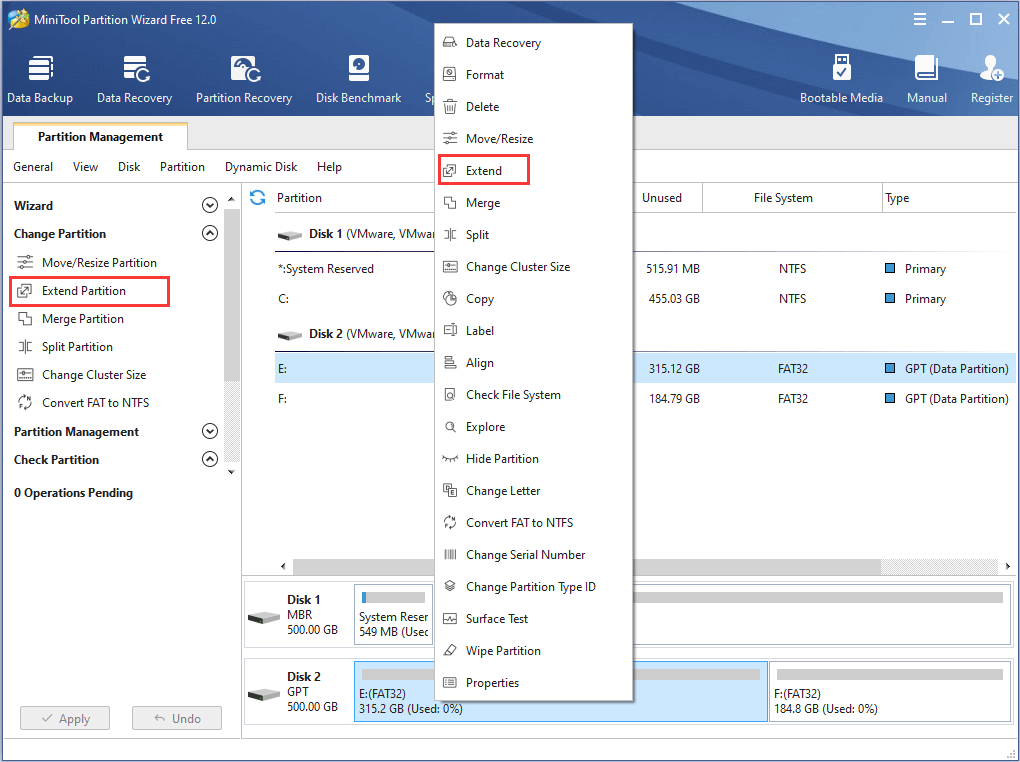
Step 2: Select the TeslaCam partition and choose Extend Partition from the left pane. Alternatively, you can right-click the partition and choose Extend from the context menu.
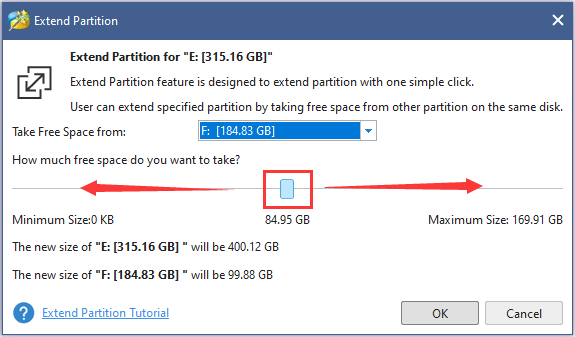
Step 3: The other partition will be selected by default to be taken free space. Drag the sliding handle leftwards or rightwards to decide how much space to take. Then, click OK.
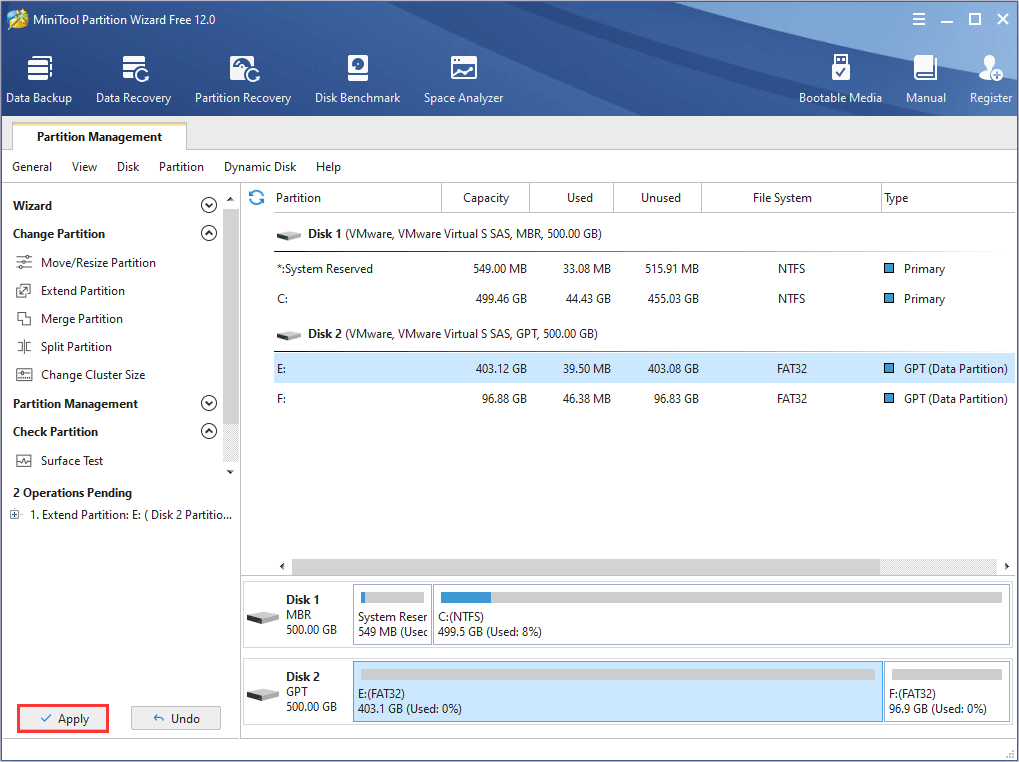
Step 4: Click Apply button to confirm the pending operation.
Fix 4: Format TeslaCam USB to FAT32
Actually, FAT32 is the standard file system for Dashcam. So, if you have bought a new USB for Dashcam, you need to check its file system and make sure it is FAT32 format.
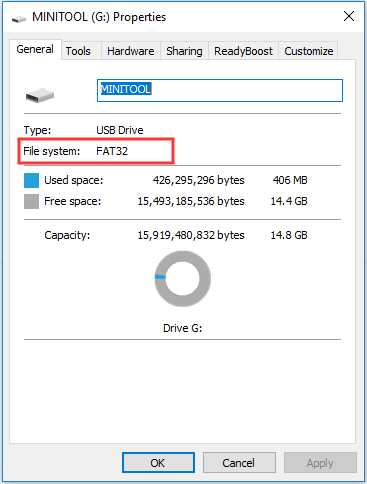
To check the USB’s file system, just connect it to your computer and open File Explore. Right-click the USB drive and choose Properties from the context menu. You will get the following window which shows the file system.
Besides, even if you have formatted your TeslaCam USB before, you might have to reformat it when Tesla Dashcam doesn’t work. Many users reported on the forum that they have always fixed the error in most cases by reformatting. So, feel free to try this solution.
Use Disk Management
You can format TeslaCam USB using Disk Management and it’s a rather simple operation.
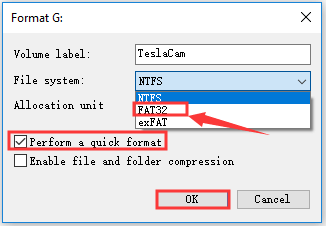
After connecting it to your PC, open Disk Management by typing diskmgmt.msc in Run dialog and clicking OK. Then, right-click the TeslaCam drive and select Format. When you get the following window, choose FAT32 file system, and then check Perform a quick format option and click OK.
Some users have fixed Tesla Dashcam not working in this way, but some others complain that formatting with Windows built-in tool doesn’t work. Instead, they fix the error by formatting using third-party programs.
In addition, the regular Windows format tool cannot format FAT32 USB drivers larger than 32 GB. So, users who use TeslaCam USB larger than 32 GB have to employ third-party formatters to finish this operation.
You can also use MiniTool Partition Wizard to perform TeslaCam USB format.
Use MiniTool Partition Wizard
The Format Partition feature is also provided in MiniTool Partition Wizard Free edition. Don’t hesitate to download and install it.
MiniTool Partition Wizard FreeClick to Download100%Clean & Safe
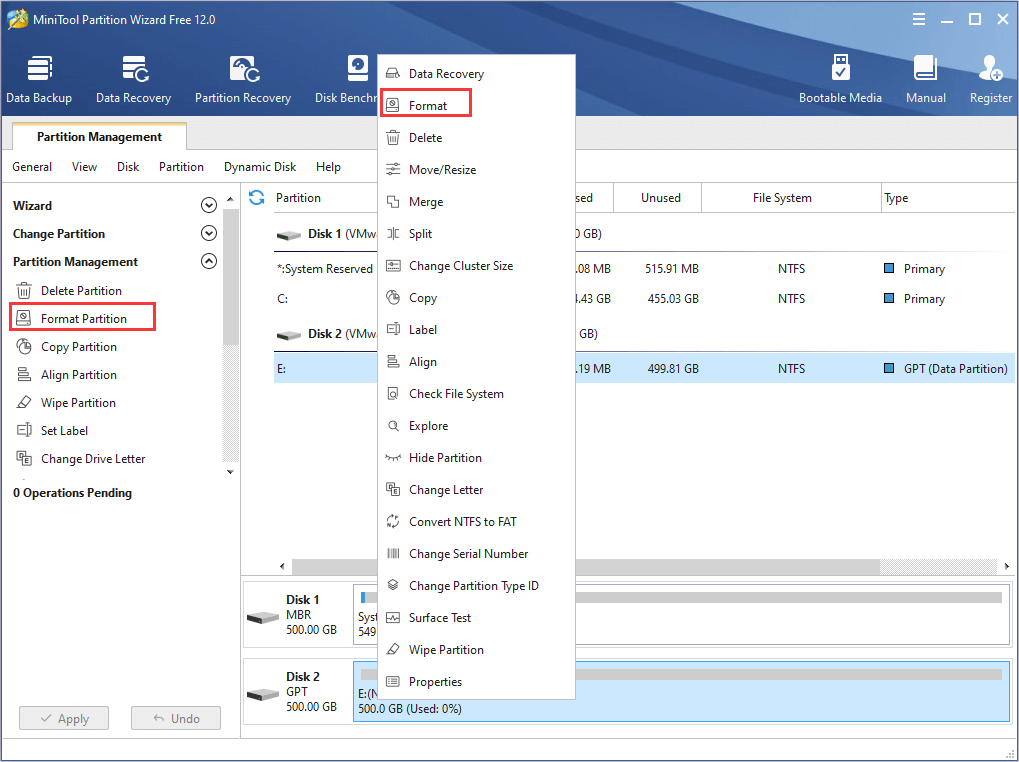
Step 1: Launch this application to get the interface.
Step 2: Select the TeslaCam partition and choose Format Partition from the left pane, or you can right-click the partition and hit Format in the drop-down menu.
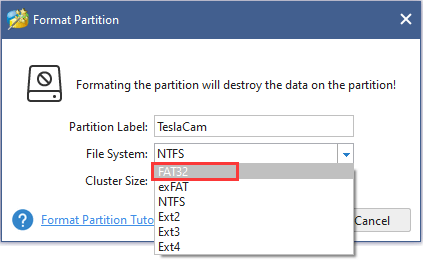
Step 3: Open the list of File System and choose FAT32. Then, click OK button.
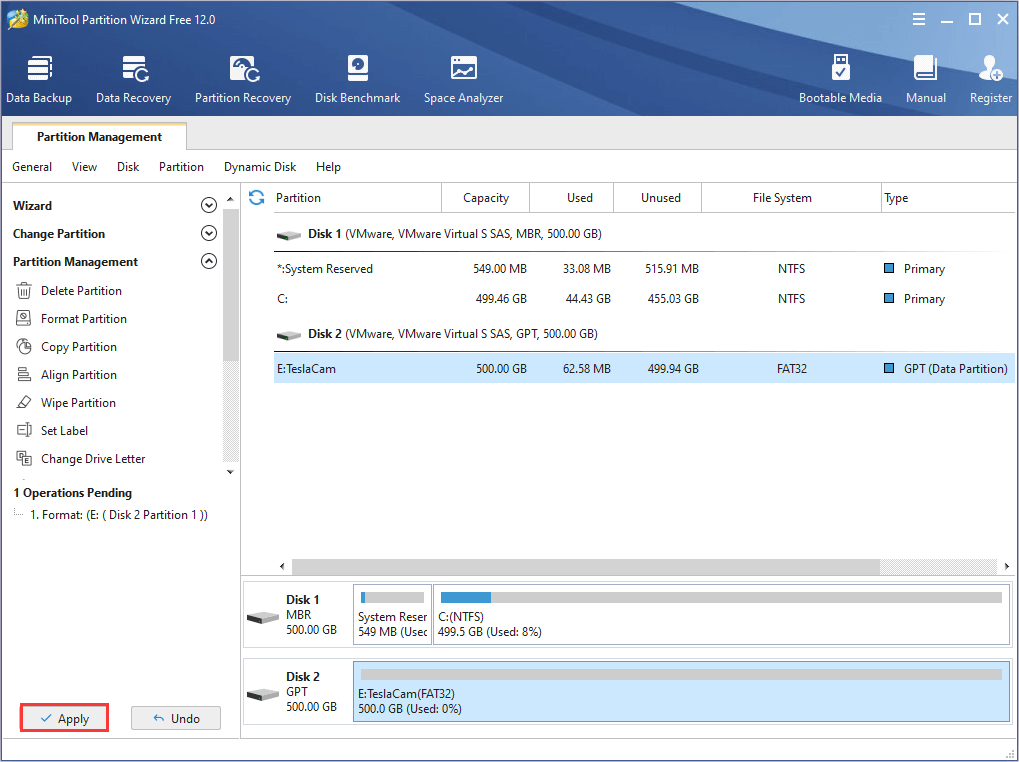
Step 4: After coming back to the interface, click Apply button to perform the change.
See also: If you just need to change the NTFS format to FAT format, the Convert NTFS to FAT32 feature provided by MiniTool Partition Wizard can help you perform the conversion without any data loss.
Bottom Line
That’s all about Tesla Dashcam not working error. Hope the solutions listed above can help you fix this error effectively.
Any corrections, discoveries and complements to this post are welcome. You can leave them in the comment zone below, or contact us via [email protected].
User Comments :