It is annoying to experience random shutdowns on Windows 11. Many users complain that influences their work efficiency. To stop Windows 11 PC shutting down for no reason, you can apply the methods offered by MiniTool Partition Wizard in this post.
Due to various reasons, Windows 11 randomly or automatically shuts down. This may disturb your work plan and result in data loss, which is confusing. Therefore, it is vital to get rid of Windows 11 random shutdowns immediately.
To solve the issue accurately, you should find the possible reasons behind it. After looking into this error, we find that factors like software/hardware conflicts, hard drive errors, overheating CPU/GPU, messed power plans, enabled sleep mode, and faulty memory will trigger random shutdowns on Windows 11.
Based on these possible reasons, we summarize the methods below to troubleshoot the Windows 11 PC shutting down for no reason issue.
Here are some methods to shut down a computer or solve PC shutdown issues.
- Shut down or restart your PC without updating Windows
- Shutdown button not working
- Shut down computer using Notepad
- This app is preventing shutdown
Method 1: Run the Power Troubleshooter
The Windows 11 PC shutting down for no reason issue can be caused by a messed power plan. Fortunately, you can simply run the Windows built-in Power Troubleshooter to fix issues with the power plan. Here’s how to do that.
Step 1: Press the Windows and I keys to open Settings.
Step 2: Click on the System tab and then scroll down and click Troubleshoot on the right side of the window.
Step 3: Then click on Other troubleshooters.
Step 4: Locate the Power option and click the Run button behind it to start the troubleshooting process.
Step 5: Wait for the finish of the process and follow the on-screen instructions to apply the fixes.
Step 6: Restart your computer to see if your Windows 11 PC shuts down unexpectedly again.
Method 2: Disable Fast Startup
Step 1: Right-click on the Windows icon to open the Start menu.
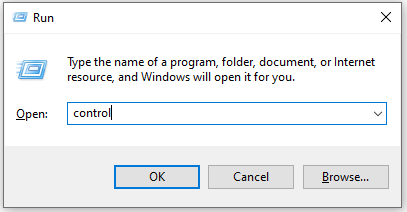
Step 2: Tap on the Run option in the opened menu. This operation will open the Run dialog window.
Step 3: Type control and hit the Enter key.
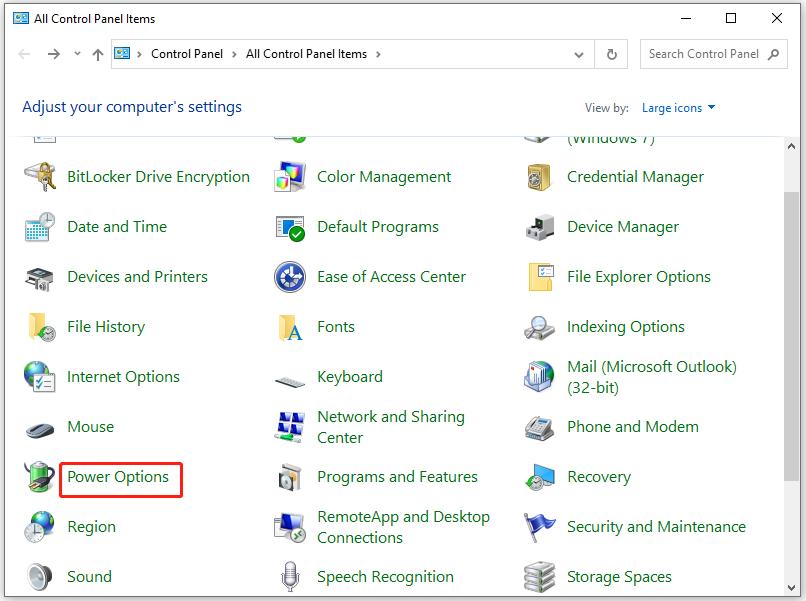
Step 4: In the Control Panel window, find and click Power Options.
Step 5: In the left panel of the prompted window, click Choose what the power button does.

Step 6: Click on the Change settings that are currently unavailable link.
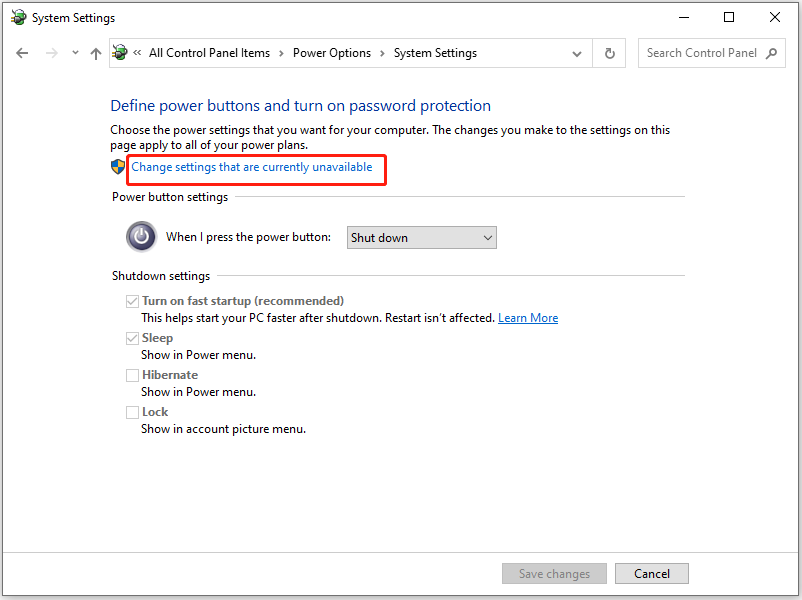
Step 7: Uncheck the Turn on fast startup (recommended) box and click Save changes to confirm the operation.

![How to Remove Windows Service on Windows 10? [3 Methods]](https://images.minitool.com/partitionwizard.com/images/uploads/2023/08/remove-windows-service-thumbnail.jpg)
Method 3: Turn off Sleep Mode
Though the sleep mode helps you save power when you’re away, there have been instances that Windows 11 randomly or automatically shuts down rather than going to sleep.
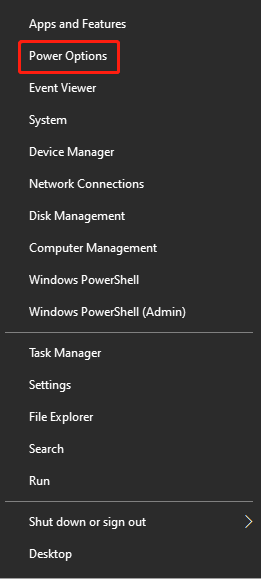
Step 1: Press the Windows and X keys to call out the Start menu. Then click Power Options on it.
Step 2: Click System > Power & battery.
Step 3: Under the Screen and sleep section, set the status of “On battery power, put my device to sleep after” and “When plugged in, put my device to sleep after” to Never.
Step 4: Now, check if you receive random shutdowns on Windows 11. If the issue persists, try other methods offered in the post to get rid of the issue.
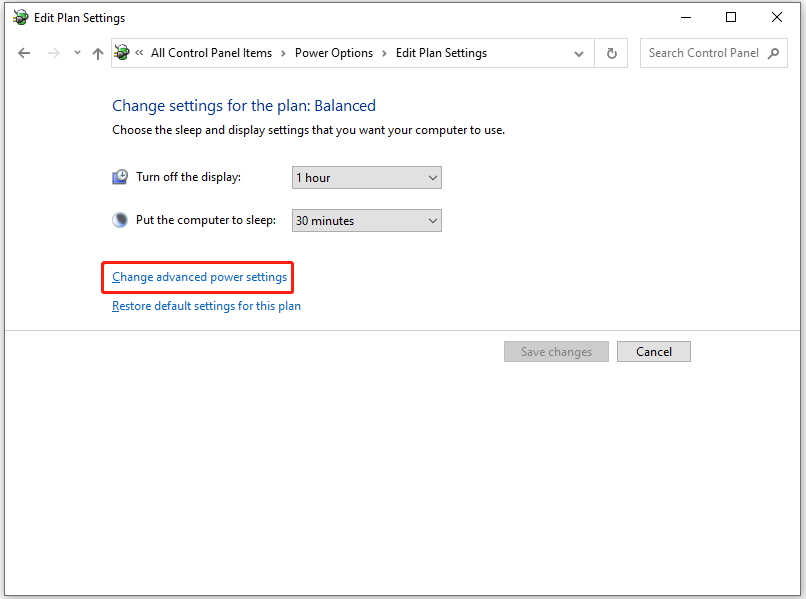
Method 4: Change Advanced Power Settings
The advanced power settings allow you to customize power options for different system components like USB settings, hard disk, wireless adapter, etc. Try modifying these settings to fix Windows 11 PC shutting down for no reason.
Step 1: Open the Control Panel from the Run window.
Step 2: Then click Power Options > Change plan settings (behind the current power plan) > Change advanced power settings in the Control Panel window.
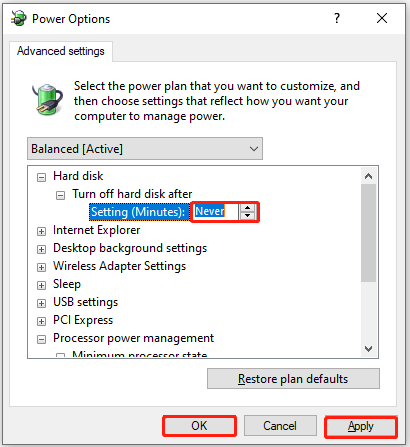
Step 3: In the pop-up window, find and double-click Processor power management. Then click Minimum processor state under this category.

Step 4: Double-click Minimum processor state and click on its settings. Change the value on it from 100 to 0.
Step 5: Find and double-click Hard disk > Turn off hard disk after, and reduce the value to Never.
Step 6: Eventually, click Apply > OK to execute the operation.
Method 5: Run a Virus Scan
Malware and virus attacks sometimes can be the culprits for random shutdowns on Windows 11. It is necessary to run a virus scan when Windows 11 randomly or automatically shuts down. You can scan your computer for viruses or malware by using Windows embedded utility or a third-party anti-virus program like Malwarebytes.
Here, we show you how to scan the system for viruses with Windows Security.
Step 1: Type windows security in the search box and hit Enter.
Step 2: Click Windows Security under Best match to open it.
Step 3: In the elevated window, click Privacy & security > Windows Security.
Step 4: Then click Open Windows Security to open the app.
Step 5: On the home screen of Windows Security, click the Virus & threat protection option.
Step 6: Under the Virus & threat protection section, click Manage settings to reconfigure Windows Defender.
Step 7: Enable the Real-time protection toggle and other toggles on this page. Then your computer will be scanned for viruses.
Method 6: Check the Hard Drive for Errors
Windows 11 random shutdowns sometimes can result from hardware issues like hard drive errors. Like other things, hard drives also have a lifespan. Sometimes, even if the hard drive doesn’t reach its lifespan, it’s still possible that it prompts with errors.
Fortunately, you can check if a hard drive is failing with SMART or check hard drive errors with disk managers like MiniTool Partition Wizard. Both the Surface Test and Check File System features of this program are capable of detecting errors on the hard drive.
As comprehensive partition software, MiniTool Partition Wizard allows you to perform various tasks related to hard drives and partitions. For example, it enables you to create/format/extend/shrink/merge/split/copy/delete/recover partitions, convert FAT to NTFS (and vice versa), copy disks, test hard drive speeds, check disk space usage, wipe disks, and so on.
Click the button below to download and install this free partition manager on your computer. Then launch this software and follow the given steps to check hard drive errors.
MiniTool Partition Wizard FreeClick to Download100%Clean & Safe
Step 1: Right-click on the hard disk and click Surface Test in the context menu.
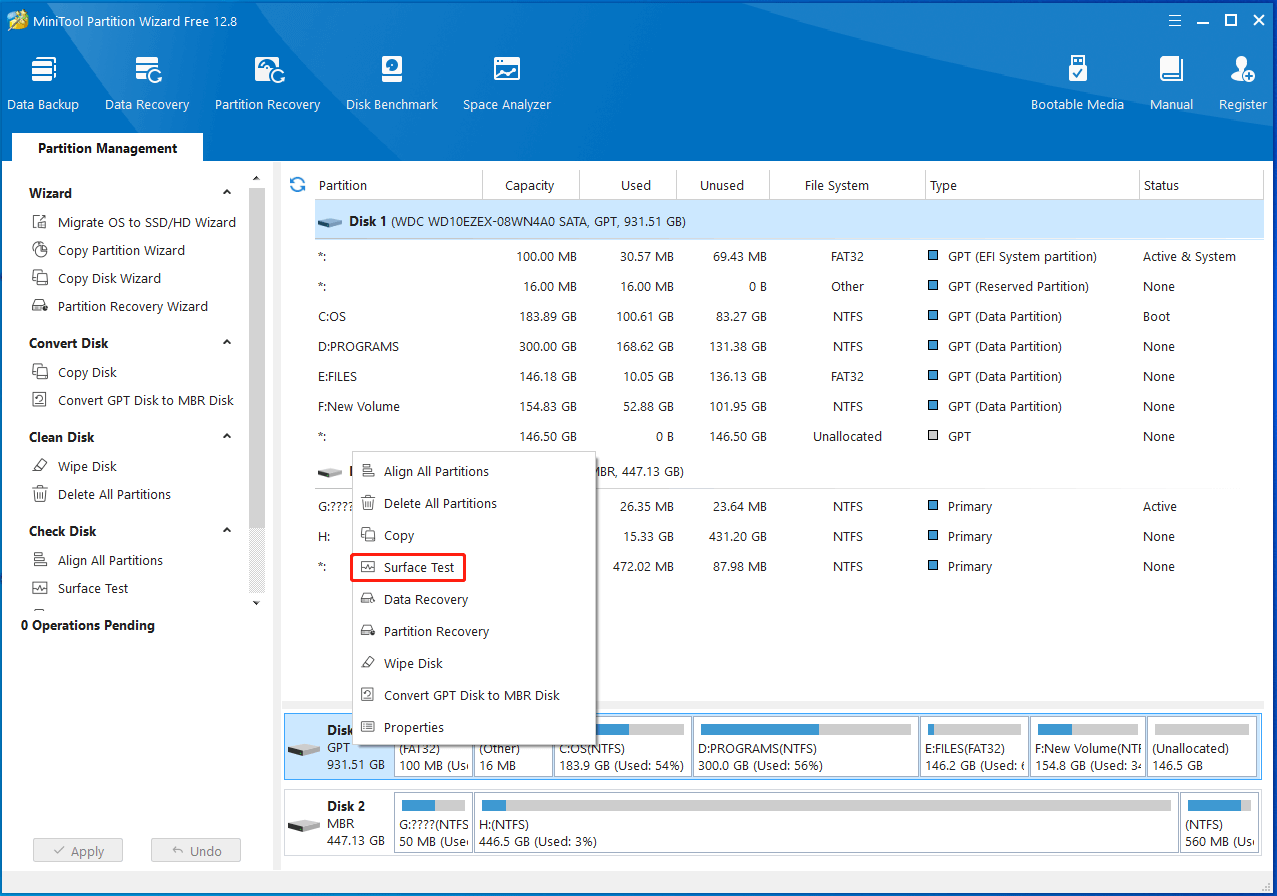
Step 2: In the Surface Test window, click the Start Now button to start the process.
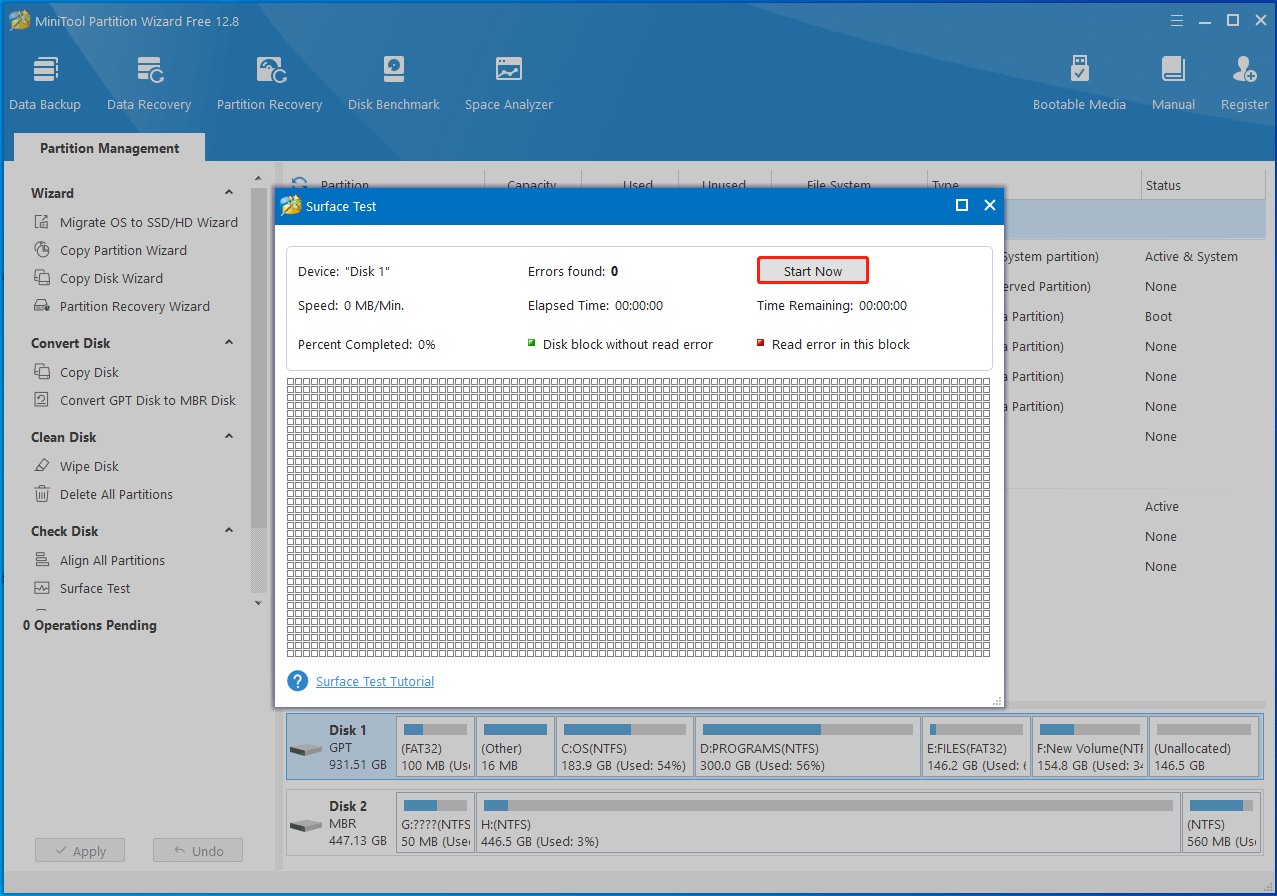
Step 3: Wait for the finish of the scanning process. Once the test ends, you will see the complete scan result. If there are any blocks marked with red, it means that your hard drive contains bad sectors. If so, mark them as unusable or replace the hard drive. Please remember to back up the data on the hard disk before you replace it.
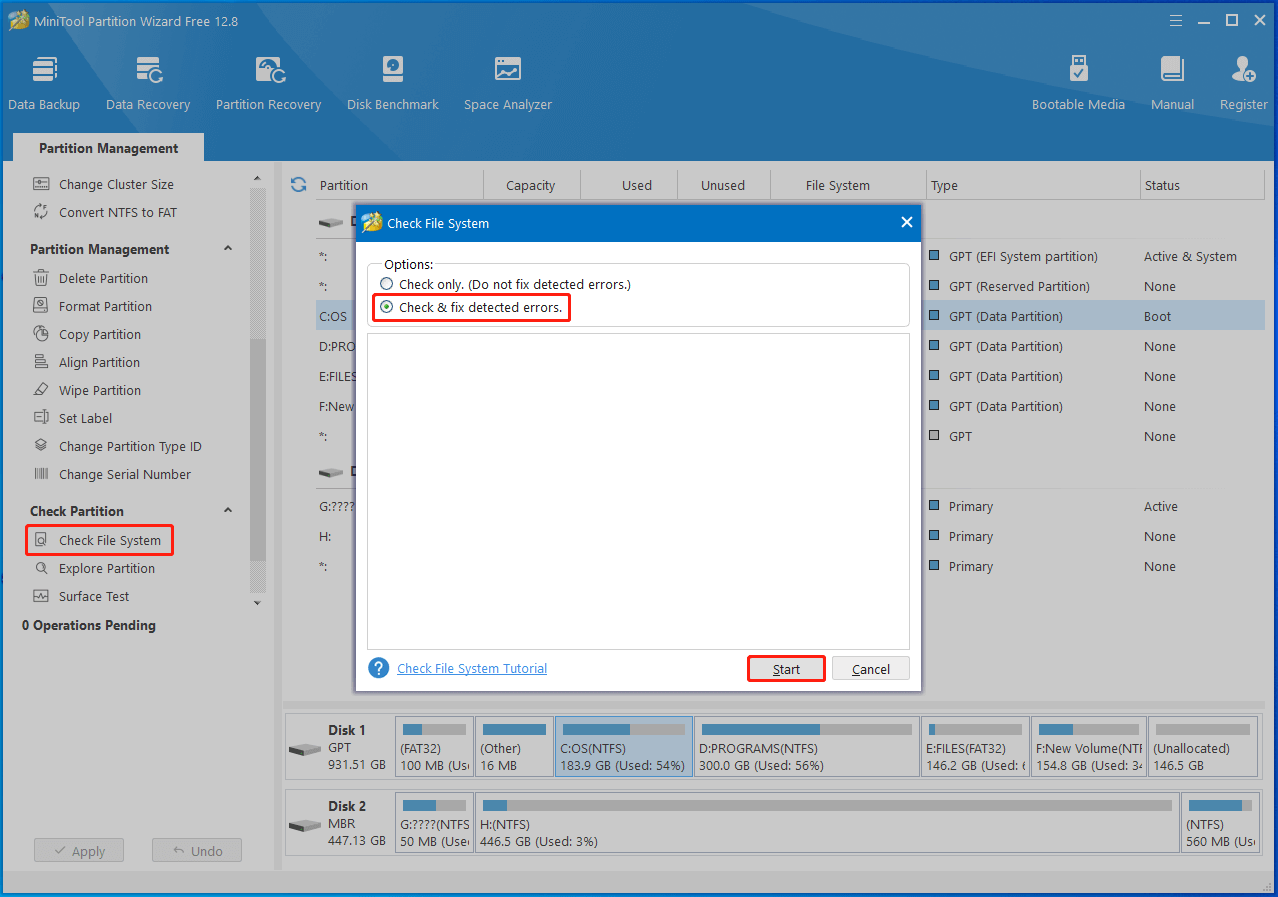
Step 4: To check if your hard drive has file system errors, continue to execute the steps below.
Step 5: Click on the specific partition, click Check File System in the left panel, choose Check & fix detected errors, and then click Start in the pop-up window.
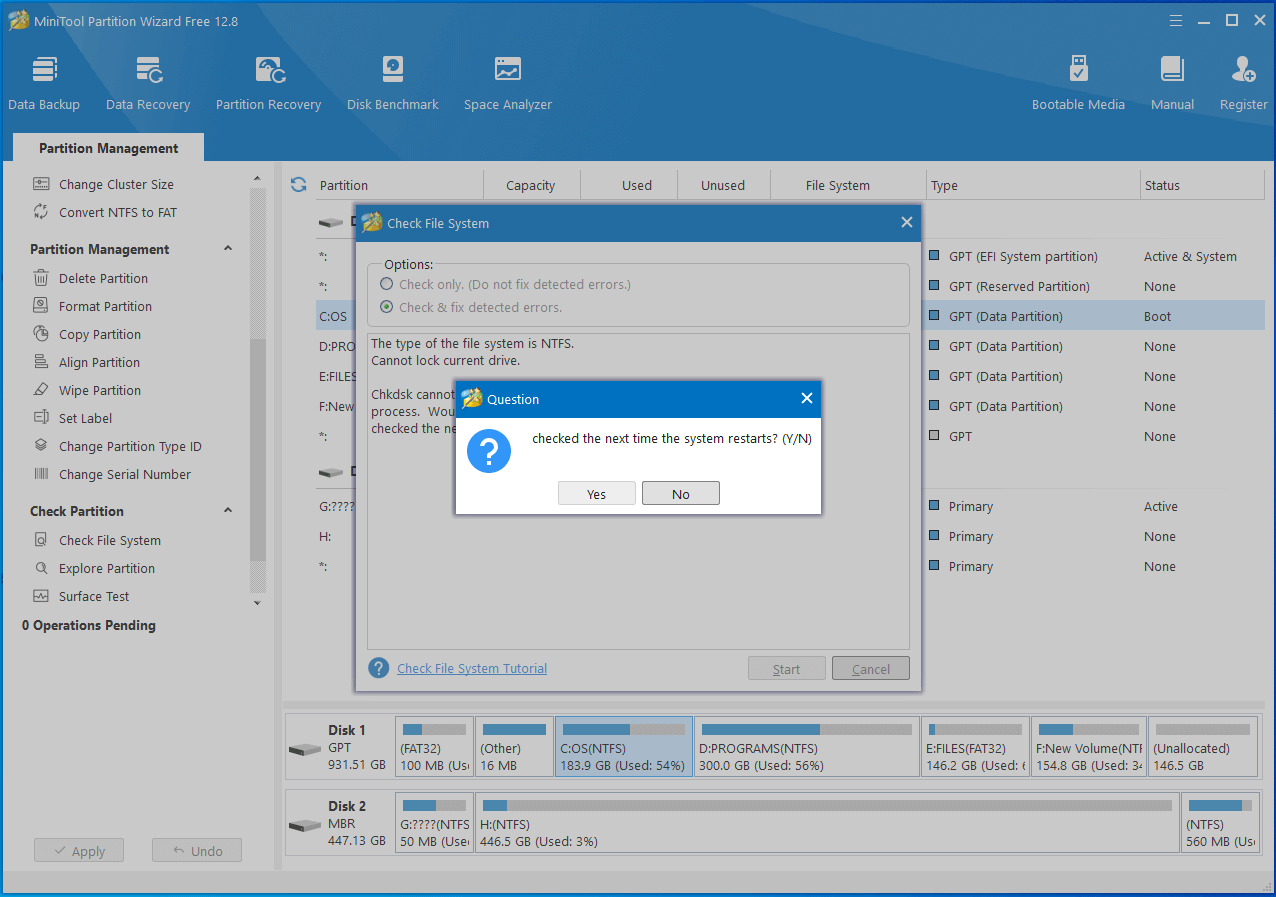
Step 6: When you check the system partition (C drive), you might be prompted with the question “checked the next time the system restarts”. Click Yes to confirm that.
Method 7: Perform a Memory Test
Faulty memory (Random Access Memory) modules are also responsible for random shutdowns on Windows 11. Once your Windows 11 PC shuts down unexpectedly, check if there are any issues with the RAM with Windows Memory Diagnostic tool. Here’s the full tutorial for doing that.
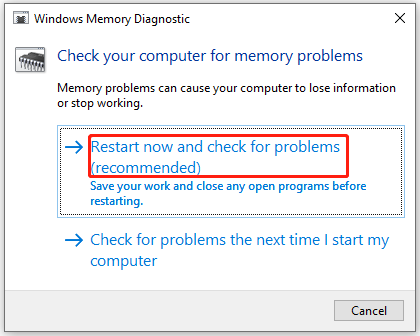
Step 1: Type Windows Memory Diagnostic in the search box, and then click the Open option under this app.

Step 2: In the prompted window, choose Restart now and check for problems (recommended).
Step 3: After your computer restarts, Windows Memory Diagnostic would test the memory for issues.
Step 4: If your memory is faulty, replace it with a new one.
Method 8: View Shutdown Log in Event Viewer
The Event Viewer on the computer keeps track of everything that occurs on your computer, including shutdowns and restarts. If the Windows 11 PC shutting down for no reason issue often happens, you’d better check shutdown logs in Event Viewer.
Step 1: Input event viewer in the search box and press Enter.
Step 2: Find and open it from the search results.
Step 3: In the Event Viewer window, double-click Windows Logs to expand it.
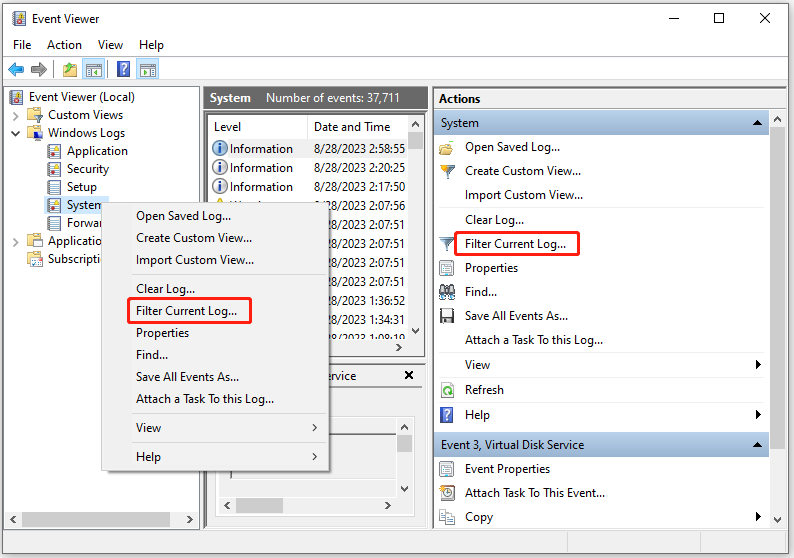
Step 4: Under Windows Logs, find and right-click System and then click Filter Current Log. Alternatively, click the System option and click Filter Current Log in the right panel.
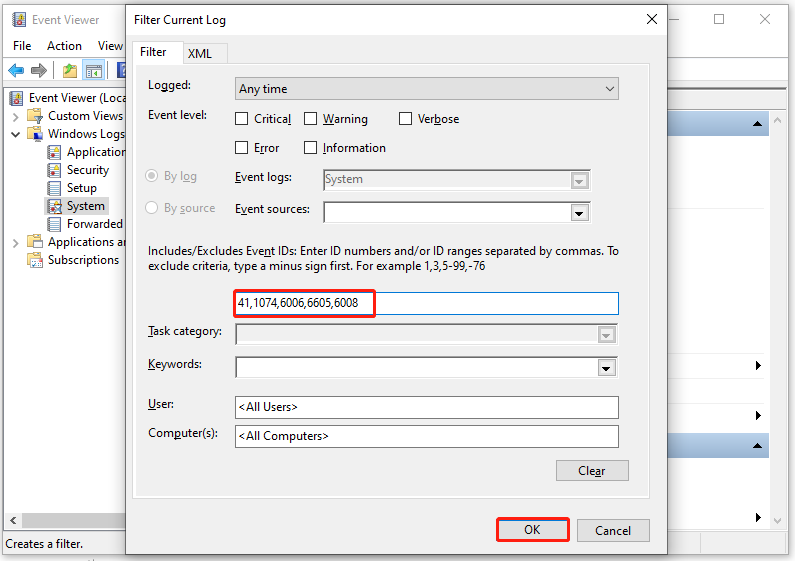
Step 5: In the next window, type 41,1074,6006,6605,6008 in the Includes/Excludes Event IDs field and tap OK.
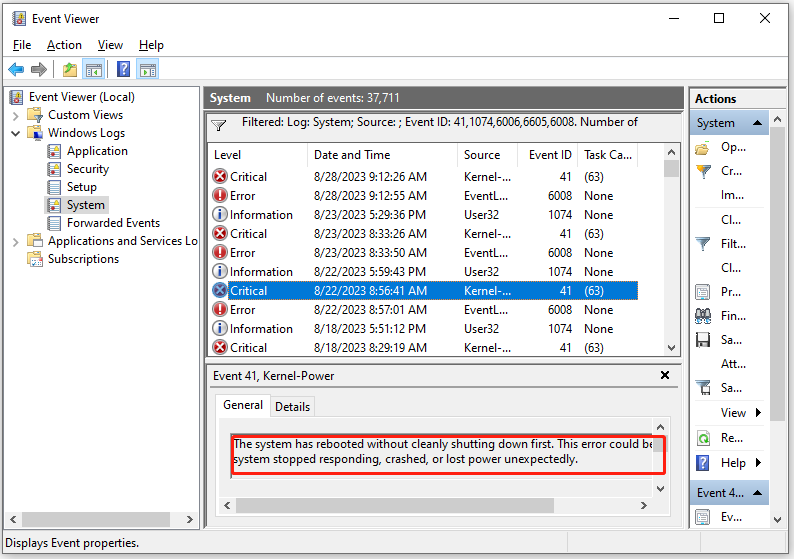
Step 6: After that, Windows will display all the corresponding shutdown and restart logs. You can see the specific reason for the shutdown or restart by clicking on the log.
Method 9: Update Windows 11
As you might know, Microsoft keeps releasing new updates to improve user experience. To be specific, it adds new features and bug patches to known issues in the previous versions in these updates. According to user reports, installing Windows 11 new updates helps them fix some confusing issues.
Here, you can try updating Windows 11 to solve Windows 11 random shutdowns too.
Step 1: Open the Settings app on your computer.
Step 2: Click Windows Update in the left panel.
Step 3: Then hit the Check for updates button on the right side of the window. If there are any available updates, they will be listed. Then click the Download and Install button to get the update installed.
Bottom Line
What to do if Windows 11 randomly or automatically shuts down? Well, this post collects several troubleshooting methods for random shutdowns on Windows 11. You can try them when your Windows 11 PC shuts down unexpectedly.
If you have any thoughts about this topic, share them with us in the following comment area. For problems that occur when you use MiniTool Partition Wizard, contact us by sending an email to [email protected]. We will get back to you as soon as possible.
User Comments :