Have you come across the new Steam folder must be writable error? A great many people are searching for methods to fix the issue. Now, you come to the right place. MiniTool summarizes several simple and effective troubleshooting methods for you.
What Causes Steam Folder Not Writable
The Steam games folders are located at the C: /Program Files/steam/steamapps/common path by default. Sometimes, however, when trying to create or change the new Steam library folder on an external SSD or HDD, many people get troubled in the new Steam folder must be writable error.
What causes the Steam folder not writable? After analyzing lots of articles and user reports, we found there are many possible causes.
- Read-only Steam folder: The new Steam folder must be writable error often occurs when the Steam folder doesn’t have enough permissions to write and the folder is set to read-only.
- Corrupted download cache: The download cache can help users load Steam games at a fast speed. However, the corrupt download cache can trigger issues like new Steam library folder must be writable
- Write-protected program files: If the Program Files on your hard drive become write-protected, this error can occur. You can try changing the default library folder to fix it.
- Hard drive errors: The Steam install folder is currently not writable error can be caused by hard drive errors.
- Antivirus programs: This error can occur when your antivirus program blocks the system from accessing Steam folders.
Plenty of users fixed the Steam folder must be writable error simply by restarting the computer. You may have a try. If a simple restart fails to work, you can try the following 8 methods.
How to Fix New Steam Folder Must Be Writable Error
- Make sure the Steam library folder is not read-only.
- Clean the download cache.
- Reinstall the problematic games.
- Repair the Steam library folder.
- Change the default Steam library folder.
- Check the hard drive for errors.
- Add Steam client to the Exceptions list of antivirus programs.
- Take ownership of the Steam library folder.
Fix 1. Make Sure the Steam Library Folder Is Not Read-Only
If the Steam folder not writable folder error occurs whiling installing or updating a Steam game, then it can be caused by insufficient permissions. To avoid this error, make sure that the Steam Library folder is not read-only. Here’s how to do that:
Step 1. Stop the downloading process and close all Steam client that’s related processes in Task Manager.
Step 2. Press Win + E keys to open your File Explorer, and then navigate to the C: /Program Files/steam/steamapps path.
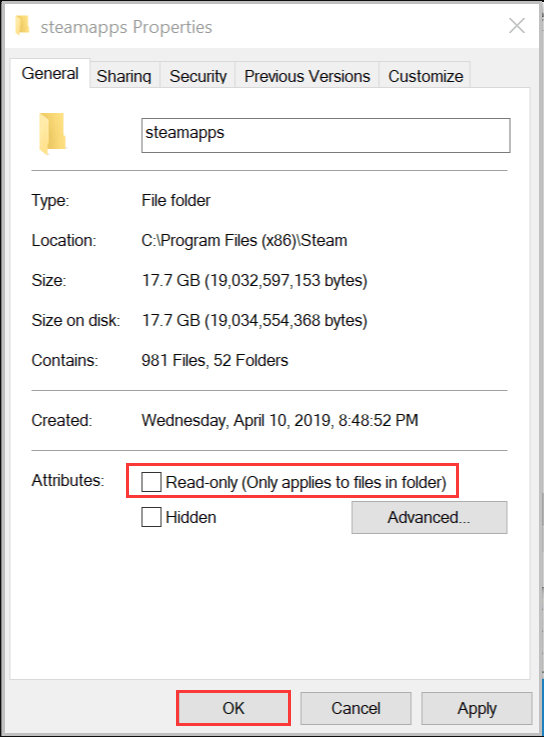
Step 3. Right-click the Steamapps folder and select Properties.
Step 4. In the Properties window, uncheck the box of Read-only next to the Attributes section and click OK to save this change.
Relaunch Steam and see if the issue is fixed. If not, then you need to delete the downloading folder and restart.
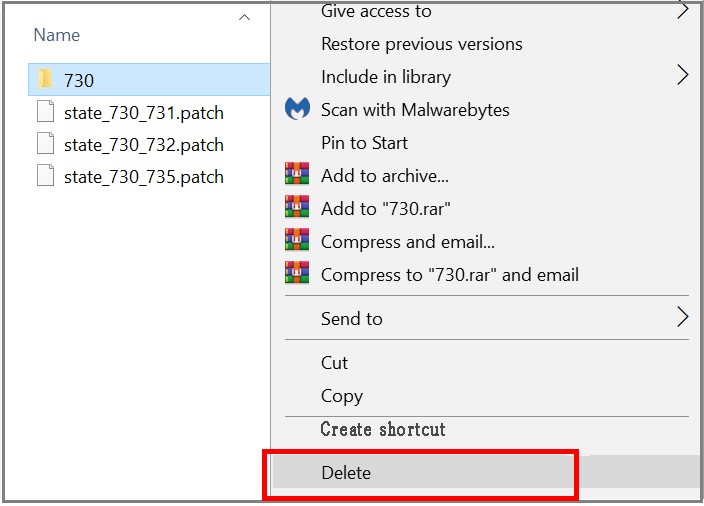
Step 1. Open the Downloading folder inside the Steamapps folder, and then right-click the numbered folder corresponding to the problematic game and select Delete.
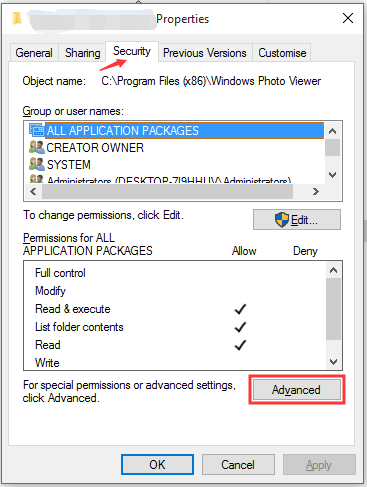
Step 2. If you can’t delete the folder, open the Properties window of the Steam game folder.
Step 3. Go to the Security tab and click on the Advanced button.
Step 4. Click the Change link next to Owner: TrustedInstaller.
Step 5. In the pop-up dialog box, type your user name and click on Check Names.
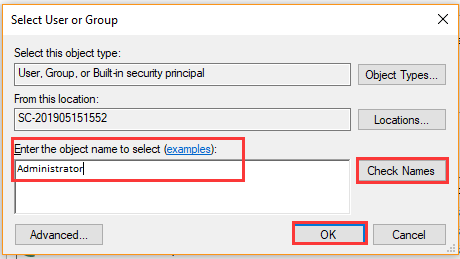
Step 6. Click on the OK and Apply button in the Advanced Security Settings window to execute these changes.
Fix 2. Clear the Download Cache
The corrupt download cache is also responsible for the new Steam library folder must be writable error. Now, follow the steps below to clear the download cache in Steam.
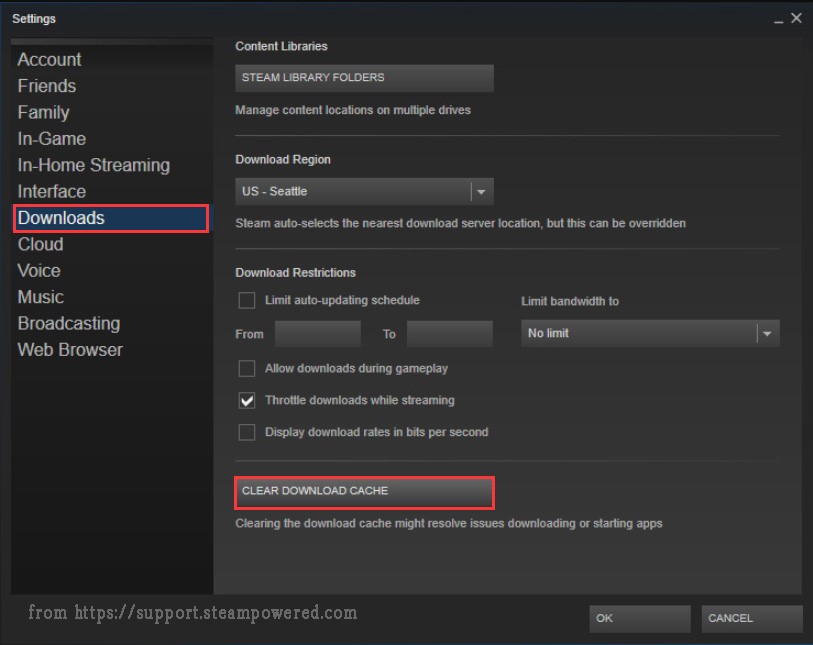
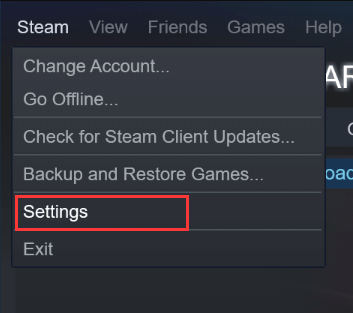
Step 1. Run your Steam client as an administrator, and then navigate to Steam > Settings.
Step 2. Go to the Downloads tab from the left pane, and click on the Clear Download Cache button at the right bottom of the page.
After that, you can try downloading the game and see if the new Steam folder must be writable error still persists.
Fix 3. Reinstall the Problematic Games
Sometimes the Steam install folder is currently not writable error appears while updating an existing game, it might be caused by a bug that could be fixed by reinstalling the problematic game. For that:
Step 1. Log in to your computer with an administrator account and make sure you have a backup of all important files. Here you can use Steam Cloud to back up files.
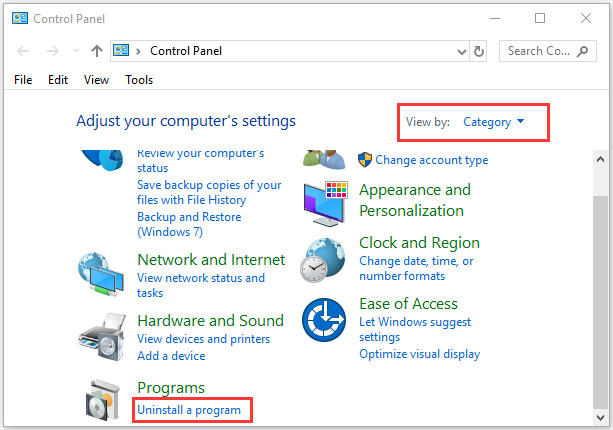
Step 2. Type control in the search box and select the Control Panel app from the context menu.
Step 3. Change the View by type to Category, and then click on Uninstall a program under the Programs section.
Step 4. Right-click the problematic game and select Uninstall. Then follow the on-screen prompts to complete the uninstallation.
Step 5. Relaunch your Steam client and go to the Steam Library tab. Then right-click the problematic game from the left pane and click on the Install game option. After that, Steam will start downloading and installing the game.
Once the game is reinstalled, check if the Steam folder not writable error is resolved.
Fix 4. Repair Steam Library Folder
As you know, Steam client has a built-in library folder repair feature that’s often used to repair the Steam game folder. It is reported that several users manage to fix the new Steam library folder must be writable error by using this feature. Have a try now!
Step 1. Launch your Steam client from the desktop or by searching for it in the Start menu.
Step 2. Click on Steam at the top menu and select Settings from the submenu.
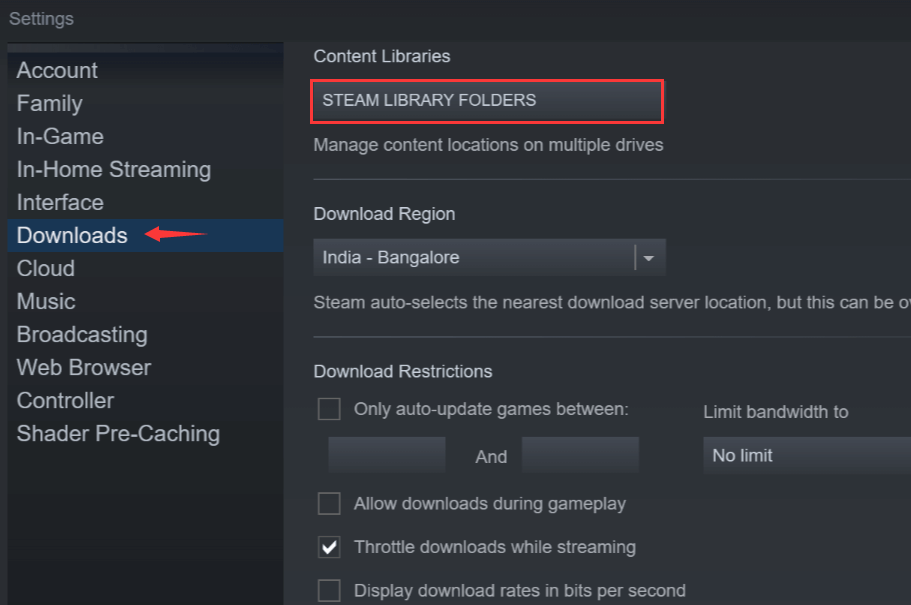
Step 3. Go to the Downloads tab from the left pane and click on Steam Library Folders button on the right side.
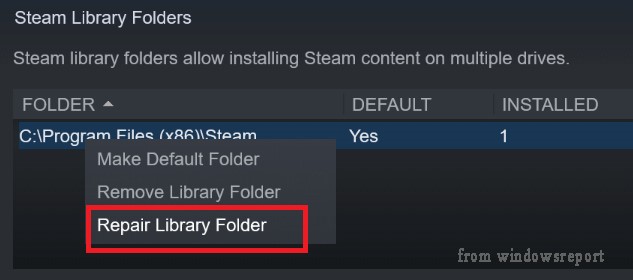
Step 4. Right-click the problematic Steam folder from the list and select Repair Library Folder. After that, Steam will automatically repair any problems with the folder.
Fix 5. Change the Default Steam Library Folder
As mentioned above, Steam folders are stored in Program Files by default. However, if the Program Files become write-protected, you may encounter the new Steam folder must be writable error. To fix the issue, you can try changing the default Steam library folder location and set it to a new one.
Here’s a step-by-step guide.
Step 1. Create a folder outside the Program Files location and make sure there is enough free space at this location.
Step 2. Right-click the Steam shortcut on your desktop and select Run as administrator. Then navigate to Steam > Settings.
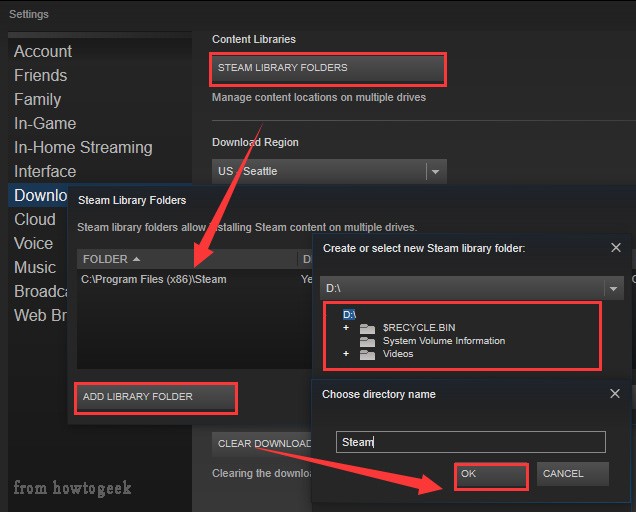
Step 3. Go to the Downloads tab from the left pane and click on Steam Library Folders button under the Content Libraries section.
Step 4. Click on Add Library Folder in the pop-up window, and then you can select the folder that you just created and click OK to save changes. From then on, you will be prompted with an option which Steam folder you want to install each time you install a game.
Step 5. Uninstall the problematic game via the steps in Fix 3. Now, you can reinstall the game from Library and select the new folder to save the installation. Once the reinstallation completes, check if the error disappears.
Fix 6. Check Your Hard Drive for Errors
The “new Steam library folder must be writable” error often appears when the Steam Library folder is located in a corrupted external SSD or HDD. So, we recommend you run a scan for hard drive errors and repair them. Here are 2 simple methods to check hard drive errors.
Method 1. Use CHKDSK
CHKDSK utility is a widely used tool to check and fix hard drive errors. Here’s a quick guide:
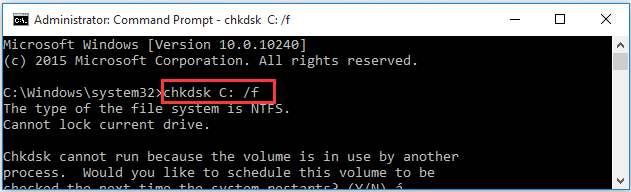
Step 1. Type cmd in the search box, and then right-click Command Prompt app from the Best match and select Run as administrator.
Step 2. In the elevated command prompt, type chkdsk C: /f and hit Enter. (Replace the C: with the driver letter of your drive that you want to check.)
This tool can help you fix hard drive errors. Sometimes, however, you may encounter various issues like CHKDSK gets stuck in Windows 10, and CHKDSK cannot run when scanning the hard drive. To check the hard drive easily and quickly, we recommend you use a reliable tool – MiniTool Partition Wizard.
Method 2. Use MiniTool Partition Wizard
MiniTool Partition Wizard is an ideal choice for checking the hard drive for errors. It is a trusted partition manager that focuses on data recovery, hard drive optimization, and file system conversions. This tool has fixed various errors like the green screen of death, BSOD, Recuva unable to determine file system type, etc.
MiniTool Partition Wizard FreeClick to Download100%Clean & Safe
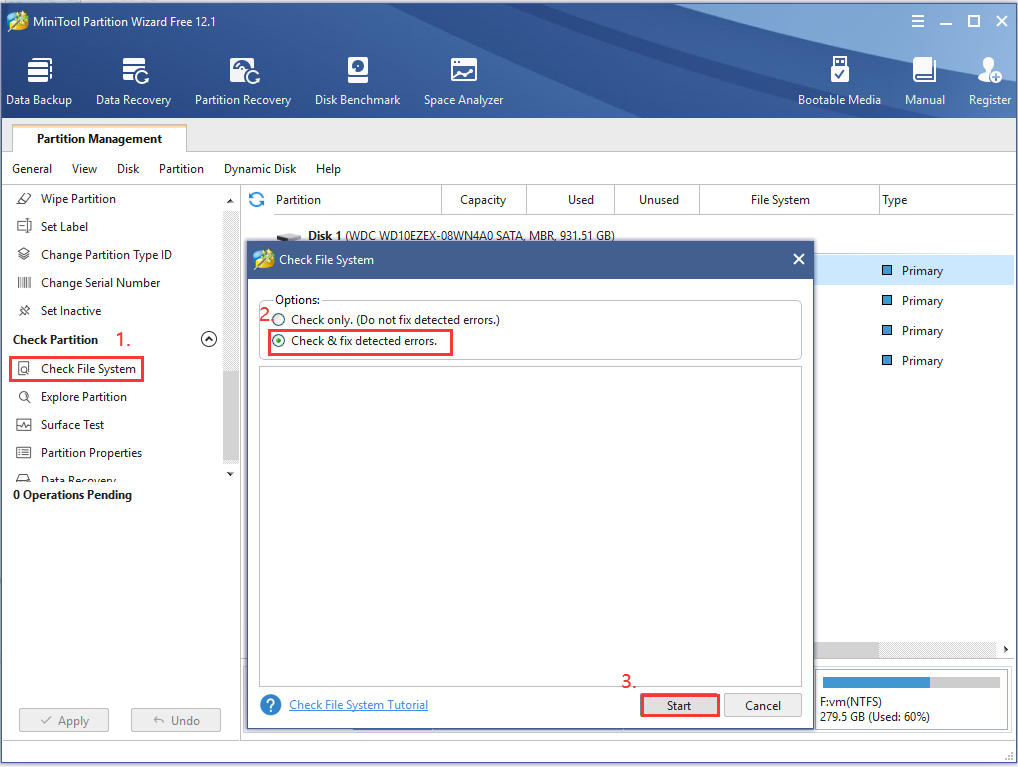
Step 1. Launch the program to enter its main interface.
Step 2. Select the hard drive you need to check and click on Check File System from the left pane.
Step 3. Select the second option – Check & fix detected errors and click on the Start button. Then this tool will scan the whole drive for errors and fix them automatically.
Once the hard drive errors are repaired, relaunch your game and see if the new Steam folder must be writable error is gone.
Fix 7. Add Steam Client to the Exceptions List of Antivirus Program
Antivirus programs sometimes can block Steam from accessing game files. You can follow the steps below to add Steam to the exceptions list of your antivirus program.
Step 1. Type firewall in the search box and then select the Windows Defender Firewall from the context menu.
Step 2. Click on Allow an app or feature through Windows Defender Firewall from the left pane.
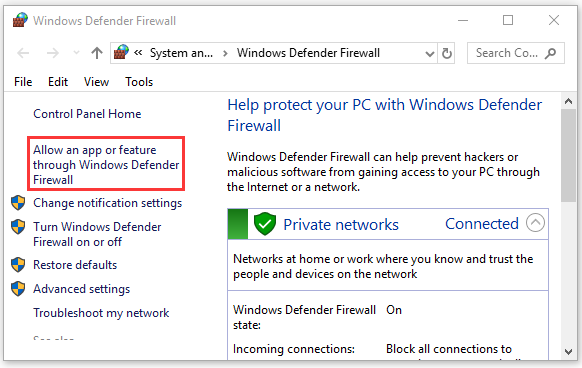
Step 3. Select the checkbox of Steam.exe from the list of programs and click OK to save the change.
Fix 8. Take the Ownership of the Steam Library Folder
If you still receive the error message “the Steam install folder is currently not writable”, it is very possible that you don’t have full control to write and read from the Steam folder. To get rid of the error, you can try getting permissions from TrustedInstaller so that you can read and write the Steam folder smoothly. This post “How to Get Permission from TrustedInstaller in Windows 10/7” walks you through a step-by-step guide.
Bottom Line
Here comes the end of this post. How to fix the Steam folder not writable? You can try the given methods in this post one by one until the error is resolved.
If you have other nice suggestions to fix the problem, leave them in the comment area. Also, you can send us an e-mail via [email protected] if you have any questions about MiniTool Partition Wizard.
User Comments :