The below article is going to show you the reason, method and frequently asked questions about network external hard drive. After reading, you are supposed to know how to map a network drive in Windows 10, Windows 11 as well as other system versions. View more info from MiniTool partition manager website.
Network external hard drive here means an external hard drive being connected to your computer network via a USB port and serving as a storage for digital data from another machine in the same network.
Why Need Networking External Hard Drive?
After a long time of usage of your computer or with many hours per day, you are probably suffering from a low disk space problem. That is, you are running out of your local internal hard drive storage. Therefore, it is of great emergency to find a way to solve that issue. And, one of the easy methods is to make use of a network drive.
Besides, in your daily life either of work or of private, you have many files that need to be used every day. It is space-wasting to save a copy of those files on each computer your use. Still, it is troublesome to take those files with you wherever you go. Thus, you can rely on a network drive to store only in one place while accessing them on every computer you use no matter in the office or at home.
A network drive can be created by an internal disk or an external drive. Since the local storage is precious for every machine, it is wise to map network drive Windows 10/11 with a large external hard drive.
Choose Your Network External Hard Drive
For the external hard drive to be mapped as a network drive, it all depends on your needs. It can be a USB flash drive, a thumb drive, hard disk drive (HDD), solid state drive (SSD) and so on. The capacity of the external disk ranges from several GB to tens of TB, such as 12TB external hard drive.
Preparation Before Mapping a Network Drive
Either your external hard drive is a new one or an old piece, you are recommended to give it a refresh before mapping it as a network disk. The refresh here means to format it with a proper disk type, partition file system as well as cluster size. Also, you can assign a meaningful drive letter and partition label to it.
Since the external hard drive is used to store data within the LAN, it is recommended to make it fully serving as a network drive. Thus, you should first of all copy all its data to another storage place and then wipe partition completely. Or, if there is no data on the hard disk or the data are not important at all, you can directly wipe it out. Next, create a whole new partition on the external hard drive.
To do the above operations, you need help from a third-party program. MiniTool Partition Wizard is a professional and reliable partition and disk management software. With it, you can quickly format your external hard drive partition with a new partition label, drive letter, file system, etc.
MiniTool Partition Wizard FreeClick to Download100%Clean & Safe
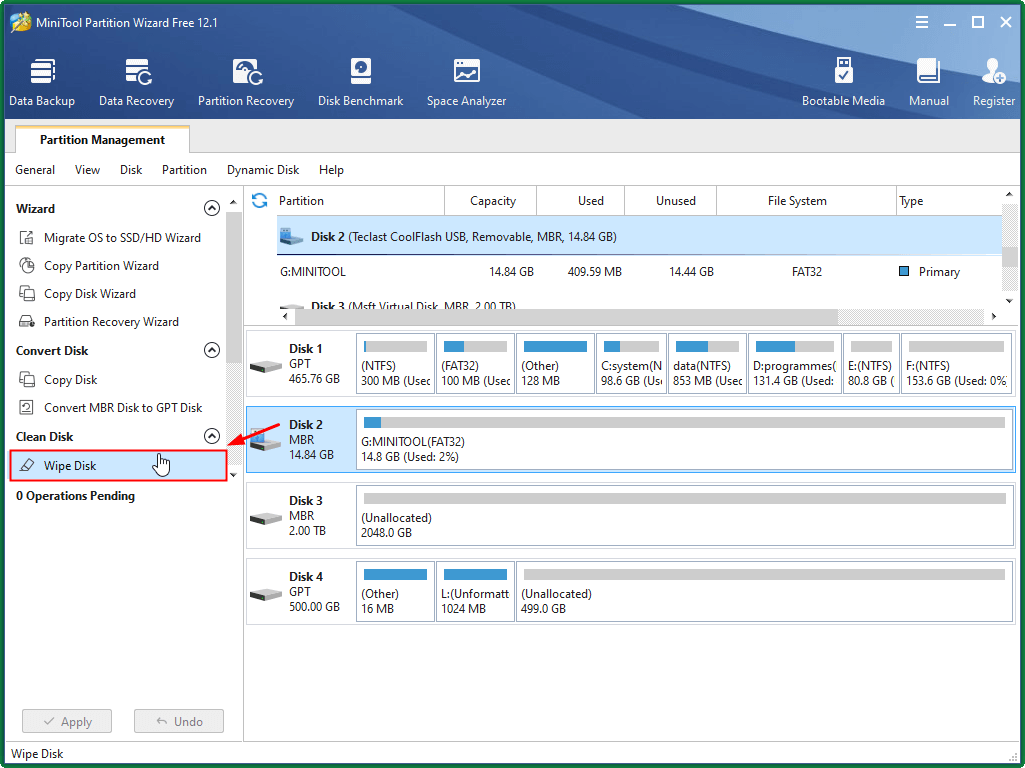
Step 1. Click on the target external hard drive to activate it. Then, select Wipe Disk in the left panel under the Clean Disk part.
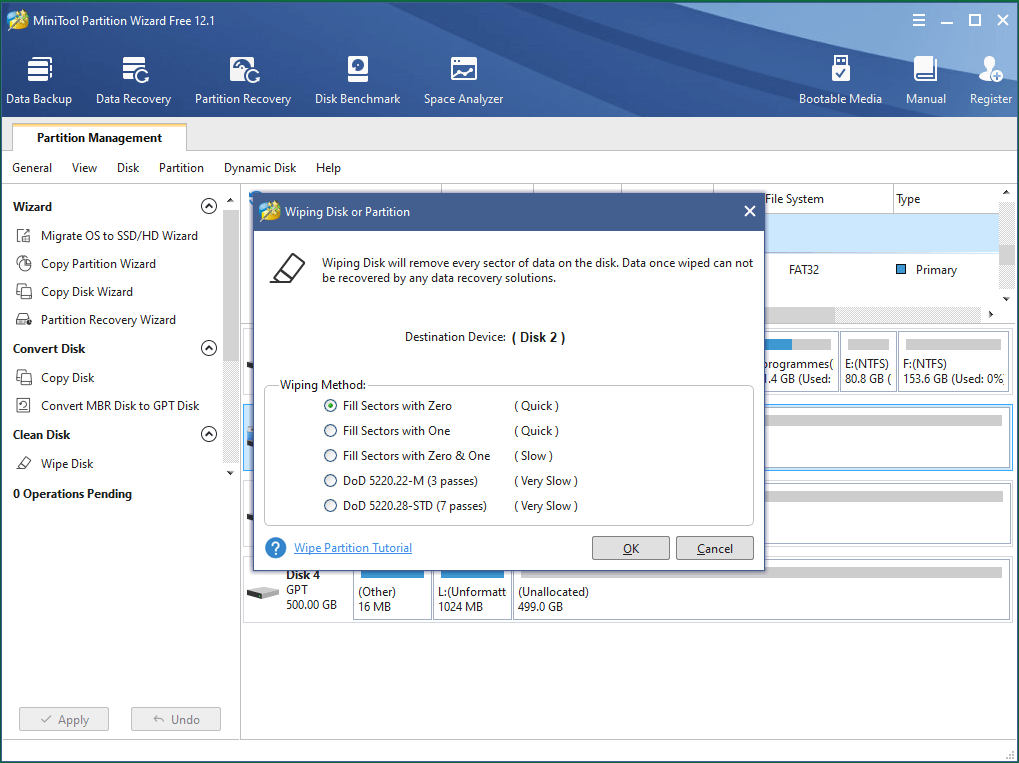
Step 2. Choose one of the disk wiping methods and click OK to continue. The first three methods (Fill Section with Zero, Fill Section with One and Fill Section with Zero & One) will remove the data of the disk and prevent the data recovery tool from data retrieve. The last two methods (DoD 5220.22-M and DoD 5220.28-STD) will destroy data from any data recovery approaches. Which method to pick depends on how you want the network external hard drive to be wiped.
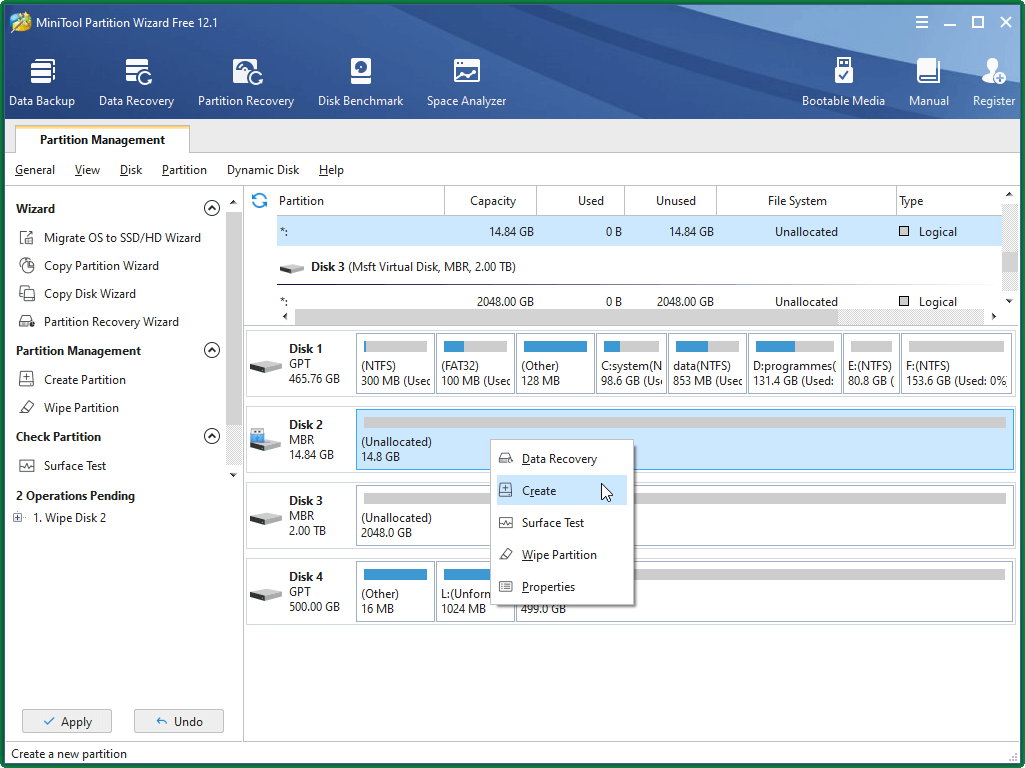
Step 3. After the wiping, the whole disk will become unallocated. Then, right-click on the unallocated space and select Create to create a new partition on it.
Step 4. Specify the Partition Label, type of Partition (primary or logical), Drive Letter, File System, Cluster Size as Well as Partition Size. Then, click OK to go on.
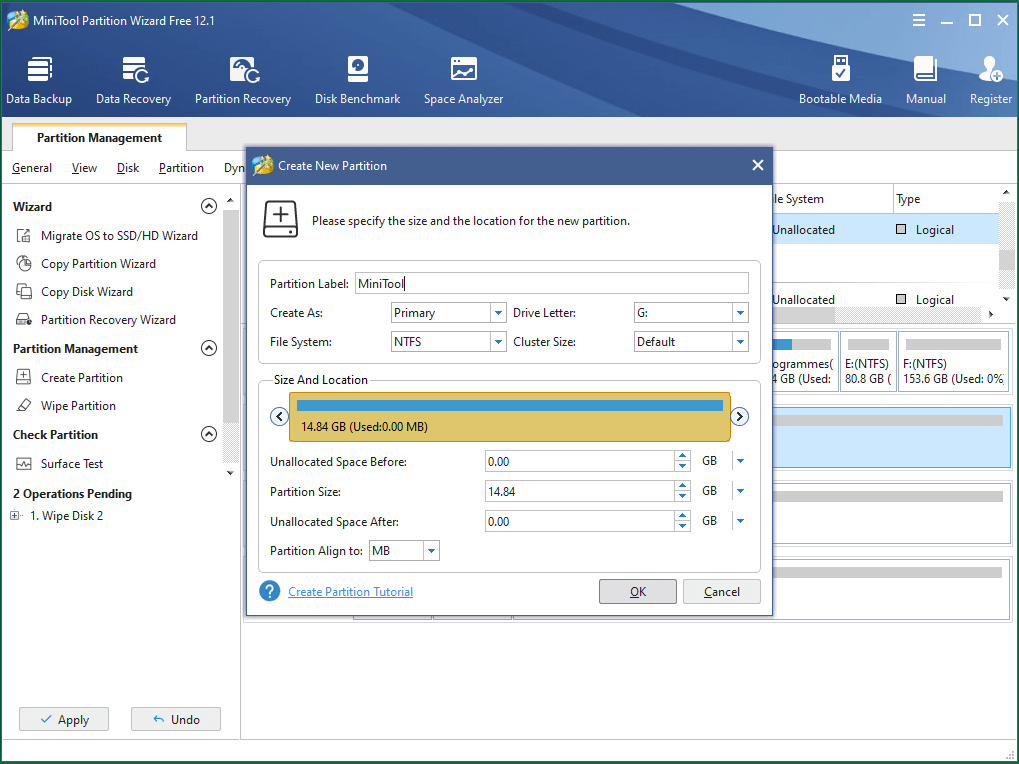
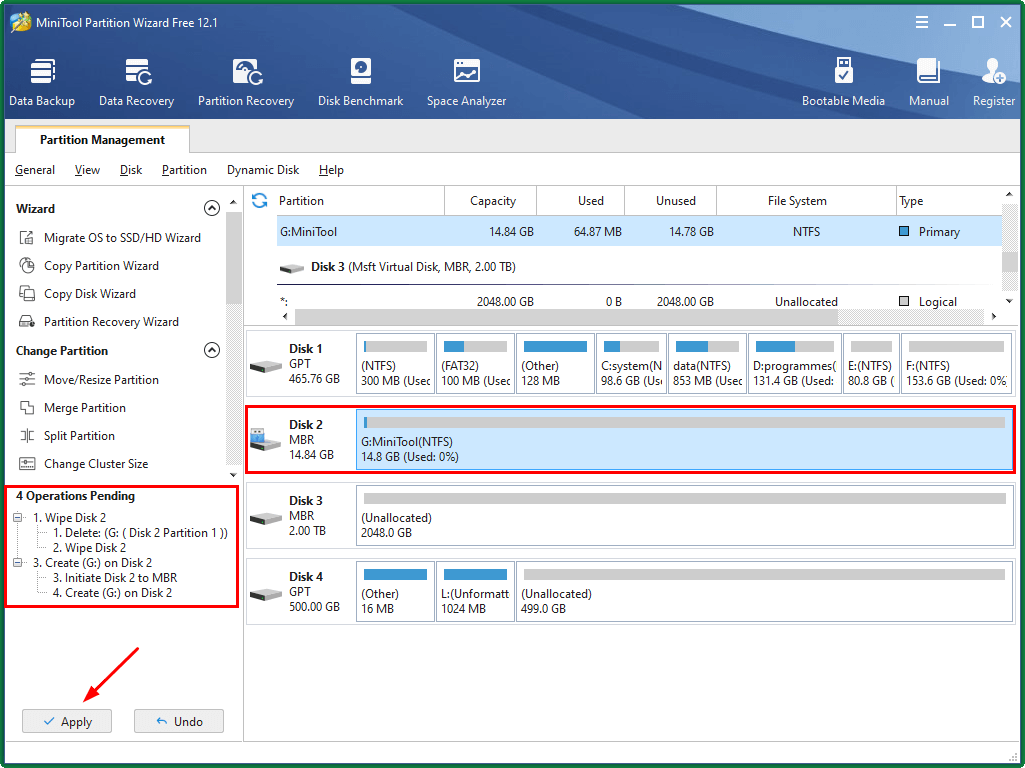
Step 5. Preview the changes to the external hard drive and check for the Pending Operations. Finally, click Apply to save all the changes by carrying out all pending operations.
When all preparations are done, you are ready to map network drive Windows 10/11. In general, there are two parts for mapping network external hard drive.
Part 1: How to Share Hard Drive on Network Windows 10/11?
The first part of networking an external hard drive is to share it to the network. The guidance is as described below.
Step 1. Connect your external hard drive into one of the USB ports on your computer and make sure the selected USB port is always on.
Step 2. Remember or just write down the IP address of your machine for it will be used to map the shared disk on your network.
Step 3. Go to Windows Explorer and find the target external hard drive there. Right-click on it and choose Get access to > Advanced sharing…
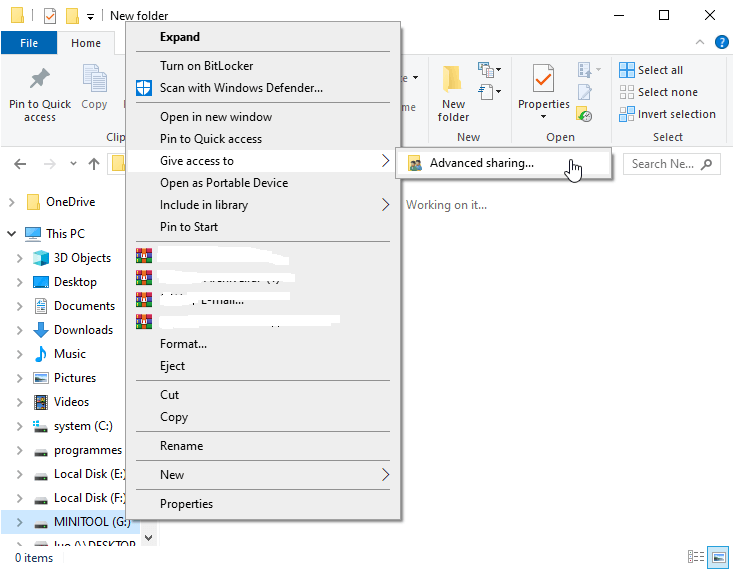
Step 4. In the pop-up window, click the Advanced Sharing… button.
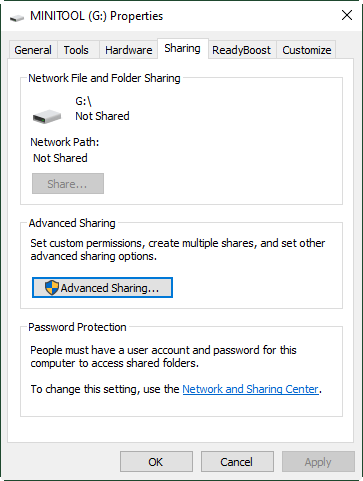
Step 5. Tick Share this folder option. Click Add and type a name for the folder or hard drive you are going to share.
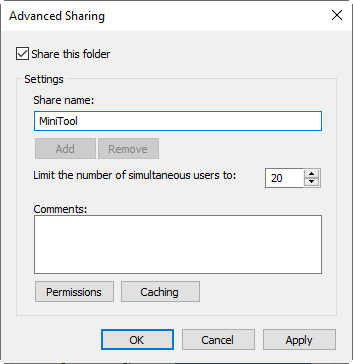
Step 6. Click Permissions and select Everyone in the pop-up box.
Step 7. Check the boxes under Allow column for Full Control, Change and Read.

Step 8. Click Apply and then OK to exit the Permissions window. Then, click Apply and OK to close the Advanced Sharing window. Finally, click Close to exit the drive Properties window.
Kind reminder:
- You can also connect your hard drive directly to your router. Then, go to the router’s firmware to set up the drive. Sign in to the router’s firmware with your IP address or user account (if not changed, it should be the admin account) through a browser or an application, and usually, it is 192.168.1.1. Then, you can enable file sharing for the drive as well as customize its name, drive letter, password, etc.
- If your network external hard drive is a wireless one, you should fire up it and set up a wireless connection to the drive from your computer following the manual. To set up the drive (name, accessing password, etc.), you probably need to install and launch the program for the disk. Also, make sure the hard drive is fully charged or running off external power.
Related article: 5 Solutions to Fix the Network Path Not Found Windows 10/11
Now, the external hard drive should be shared over the network. To check whether you have done it successfully, just take a look at the drive letter of the external disk in the left panel list in Windows Explorer. If there is a two-people icon on the hard disk icon, congratulations! You made it. If not, you may check your operations with the above guide carefully to find out where you have done incorrectly.
Part 2: How to Map a Network Drive Windows 10/11?
The second part of mapping an external hard drive as a network drive is to connect it to another computer in the network. The steps are easy as the following ones.
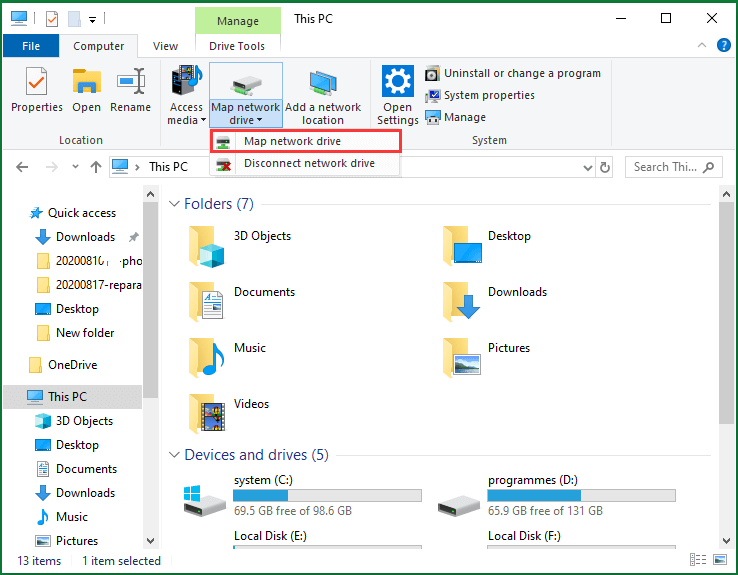
Step 1. In another computer that is connected to the same local network of the previous computer, in This PC, Click Map network drive in the top menu and select Map network drive in the drop-down list.
Step 2. In the pop-up window, choose a Drive Letter or you can keep the default one. Then, enter the address of the shared folder; it should consist of the IP address of the previous computer and the share name like in the form of this “\ip addressshare name”.
Step 3. Tick the Reconnect at logon option and click Finish.
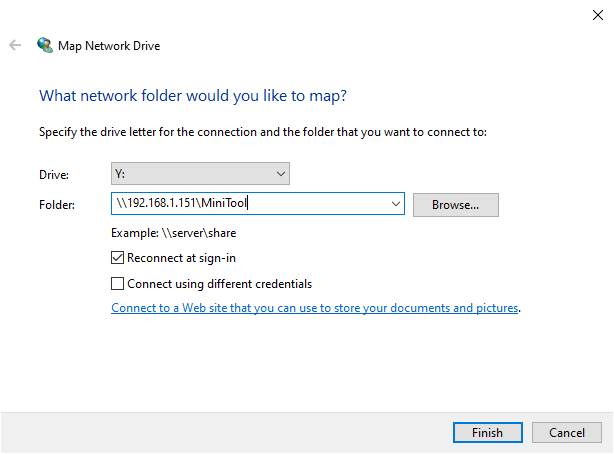
If you have set a username and password for the external hard drive that is different from the ones for your Windows 10/11 account, check Connect using different credentials and then click Browse. In the Browse for Folder window, click the name for the network drive and then click OK. Enter the username and password for your network drive if prompted.
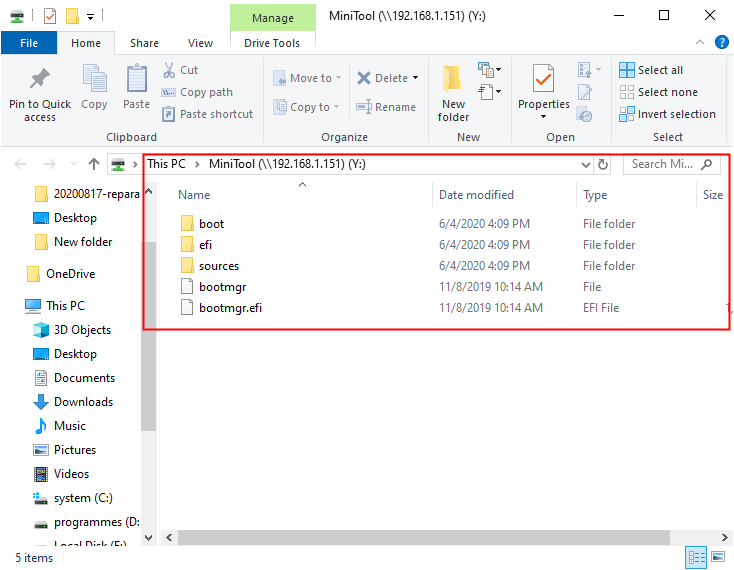
Finally, you can view the contents of the shared folder in the first computer from the mapped network drive on the second computer.
That is all about network external hard drive. For how to map a network drive Windows 10/11 with an external hard drive, generally, share the external disk to your network and map it on your computer. If you still have questions about it or want to learn more information, feel free to contact us either through the comments section below or via email at [email protected]. We will reply to you as soon as possible. Hope you enjoy your reading!
Network External Hard Drive FAQ
An external hard drive is just a dumb data storage device. You can only connect it to one of your devices at one time. If you want to make use of it for other devices, you should first arrange the work between the drive and its current attached computer, then disconnect it from the current machine and connect it to the next device.
As for network drive, you can use it on several of your devices simultaneously in your network without shift from one machine to another. Also, you can share files among those devices via network quickly and safely. Therefore, the network drive is better somehow compared with the external hard drive.
If your network drive does not show itself in File Explorer, you can fix it by the below steps.
- In Registry Editor, navigate to HKEY_LOCAL_MACHINE > SOFTWARE > Microsoft > Windows > CurrentVersion > Policies > System.
- Right-click System and choose New > DWORD Value.
- Name the new value as EnableLinkedConnections.
- Right-click the new value and select Modify to change its Value data to 1.
This method can help most people, yet, if your problem can’t be solved in this way, view more solutions from How to Fix Network Drive Not Showing Issue?
You can find your IP address in the following ways:
- In the Network & Internet Settings. Right-click on the network icon on the Taskbar and select Open Network & Internet Settings. In the pop-up window, choose View your network properties. In the first Ethernet properties group, usually, you can see your IP address behind the IPv4 address.
- By CMD. You can make use of the command prompt. Just type ipconfig order and press Enter to find out your IP address.
- From the router. On the back of the router or in its manual, you are able to find your IP address.
- Search online. You can search “ip address” in any explorer such as Google, and there are websites that can directly detect your IP address.
About The Author

Position: Columnist
Helen is a tech writer with over 10 years of experience. She specializes in creating easy-to-follow guides for video editing, media file conversion, and computer performance. Helen doesn't just write—she tests every software herself and listens to feedback from users and experts. Her goal is to make complex programs simple so that everyone can solve their tech problems with confidence.
User Comments :