Here is what the user says:
I’ve been trying to update my Windows 10 1809 to 1909, and having tried a lot of things I’m totally stuck. It gets to about 91% complete in the second boot phase, but then always rolls back the update. The last thing I tried was an installation from an ISO image on a USB stick, which gave me the following error: 0x8007042b – 0x4000D The installation failed in the SECOND_BOOT phase with an error during MIGRATE_DATA operation.https://answers.microsoft.com/en-us/windows/forum/all/0x8007042b-0x4000d-the-installation-failed-in-the/a828f302-35d9-4720-90df-190dd76656db
Then, do you know what is it and how to fix this error? Please keep reading below.
What Is Error 0xC1900101 – 0x4000D?
The error 0xC1900101 – 0x4000D prevents users from installing the latest version, which usually occurs during the second boot phase when data migration happens to leave your computer vulnerable. Simply put, this error occurs when the upgrade process fails to migrate data to the new operating system.
There are several reasons that can cause this issue, such as missing system files, insufficient disk space, a corrupt Windows Image, or a pending XML file. Sometimes Windows 10 errors on the second startup can also occur due to the presence of third-party applications or services.
You can do a preliminary quick fix before applying the methods below:
- Make sure that the Date & Time settings are correct.
- Disconnect all external USB drives & SD cards.
- Disable the hard drive encryption.
- Install the latest drivers for all the devices on your system, especially for the Ethernet & the Wireless adapter (if any).
If this doesn’t help you fix the error, try the following methods.
Method 1: Run Windows Update Troubleshooter
Troubleshooting Windows Update can often fix the error or let you know why the problem occurred. Please follow the guidelines below:
Step 1: Press the Win + I key to open Settings, and navigate to the Update & Security > Troubleshoot option.
Step 2: Under the Get up and running section, click the Windows Update option and select the Run the troubleshooter option from the extended pane.
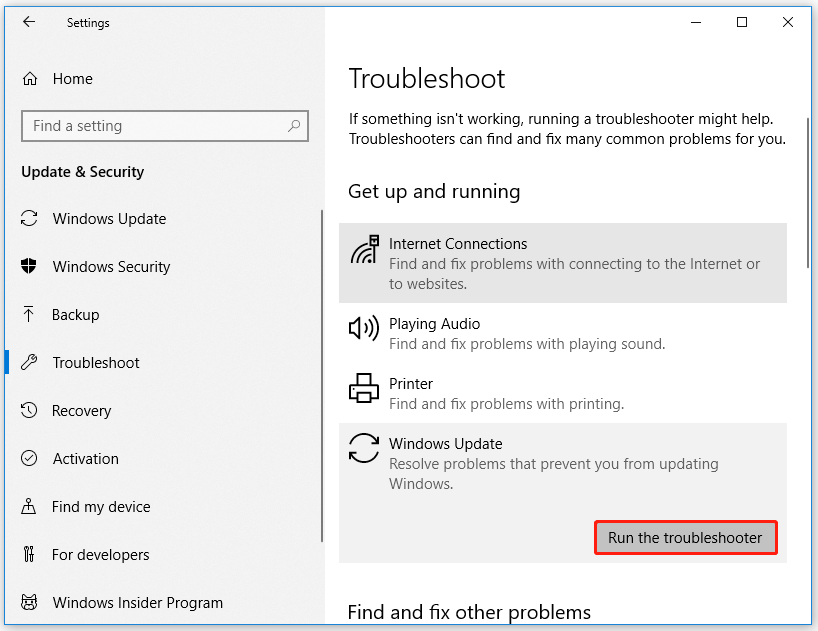
Step 3: Follow the on-screen instructions. And when you see the Apply this fix option in the window, click it to fix this error.
Step 4: Restart your computer.
Method 2: Fix Corrupted System Files – SFC & DISM
The presence of corrupted system files or a “Windows image” can also trigger 0x8007042B – 0x4000D errors when you try to install a new operating system. To fix this, you need to use SFC and DISM tools to fix corruption in core system files.
Here’s how to perform these scans:
Step 1: Open the Command Prompts as administrator.
Step 2: In the Command Prompt window, type the following path in the Command Prompt: sfc /scannow and press Enter.
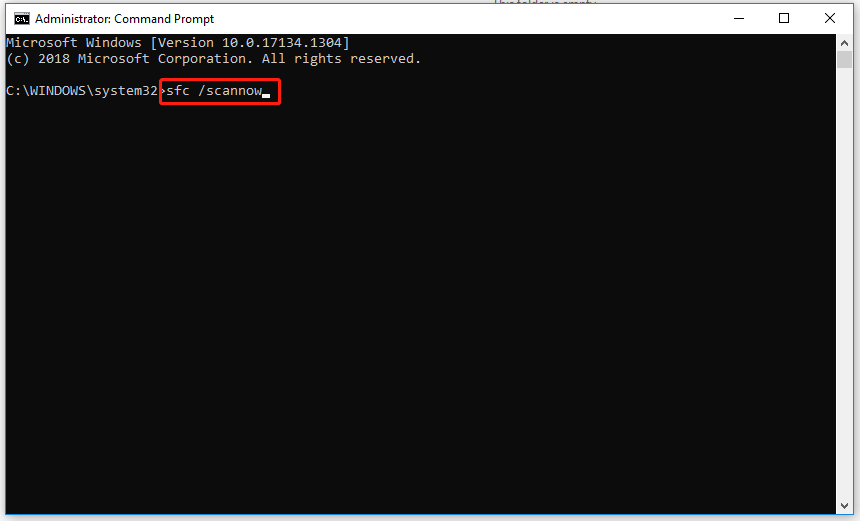
Step 3: After the scanning process is complete, if it describes that the corruption is resolved, close Command Prompt and restart Windows 10.
Step 4: If SFC fails, type DISM.exe /Online /Cleanup-image /Restorehealth. Then press Enter.
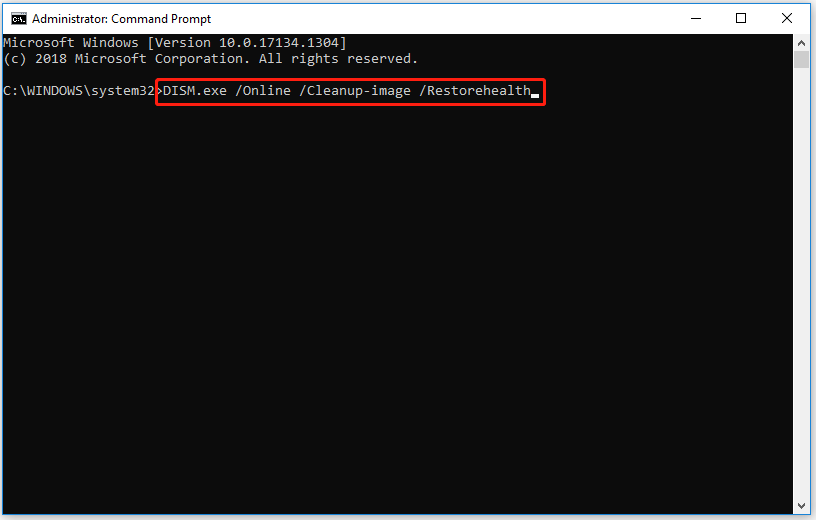
Step 5: After the scanning process is complete, restart your computer to check if the error has been solved.
Method 3: Free up Space to Upgrade
Windows 10 requires at least 32 GB of free space to upgrade. So, you have to make sure you have enough free space to upgrade to Windows 10. There are two options to free up space. One is to remove unnecessary files, and the other is to directly expand the partition size.
Option 1: Use Disk Cleanup
Step 1: Open the Run dialog and type cleanmgr, and then press Enter.
Step 2: A small box will pop up and ask you to select a drive to run the cleanup on. Then click OK.
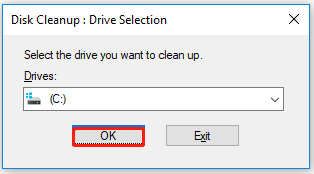
Step 3: In a new window, select the files you want to delete and then click OK.
Note: If you delete important files by mistake, you can recover deleted/lost files by using MiniTool Partition Wizard.
Option 2: Use MiniTool Partition Wizard
If your disk is filled with important files, using the Extend Partition feature of MiniTool Partition Wizard is a better option. MiniTool Partition Wizard is a professional partition manager, which can help you recover missing data, scan bad sectors, fix file system errors, etc.
To free up space, here is the guide:
MiniTool Partition Wizard FreeClick to Download100%Clean & Safe
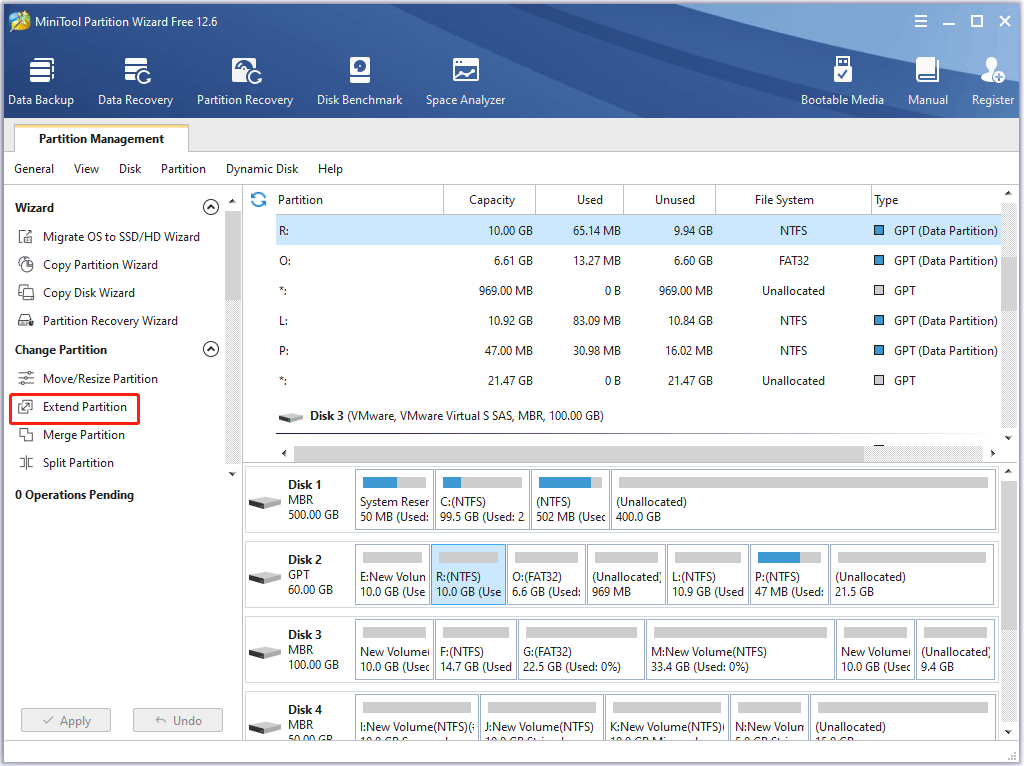
Step 1: Launch MiniTool Partition Wizard and enter its main interface.
Step 2: Select the drive you want to extend and click Extend Partition on the left operation panel.
Step 3: In the drop-down menu, select where to take free space. Then drag the light blue block to decide how much free space you want to take. Finally, click the OK button.
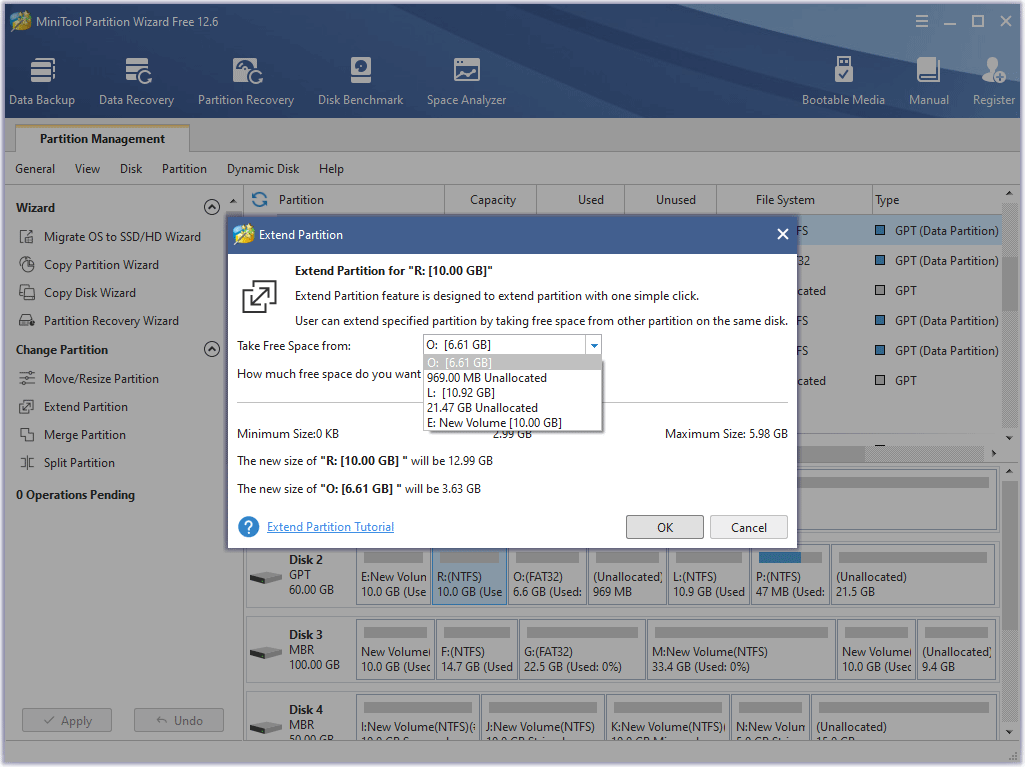
Step 4: Click the Apply button to execute the operation.
Method 4: Delete or Rename the SoftwareDistribution Folder
The 0x8007042B – 0x4000D error can occur if any update-related services are disabled or if old update files in the SoftwareDistribution and Catroot2 folders are corrupted. So, you need to delete and rename SoftwareDistribution file. Here is the guide:
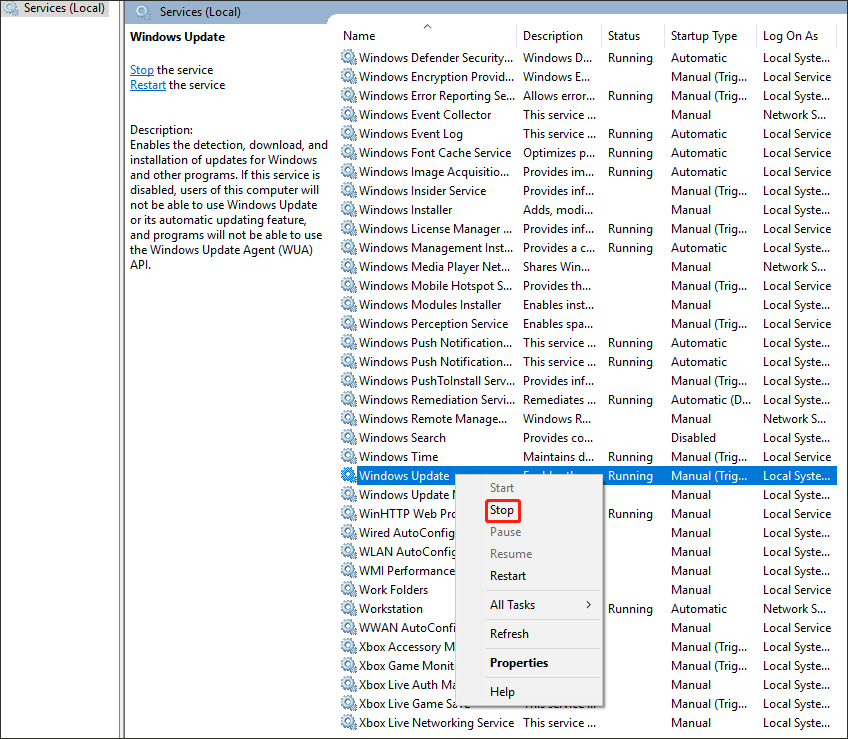
Step 1: Stop Windows Update Service.
- 1: Press the Win + R key to open the Run Then type services.msc in the search box and click OK.
- 2: In the Services window, find the Windows Update service and right-click it. Then select Stop.
Step 2: Delete the SoftwareDistribution Folder
- Open Windows File Explorer and navigate to C: Windows folder.
- Find the SoftwareDistribution folder and right-click it to Delete or Rename
Step 3: Start the Windows Update Service.
- Open the Windows Services control panel.
- Right-click the Windows Update service and select Start.
Step 4: Check and Install Windows 10 Update
- Open Settings and navigate to the Update & Security > Windows Update
- Click Check for Updates.
Method 5: Perform a Clean Boot
Some third-party apps or services often conflict with built-in apps or services. This can hinder the update process and trigger 0x8007042B – 0x4000D errors during installation. So, you can use the following steps to perform a clean boot in Windows 10.
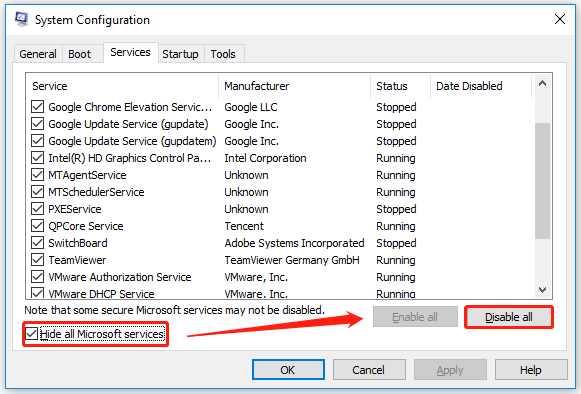
Step 1: Type msconfig in the search box on the taskbar and select System Configuration from the search.
Step 2: In the System Configuration window, click the Services tab and select Hide all Microsoft services. Then click Disable all.
Step 3: Now click the Startup tab of the System Configuration window and select Open Task Manager.
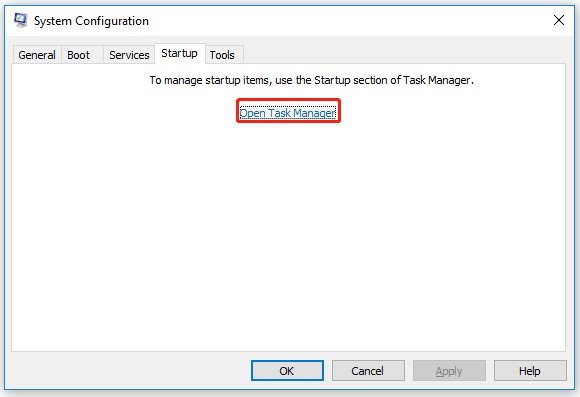
Step 4: Once the Task Manager window opens, right-click on each startup item and select Disable.
Step 5: Close the Task Manager and go back to the System Configuration window.
Step 6: Click OK on the Startup tab of System Configuration.
After that, restart your computer and try to install the Windows 10 update.
Method 6: Disable Third-party Antimalware Software
There is a high chance of conflicts between third-party antivirus software and updated files. To get rid of this 0x8007042B – 0x4000D error, you need to temporarily uninstall installed third-party security programs. If you successfully installed the latest Windows after doing so, you can reinstall the application again.
To uninstall third-party antivirus software, proceed as follows:
Step 1: Press the Win + R key to open the Run dialog. Then type appwiz.cpl in the search box and press Enter.
Step 2: In the Programs and Features window, find the antimalware software installed on your computer. Then right-click it and select the Uninstall option.
Step 3: Follow on-screen instructions to complete the uninstallation process.
Method 7: Clear Pending .XML File
The presence of the pending .xml file may also prevent the installation of a new OS on your device. To solve this error, you need to clear the pending .xml file. The steps are as follows:
Step 1: Press the Win + R key to open the Run dialog. Then type cmd.exe in the search box and click OK.
Step 2: Enter the following command and press Enter:
Ren NC:Windowswins shows pending.XML pending.old
After that, the pending.xml file renames to pending.old.
Method 8: Check Windows Update Log File
If you still cannot install Windows 10/11 due to errors 0x8007042b – 0x4000D, check the Windows Update log files.
You can find this file in the following path: C:WindowsWindowsUpdate.log. This log basically contains all the information about the upgrade failed error. If there are too many error codes in this file, just delete the entire file.
After successfully deleting this file, restart your PC and retry installing the update.
Method 9: Upgrade Windows 10 Using an ISO File
The next way to fix the Windows 10 update “the installation failed in the SECOND_BOOT phase with an error during MIGRATE_DATA operation” error is to update Windows 10 from a Windows ISO file. Proceed as follows:
Step 1: Download Windows 10 in an ISO file.
- Navigate to Windows 10 download page and download the Media Creation Tool.
- Run the Media Creation Tool as administrator and click Accept on the first screen.
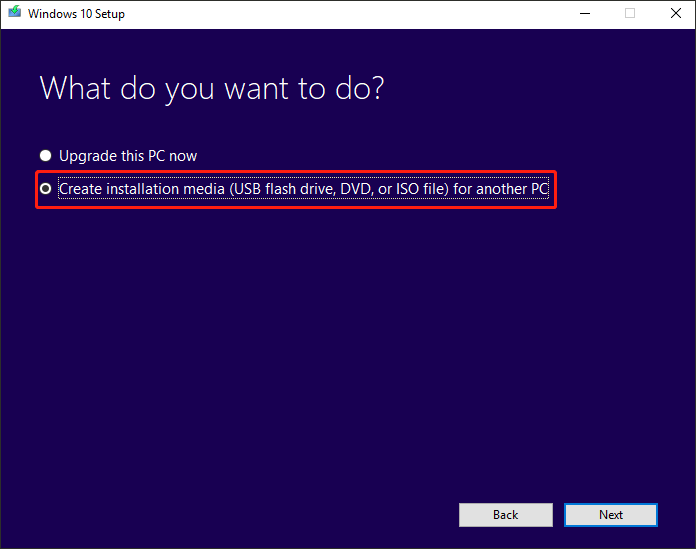
- On the What do you want to do page, select Create installation media (USB flash drive, DVD, or ISO file) for another PC.
- Select the Language, Windows Edition, and Architecture to use to create the installation media. Once selected, click Next to continue.
- Select ISO file and click Next.
- Click Save to put the Windows.iso file on your desktop.
- The Media Creation Tool starts to download the latest Windows 10 installation files in an ISO format.
Step 2: Update Windows 10 from ISO file
- Disconnect your computer from the Internet.
- Right click the Windows.iso file (on your desktop) and click Mount.
- Double click the Settings.
- On a new pop-up screen, select Not now and click Next.
- Follow the on-screen instructions to update your system.
![[Full Guide] The Remote Session Was Disconnected](https://images.minitool.com/partitionwizard.com/images/uploads/2022/06/the-remote-session-was-disconnected-thumbnail.png)
Method 10: Clean Install Windows 10
If none of the above methods helped you, you can perform a clean install of Windows 10 to check if the error can be solved.
To perform a clean install of Windows 10, read the instructions in this article: How to do a clean install of Windows 10
Bottom Line
With the methods introduced in this article, you can easily fix the “the installation failed in the SECOND_BOOT phase with an error during MIGRATE_DATA operation” error.
If you have any questions while trying the methods above or if you have other better methods, you can leave a message in the following comment zone. If you need any help when using MiniTool Partition Wizard, you are welcome to send us an email at [email protected].
About The Author

Position: Columnist
Vega enjoys helping people with computer problems, including disk management, data recovery, data backup, and more. She is constantly expanding her knowledge in related fields. And she will continue to bring more easy-to-understand professional articles to help people solve various problems on the PC.
User Comments :