About WD Elements
WD Elements is a basic external portable hard drive that is widely used across the world. As one of the cheapest portable external storage devices on the market, WD Elements offers fast data transfer rates, reliable and high-capacity storage, and universal connectivity with USB 3.0 and USB 2.0 devices to back up your files. Its common capacity is 1 TB, 2 TB, 3 TB, 4 TB, and 5 TB.
When your computer comes full and your PC slows down, it’s a good idea to use WD Elements portable hard drive to improve PC performance. You can transfer files to the external drive to free up disk space. Besides, you can use it to back up your Mac computer.
However, by default, the WD Elements is formatted as NTFS for Windows. You need to reformat it if you want to use it on other operating systems such as MacOS.
Besides, you can choose the WD Elements desktop hard disk drive for a larger capacity. The WD Elements desktop hard disk drive can offer up to 22 TB capacity. Also, the WD Elements desktop hard disk drive is formatted NTFS and you need to reformat it for Mac.

Does WD Elements Work with Mac?
The answer is yes. A Western Digital external hard drive can be used on both Windows and Mac OS. However, as we know from the above, reformat is required if you want to use WD Elements for Mac. So, before the operation, we should know what file system does Mac support.
What File System Does Mac Support
Both Macs and Windows have their own native file systems such as NTFS, APFS, HFS+, and FAT. Most WD drives are formatted in the NTFS for Windows or HFS+ for Mac. If a WD Elements hard drive is formatted with the Windows file system, it may be useless on MAC. So, what system file formats does MAC or Windows PC support? You can find the answers in the following content:
For Mac:
- APFS (Apple File System): it is used by macOS 10.13 or later.
- HFS+ (Hierarchical File System Plus): also called Mac OS Extended, is the primary file system used for Mac system storage and is used by macOS 10.12 or earlier. You can only access HFS+ hard drives on Windows by using third-party apps.
- exFAT (Extended File Allocation Table): Both Mac and Windows offer full read and write support for exFAT. It is an ideal format and can be used for partitions over 32 GB.
- MS-DOS (FAT): Individual files on a FAT32 drive can’t be over 4 GB in size. Besides, it is compatible with Windows and suitable for Windows.
The exFAT format is only supported in Mac OS X10.6.5 or later. And FAT32 is fully compatible with modern Apple Mac computers.
For Windows:
- NTFS
- FAT/FAT32
- exFAT
Also read: NTFS vs. FAT32 vs. exFAT – Differences and How to Format to
Which file system format is best for WD Elements hard drive? As we know from the above, both exFAT and FAT32 are compatible with Mac and Windows. If you want to transfer data between Mac and Windows, exFAT is the best format for external hard drives that will work on Mac and PC.

How to Format WD Elements Drive for Mac
To access the WD Elements drive on Mac, you need to format the hard drive to Mac-supported drive formats. As we all know from above, APFS or HFS+ is the most recommended format for Mac computers. If you only plan to use WD Elements drive on Mac, you can format it to HFS+ by using Disk Utility and Terminal Prompt.
If you have a new WD Elements drive, you can directly use the methods below to format the hard drive. But if there are some files in the WD Elements hard drive, you’d be better to back up your data in advance, because formatting will wipe any files on your WD external hard drive.
So, how to format WD Elements for Mac? There are two methods introduced below.
Way 1. Use Disk Utility
To format WD Elements drive for Mac, you can use a free built-in disk management tool – Disk Utility on Mac. Follow the steps below to format WD Elements for Mac with Disk Utility.
Step 1. Boot your Mac computer and then plug your WD hard drive into your Mac. Once your PC mounts the hard drive, a disk icon will appear on the desktop.
Step 2. Open Utilities and select Disk Utility.
Step 3. In the pop-up window, select your WD Elements hard drive and then click Erase from the Disk Utility file menu.
Step 4. Then assign a Name to the WD hard drive and select your desired format (e.g., APFS) from the Format box. Once done, click Erase.
Step 5. Wait patiently until the process ends up.
Way 2. Use Terminal Prompt
In addition to the above method, you can use Terminal Prompt to format hard drives. Here is a step-by-step guide on how to format WD Elements drive for Mac below.
Step 1. After connecting your WD Elements hard drive to your Mac, click the Spotlight icon which is the magnifying glass at the top-right corner.
Step 2. Then enter terminal in the search box. From the search results, double-click Terminal to open the command prompt.
Step 3. In the prompted window, type diskutil list and press Enter.
Step 4. Then choose the WD Elements hard drive that you want to format. Then type the following command and press Enter.
diskutil eraseDisk JHFS+ CleanDrive /dev/disk1
You can replace JHFS+ with any file system you need, and replace CleanDrive with a new name for your formatted drive. Besides, /dev/disk1 refers to the location of the WD Elements hard drive.
Step 5. Once done, exit the window.
If you want to format WD Elements for both Mac and PC or Mac fails formatting to exFAT and FAT32, you can solve this issue with the following method.
How to Make a WD Elements Work for Both Mac & Windows
What kind of file system works well on Mac and Windows PC? As we know from the above content, exFAT and FAT32 formats are compatible with Windows and Mac. However, when your individual files are over 4 GB and the partition exceeds 8 TB, exFAT is the most recommended format.
Quickly Format an External Hard Drive for Mac and Windows PC
Here is the step-by-step guide on how to format WD Elements for Mac and PC.
Method 1. Format WD Elements to FAT32
You can choose to format WD Elements to FAT32. There is a limit for FAT32 on Windows. You can’t format a partition larger than 32 GB to FAT32 by using Windows built-in tools such as File Explorer, Disk Management, and Diskpart.
Therefore, here we recommend you use a professional partition manager – MiniTool Partition Wizard to format your WD Elements to FAT32. As a multifunctional tool, MiniTool Partition Wizard can help you recover lost data and partitions, migrate OS to SSD or HDD, format the partition, etc.
Format the Partition to FAT32
The following are the detailed steps to format your WD Elements to FAT32.
If there are any important files on your WD Elements hard drive, you need to back up them in advance to avoid data loss.
Step 1. Connect your WD Elements hard drive to your PC.
Step 2. Download and install MiniTool Partition Wizard, and then launch it to get its main interface.
MiniTool Partition Wizard FreeClick to Download100%Clean & Safe
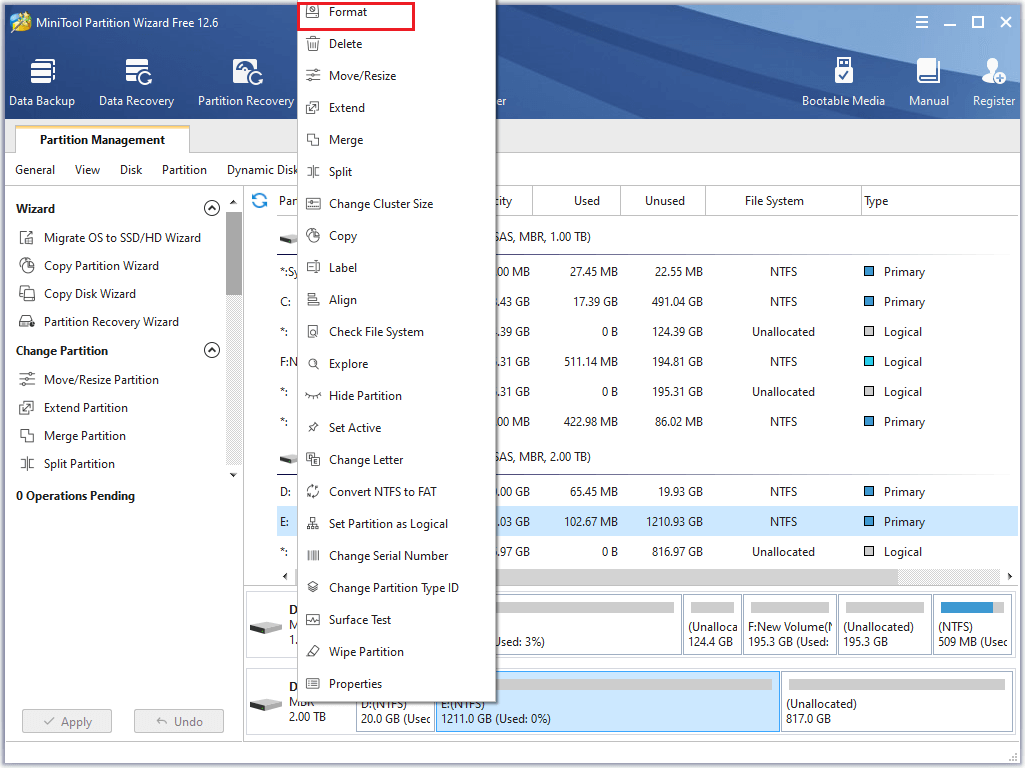
Step 3. Right-click the partition you want to format on the WD Elements hard drive and select Format.

Step 4. In the pop-up window, select FAT32 as File System. Click OK.

Step 5. Then click Appy to apply changes.
Convert to FAT32 without Data Loss
There is another way – Convert NTFS to FAT to convert to FAT32 without data loss.
Step 1. In the main interface of MiniTool Partition Wizard, right-click the NTFS partition on the WD Elements hard drive and select Convert NTFS to FAT.
MiniTool Partition Wizard DemoClick to Download100%Clean & Safe
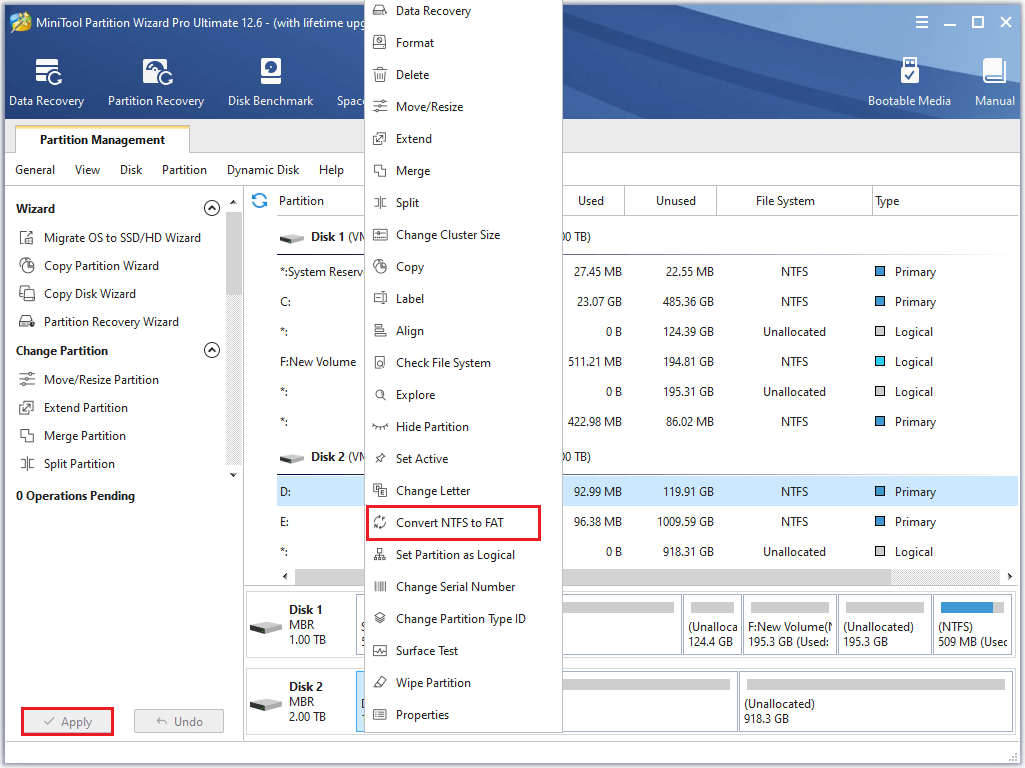
Step 2. Click Apply.
Method 2. Format WD Elements to exFAT
If your single file is larger than 4 GB on the WD Elements hard drive, you should select the exFAT format. Formatting to exFAT is not supported in Disk Management and File Explorer. You can follow the detailed steps below to use MiniTool Partition Wizard to format WD Elements to exFAT.
Step 1. Launch MiniTool Partition Wizard into its main interface. Then right-click the target partition on the WD Elements hard drive and select Format.
Step 2. In the next window, select exFAT as File System. Then click OK > Apply.

Now, you can use WD Elements on both Mac and Windows and transfer files.
Conclusion
This post summarizes some ways to format WD Elements for Mac and PC. It’s recommended you use MiniTool Partition Wizard to perform the operation. If you have issues while using MiniTool Partition Wizard, you can contact us via [email protected] or leave us a message.
Format WD Elements for Mac FAQ
What is the best WD Elements hard drive format for Mac and PC?
Both exFAT and FAT32 file systems are compatible with Mac and Windows. If you need to transfer files larger than 4 GB between Macs and PCs, exFAT is a better choice.
How to make WD Elements work for both Mac & Windows?
If you want to make your WD Elements work for both Mac & Windows, you can format WD Elements to exFAT and FAT32. Choose one according to your needs.
How do I format a WD Elements external hard drive for Mac?
You can use Disk Utility and Terminal Prompt on Mac to format the external hard drive. Choose the Extended Mac OS (Journaled) file system.
User Comments :