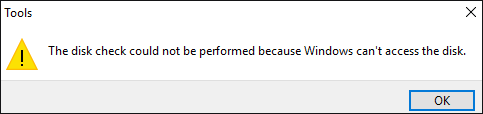
It is easy to check hard drive error by clicking the Check now button. But some Windows users reported that they ran into ‘The disk check could not be performed because Windows cannot access the disk’ when activating this feature. In this post, MiniTool shows you 3 solutions to fix this issue.
When we run into hard drive issues, we always use CHKDSK to check and repair them. But sometimes, this Windows tool fails to work and prompts an error: The disk check could not be performed because Windows cannot access the disk.
One user reported this irritating issue when clicking the Check now button to fix one hard drive issue.
When I tried to install new software to volume D, it always says the partition is full. In Windows Explorer, the disk shows 9.8GB of 70GB is free, but the Properties show 0 bytes used and 0 bytes free. I checked ‘Check now’ button to check this drive for errors and got a dialog box saying ‘The disk check could not be performed because Windows cannot access the disk’.
If you also receive ‘cannot access hard drive Windows 10’, please keep reading and the following content shows you the reasons behind this issue and the corresponding solutions.
Fix 1: Check the Disk Connection
The first possible culprit behind “The disk check could not be performed because Windows cannot access the disk” is that your hard disk is not properly connected to your system. Therefore, you should check whether the connection is secure right now.
To check disk connection, you should check the following TWO things.
- Make sure all cables are properly connected between storage devices and computer.
- Make sure the USB port does not have power supply issue (insufficient power supply can also lead to inaccessible drive).
If there is nothing wrong with the cables and USB port, you can try the following issues.
Fix 2: Change the Drive Letter of the Problematic Partition
Changing the drive letter of the problematic partition can help you get rid of the issue ‘the disk check could not be performed because Windows cannot access the disk’, which has been proved by many users.
As we know, every hard drive connected to a Windows computer is assigned a specific letter of the alphabet. However, any mismatched or inconsistency with the drive letter can produce this error.
So, in this situation, we can try changing the drive letter to the affected hard drive to fix this error.
There are three ways to change the drive letter of the problematic partition, namely:
- using Disk Management;
- using diskpart commands in Command Prompt;
- using a third-party program – MiniTool Partition Wizard.
Whichever you choose, the respective tutorial for the three methods is displayed below.
Way 1: Change Drive Letter via Disk Management
Here is the tutorial on changing drive letter of the problematic partition via Disk Management on Windows 10.
Step 1: Open Disk Management.
- Press the Windows icon and the R key on the keyboard simultaneously to call out the Run window.
- On the Run window, type diskmgmt.msc and then click the OK button to open Disk Management.
Step 2: On the Disk Management window, right-click the problematic partition and then choose Change Drive Letter and Paths… from the right-click menu.
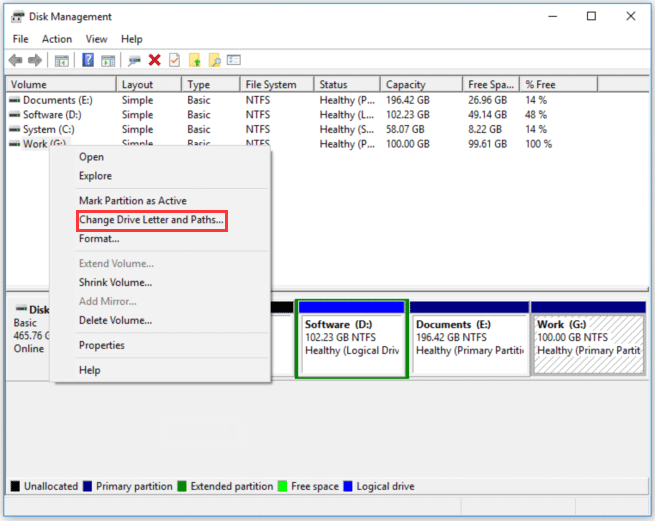
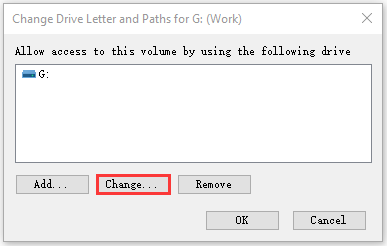
Step 3: On the newly popping-up window, click the Change button to change the drive letter of the problematic partition.
Step 4: Select a different drive letter from the drop-down menu and then click the OK button to confirm this change.
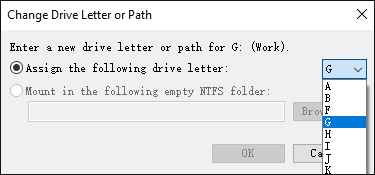
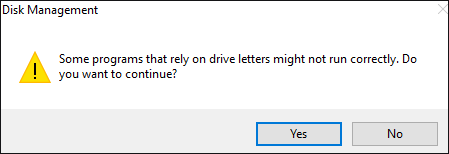
Step 5: You will get a warning saying that some programs that rely on drive letter might not run correctly. Make sure whether the selected drive letter is used for other drives. If not, click Yes to continue.
Way 2: Change Drive Letter via Diskpart Commands
To use diskpart commands to change the drive letter of the problematic partition on Windows 10, you can refer to the following tutorial.
Step 1: Launch Command Prompt.
- Press the Windows icon and the R key on the keyboard simultaneously to call out the Run window.
- On the Run window, type cmd and then click the OK button to open Command Prompt.
Step 2: On the Command Prompt window, please type diskpart and then hit the Enter key to run this command. On the UAC window, click the Yes button to allow the following changes.
Step 3: On the newly popping-up window, type the following commands to change the drive letter for the problematic partition.
- list disk (this command will list all the disk connected to your computer)
- select disk # (here # refers to the number of the disk on which the partition has some problems)
- list volume (this command will list all the volumes on the selected hard disk)
- select volume # (here # refers to the number of the problematic partition)
- assign letter=# (here # refers to the new drive letter you want to assign to the problematic partition)
After running the above commands, you should change the drive letter of the problematic.
Way 3: Change Drive Letter via MiniTool Partition Wizard
Compared with the first two methods, changing drive letter for one partition via MiniTool Partition Wizard is more convenient.
This program is a professional partition manager that is skilled at performing the basic partition and disk management, including resizing partition, changing file system of specific partition, and so on. Furthermore, it can also help you recover the mistakenly deleted partitions and upgrade to a large hard drive without reinstalling Windows OS.
Here is the tutorial on how to change the drive letter of the problematic partition via MiniTool Partition Wizard.
MiniTool Partition Wizard FreeClick to Download100%Clean & Safe
Step 1: Download MiniTool Partition Wizard by clicking the above downloadable button, install it and launch it to get its main interface.
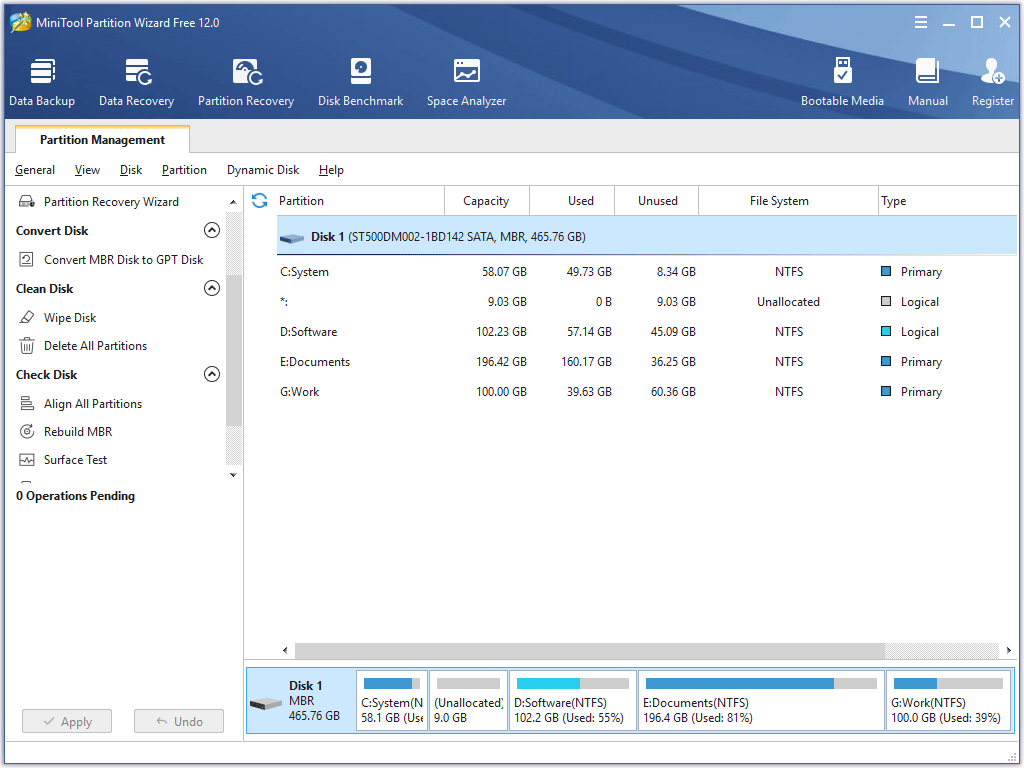
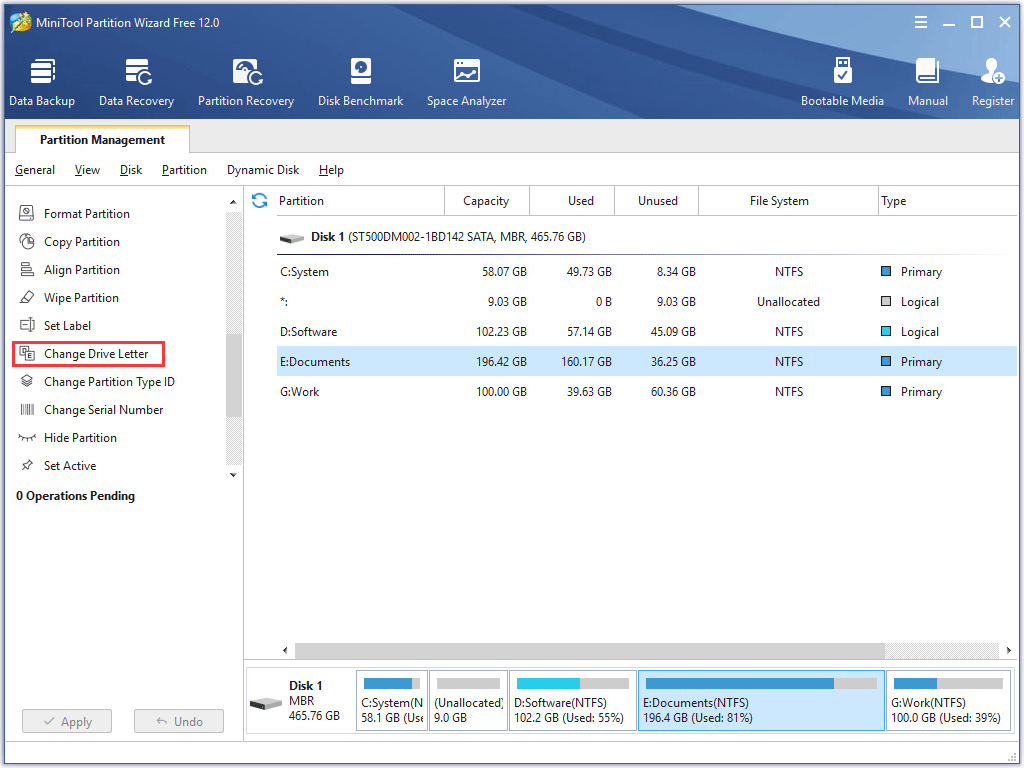
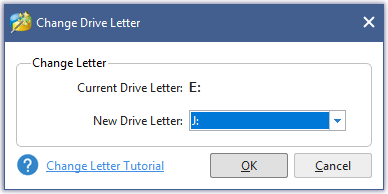
Step 2: Right-click the problematic partition and then select Change Letter from the right-click menu or you can directly select the Change Drive Letter from the left panel when you highlight this partition.
Step 4: Select a new drive letter from the drop-down menu for the selected partition and then click OK.
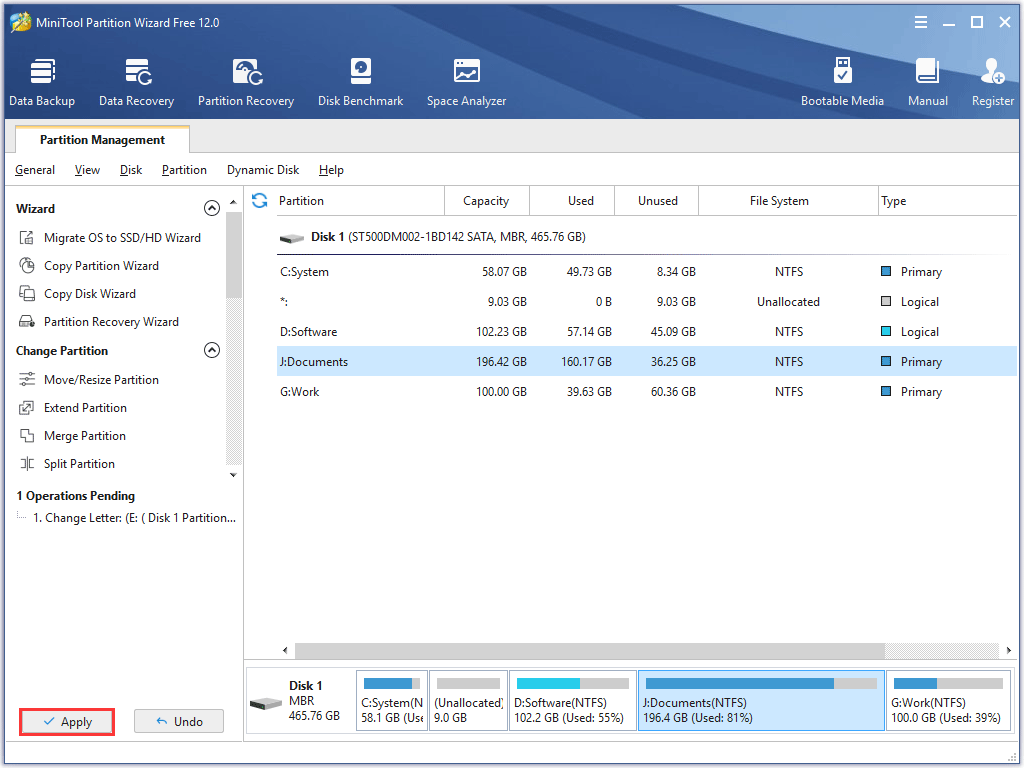
Step 5: Click the Apply button on the main interface to complete the pending operations.
When you finish reassigning the drive letter to the problematic partition, you should reboot your computer and then try CHKDSK again to see whether the error ‘The disk check cannot be performed because Windows cannot access the disk’ still shows up.
Fix 3: Check and Repair Hard Drive Issues
If the above fixes do not work to fix ‘The disk check could not be performed because Windows access the disk, it is probably that your hard drive is damaged or even dead due to some reason.
To check your hard disk health, you can also take advantage of MiniTool Partition Wizard.
The Surface Test feature of this program can help you detect the bad sectors on your hard drive. Refer to the following tutorial to start testing your hard drive health.
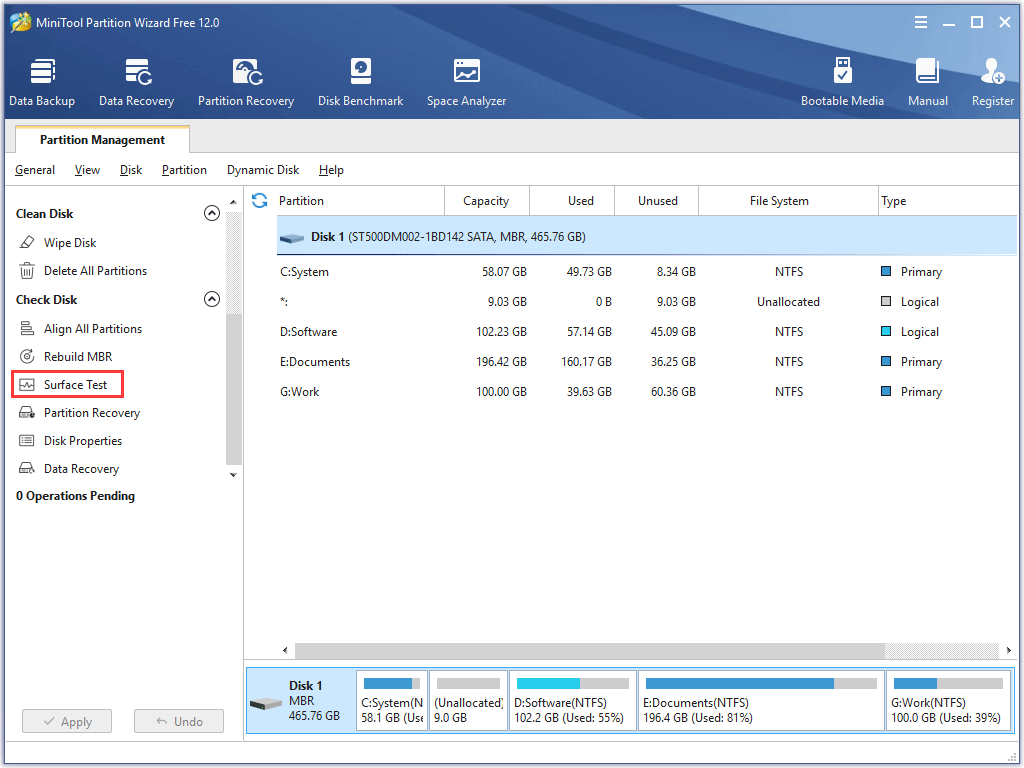
Step 1: Launch MiniTool Partition Wizard to get its main interface.
Step 2: Highlight the problematic hard drive and then choose the Surface Test feature from the left pane.
Step 3: Click the Start Now button. The program will automatically diagnose your hard drive health.
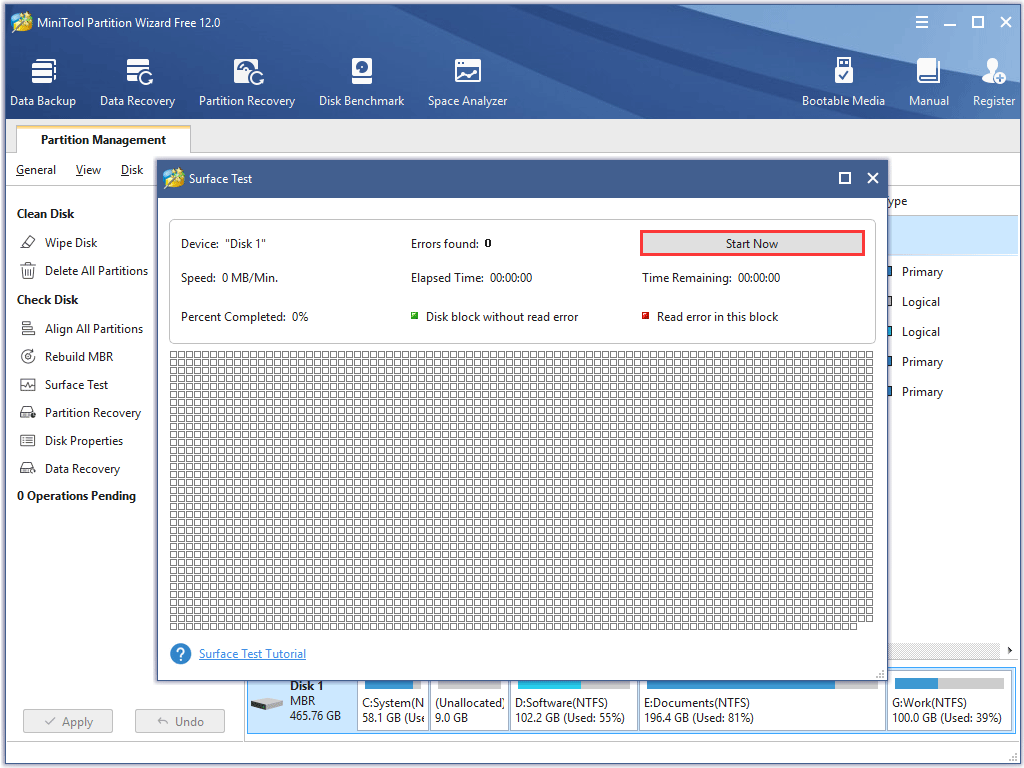
When the process comes to an end, check the test result. If you see some red squares, it is a shame to say that your hard drive has bad sectors.
In this situation, you need to run a CHKDSK command – chkdsk #: /r (# refers to the drive letter of partition you want to repair) that focuses on the bad sectors as well as the logical errors.
But note that running this command will cause data loss. Therefore, it is highly recommended that you back up the hard drive first and then run this command.
To back up hard drive, please try the Copy Partition or Copy Disk feature of MiniTool Partition Wizard. How to do that? Please read the tutorial.

After backing up all the data on the drive, you can try to repair the bad sectors and other logical errors.
Step 1: Run Command Prompt as administrator.
- Type Command Prompt in the Cortana’s search bar;
- Select the best-matched result and right-click it to selct Run as administrator.
Step 2: On the Command Prompt window, type chkdsk #: /f ((# refers to the drive letter of partition you want to repair) and then hit the Enter key to execute this command.
Step 3: Wait for the repairing process finishing.
Once the command finishes, please restart your computer and check whether you have gotten rid of the error ‘The disk check could not be performed because Windows cannot access the disk’. If not, you can send this hard drive to the professional to have it look at.
What to do if the final answer is that the hard drive has failed?
- If the hard drive is under the warranty, contact the manufacturer and ask them to offer you a new one.
- If the warranty is expired, prepare a new hard drive by yourself.
Hard drive failure is quite an annoying issue. Therefore, please back up your computer regularly in case of data loss.
Bottom Line
Have you tried one of the mentioned fixes? Have you gotten rid of the error ‘The disk check could not be performed because Windows cannot access the disk’ after using the fixes?
If you have any doubts about the mentioned fixes, please do not hesitate to let us know by leaving them in the following comment zone or contact us via [email protected].
The Disk Check Could Not Be Performed Because Windows Cannot Access the Disk FAQ
- Check the disk connection.
- Change the drive letter of the problematic partition.
- Check and repair the hard drive issues.
User Comments :