When choosing a hard drive, PC builders and gamers often wonder which WD drive is best for their setup.
While both come from the same brand, they differ significantly in performance, positioning, and price.
This article compares the WD Blue and WD Black across multiple dimensions to help you choose the right drive for your needs.
The following is excerpted from a forum user’s experience.
What’s the difference between WD Blue and Black drives? I have one of each. My single-player games are currently stored on the Blue drive, but I can switch to the Black. So, what’s the difference between them? Should I migrate my games to the Black drive?
Overview of WD Blue and WD Black
WD Blue HDD

The WD Blue HDD is an entry-level mechanical hard drive from Western Digital designed for everyday users performing basic tasks such as office work, web browsing, and video watching.
This series of hard drives is popular for its reliability and affordability. It’s suitable for both system drives and data storage, making it a practical choice for those on a tight budget.
The hard drive specifications are presented in the table below.
| Explanation | |
| Brand | Western Digital |
| Series | WD Blue HDD |
| Main Applications | Daily use, document storage, media playback, office applications, etc. |
| Capacities | 500GB / 1TB / 2TB / 4TB / 6TB |
| Interface | SATA III (6Gb/s) |
| Speed | 5400 RPM (some older models use 7200 RPM) |
| Performance | Mid-range, emphasizing stability and value. |
| Compatible Devices | Desktops, some external hard drive enclosures, etc. |
WD Black HDD
The WD Black HDD is a high-performance mechanical hard drive from Western Digital, designed for users who demand the highest speed and performance.
It’s ideal for gaming, content creation, running large-scale software, and other applications requiring high-performance drives.
The following is a table summarizing the features of the hard drive.
| Explanation | |
| Brand | Western Digital |
| Series | WD Black HDD |
| Main Applications | Suitable for gaming, multimedia creation, large-scale applications, etc. |
| Capacities | 500GB, 1TB, 2TB, 4TB, 6TB, 10TB, etc. |
| Interface | SATA III (6Gb/s) |
| Speed | 7200 RPM |
| Performance | Faster read and write speeds and stronger data processing capabilities. |
WD Blue vs Black: Which One to Choose
Looking to upgrade your hard drive but undecided between the WD Blue and WD Black? One focuses on value, the other emphasizes performance. Which of these two series is right for you?
Below is a comprehensive comparison of these two hard drives based on form factor, interface, applicable scenarios, and price.
#1. Form Factor
The WD Blue and WD Black series are largely similar in terms of form factor.
Both offer mainstream size options: the 3.5-inch HDD is suitable for desktops, while the 2.5-inch HDD is designed for laptops or compact devices.
#2. Interface
In terms of interfaces, both the WD Blue and WD Black series mechanical hard drives use the mainstream SATA III (6 Gb/s) interface, compatible with most modern desktop and laptop computers.
The SATA interface offers excellent compatibility and is currently the most common interface standard for mechanical hard drives.
It’s important to note that in some product lines, WD Black also offers SSDs using the NVMe interface (such as the WD Black SN series).
Correspondingly, WD Blue also offers SSDs with NVMe interfaces (such as the WD Blue SN570).
#3. Applicable Scenarios
In terms of usage scenarios, the WD Blue and WD Black target different user groups.
WD Blue:
- The WD Blue is primarily targeted at everyday basic applications, suitable for home use, light office work, and general data storage needs.
- Its performance focuses on stability and cost-effectiveness, making it capable of handling light-load tasks such as document processing, web browsing, and HD video playback.
WD Black:
- The WD Black is designed for users with high-performance requirements and is suitable for gaming, content creation, and high-intensity office use.
- With faster read and write speeds, a larger cache, and a longer warranty, it’s capable of handling large programs, multitasking, and serving as a primary gaming drive.
#4. Price
The WD Blue is more affordable, making it suitable for budget-conscious users who don’t demand high-performance drives.
In contrast, the WD Black is positioned as a high-performance product, boasting faster rotational speeds, a larger cache, and a longer warranty.
Consequently, its price is generally higher than the Blue series of the same capacity.
Bonus tip: WD Blue vs Black vs Purple, Red, & Gold
In addition to the Black and Blue series, Western Digital also offers Purple, Red, and Gold series hard drives.
These series each focus on specific applications, performance, and design.
The following table compares the core specifications of these series to help you quickly understand the application scenarios of different products.
| Specification Compared | WD Blue | WD Black | WD Purple | WD Red | WD Gold |
| Capacity Range | 500GB to 6TB | 500GB to 10TB | 1 TB to 10 TB | 1TB to 14TB | 1 TB to 20TB |
| Form Factor | 2.5/3.5 inch | 2.5/3.5 inch | 3.5 inch | 3.5 inch | |
| Sustained Transfer Speed | 147 MB/s to 180 MB/s | 202 MB/s to 227 MB/s | 110 MB/s to 145 MB/s | 150 MB/s to 210 MB/s | 255 MB/s to 291 MB/s |
| RPM Class | 5400 RPM | 7200 RPM | 5400 RPM, 7200 RPM | 5400 RPM | 7200 RPM |
| Main Applications | Daily office use, documents, audio, and video playback | Gaming, large-scale software, and content creation | Surveillance recording, continuous writing | Small NAS, RAID environments | Data centers, large servers, and enterprise-level RAID |
| Position | Mainstream consumer-grade | High-performance consumer-grade | Dedicated for video surveillance | Dedicated for NAS | Enterprise-grade high-end storage |
How to Manage Your Hard Drive
After purchasing a new hard drive (Western Digital Blue vs Black), you may need to manage it.
How can you do this?
MiniTool Partition Wizard can help you. It allows you to create and delete partitions, migrate operating systems, test disk performance, and more.
Here are its featured functions:
- Disk Benchmark: This feature can help you test the disk speed.
- Create Partition: It helps you create one or more partitions.
- Delete Partition: You can delete existing partitions on a hard drive.
- Migrate Windows OS to SSD/HD: You can migrate operating system data from one hard disk to another.
- Wipe Disk: It can help you completely erase all data on the disk.
MiniTool Partition Wizard FreeClick to Download100%Clean & Safe
#1. Disk Benchmark
MiniTool Partition Wizard’s built-in Disk Benchmark feature can measure the sequential and random read and write performance of storage devices by varying transfer sizes and test lengths.
Here are the steps on how to test the performance of your Western Digital Blue or WD Black.
Step 1: Run MiniTool Partition Wizard and select Disk Benchmark.
Step 2: Choose the WD disk you want to test and then click the Start button to start the test.
- Transfer Size: The data size per transfer, which varies between 1KB and 2048KB
- Total Length: The total amount of data to be transferred, which ranges from 100MB to 4096MB.
- Test Mode: Choose a mode to test, which can be Sequential, Random, or Sequential & Random.
- Cool Down Time: Set up the cool-down time to reduce the hard drive temperature before it continues with the next test.
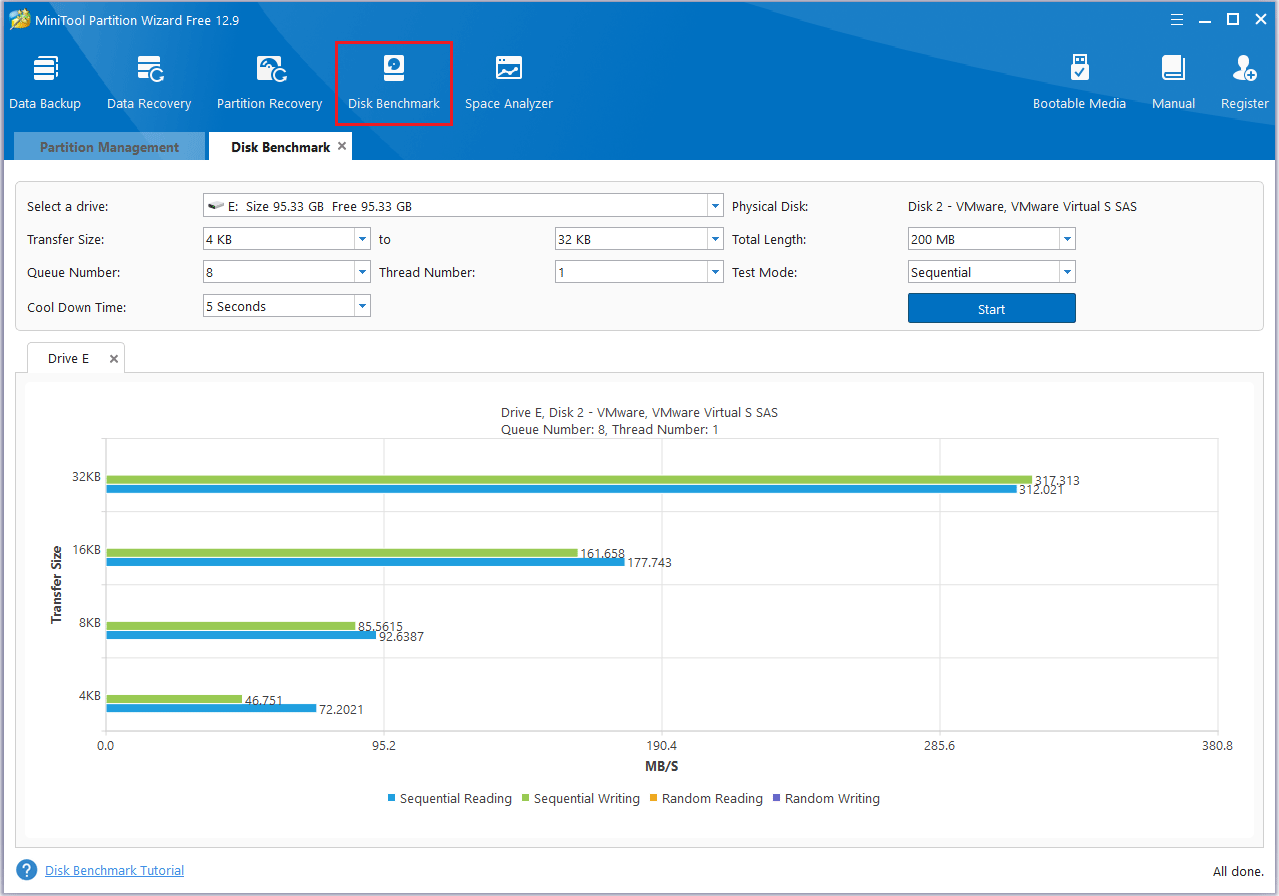
This feature not only tests a disk’s read and write performance but also outputs detailed test results, such as transfer sizes.
By analyzing this data, you can determine whether a disk’s performance meets your standards or make an informed choice between multiple disks.
![How to Measure Disk Performance Easily [Step-By-Step Guide]](https://images.minitool.com/partitionwizard.com/images/uploads/2019/06/disk-performance-test-thumbnail.jpg)
#2. Create Partition
To make managing your WD disk easier, you can set up different partitions to store various types of files.
Here are the steps:
Step 1: Right-click the disk and choose Create.
Step 2: In the new interface, you can customize Partition Label, File System, Drive letter, partition size, etc. Then, click OK.
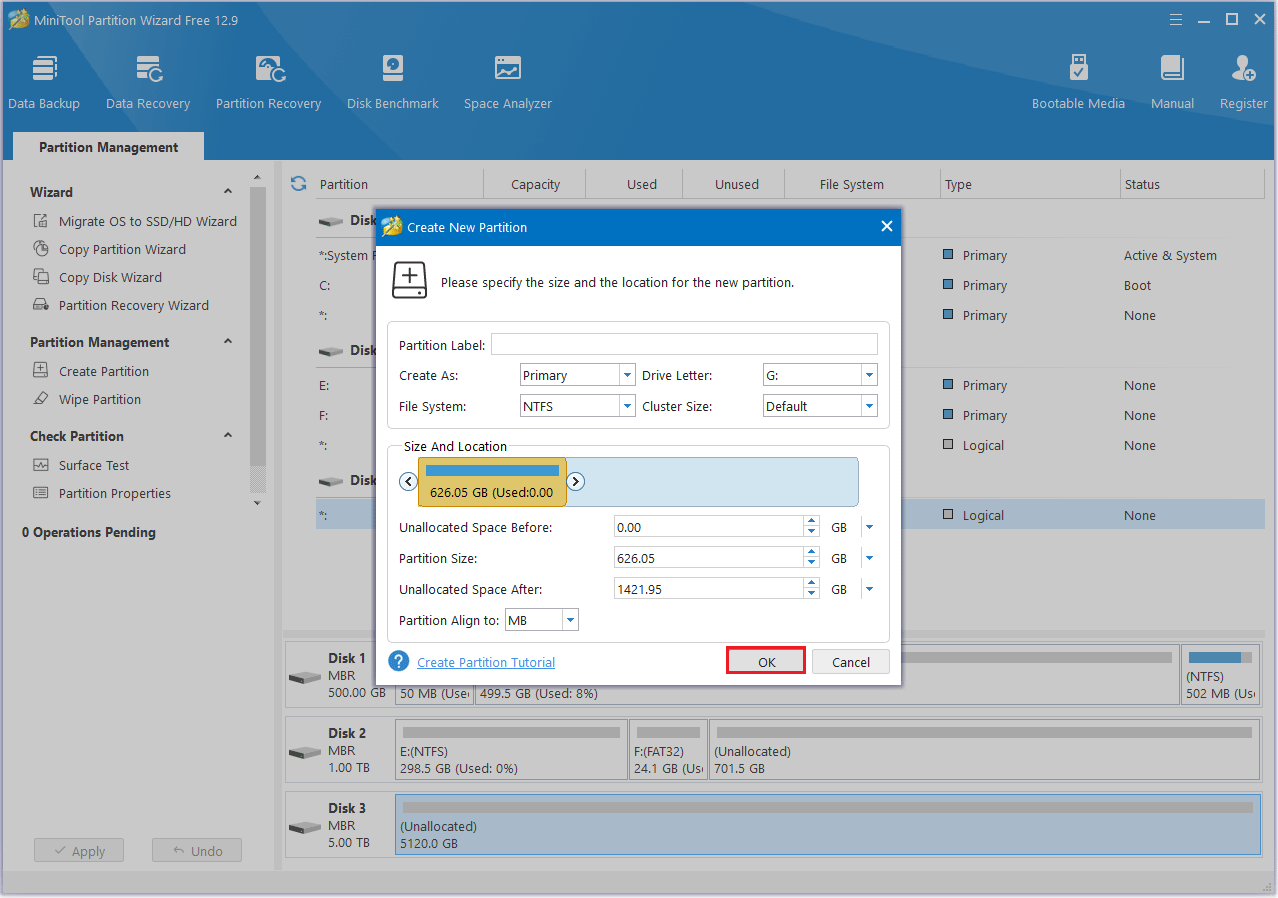
Step 3: Click Apply to finish the process.
After creating a partition, you can store files in it or use it for specific data management needs to better organize data and improve disk usage efficiency.
#3. Delete Partition
By deleting partitions that are no longer in use, you can free up disk space for creating or expanding other partitions.
Step 1: Open MiniTool Partition Wizard.
Step 2: Right-click the unwanted partition and choose Delete.
Step 3: The original partition becomes unallocated space, and click Apply.
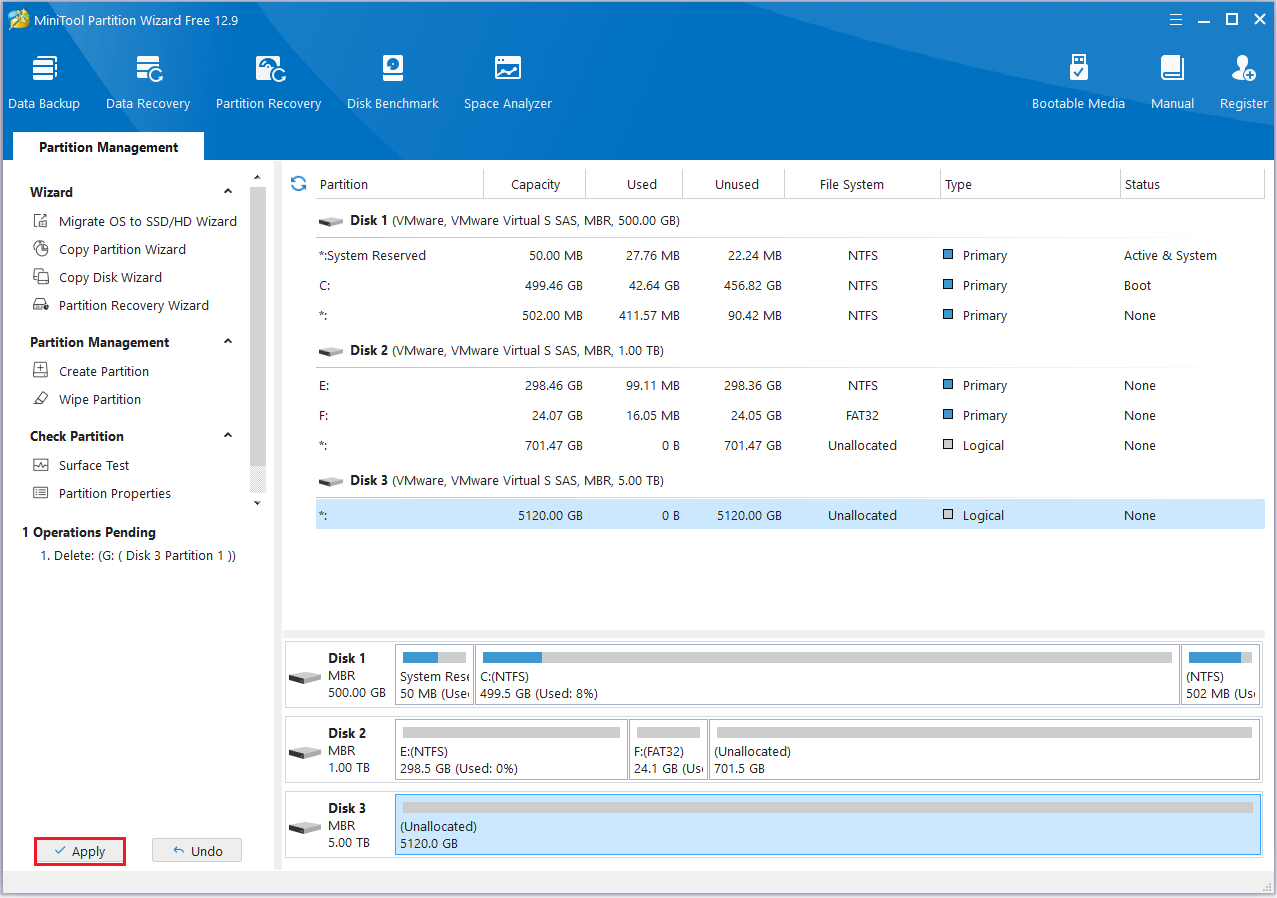
After deleting a partition, the area becomes unallocated space.
You can use this unallocated space to create a new partition or expand an existing partition.
#4. Migrate Windows OS to SSD/HD
Given the excellent performance of a WD Black or WD Blue drive, you might want to use it as your primary drive for gaming or work.
So, how can you migrate your Windows operating system from your original hard drive to a new one without losing data?
You can try MiniTool Partition Wizard, a reliable Windows system migration tool.
MiniTool Partition Wizard DemoClick to Download100%Clean & Safe
Step 1: Open MiniTool Partition Wizard and click on the Migrate OS to SSD/HD Wizard feature.
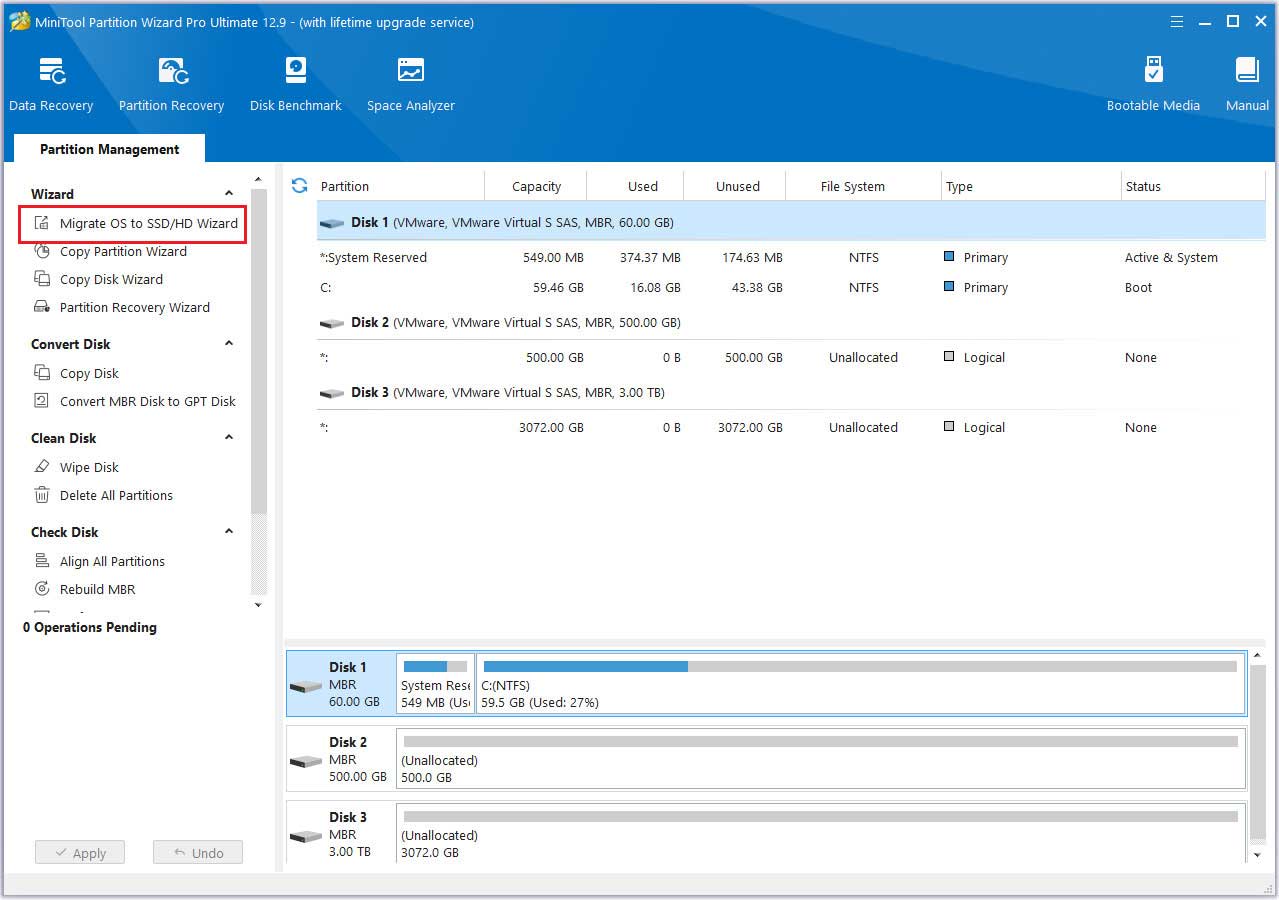
Step 2: Select option B and click Next.
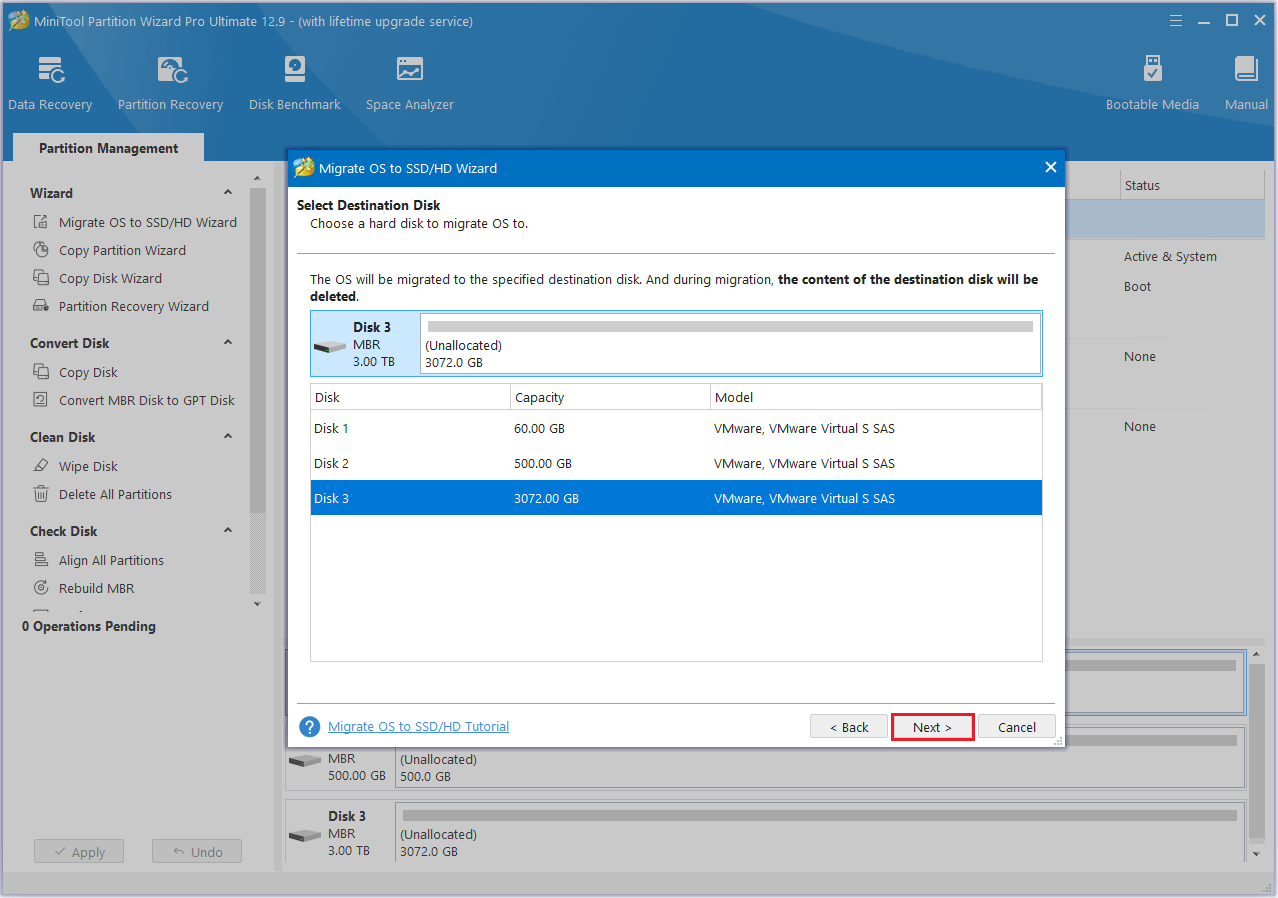
Step 3: Choose the destination disk. Make sure your hard drive doesn’t contain any important data, as it will be overwritten. Then click Next.
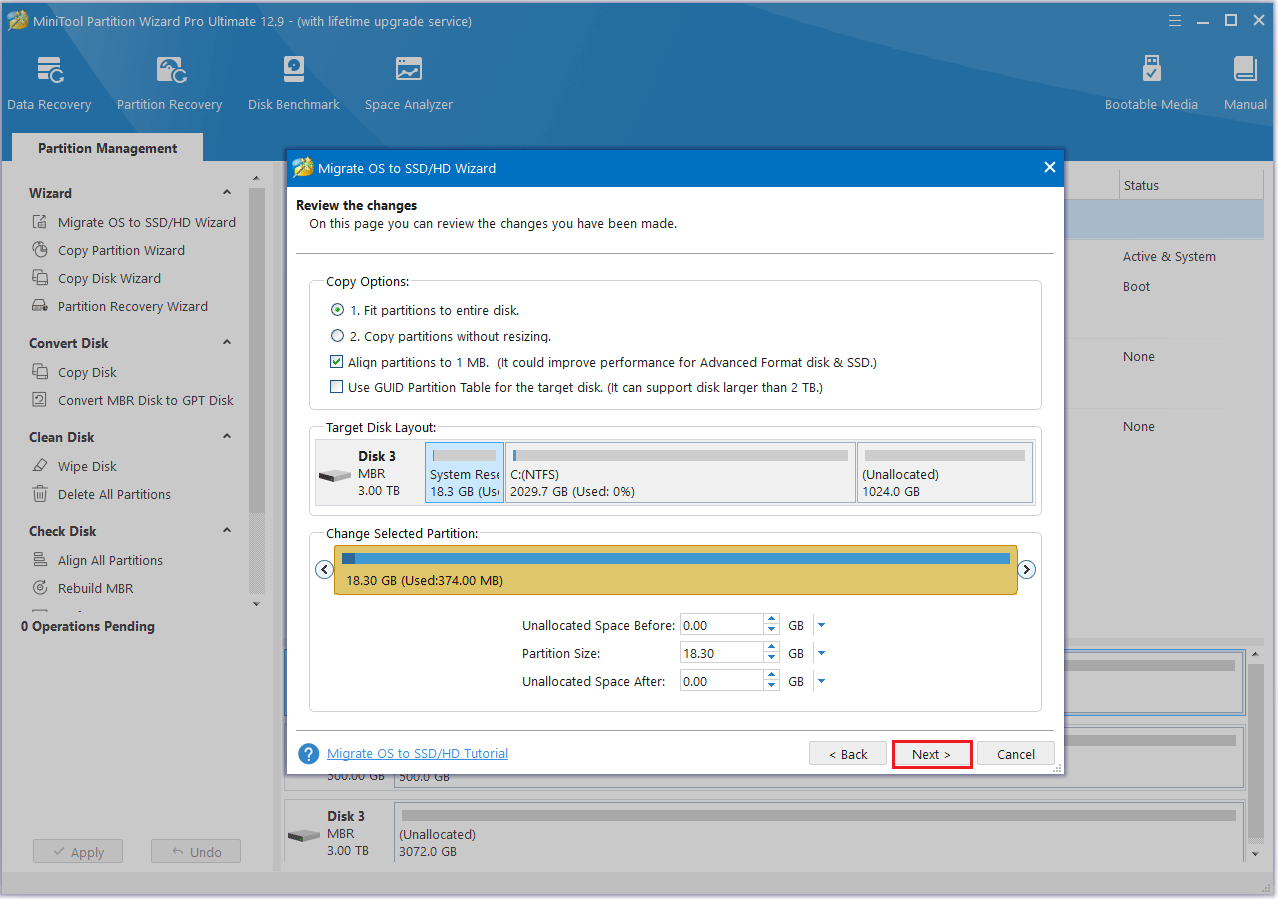
Step 4: Choose your desired copy settings and customize the disk layout as needed. Then, click Next to continue.
- The options “Fit partitions to entire disk” and “Align partitions to 1 MB” are selected by default. The former adjusts partition sizes proportionally to utilize the full capacity of the new hard drive, and the latter option will apply 4K alignment to the disk.
- If the original hard drive is an MBR disk, but you want the cloned disk to be a GPT disk, you can choose the Use GUID partition table for the target disk option.
- Under the Change Selected Partition section, you can resize or move the partition according to your needs.
Step 5: Read the note about how to boot from the new disk and press the Finish > Apply button.
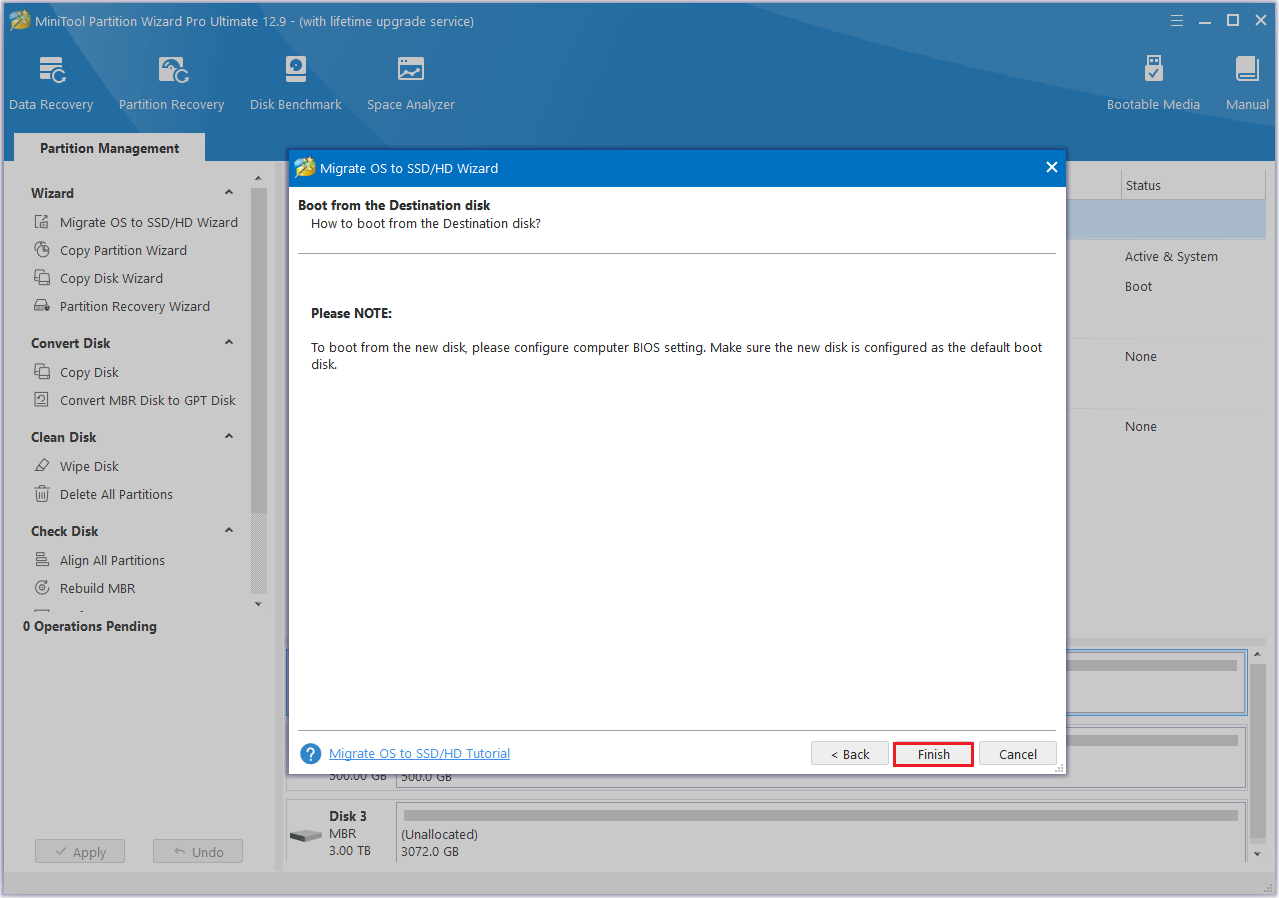
After the migration is complete, the Windows system and all applications and files will be completely copied to the new hard drive, and you can start the system directly from the new hard drive.
#5. Wipe Disk
Normal deletion or formatting a hard drive doesn’t actually erase data. It only marks it for overwriting.
A wipe disk, on the other hand, overwrites the entire drive with random data or zeros, preventing data recovery.
It’s suitable for use before selling or erasing sensitive information.
Here are the steps:
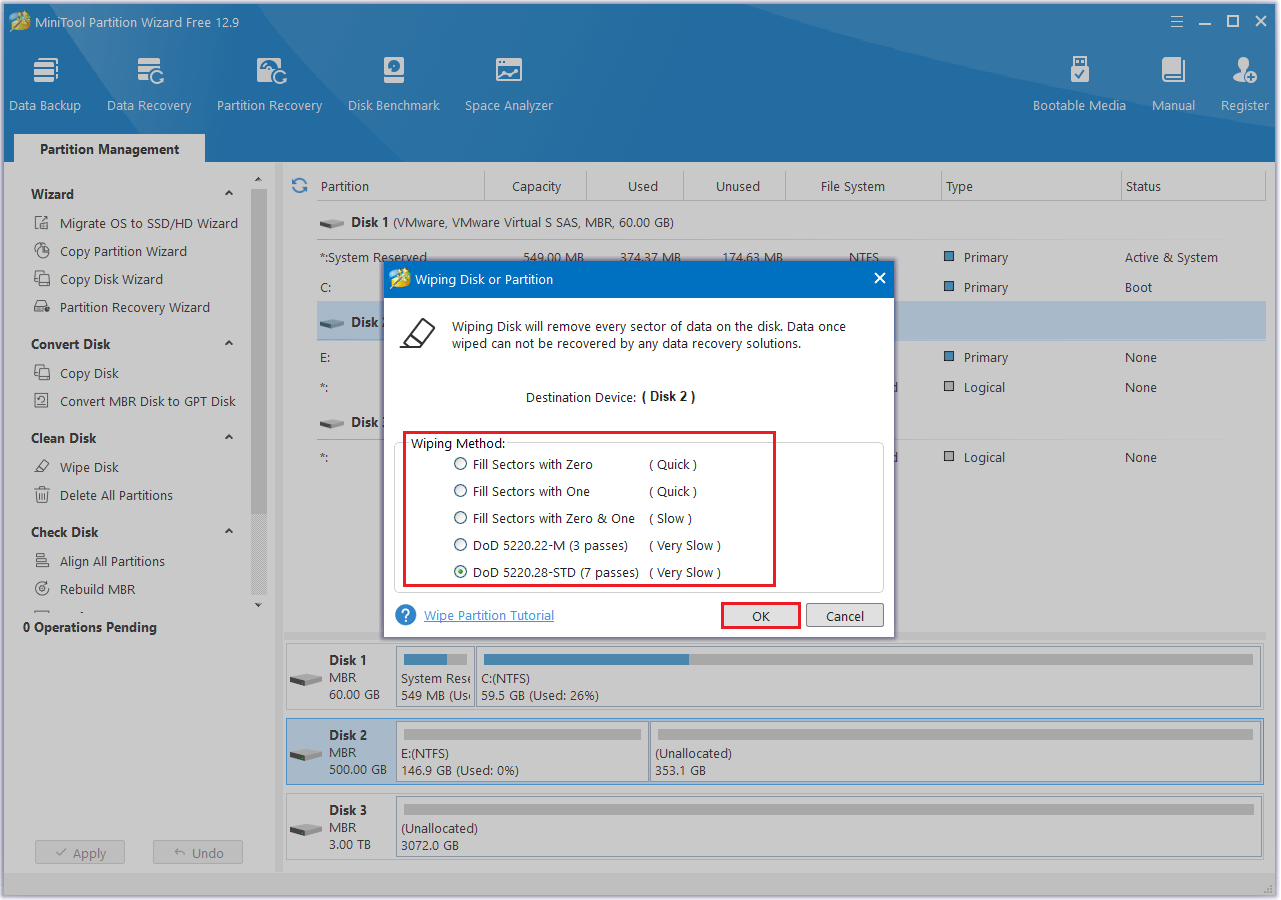
Step 1: Right-click on the disk you wish to wipe and choose Wipe Disk.
Step 2: Choose a wipe method, then click OK > Apply.
- Fill sectors with Zero and Fill sectors with One: They just write the same code to the partition, which is similar to a full format in Windows.
- Fill sectors with Zero &One: It will randomly write zeros and ones to partition, which makes the data more unrecoverable.
- DoD 5220.22-M (3 passes): It is recommended that users want to get rid of the data permanently.
- DoD 5220.28-STD (7 passes): It provides a higher security level for data because it has more passes than DoD 5220.22-M (3 passes).
After wiping the disk, all data on the hard drive will be completely cleared.
Bottom Line
WD Black vs. Blue: Which should you choose? This article will help you find out.
The WD Blue is a general-purpose hard drive suitable for everyday tasks like office work, browsing the web, and handling large files. The WD Black, on the other hand, is designed for high-performance needs, targeting gamers and content creators.
If you have any questions or suggestions while using MiniTool Partition Wizard, you can contact us at [email protected] to get a quick reply.
WD Blue vs Black FAQ
About The Author

Position: Columnist
Cecilia has been an editor at MiniTool for two years. She primarily focuses on disk and partition-related content, with particular expertise in disk cloning, partition recovery, and PDF document conversion. She is dedicated to providing users with clear and accurate solutions to help them efficiently resolve common computer problems.
User Comments :