What is system interrupts? Why is system interrupts using so much CPU? Is it a virus? If you have encountered the system interrupts high CPU usage issue, you must be concerned of the answers of those questions. Luckily, this post will answer all your questions.
And if you don’t know how to fix the system error interrupts high CPU usage issue, you can try the fixes mentioned in this post. Now, just keep on reading.
What Causes System Interrupts High CPU Usage
System interrupts is an official part of Windows operating system, which manages the communication between computer hardware and systems. You can find it displayed as a process in Task Manager, showing the CPU usage for all hardware interrupts.
System interrupts likes an alarm system for CPU. If a scenario needs CPU attention, system interrupts will remind the processor of the high priority condition. Then the CPU pauses what it’s doing, saves it, and processes the important work. Once the work is done, it will return to its original state.
When there are many interrupts, it means that some errors can occur at the hardware level, and this is why that they start taking up a lot of resources.
Typically, system interrupts take up 0.1% and 2% of the CPU. Sometimes it goes up to 7%, which is also considered normal. However, you sometimes may see system interrupts 100 CPU usage. This is rather dangerous. If the system interrupts consumes more than 10% of your CPU, you should pay attention to it, as it indicates the occurrence of a hardware error.
Well how to fix system interrupts high CPU Windows 10/8/7? At first, you can try restarting your PC. Sometimes a restart can fix the problem. If this doesn’t work, you can try the following effective fixes that have been practiced by many users.
1. Update the hardware driver
2. Disable network adapters
3. Disable audio enhancements
4. Turn off Windows fast startup
5. Disable USB root hubs
6. Check failing hadware on the computer
7. Update BIOS
Fix 1. Update Hardware Driver
A faulty hardware driver could be the culprit if you encounter system interrupts high CPU usage issue. You can follow the steps below to update your device drivers.
Step 1. Right click Windows Start menu and choose Settings from the pop-up menu.
Step 2. Choose Update & Security from the window.

Step 3. Locate to the Windows Updated section. Then check if there is any hardware driver update available. If yes, click Next update all of them.
Fix 2. Disable Network Adapters
The network adapter has the privilege to wake up your computer when transmitting data, which may cause high CPU usage as a lot of interrupts are generated during the process. So to stop system interrupts high CPU, you can disable the feature.
Here is the tutorial.
Step 1. Right click Windows Start menu and choose Device Manager from the menu. Alternatively, you can press Windows logo key and R key on the keyboard to bring up the Run dialog box, then input devmgmt.msc and hit Enter to open Device Manager.
Step 2. Expand Network adapters dialog.
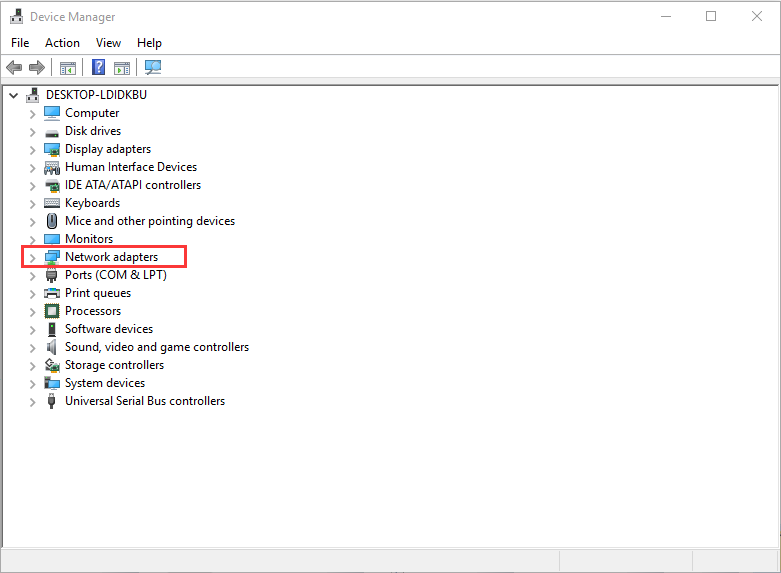
Step 3. Then right-click on your network adapter and choose Properties.
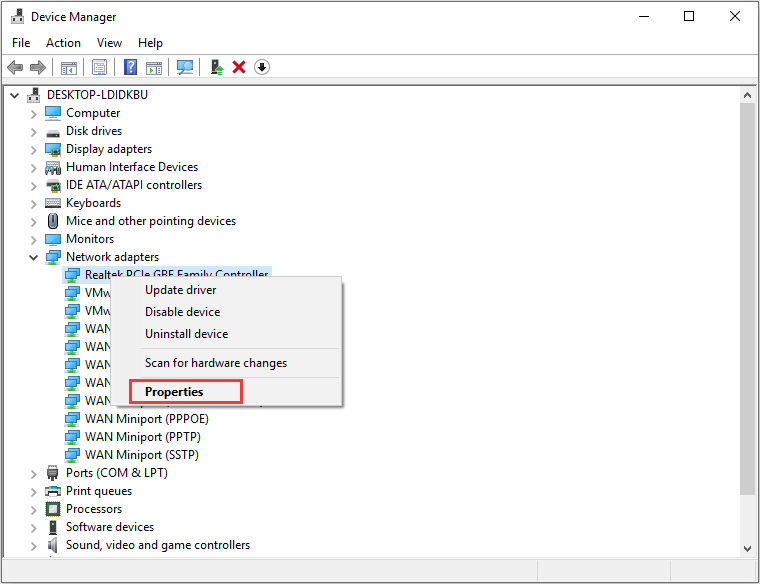
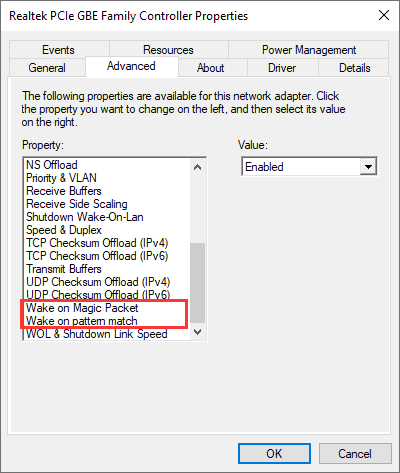
Step 4. Switch to the Advanced tab. Then under Property, scroll down to find the Wake on Magic Packet and Wake on pattern match.
Step 5. Set their value to be Disabled from the drop-down menu one by one.
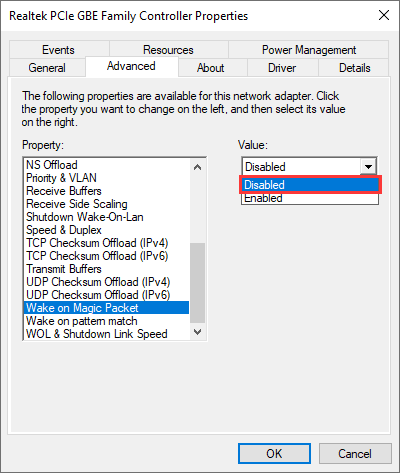
Step 6. Click OK to save your settings.
Many users reported that they solved the system interrupts 100 CPU issue after trying this fix. So if you encounter the same issue, try disabling network adapter by following the steps above.
Fix 3. Disable Audio Enhancements
Some sound drivers use enhancement to improve your sound quality. If these properties are incompatible with your computer, some problems such as system interrupts high CPU usage. In this case, disabling Audio Enhancement may help you fix the issue.
You can follow the steps below and then check if the Windows system interrupts 100 CPU usage issue gets fixed.
Step 1. Right-click the speaker icon in your system tray.
Step 3. Double-click your Default Device (speaker) to open Properties
Step 4. Now head to the Enhancements tab and check the box which says Disable all sound effects.
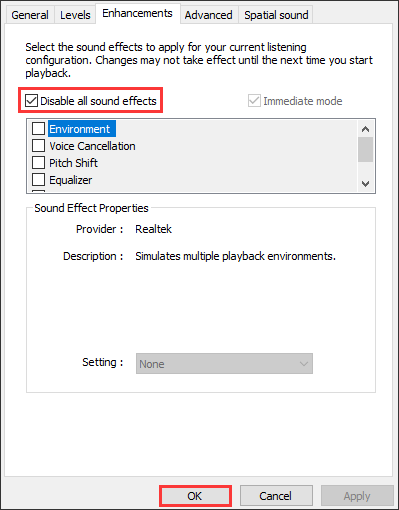
Step 5. Then click OK to allow the change and exit the setting.
If this doesn’t help, you can turn these options on and then try the next method.
Recommended article: Epic Games Launcher High CPU Usage: 6 Fixes for You
Fix 4. Disable Windows Fast Startup
Many users found that disabling the Windows fast startup can solve the system interrupts high CPU issue. So you can try this fix to see if it works.
Step 1. Type Control in the Windows 10 Cortana search box. Then click the best match Control panel to open it.
Step 2. In the Control Panel, click Power Options.
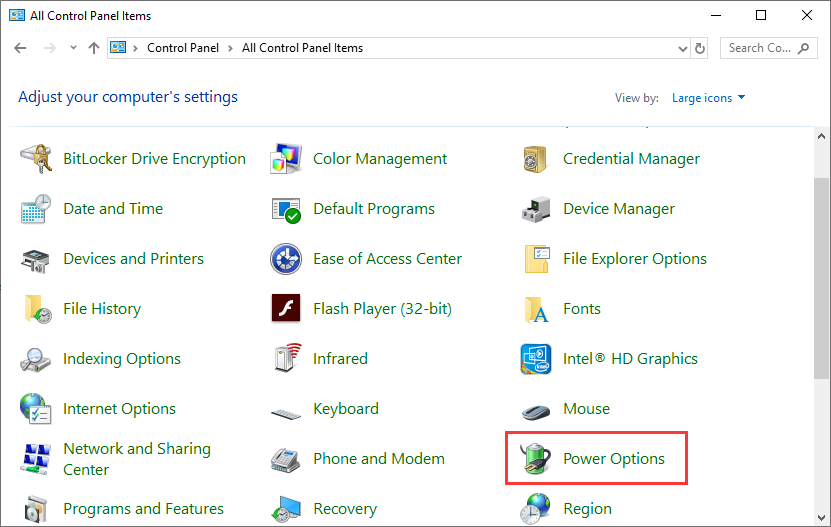
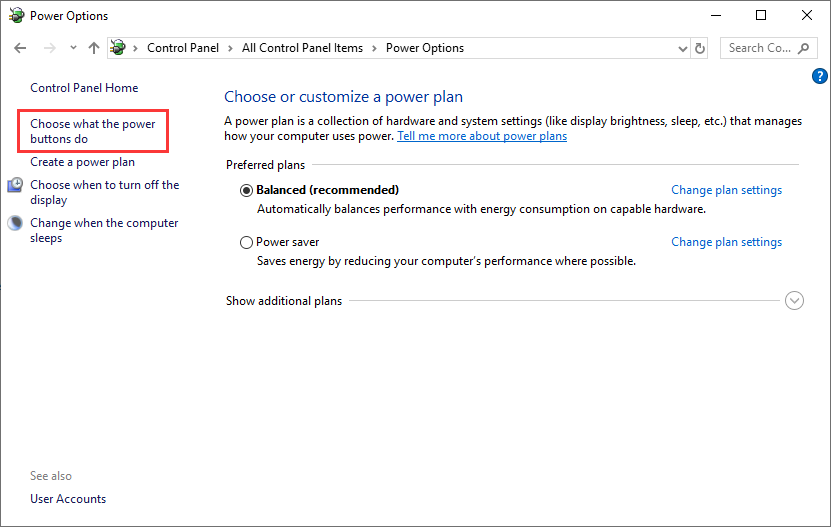
Step 3. Click Choose what the power buttons do located at the left side of the screen.
Step 4. Choose the option Change Settings that are currently unavailable. This requires administrative privileges.
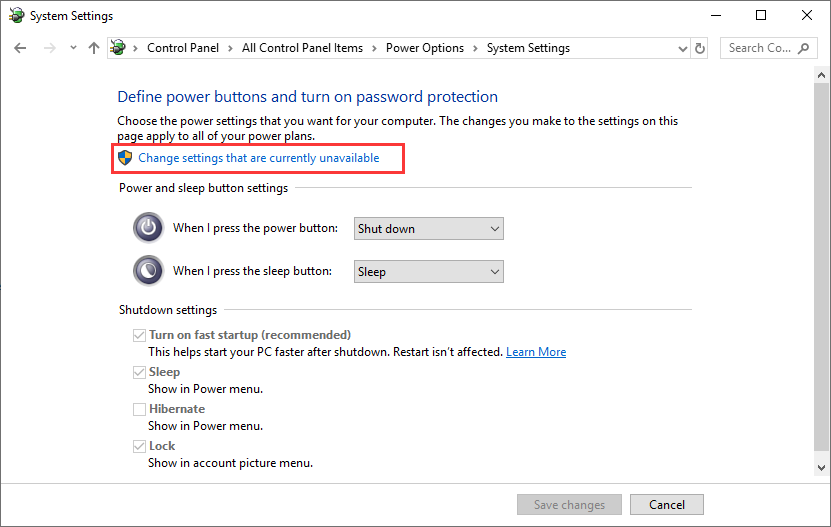
Step 5. At the bottom of the screen, uncheck the box next to Turn on fast startup.
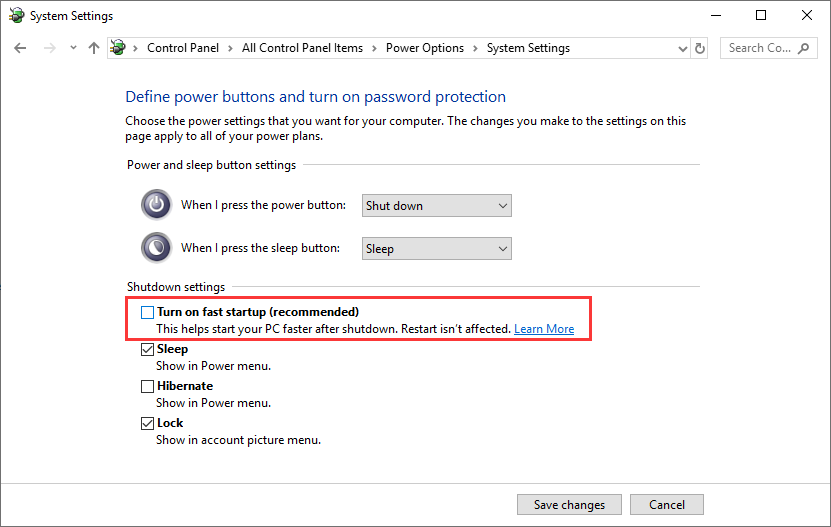
Step 6. Save changes and exit.
Then restart your computer and check if the system interrupts high CPU problem can be fixed. If not, try the following fixes.
Also read: 7 Solutions to Apex Legends High CPU Usage on Windows PCs
Fix 5. Disable USB Root Hubs
Step 1. Right click Windows start menu and then choose Device Manager from the menu.
Step 2. Find and click the Universal Serial Bus controllers dialog to expand it.
Step 3. Right-click on the USB Root Hub and choose Properties.
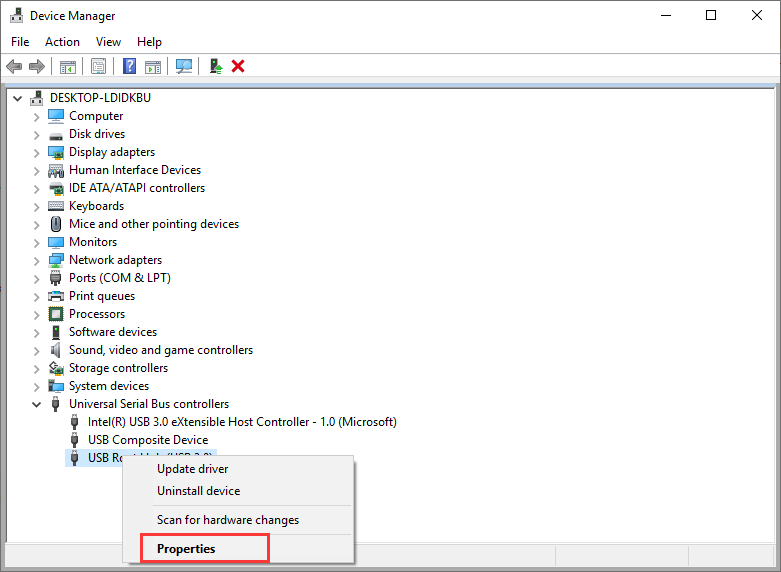
Step 4. Switch to the Power tab and check if your mouse and keyboard are using this root hub. If not, disable it. Disable all root hub exception the one for your keyboard and mouse.
After disabling your USB Root Hubs, you can go to task manager to check if the system interrupts high CPU issue is fixed.
Fix 6. Check Failing Hardware
If the above fixes do not work, you can check if there is a failing hardware on your PC. As I mentioned before, if the system interrupts consumes high CPU, it indicates the coming of hardware failure.
If you suspect that it is your hard disk causing an issue, you refer the following post to check if there is something wrong with your hard drive.
To check if your RAM has an issue on the hardware level, you can utilize the Windows built-in Memory Diagnostic tool.
For other hardware, you can use Windows Diagnostic Tools like Windows Reliability Monitor, Performance Monitor to test computer performance and get a result of your computer hardware.
Fix 7. Update BIOS
Outdated BIOS could also lead to system interrupts high CPU usage. If you cannot fix the system interrupts high CPU usage issue with above fixes, you can try updating BIOS to solve the issue.
Firstly, you can follow the steps below to check your BISO version.
Step 1. Type cmd in the Windows Cortana search box and click the best match Command Prompt to open it.
Step 2. Then input the follow commands one by one and hit Enter after each.
systeminfo | findstr /I /c:bios
wmic bios get manufacturer, smbiosbiosversion
After identifying the BISO version, you can check the manufacturer’s website for updates and instructions.
However, updating BIOS is not an easy task. As it concerns Windows startup, mistaken operation may render your computer unbootable. So, for my perspective, you should also make a backup of the system disk. The following will show you how to backup system disk when you need to perform some dangerous operations that may cause boot issue.
How to backup system disk? MiniTool Partition Wizard Pro Ultimate Edition can help you perform the operation in a simple way.
MiniTool Partition Wizard Pro Ultimate Edition is a piece of professional and reliable partition manager & disk cloning software for Windows users. It can help you extend partition, resize partition, check file system, migrate OS to HD/SSD, convert MBR to GPT disk, convert FAT to NTFS at ease.
If you need to backup disks or partitions, MiniTool Partition Wizard Pro Ultimate Edition is highly recommended.
Step 1. Get MiniTool Partition Wizard Pro Ultimate Edition. Install it on your computer, launch it and get the main interface.
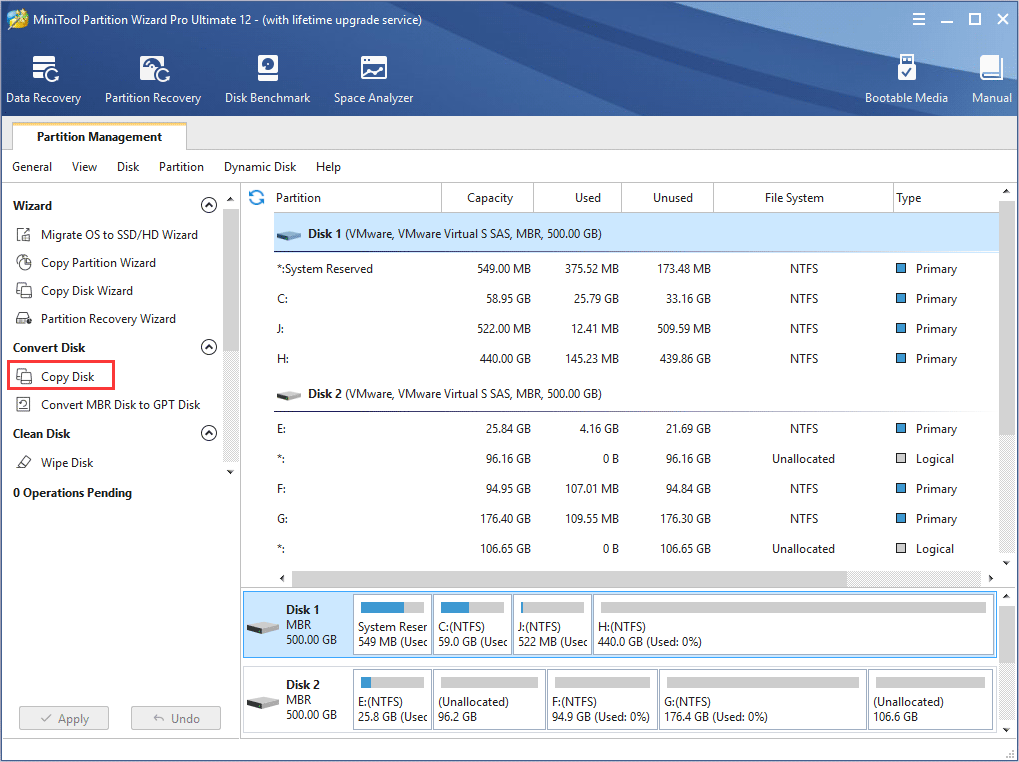
Step 2. Select the target system disk and choose Copy Disk from the left panel.
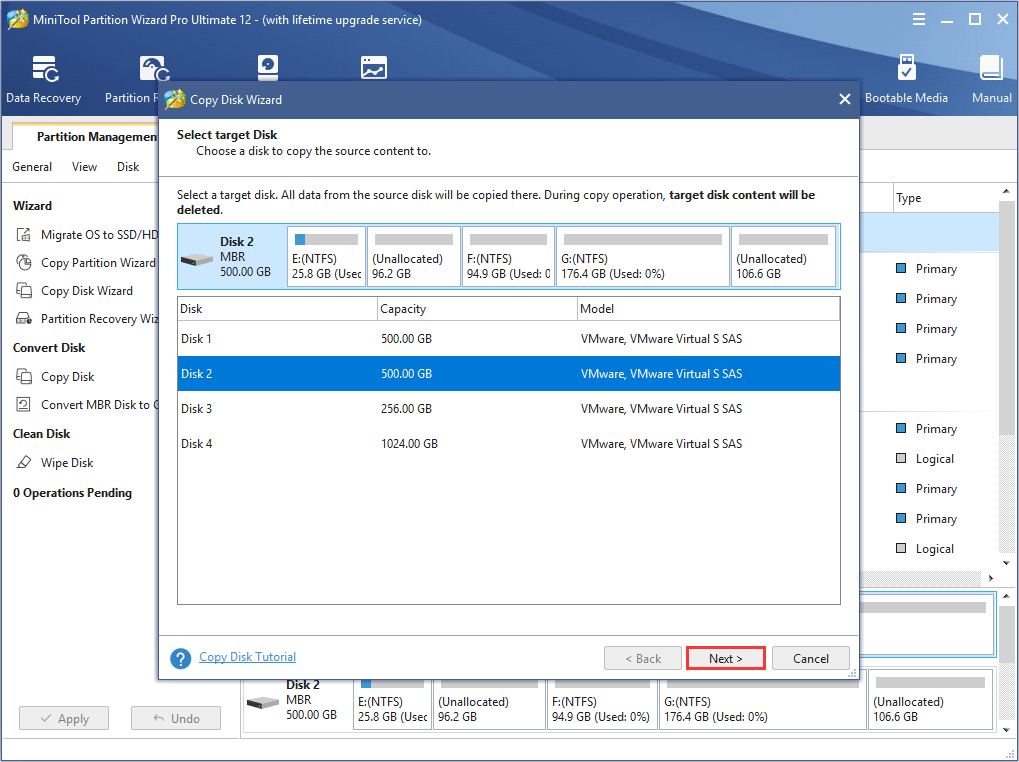
Step 3. Select a target disk to copy content to and click Next. When you click Next, it will remind you all the data on the target disk will be deleted, click OK if there are no important files on the target disk.
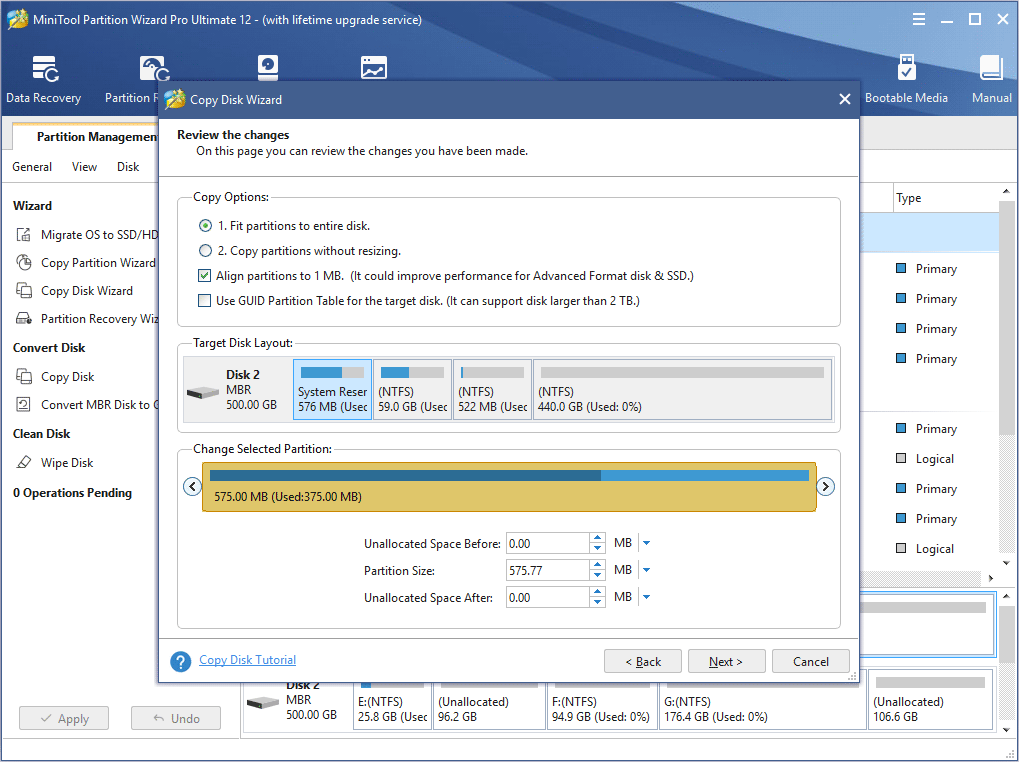
Step 4. Review the changes you are going to make and click Next to go on.
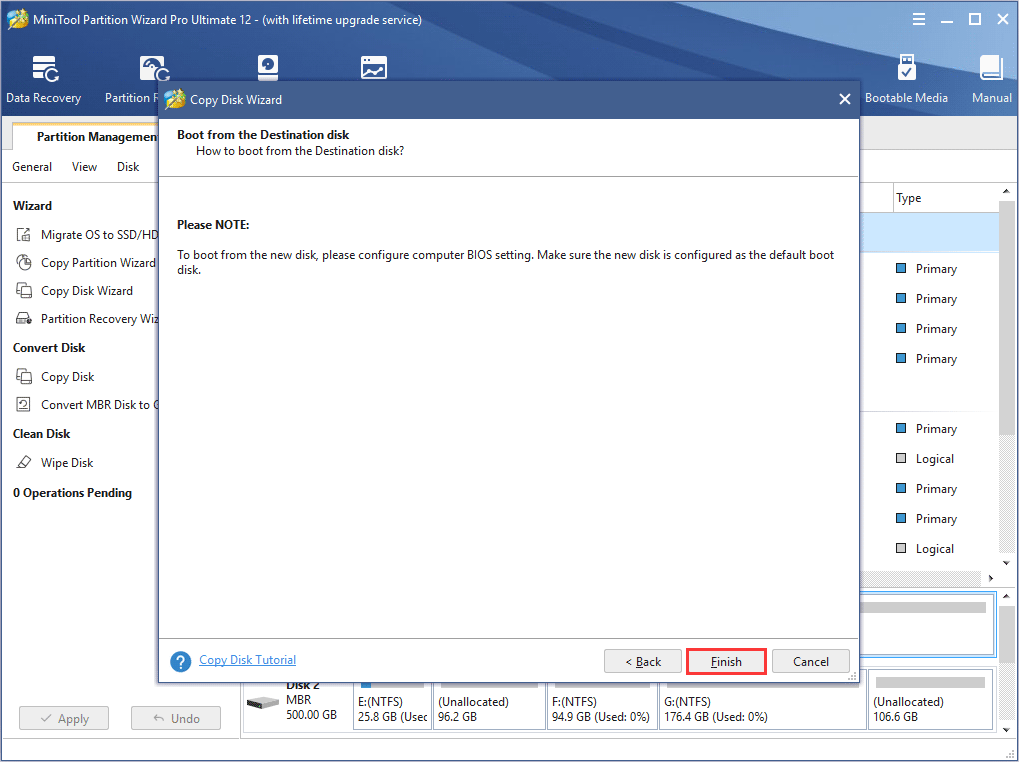
Step 5. Pay attention to the note which tells you how to boot from the destination hard drives. Then click Finish.
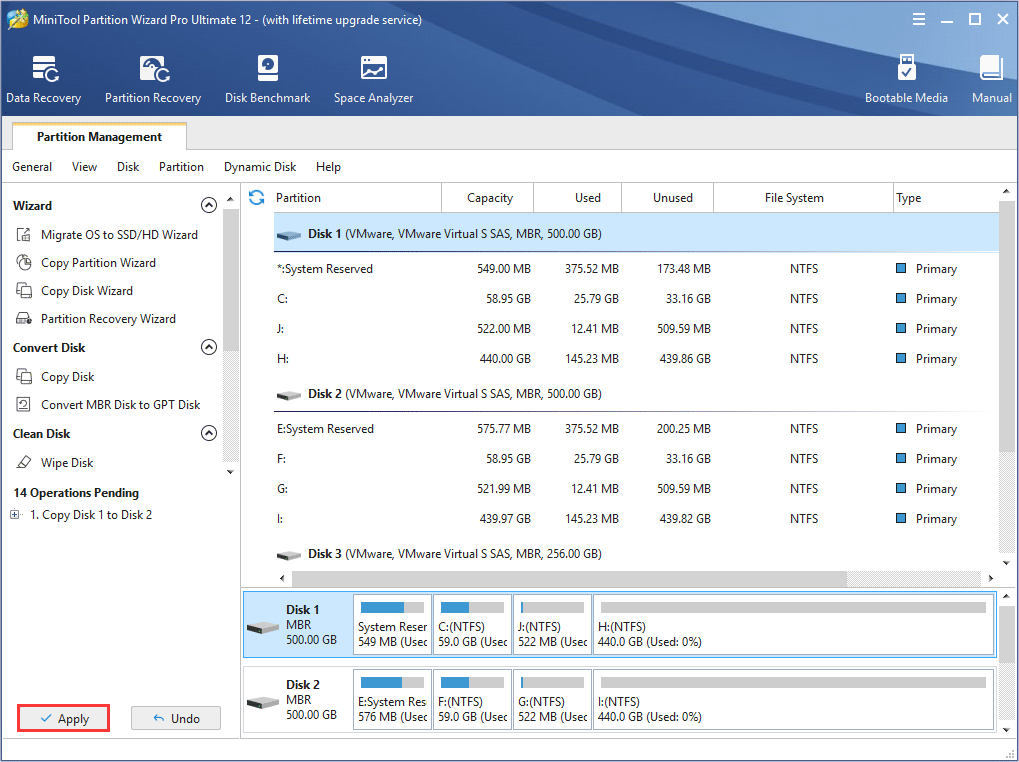
Step 6. At last, click Apply on the upper left corner to allow the pending operations.
MiniTool Partition Wizard FreeClick to Download100%Clean & Safe
After the backup is completed, you can update BIOS. When the BIOS is updated to the latest version successfully, the Windows 10 system interrupts high CPU usage issue should be fixed.
Bottom Line
After trying the 7 fixes mentioned in this post, the system interrupts high CPU issue on your PC should be fixed. If you have better solutions, we are glad to have you share it with us.
If you have any question about how to backup partition/disk with MiniTool Partition Wizard, you can leave a message on the following comment zone and we will reply as soon as possible. If you need any help when using MiniTool software, you may contact us via [email protected].
System Interrupts High CPU FAQ
When there are many system interrupts, it means that there is some software or hardware errors appeared on your PC, and this will cause system interrupts high CPU issue. You can try following steps to solve system interrupts issue:
- Update hardware drivers.
- Disable Network adapters
- Disable Audio Enhancements.
- Disable the Windows fast startup.
- Disable USB root hubs.
- Check if there is any failing hardware.
- Update the BIOS version on your PC.


User Comments :