You may encounter the Epic Games Launcher high CPU usage issue while using this program. Fortunately, you can lower it down by using the methods offered by Partition Magic in this post. Detailed steps for each method have been shown to you, so you can perform the operation with ease.
Epic Games Launcher high CPU usage can cause slowdowns and lag in other tasks. To get rid of these issues, you need to drop down the CPU usage by taking some measures. In this post, several fixes for high CPU usage on Epic Games Launcher are collected. You can have a try!
Fix 1: Relaunch Epic Games Launcher
A simple fix for Epic Games Launcher high CPU usage is to relaunch the program. You should close Epic Games Launcher first and then launch it again. Here are the steps for doing that.
Step 1: Right-click the icon of Epic Games Launcher at the taskbar and click Exit to close the Launcher.
Step 2: Remove any command line arguments you may have from the launcher desktop shortcut’s target line.
- Right-click on the Epic Games Launcher desktop shortcut and then choose Properties.
- Under the Shortcut tab, the field labeled Target should have a path that looks something like this: C:\Program Files\Epic Games\Launcher\Portal\Binaries\Win64\EpicGamesLauncher.exe
- If there are any arguments in the Target field after the path (such as -http=wininet), remove them.
- Click Apply to execute the operation.
Step 3: Launch Epic Games Launcher again and check if Epic Games Launcher high CPU usage on PC disappears.
Fix 2: Update Graphics Driver
The latest graphics driver is required to run Epic Games Launcher without issues. So, if your graphics driver is outdated, you may encounter high CPU usage on Epic Games Launcher. In this case, you need to update your graphics driver to solve the problem.
You can reach the purpose by downloading the latest version of your graphics driver from its official website, making use of a third-party driver updater, or through Device Manager with the steps below.
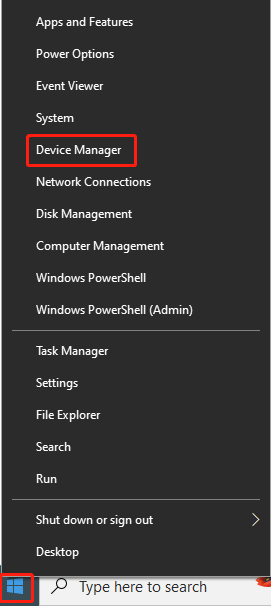
Step 1: Right-click on the Windows icon to open the Start menu and then click the Device Manager option from here.
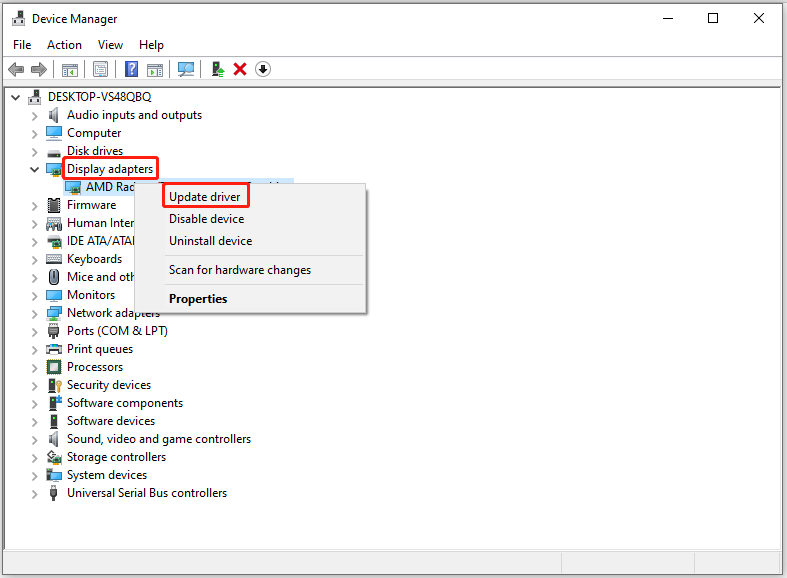
Step 2: Double-click Display adapters to expand it. Then right-click on your graphics driver and click Update driver.
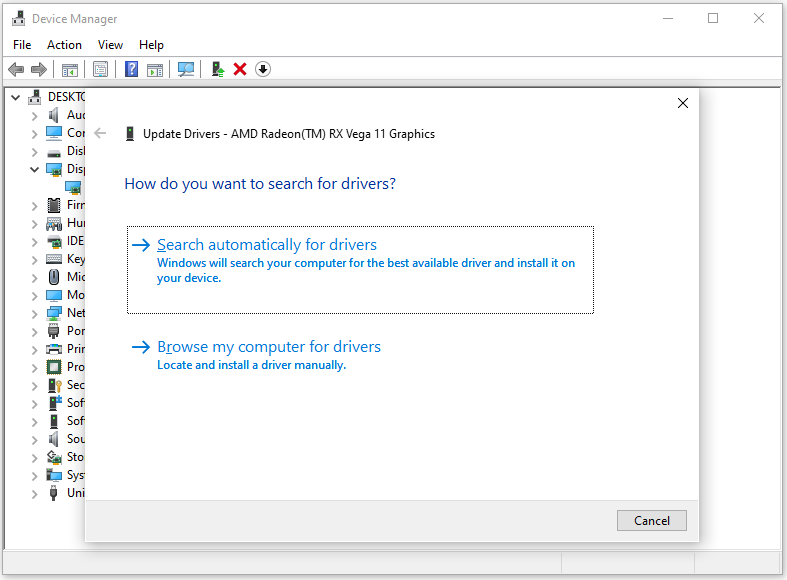
Step 3: In the next window, choose a manner to update the driver. To automatically update the driver, click Search automatically for drivers. If you want to update the driver manually, hit Browse my computer for drivers instead.
Step 4: Follow the on-screen instructions to complete the process.
Step 5: Now, check if Epic Games Launcher high CPU usage on PC is fixed. If not, try other methods in the post.
Fix 3: Update Epic Games Launcher
Epic Games has confirmed that they are working on an update that can fix the high CPU usage issue. So, you can install the latest version of the app to troubleshoot the Epic Games Launcher high CPU usage problem.
Step 1: Open the Epic Games Launcher and click on the initials displayed in the upper right corner.
Step 2: Select Settings from the context menu.
Step 3: Tap on the Install Now option under Epic Online Services.
Step 4: Click Yes in the prompted UAC window. Wait until the process ends.
Alternatively, you can also download the latest version of Epic Games Launcher from store.epicgames.com and install it.
Fix 4: Change the Power Plan of the PC
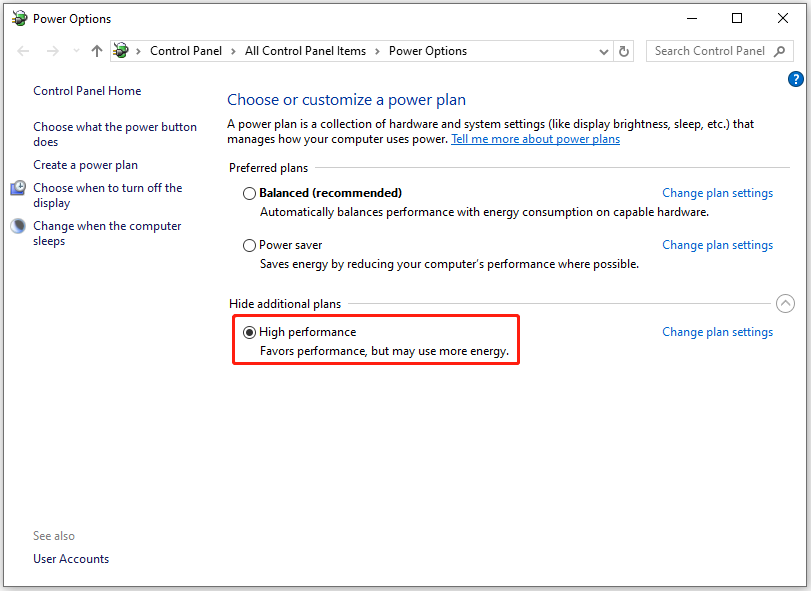
You are allowed to optimize CPU performance by adjusting your power settings. Here, you can change the power plan to get rid of Epic Games Launcher high CPU usage on PC.
Step 1: Hold the Windows and I keys to open the Settings app.
Step 2: Click the System tab and then click Power & sleep > Additional power settings.
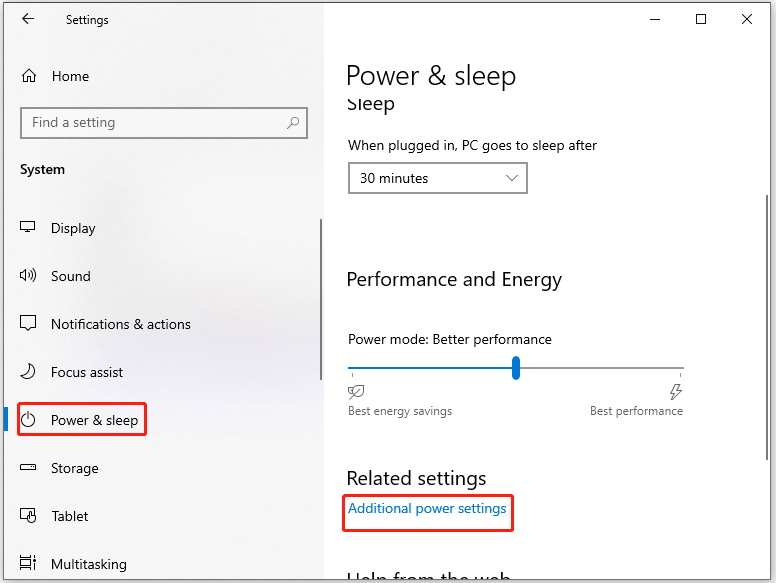
Step 3: Choose High performance in the elevated window.
Also read: Disk at 99: Here’s a Windows 10 Disk Usage 99% Fix Guide
Fix 5: Update Windows
If the high CPU usage on Epic Games Launcher is caused by an outdated Windows, you should update your Windows to the latest version to fix the issue. Here’s the full guide.
Step 1: Open Settings and click Update & Security > Windows Update.
Step 2: Click Check for updates under the Windows Update section on the right panel.
Step 3: Then available updates will be displayed. Click on the Download & install button next to the desired update.
Step 4: Wait for the finish of the download and install process.
Fix 6: Reinstall the Epic Games Launcher
Try reinstalling the Epic Games Launcher if Epic Games Launcher high CPU usage persists. You should uninstall it and then install it from scratch.
Step 1: Open Control Panel on your PC.
Step 2: Set the View by as Category and then click Uninstall a program under the Program section.
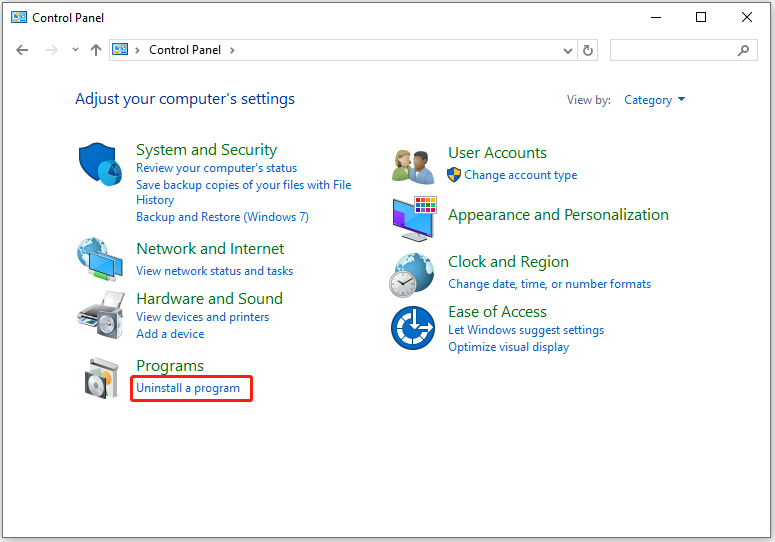
Step 3: In the next window, find and right-click Epic Games Launcher and choose Uninstall from the context menu.
Step 4: Click Yes in the prompted window to confirm the operation.
Step 5: After the uninstallation process ends, navigate to the Epic Games Launcher download page and click on the DOWNLOAD EPIC GAMES LAUNCHER button to get it.
Step 6: Run the setup file and follow the on-screen instructions to install the program.
Also read: Fixed: EpicGamesLauncher.exe – Application Error (0xc000007b)
In addition to the above fixes, you can also remove unnecessary files to free up disk space, which is useful for improving overall system performance, including CPU usage in the Epic Games Launcher. The Space Analyzer feature of MiniTool Partition Wizard helps you find what’s taking up your hard drive space and allows you to remove useless files and folders.
MiniTool Partition Wizard FreeClick to Download100%Clean & Safe
Conclusion
This post offers you 6 solutions to Epic Games Launcher high CPU usage. Pick one from them to resolve the issue now!

User Comments :