This “scratch disks are full” error message appears due to insufficient disk space, excessive temporary files, or incorrect scratch disk settings. To solve this issue, you can try to free up disk space, delete temporary files, or upgrade your hard drive with MiniTool Partition Wizard.
Adobe Photoshop (PS) is professional image processing software. It provides a wealth of editing and drawing tools and is widely used in graphic design, web design, photography post-production, and visual creativity. It has received positive reviews from users.
However, one common and frustrating issue that users often encounter is the “scratch disks are full” error. Fortunately, there are several ways to fix it. In this article, we will explore in detail what scratch disks are, why this error occurs, and most importantly, how to resolve it.
What Does Scratch Disks Are Full Mean?
A “scratch disks are full” error in Photoshop means the hard disk, which Photoshop uses for temporary storage (the scratch disk), is full. This prevents Photoshop from working correctly and may cause it to crash or freeze.
When you operate in Photoshop, you may see one of the following error messages:
- Could not initialize Photoshop because the scratch disks are full.
- Could not complete the command because the scratch disks are full.
- Could not open “xx.psd” because the scratch disks are full.
- Could not complete your request because the scratch disks are full.
A scratch disk refers to a hard drive that Photoshop uses as temporary storage. By default, Photoshop uses the hard drive where the OS is installed (usually the C: drive) as the primary scratch disk. Also, it can use an external drive as the second scratch disk.
When you’re working on a complex image in Photoshop, the program may not be able to store all the necessary data in your computer’s RAM (Random Access Memory).
In such cases, Photoshop uses the scratch disk to save temporary data, such as document history states, undo information, and parts of the image that don’t fit into memory.
Without sufficient scratch disk space, Photoshop may become unresponsive, slow down significantly, or display the “scratch disks are full” error.
Reasons for Photoshop Scratch Disks Are Full
Why are the Photoshop scratch disks full? This issue usually appears due to various reasons, including insufficient disk space, excessive temporary files, incorrect scratch disk settings, and other apps using disk space.
In this part, we will give you details about the cause.
#1. Insufficient Disk Space
The most obvious reason for this error is that the drive designated as the scratch disk has run out of available space.
As you work on more and more projects in Photoshop, the files stored on the scratch disk accumulate. If you haven’t regularly cleared out unnecessary files or if your scratch disk was small to begin with, it can quickly become full.
#2. Excessive Temporary Files
Photoshop generates a large number of temporary files during its operation. These files are used to store intermediate states of your work, such as when you adjust and then undo it.
Over time, these temporary files can consume a significant amount of disk space. If you’ve been using Photoshop for a long time without clearing these files, they can pile up and cause the scratch disk to fill up.
#3. Incorrect Scratch Disk Settings
If you’ve configured the scratch disk settings in Photoshop incorrectly, it can lead to the “scratch disks are full” error.
For instance, if you’ve selected a drive that doesn’t have enough space as the primary scratch disk, Photoshop may run into issues. Also, if the drive you’ve chosen as a scratch disk has become corrupted or has permission issues, it can cause problems.
#4. Other Applications Using Disk Space
Sometimes, other applications running on your computer may be using a large amount of disk space simultaneously. This can reduce the available space on the scratch disk.
For example, if you have a video-editing program that caches large video files on the same drive as your Photoshop scratch disk, or if you’re in the middle of a large file download, it can cause the scratch disk to run out of space.
How to Fix Scratch Disks Are Full in Photoshop?
Now, it’s time to fix this problem in Photoshop. Here, we offer you 7 feasible solutions. The detailed steps are shown below. You can have a try.
Here is a video guide:
Way 1. Free Up Disk Space
As mentioned above, insufficient disk space is the main reason for this issue. Therefore, you should free up the disk space of the scratch disk.
According to Adobe, the required scratch disk space recommends maintaining at least 20 GB of free space on the hard drive when using Photoshop. Depending on the types of files you work with, you may need additional free space.
If your scratch disk space is insufficient, try to free up space by deleting some unnecessary files or moving files to another location.
Delete unnecessary files
To delete unnecessary files on your PC, you can use MiniTool Partition Wizard. As a disk space analyzer, it can find what’s taking up your hard drive space and delete useless files/apps.
Here is how to delete unnecessary files using MiniTool Partition Wizard.
MiniTool Partition Wizard FreeClick to Download100%Clean & Safe
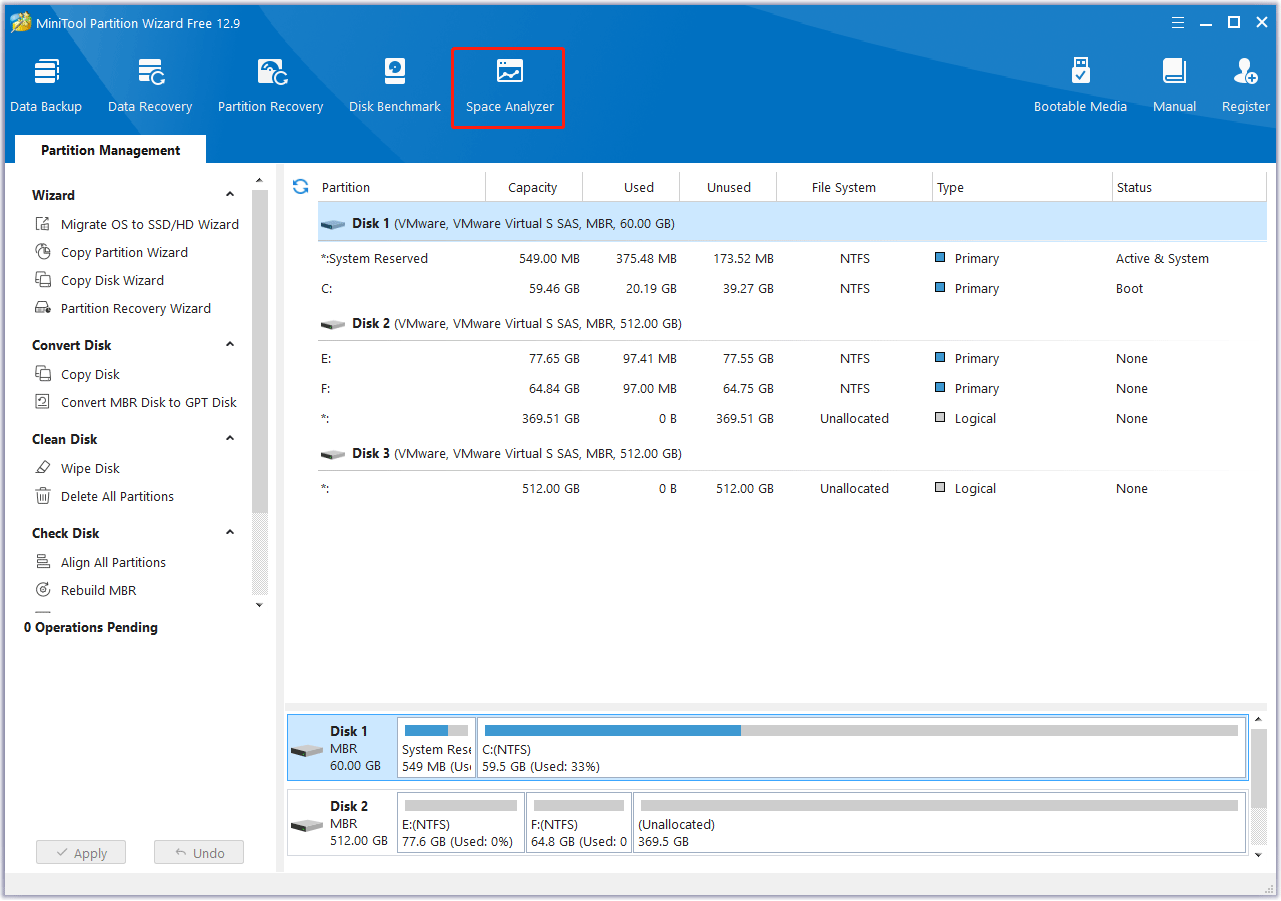
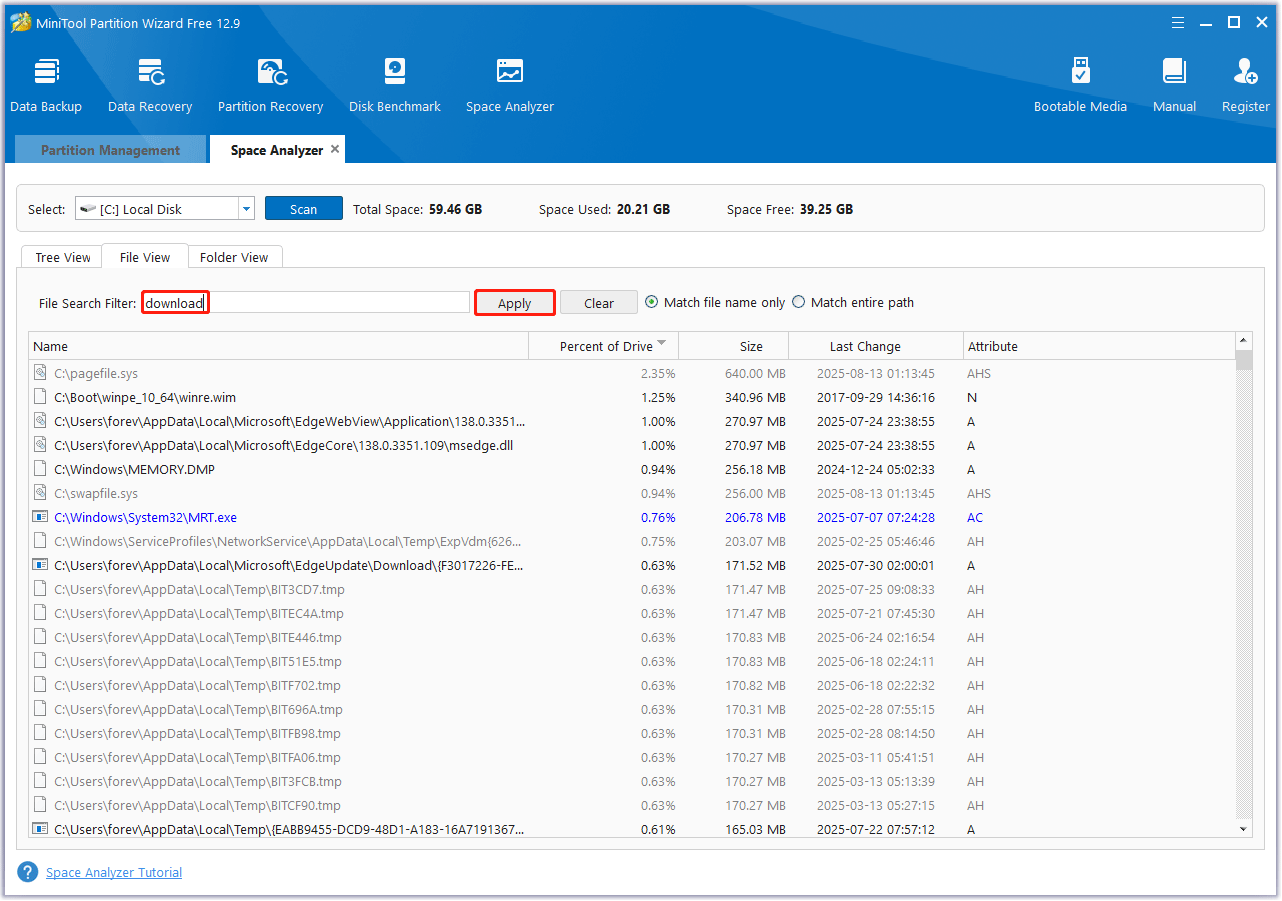
Step 1. Launch this free partition manager to enter its main interface. Then click on Space Analyzer from the top ribbon area.
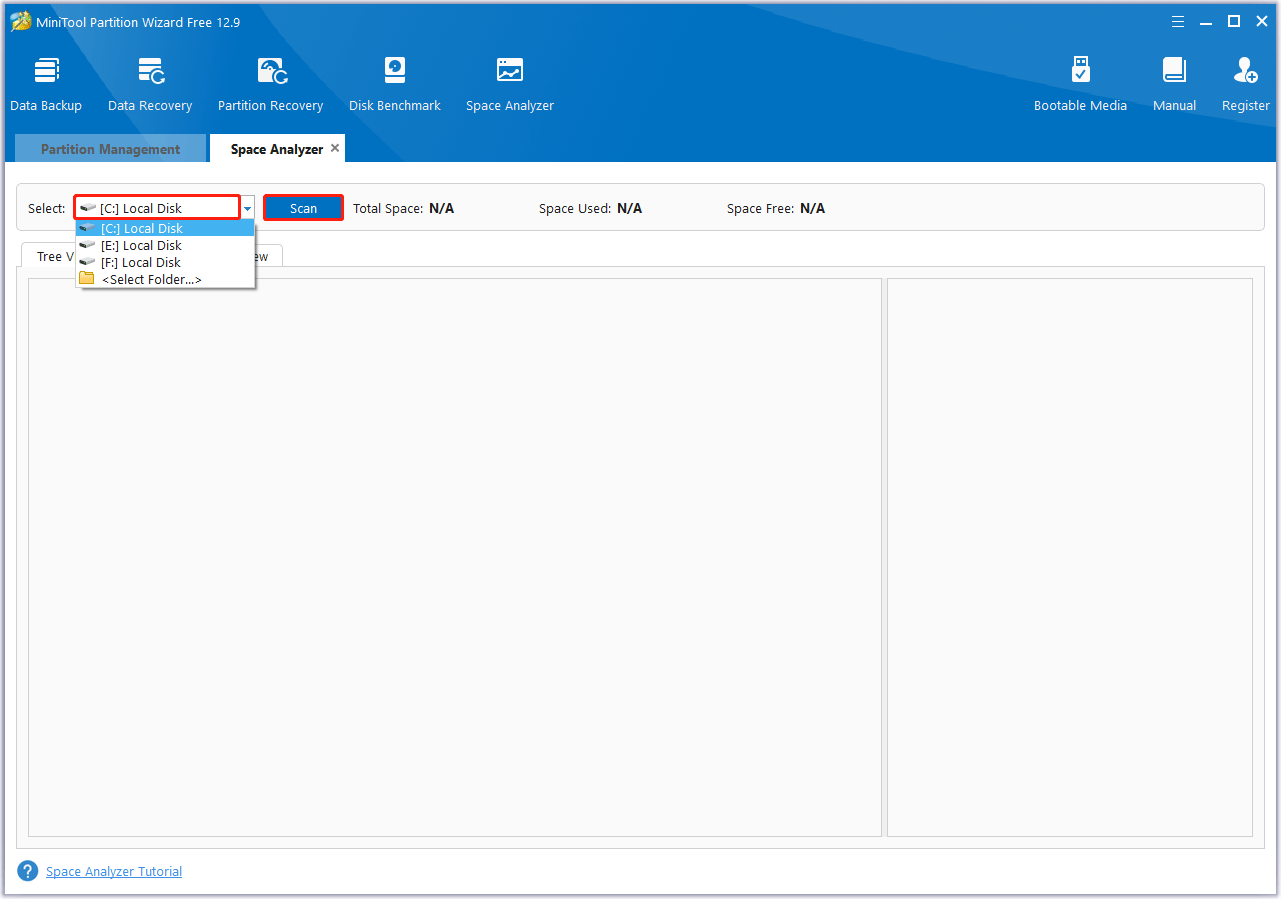
Step 2. Select the C drive from the drop-down menu and click on Scan to analyze the drive space immediately.
Step 3. When the scanning process is complete, you can see the scanning drive’s Total Space, Space Used, and Space Free. Then you can find some unnecessary files/folders, right-click them, and select Delete (Permanently).
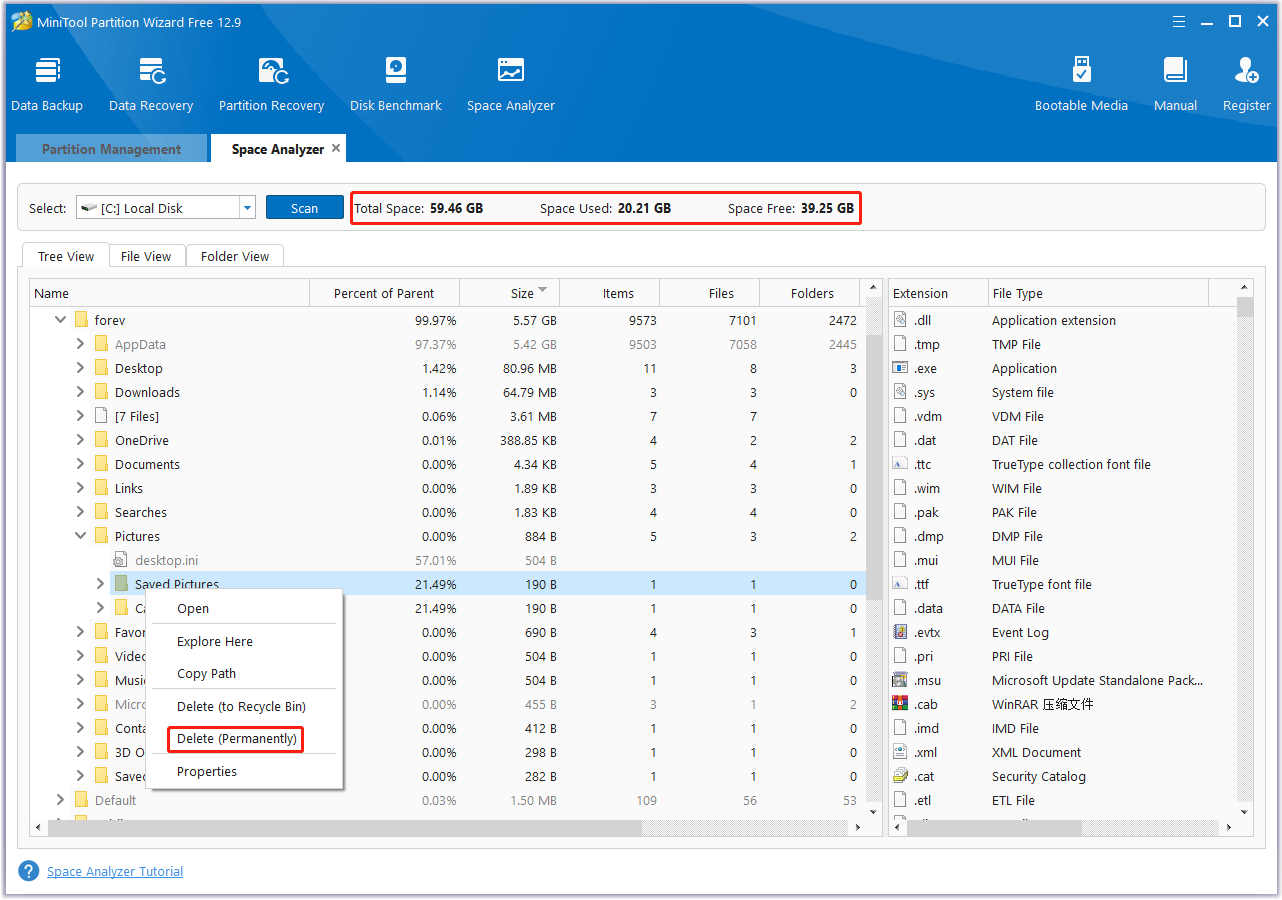
Alternatively, you can go to File View, type the file name you want to delete in the search box, click on Apply, and you will find the disk usage of the relevant file.
MiniTool Partition Wizard is not only a disk space analyzer, but also a partition manager. It can help you partition hard drives, clone hard drives, change cluster size, convert MBR to GPT without data loss, migrate OS to SSD, recover hard drive data, and so on.
Move files to another location
If you have files on the scratch disk that you still need but don’t want to delete, you can move them to another drive or storage location.
To move files in Windows, select the files you want to move in File Explorer, right-click, and choose Cut. Then navigate to the new location, right-click again, and choose Paste.
Way 2. Change the Scratch Disk Location
To solve this “scratch disks are full Photoshop” issue, you can try to change the scratch disk location. Here is how to do that:
Step 1. Open Photoshop preferences.
Launch Photoshop, and go to Edit > Preferences > Performance. In the Performance preferences window, you’ll find the Scratch Disks section.
Step 2. Select a new scratch disk.
By default, the first scratch disk is set to the system drive. Select another drive with more free space.
You can also select multiple drives to be used as scratch disks. Photoshop will use them in the order you specify. To change the order of the scratch disks, use the up and down arrow buttons next to the drive list.
Step 3. Apply and restart Photoshop.
After you’ve selected the new scratch disk, click OK to save the changes. You’ll need to restart Photoshop for the new settings to take effect.
When you restart Photoshop, it will start using the new scratch disk location. It should resolve the “scratch disks are full” error if the problem was due to insufficient space on the previous scratch disk.
Way 3. Delete Photoshop Temporary Files
If the Photoshop temporary files are too much, it may cause the scratch disks full error. So, you’d better delete these temp files. Here is the guide:
Step 1. Press the Win + R key to open the Run dialog box. Then type appdata in it and press Enter.
Step 2. Go to Local > Temp, find the files with ~PST####.tmp. (####refers to a series of numbers)
Step 3. Right-click these files and select Delete.
Way 4. Optimize Photoshop Performance Settings
You can try to optimize Photoshop performance settings to solve the scratch disks full issue. To optimize the performance, you can adjust memory usage and limit history states. The steps are as follows:
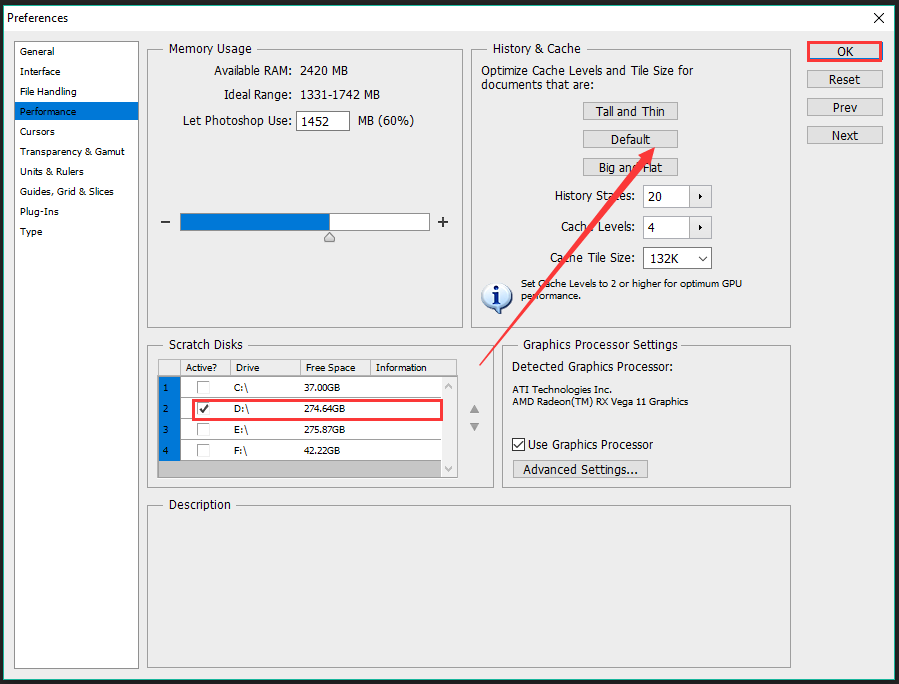
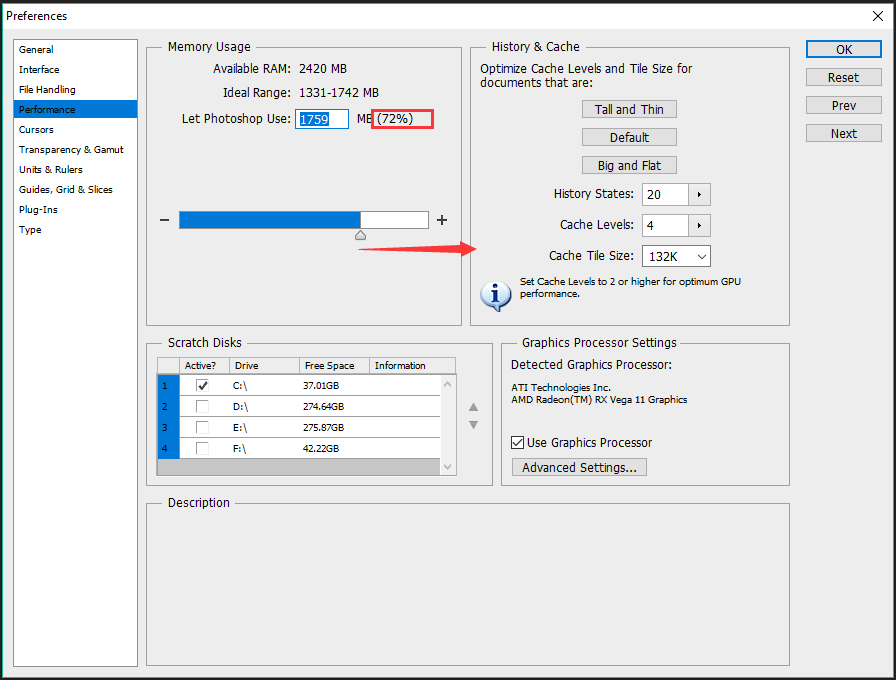
Adjust memory usage
By default, Photoshop is set to use a certain percentage of your computer’s total RAM. If you have a lot of RAM installed (e.g., 16GB or more), you can increase the percentage of RAM that Photoshop can use. This can reduce the reliance on the scratch disk.
- In Photoshop, go to Edit > Preferences > Performance.
- In the Memory Usage section, move the slider to the right to increase the amount of RAM allocated to Photoshop.
Limit history states
Photoshop keeps a record of the actions you perform in the History panel. The more history states you have, the more disk space is used to store this information. By default, Photoshop is set to keep 50 history states. You can reduce this number to free up some space.
In the Performance page, under the History & Cache section, reduce the value of History States to a lower number, such as 20 or 30.
This will limit the number of actions that Photoshop stores in the history, thus reducing the amount of disk space used for this purpose.
Way 5. Disable Auto-Recovery Saving
Auto-recovery is a useful feature that saves your work at regular intervals in case of a crash. However, it also generates additional temporary files, which can contribute to the scratch disk filling up.
If you’re regularly saving your work manually, you can disable this feature to free up some space on the scratch disk.
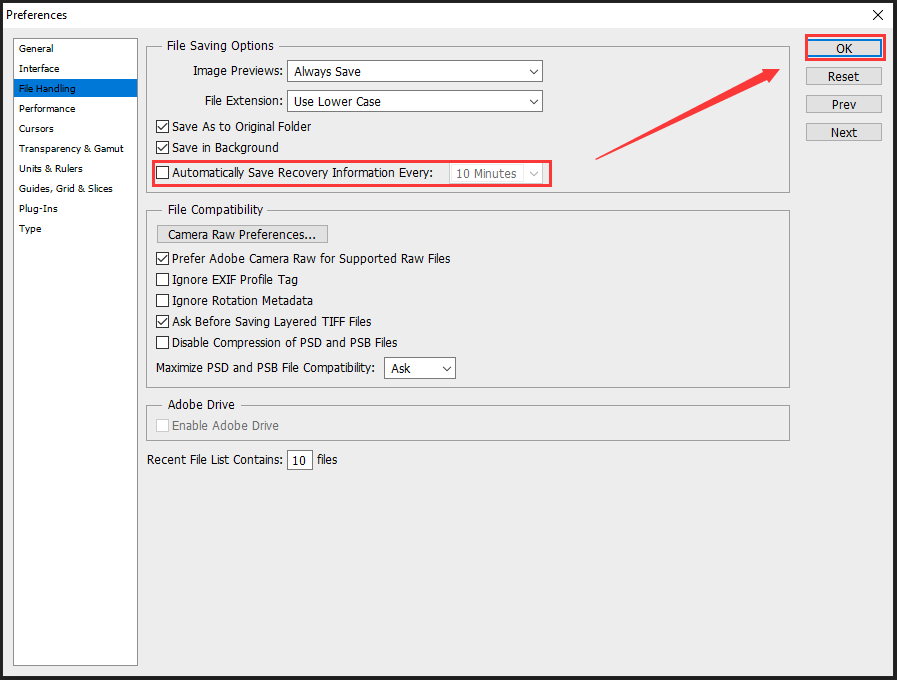
Step 1. In Photoshop, navigate to Edit > Preferences > File Handling.
Step 2. In the File Handling preferences, uncheck the box Automatically Save Recovery Information Every [X] Minutes.
Step 3. Then click OK to apply the change.
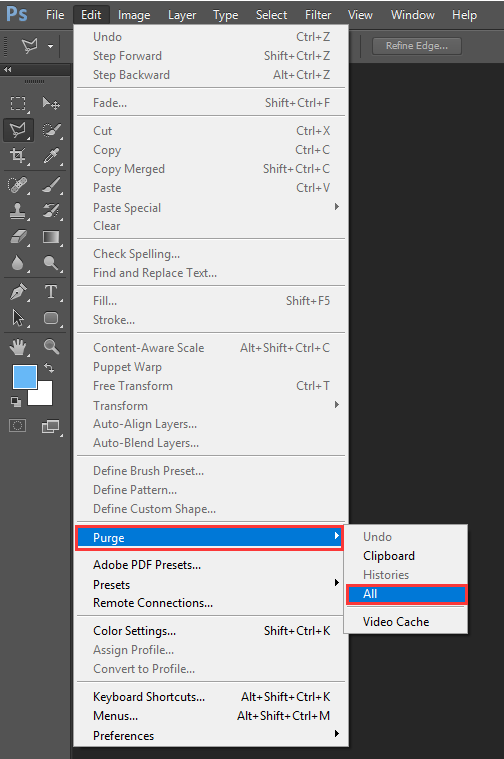
Way 6. Clear Photoshop Caches
Photoshop stores cached data to speed up certain operations. Over time, these caches can grow quite large and consume disk space.
To clear the caches, go to Edit > Purge > All. This will clear the clipboard, history states, and other cached data in Photoshop.
Be aware that clearing the clipboard will remove any copied content, and clearing the history states will make it impossible to undo actions beyond the current state.
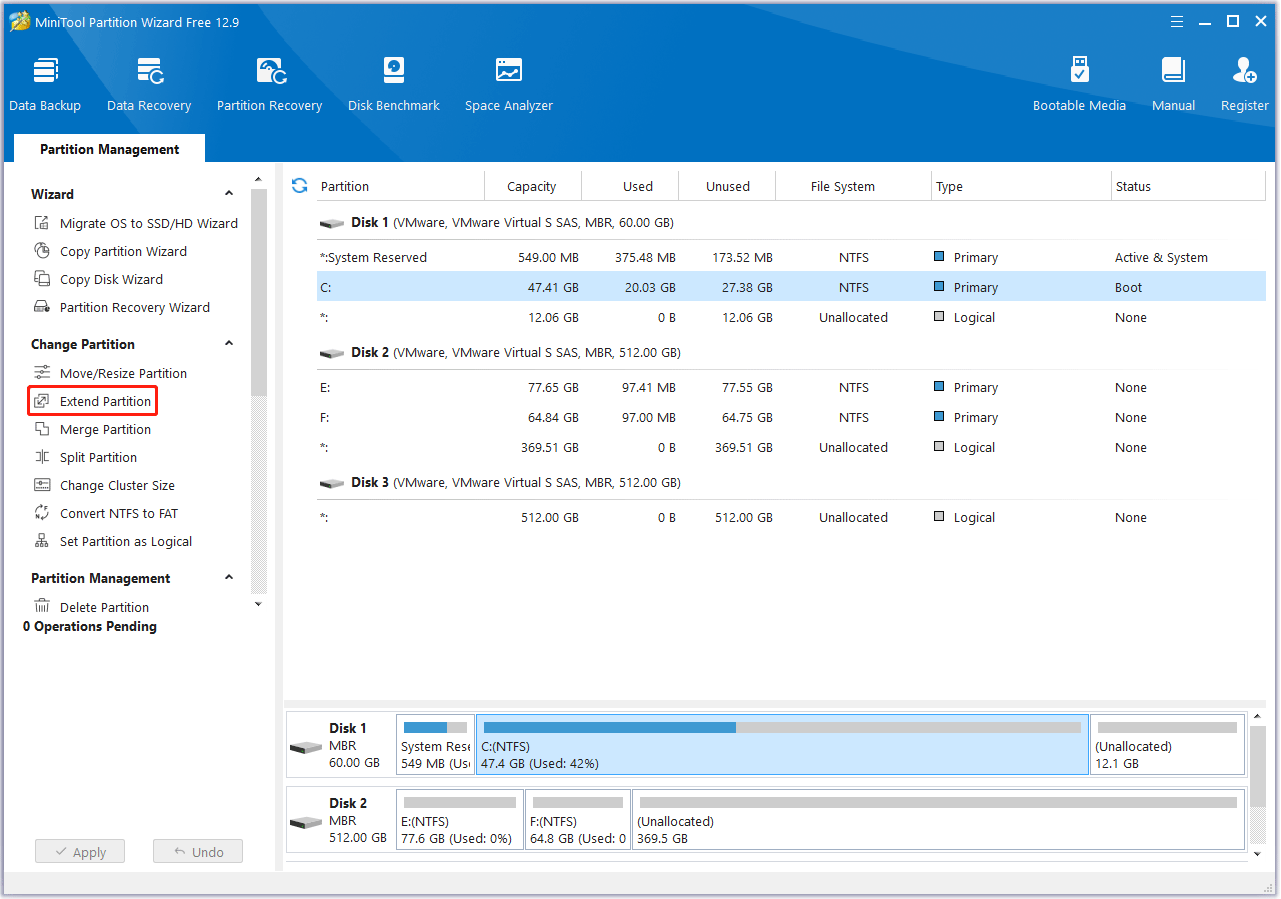
Way 7. Extend Scratch Disk Space
In addition to freeing up scratch disk space, you can choose to increase its size if other partitions on the drive have enough space. This can keep your data intact.
To do that, you can try MiniTool Partition Wizard to extend a partition. It provides an Extend Partition feature that can take free space from any other existing partition or unallocated space to enlarge a partition on the same disk.
MiniTool Partition Wizard FreeClick to Download100%Clean & Safe
Step 1. Launch MiniTool Partition Wizard to enter its main interface.
Step 2. Highlight the partition you want to extend and then select Extend Partition from the left action panel.
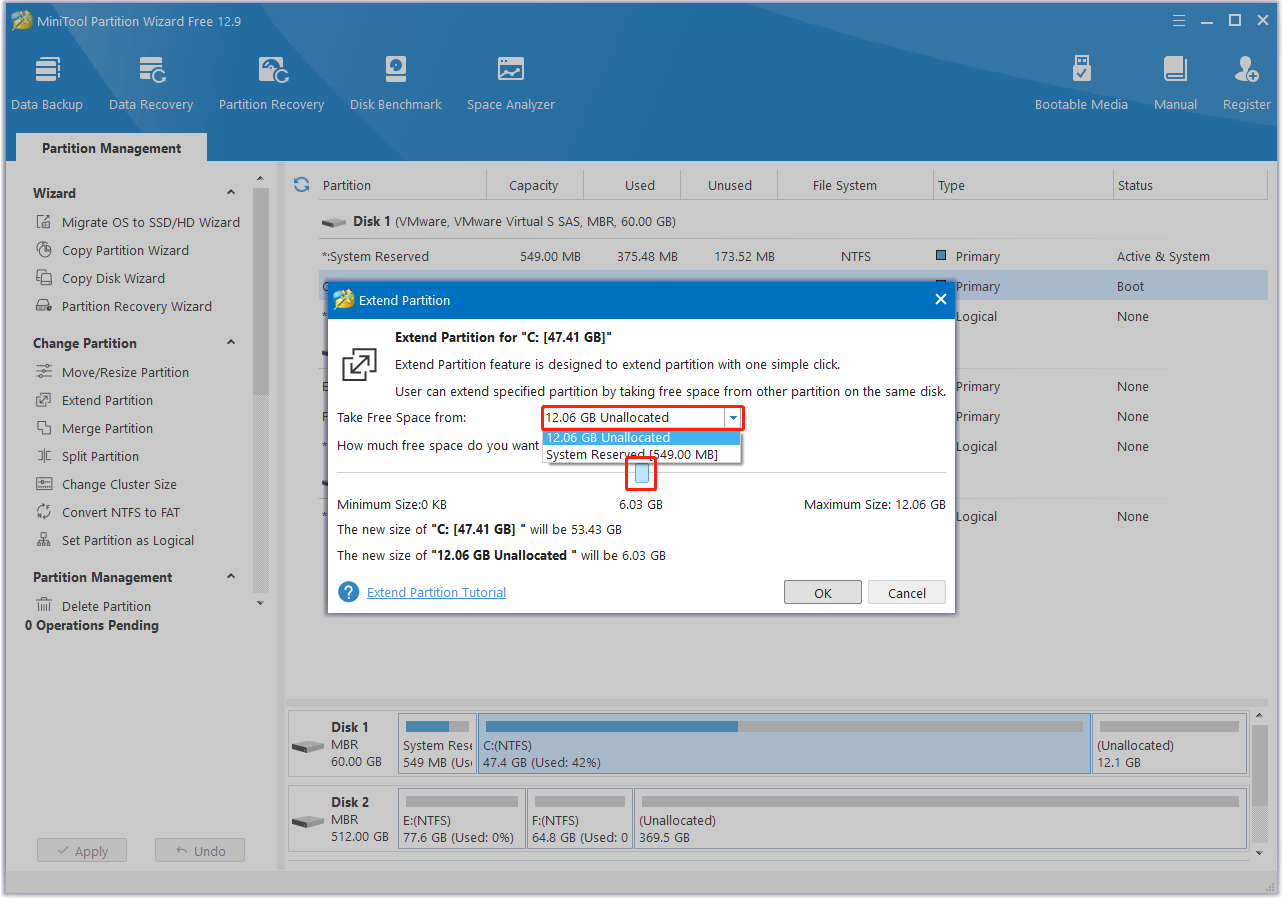
Step 3. In the pop-up window, open the drop-down list of Take Free Space from and choose a partition or unallocated space to take free space. Then, drag the blue block to decide how much space you want to occupy. After that, click OK.
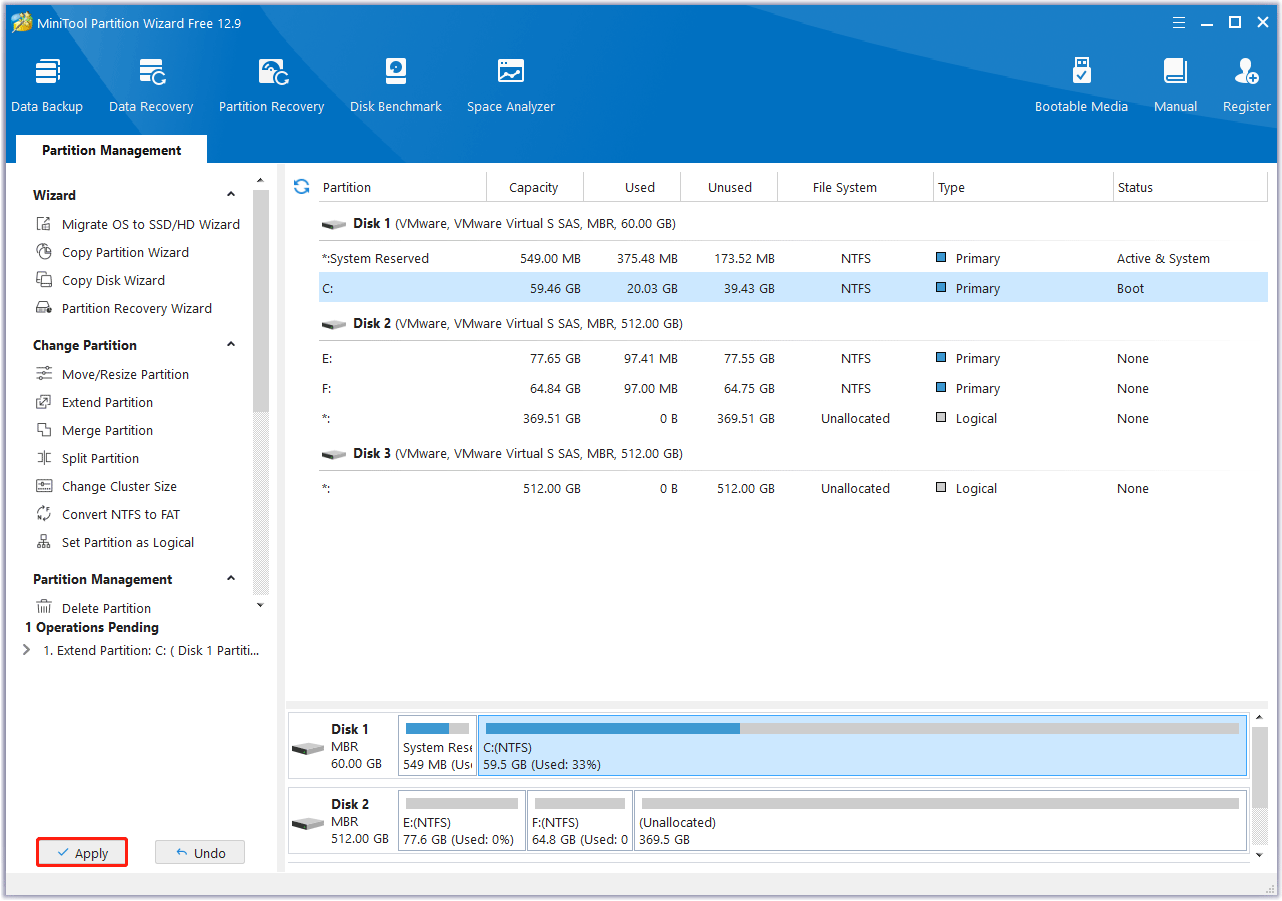
Step 4. Once get back to the main interface, you can preview that the drive has been extended. Then click the Apply button to perform the pending operation.
Way 8. Upgrade Your Hard Drive
If you frequently work on large Photoshop projects and are constantly running into scratch disk issues, it may be worth considering upgrading your hard drive.
Here are two methods you can choose from: upgrade to a larger disk or install an additional hard drive.
Method 1. Upgrade to a larger disk
You can replace your existing hard drive with a larger one, which will provide more space for both your operating system, applications, and scratch disk usage.
Additionally, if you upgrade from an HDD to an SSD, you’ll notice a significant performance improvement. An SSD is much faster than an HDD, which means that Photoshop can access the scratch disk data more quickly, resulting in smoother operation.
To upgrade a hard disk without data loss, you can try MiniTool Partition Wizard. Its Copy Disk feature can help you clone a hard drive to a larger disk, including your entire system, including the operating system, applications, files, and settings.
Now, follow the steps below to clone the disk using MiniTool Partition Wizard.
MiniTool Partition Wizard DemoClick to Download100%Clean & Safe
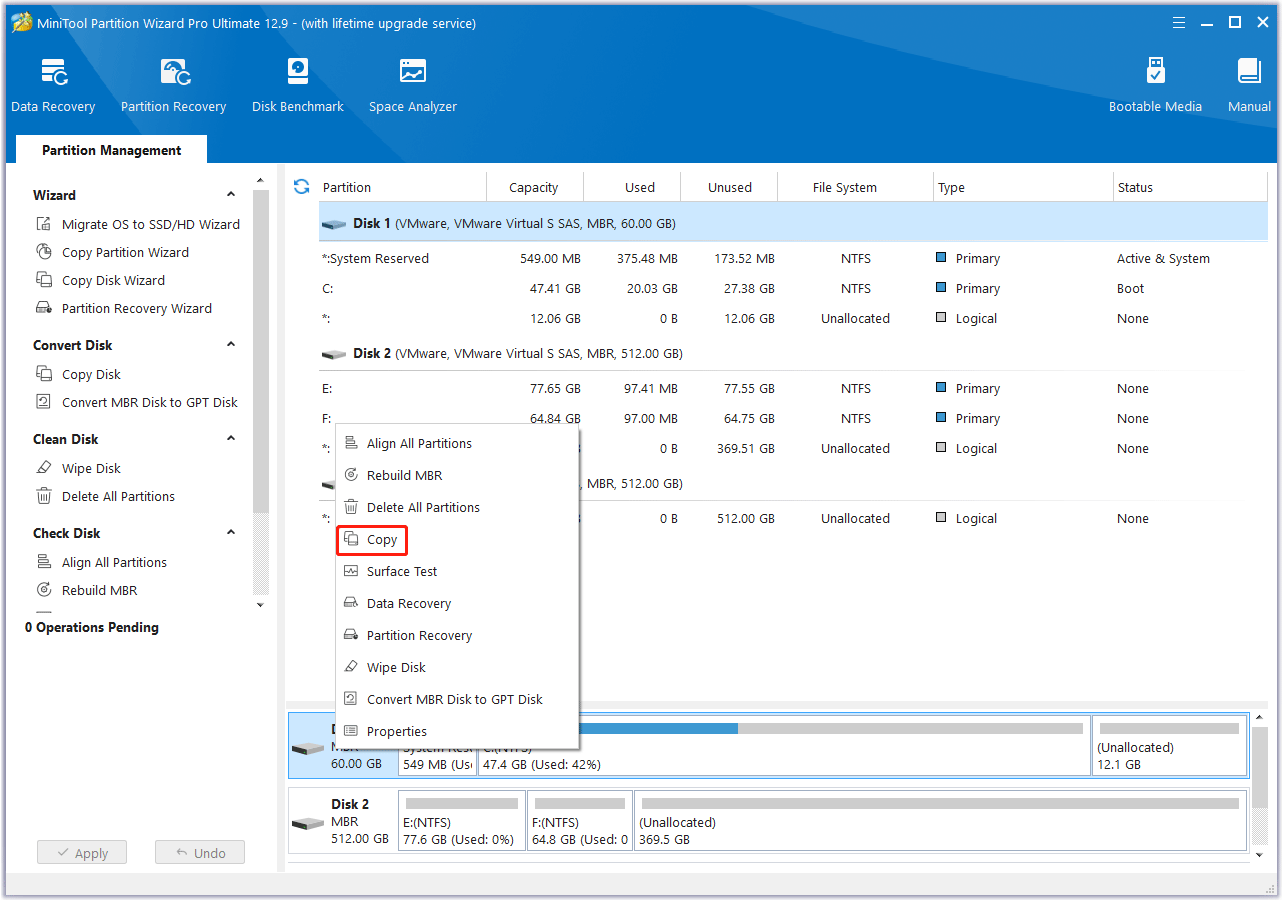
Step 1. Connect the larger drive to your computer via a USB enclosure or adapter. Now, launch MiniTool Partition Wizard to enter its main interface. Then right-click on the original disk that will be copied. Then choose Copy.
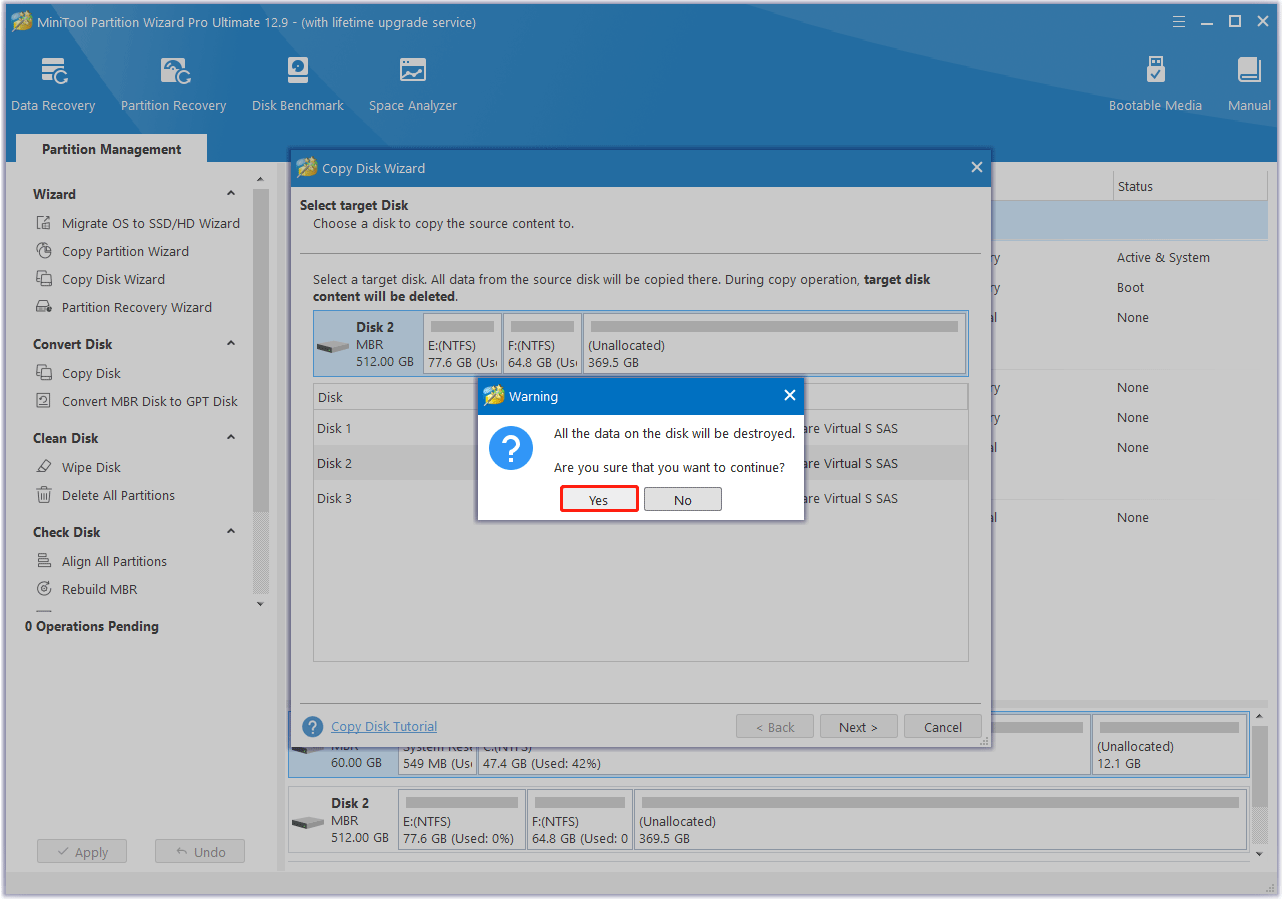
Step 2. Choose the larger disk where the copy will be stored and click Next to continue. A warning window will pop up, telling you that all the data on the larger disk will be destroyed. Click Yes.
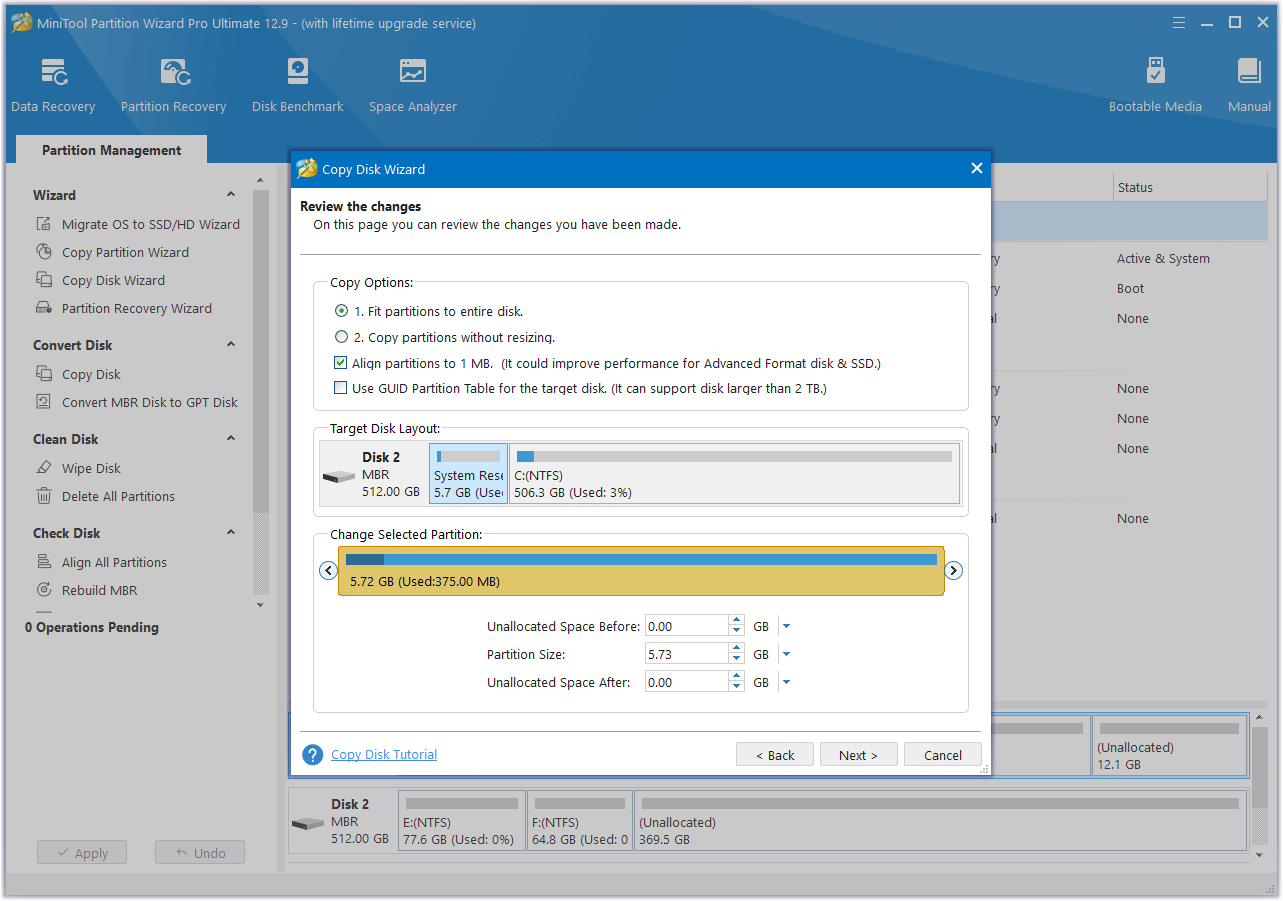
Step 3. Review the changes. You can keep the default options and layout, or adjust them accordingly. Then click Next.
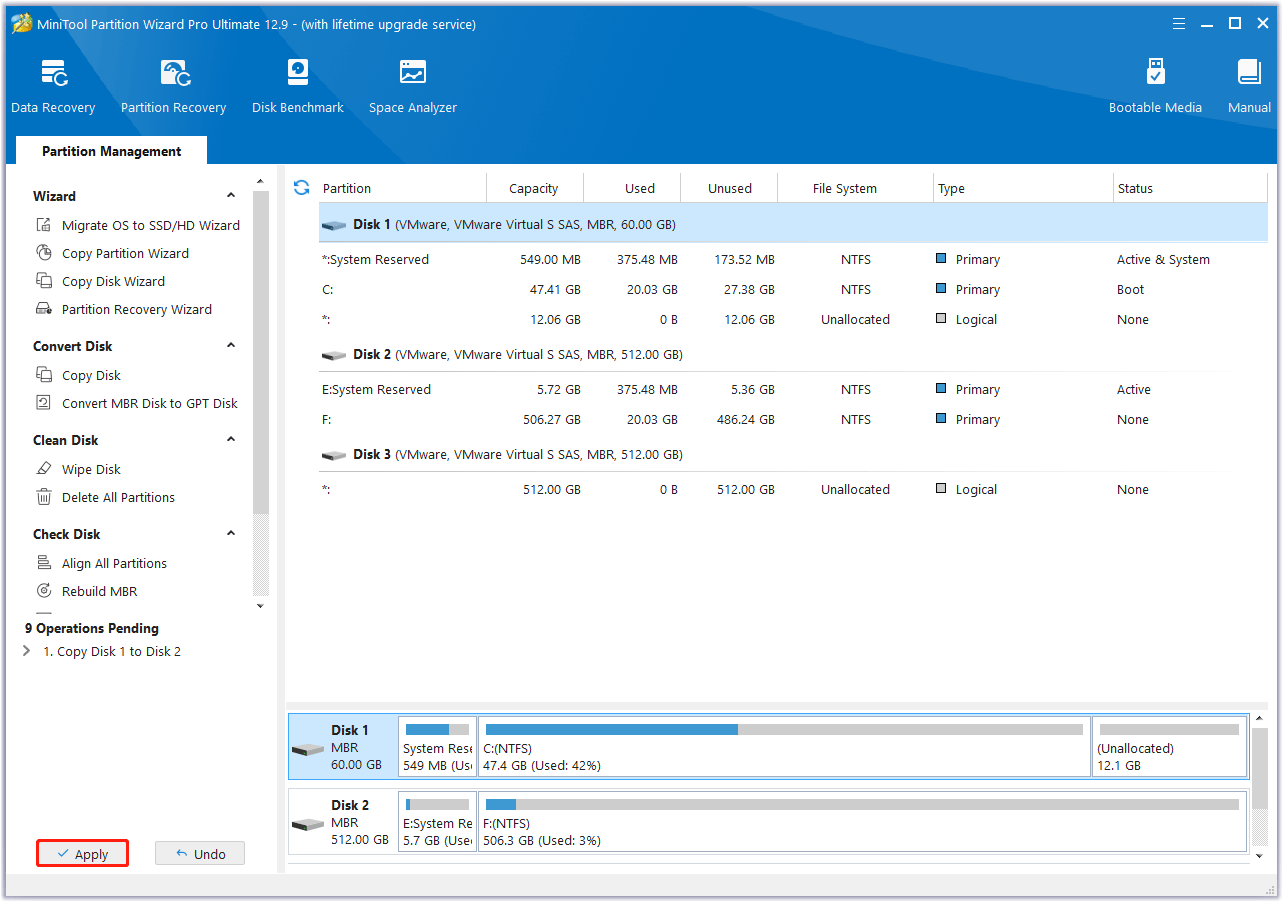
Step 4. Click Finish. Then click the Apply button to execute the pending operation.
Method 2. Install an additional hard drive
Another method is to install an additional hard drive in your computer specifically for use as a scratch disk. This can be a great solution if you don’t want to replace your existing hard drive. You can then configure Photoshop to use this new drive as the primary scratch disk.
Prevention Tips for Scratch Disks Are Full
To avoid this issue from occurring again, here are some prevention tips:
#1. Regularly clean up your hard drive
Make it a habit to regularly clean up your hard drive, especially the drive that’s used as the scratch disk. This includes deleting unnecessary files, uninstalling unused applications, and using the Disk Cleanup tool.
#2. Monitor disk space
Keep an eye on the available disk space on your scratch disk. You can use the Windows Taskbar to view the disk space of your drives.
If you notice that the available space is getting low, take action to free up space or change the scratch disk location before it becomes a problem.
#3. Manage your Photoshop projects effectively
When working on Photoshop projects, try to keep your files organized. Delete any unnecessary layers, channels, or paths in your PSD files.
Also, avoid creating overly large PSD files if possible. If you don’t need a high-resolution image for your final output, reduce the resolution during the design process to save disk space.
Bottom Line
The “scratch disks are full” error in Photoshop on Windows can be a major annoyance. With the methods described in this article, you should be able to resolve it quickly and get back to your creative work.
Whether it’s freeing up disk space, changing the scratch disk location, or optimizing Photoshop’s performance settings, each solution can help you get rid of this frustrating error in the future.
If you have any questions or suggestions on how to use MiniTool Partition Wizard, please do not hesitate to contact us via [email protected].
Scratch Disks Are Full FAQ
The available space on the scratch disk is calculated by subtracting 6 GB from the current free space on the disk.
About The Author

Position: Columnist
Vega enjoys helping people with computer problems, including disk management, data recovery, data backup, and more. She is constantly expanding her knowledge in related fields. And she will continue to bring more easy-to-understand professional articles to help people solve various problems on the PC.
User Comments :