How to install SanDisk SSD in laptop or desktop computer without data loss? If you have this question, you come to the right place. This post walks you through the whole process of SanDisk SSD installation Windows 10/11, during which, you can try MiniTool Partition Wizard to simplify the installation and prevent any data loss.
Why Choose a SanDisk SSD?
In 2015, Western Digital bought SanDisk for $19 billion and due to that, it successfully entered the SSD market. So, undoubtedly, SanDisk is a trustable and reliable brand for SSDs, and therefore a SanDisk SSD can be a good choice when you want to buy an SSD.
Here are some SanDisk SSDs picks:
Pick 1: SanDisk SSD PLUS
If you have never tried an SSD, SanDisk SSD PLUS could be a fabulous choice. It is in many regards the top-tire SanDisk SSD that you can choose such as large range of storage capacity, high performance, and high reliability. Moreover, it comes in the interface of SATA III and therefore it can be compatible with most computers.
Pros:
- 240GB to 2TB of storage capacity with a 3-year warranty
- The read speed up to 530MB/s; write speed up to 440MB/s
- Shock-resistant for proven durability
- Perfect balance between performance and reliability
Cons:
- Come in a shorter lifespan than other SSDs (see SSD lifespan).
Pick 2: SanDisk Extreme PRO SSD
Another amazing SSD is SanDisk Extreme PRO SSD. What it brings is plenty of features that ensure that your data will be transferred in a quick and safe manner. Also, it comes in the SATA interface.

Pros:
- Multiple choices of storage capacity with a 10-year warranty: 240GB, 480GB, and 960GB
- Built-in SanDisk nCache Pro technology
- TRIM support, S.M.A.R.T. support, and Background Garbage Collection
- The read speed up to 550MB/s; write speed up to 520MB/s
- Up to 33% longer laptop life
Cons:
It seems this type of SSD is perfect and one shortcoming, from a nitpicky angle, is that this drive is more geared towards laptops.
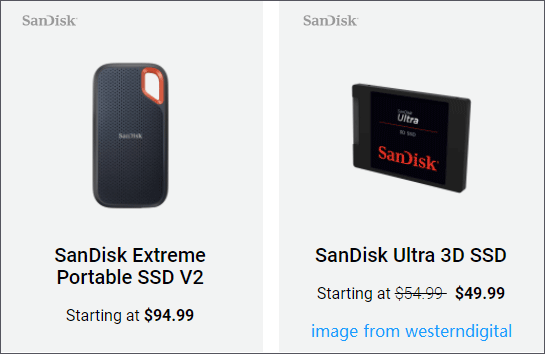
Pick 3: SanDisk Ultra 3D SSD
If you desire high speed over all else, this type of SanDisk SSD is a prime choice. It is equipped with 3D NADA technology due to that it features surprising performance as well as a long lifespan.
Pros:
- A host of choices of storage capacity with a 5-year warranty: 250GB, 500GB, 1TB, 2TB, and 4TB
- Built-in 3D NAND technology and nCache 2.0 technology
- The read/write speed up to 550MB/s/525MB/s
Cons:
Although this drive delivers high performance than the above two types, its performance is still lower than some other SSDs within the same price range.
Well, how to install SanDisk SSD in laptop or desktop computer? The guide is displayed below.
First, Figure out One Question
For SanDisk SSD installation Windows 10/11, first and forehand, one question needs to be made note of: how many hard drives does your computer support.
How many hard drives does your computer support? Whether you are using a laptop or a desktop computer, at least two hard drives can be installed on your computer’s motherboard.
Most laptops come with two drive bays. One (usually with a SATA interface) is for the primary hard drive, and the other is originally for an optical drive but can be used to install a second hard drive, but the second hard drive may deliver poor performance due to the different drive interface. Luckily, however, with the SSD development, most modern laptops have a location for mSATA or M.2 SSD installation and therefore three hard drives can be installed on such laptops.
In most desktop computers, you can find at least two drive bays on the motherboards, and the number can even be up to eight on the motherboard of modern desktop computers.
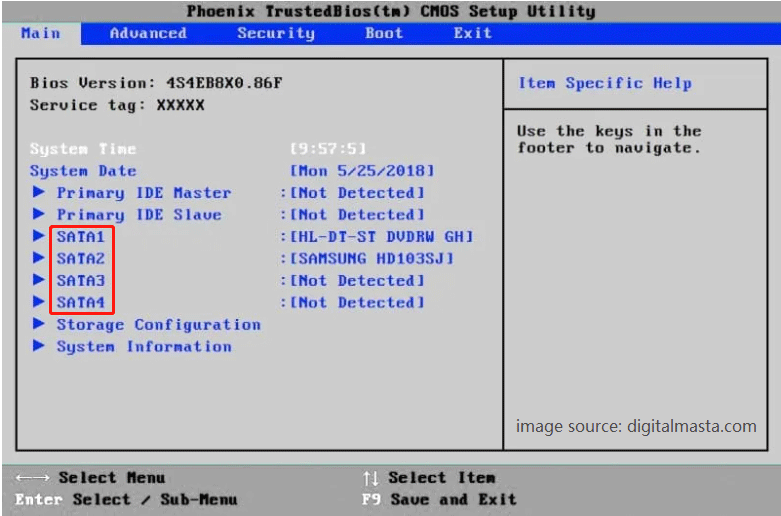
There are two ways to make sure the maximum number of hard drives your computer supports. One way is to open up the case and check the motherboard. However, this way is recommended for those who are experienced because any improper operation may damage the computer. And the other way (recommended for newbies) is to enter BIOS where you can know the SATA ports available on your computer’s motherboard.
Second, Install the SanDisk SSD on Your Computer Without Data Loss
The following guide mainly shows you how to install the SanDisk SSD in laptop without OS reinstallation.
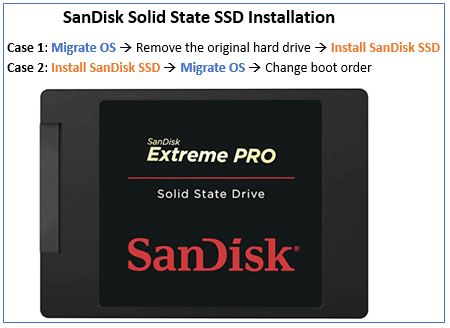
Here are two cases for SanDisk SSD installation:
(Case 1) If your laptop only supports one hard drive, you need to change the primary hard drive to the SanDisk SSD, or in other words, you need to take off the original primary hard drive from your computer’s motherboard, and then install the SanDisk SSD.
(Case 2) Certainly, if your computer can support more hard drives, the removal is unnecessary and you just only to install the SanDisk SSD in your laptop or desktop computer to finish the SanDisk SSD setup.
Here is a brief flow chart for the above two cases for SanDisk Solid State SSD installation:
SanDisk SSD Setup: Migrate OS
Once the SanDisk SSD is connected to your computer, you can start to migrate Windows 10/11 from the original primary hard drive to the SanDisk drive.
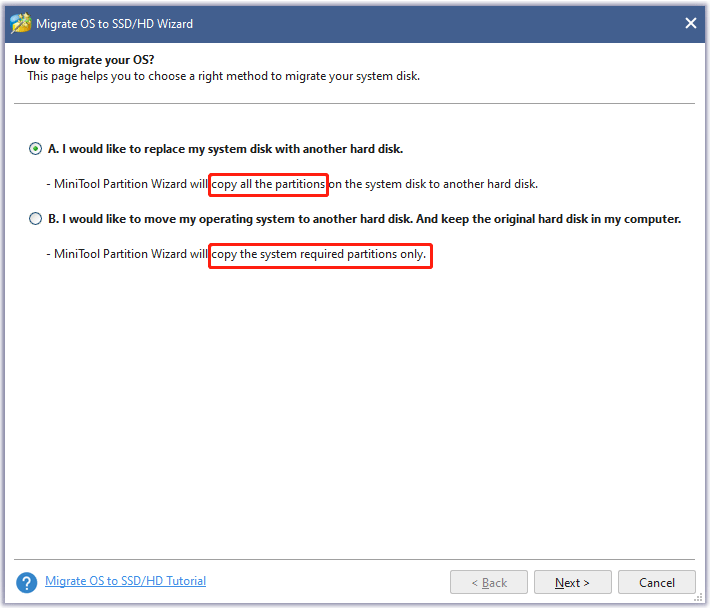
To migrate OS, you need an OS migration tool, and MiniTool Partition Wizard is a recommended one. MiniTool Partition Wizard provides you with two options:
- Option A: copy all the partitions on the system disk to the target disk.
- Option B: copy the system-required partitions to the target disk.
So, for SanDisk SSD setup without OS reinstallation, give MiniTool Partition Wizard a try.
MiniTool Partition Wizard DemoClick to Download100%Clean & Safe
The whole process of OS migration is simple:
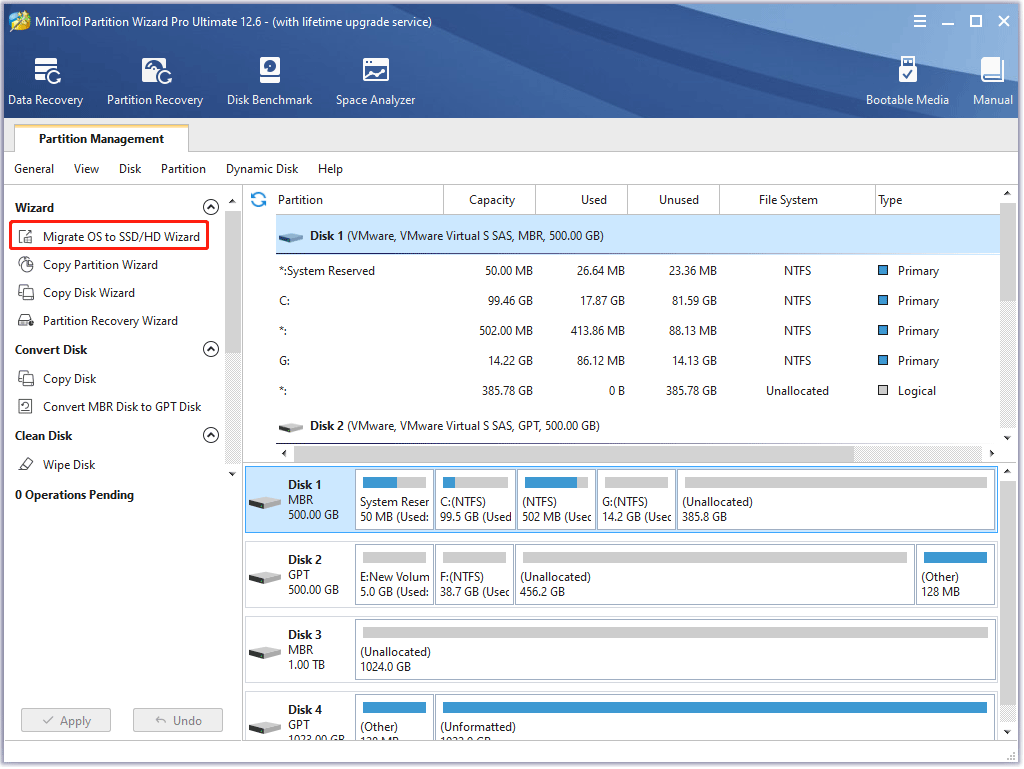
Step 1: Launch MiniTool Partition Wizard and then choose the Migrate OS to SSD/HD feature from the left side of the software’s user interface.
Step 2: Choose Option A or Option B based on your own demands and then click the Next button to continue.
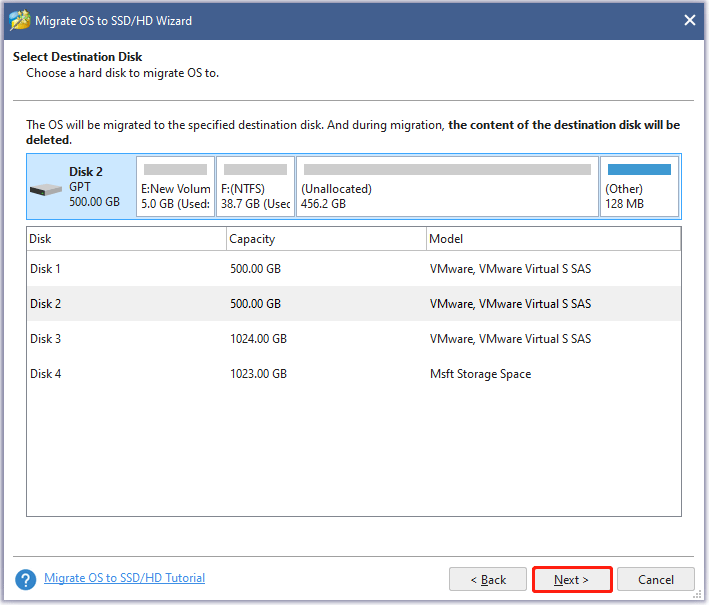
Step 3: Find and choose your SanDisk in the disk list on the Select Destination Disk window and click the Next button. Then, click the Yes button on the small pop-up window.
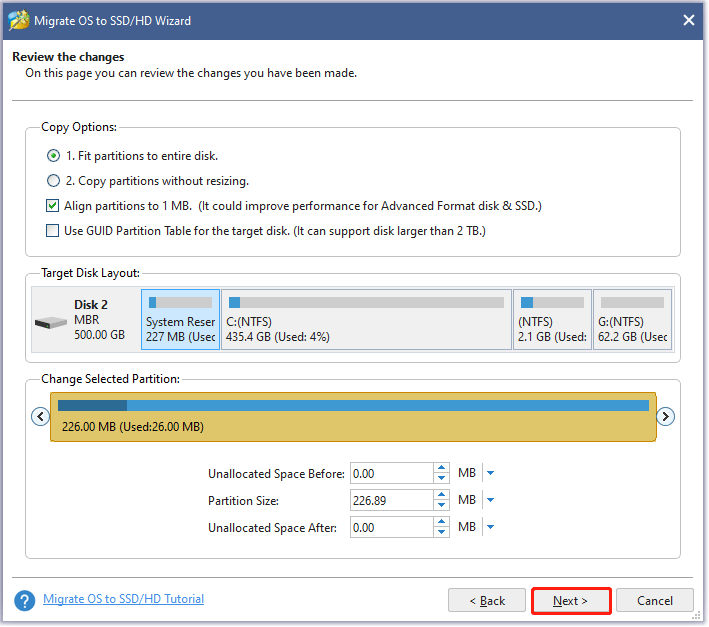
Step 4: On the Review the changes window, customize the following options and click the Next button.
- Choose the Fit partitions to entire disk option or the Copy partitions without resizing option.
- Keep the Align partitions to 1 MB checked option checked, which could improve the performance of the SSD.
- Check the Use GUID Partition Table for the target disk option if your computer support UEFI boot mode and the SanDisk SSD is of more than 2TB capacity.
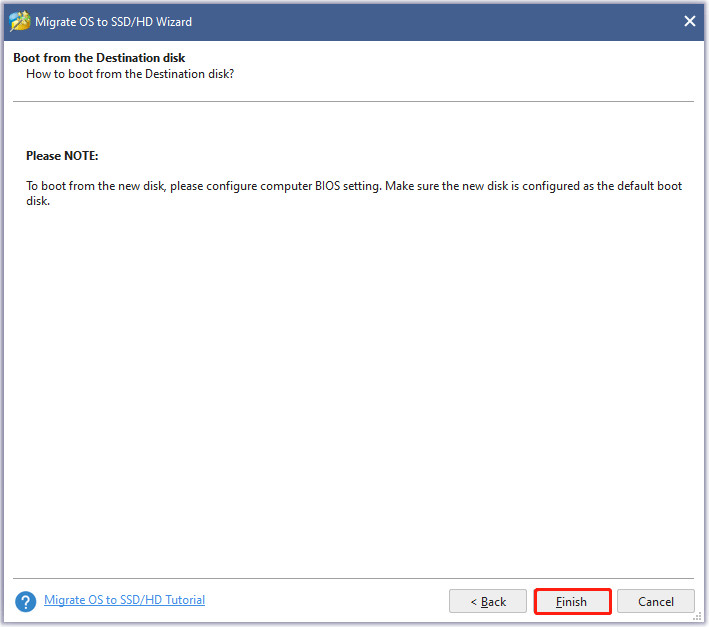
Step 5: Read the note on the current window and then click the Next button.
Step 6: Preview the change on the user interface, and if everything is OK, click the Apply button to start OS migration.
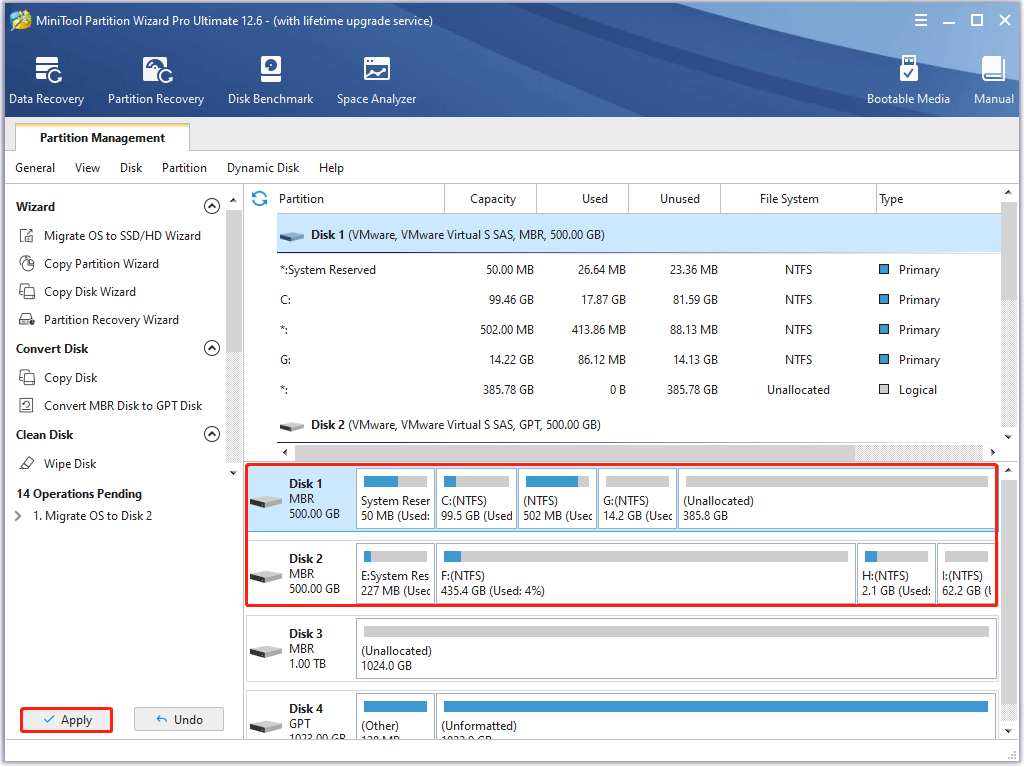
Step 7: Wait for MiniTool Partition Wizard to finish the task.
Learn More about MiniTool Partition Wizard:
MiniTool Partition Wizard is a handy OS migration tool. In fact, it has played other roles, a recovery tool that comes in the features Data Recovery and Partition Recovery to recover the lost data and partitions, a backup tool that comes in the features Copy Disk and Copy Partition to back up whole files in a disk or partition at once, a disk check tool that comes in Check File System and Surface Test to find/fix file system errors and detect bad sectors, and so forth.
MiniTool Partition Wizard DemoClick to Download100%Clean & Safe
SanDisk SSD Setup: Remove and Install a Drive
It may sound tricky to take off the original hard drive, but that thing could become easy when you follow the tutorial below.
Remove the Hard Drive from a Laptop
Seven steps are required to remove a hard drive from a laptop:
- Prepare the screwdriver.
- Turn off your computer and disconnect all cables.
- Remove battery of laptop.
- Remove screws on the main access panel.
- Remove hard drive mount.
- Pull out the hard drive from the connector.
- Take the hard drive from brackets.
Please refer to the tutorial to learn about the details.
Remove the Hard Drive from a Desktop Computer
If you need to remove the hard drive from your desktop computer, please follow the tutorial from wikiHow.
After removing the original hard drive, you can start to install a SanDisk SSD in your laptop or desktop computer. How to do that? You can rewind the above steps or refer to the two video guides from the SanDisk channel on YouTube. Both video guides show the whole process of drive removal and installation.
This is not the end of SanDisk SSD installation if you have more than system drives installed on your computer. This is because you need to continue to change the boot order so that your computer can boot from the SanDisk SSD. For that, please refer to the following tutorial.
Finally, Change the Boot Order
Several steps are needed to change boot order and they are displayed below:
Step 1: Restart your laptop or desktop computer.
Step 2: Press a key (Esc, Del, F2, F8, F10, or F12) to access the BIOS menu.
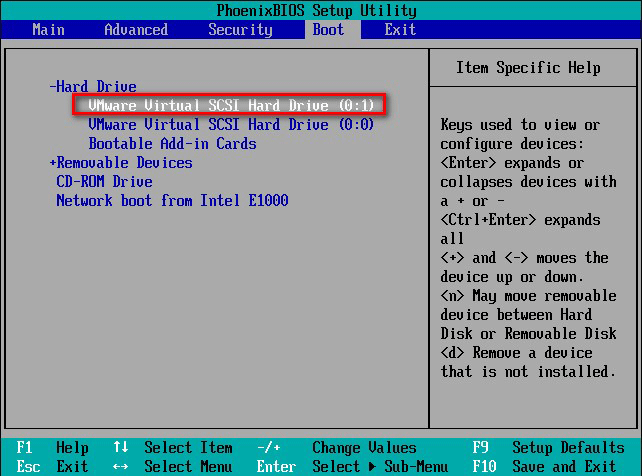
Step 3: In the BIOS menu, use the arrow keys to head over to the Boot tab.
Step 4: Find the drive and move it to the top of the propriety list. Then, hit the F10 key to save this change and close the BIOS menu.
Once your computer boots, you can use the SanDisk SSD for file storage.
Bonus: More Thoughts of SanDisk SSD Installation
The above mainly shows you how to complete SanDisk SSD installation without OS reinstallation. Maybe that is not what you really need. You may plan to reinstall the operating system on the SanDisk SSD or just want to use the SanDisk SSD as a data disk. That’s also a good choice.
If you are unfamiliar with the process of OS reinstallation, the post How to Replace Laptop Hard Drive and Reinstall Operating System could help you complete that smoothly.
Need a guide on SanDisk SSD installation? Follow this one!Click to Tweet
Bottom Line
Now you come to the end of this guide on SanDisk Solid State Drive installation. Do you have any questions? If there is something unclear in this post, please point it out in the comment zone, and we will check and update it in time.
In this guide, we have recommended an OS migration tool — MiniTool Partition Wizard. This tool can help you upgrade to a SanDisk SSD in an easy manner. If you have any questions while using this tool, please let us know by sending an email to [email protected], and we will get back to you soon enough.
User Comments :